Installing subs in a car involves connecting the audio system to a power source and mounting the subwoofers in the appropriate location. If you’re looking to enhance your car’s audio system with deep bass, installing subwoofers can greatly improve the overall sound quality.
By following a few simple steps, you can easily install subs in your car. This guide will walk you through the process, from connecting the audio system to a power source to mounting the subwoofers in the appropriate location. Whether you’re a car audio enthusiast or simply looking to upgrade your car’s sound system, this installation guide will help you achieve the desired results.
So, let’s get started and bring that booming bass to your ride.
Preparing For Installation
When it comes to enhancing your car audio system, installing subwoofers is a popular choice. Subwoofers provide deep bass and powerful sound that can elevate your overall listening experience on the road. However, before you dive into the installation process, it’s essential to prepare yourself and your car for the task at hand. In this section, we will discuss the necessary steps to ensure a successful subwoofer installation, including gathering the necessary tools and materials, selecting the right subwoofers for your car, and ensuring sufficient space in your car for the installation.
Gathering the necessary tools and materials
Before starting any installation project, it’s crucial to gather all the necessary tools and materials to avoid unnecessary delays or interruptions. Having everything at hand will make the installation process much smoother and efficient. Here is a list of essential tools and materials you will need:
- Power drill
- Screwdriver set
- Wire cutter/stripper
- Tape measure
- Electrical tape
- Speaker wire
- Subwoofer enclosure
- Amplifier
- Subwoofer(s)
- Wiring kit
Selecting the right subwoofers for your car
Choosing the right subwoofers for your car is crucial to ensure optimal sound quality and compatibility. Keep in mind the following factors when selecting your subwoofers:
- Power handling: Determine the power requirements of your car’s audio system and match it with the subwoofers’ power handling capabilities to prevent overpowering or underpowering.
- Size: Consider the available space in your car and the size of the subwoofers. Ensure that the subwoofers fit comfortably in the designated area without obstructing any other car components.
- Enclosure type: Decide whether you want a sealed or ported enclosure based on your desired sound characteristics.
- Brand and quality: Research reputable brands and read customer reviews to ensure that you invest in high-quality subwoofers that deliver reliable performance.
Ensuring sufficient space in your car for the installation
Before installing your subwoofers, it’s essential to assess your car’s space and make any necessary adjustments to accommodate the new equipment. Consider the following tips:
- Measure available trunk space: Measure the dimensions of your trunk to determine the maximum size of subwoofers and enclosure that will fit without causing obstructions.
- Remove any unnecessary items: Clear out any unnecessary items from your trunk to create more space for the subwoofers and ensure proper ventilation.
- Consider alternative mounting options: If your trunk space is limited, explore alternative mounting options such as under-seat enclosures or custom installations.
- Secure loose objects: Before installation, secure any loose objects in your car to prevent damage during the installation process and ensure a clean workspace.
By adequately preparing for the installation process, you can set yourself up for success and enjoy a professional-grade subwoofer installation in your car. The next section will guide you through the step-by-step installation process, ensuring a seamless integration of subwoofers into your car audio system.
Preparing The Car
Before you can install subs in your car, there are a few important steps you need to take to prepare your vehicle. This includes disconnecting the car’s battery, removing interior panels and trim pieces, and locating and preparing the installation area. Let’s go through each of these steps in detail.
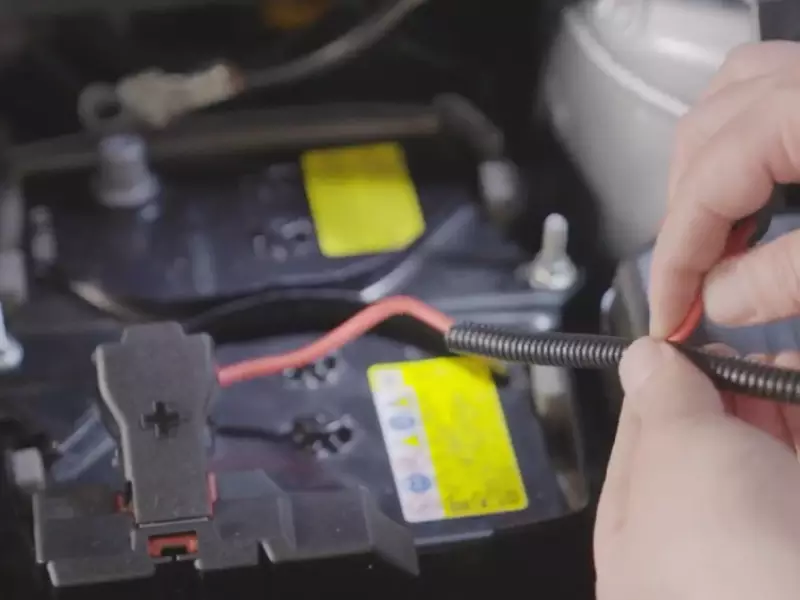
Disconnecting the Car’s Battery
First and foremost, it’s crucial to disconnect your car’s battery to avoid any potential electrical accidents during the installation process. Here’s how you can do it:
- Open the car hood and locate the negative terminal of the battery. It is usually marked with a “-” symbol.
- Using a wrench or socket, loosen the nut on the negative terminal.
- Once the nut is loose, carefully remove the negative cable from the terminal.
- After removing the negative cable, repeat the same steps for the positive terminal, which is usually marked with a “+” symbol.
By disconnecting the car battery, you ensure that no power is flowing through the electrical system while you work on the installation. This eliminates the risk of accidental shocks or short circuits.
Removing Interior Panels and Trim Pieces
Next, you’ll need to remove certain interior panels and trim pieces to access the areas where your subs will be installed. This may vary depending on the make and model of your car, but here are the general steps to follow:
- Refer to your car’s manual to identify the panels and trim pieces that need to be removed. Common examples include door panels, center console, and rear deck panels.
- Using a panel removal tool or a flathead screwdriver wrapped in a cloth, gently pry off the panels and trim pieces. Be careful not to scratch or damage the surrounding areas.
- Once the panels and trim pieces are removed, set them aside in a safe location. It’s a good idea to label them or take pictures for easy reassembly later.
Removing these interior components will allow you to access the necessary areas and create a clean and professional-looking installation.
Locating and Preparing the Installation Area
Finally, you need to locate the optimal area in your car for installing the subwoofer. Here’s how you can find and prepare the installation area:
- Consider the size and shape of the subwoofer, as well as your car’s available space. It’s important to choose a location that won’t interfere with other car components or hinder your vision while driving.
- Inspect the chosen area for any obstructions, such as wiring or structural components. Clear any obstacles that may interfere with the subwoofer’s installation or performance.
- Ensure that the installation surface is clean and free from any debris. This will help provide a solid foundation for the subwoofer and prevent any rattling noises.
By selecting an appropriate location and properly preparing the installation area, you can ensure optimal sound quality and a seamless integration of the subwoofer into your car’s interior.
Now that you have completed the necessary preparations, you’re ready to move on to the next steps of installing subs in your car. Stay tuned for our upcoming blog posts where we’ll guide you through the remaining installation process.
Wiring Setup
Installing subwoofers in your car can greatly enhance your audio experience, delivering deep bass and powerful sound. However, to achieve optimal performance, it is crucial to pay attention to the wiring setup. Properly wiring your subs ensures a clean and efficient power transfer, minimizing potential issues such as noise and interference. In this section, we will guide you through the important steps involved in the wiring setup, from choosing the appropriate wiring kit for your system to routing signal cables from the head unit to the trunk area. Follow these steps to ensure a seamless installation and enjoy an enhanced audio experience on the road.
Choosing the appropriate wiring kit for your system
The first step in wiring up your subs is to choose the appropriate wiring kit for your system. This kit includes power cables, ground cables, and RCA cables necessary for connecting your amp to the head unit. It is important to select a wiring kit that matches the power requirements of your subwoofers. Refer to the manufacturer’s specifications to determine the appropriate gauge of wire needed for your system. Using an inadequate gauge wire can result in power loss and poor performance.
Running power and ground wires to the battery
To ensure an optimal power supply to your subs, it is essential to connect the power and ground wires directly to the battery. This minimizes the risk of voltage drop and interference caused by other electrical components in your car. Use appropriate connectors and terminals to securely attach the power and ground wires. It is also recommended to route these wires away from other audio cables to avoid potential noise issues.
Installing a fuse near the battery for safety
Safety should always be a top priority when installing subwoofers. Installing a fuse near the battery in the power wire provides protection against short circuits and excessive current. This helps to prevent damage to your equipment and ensures the safety of both your car and yourself. Select an appropriate fuse rating based on the power requirements of your system and follow the manufacturer’s instructions for proper installation.
Routing signal cables from the head unit to the trunk area
The final step in the wiring setup is routing the signal cables from the head unit to the trunk area, where the subs are located. These signal cables carry the audio signals from the head unit to the amplifier. To minimize potential noise and interference, it is recommended to route the signal cables away from power wires and other electrical components. Use cable ties or clips to secure the cables along the way and maintain a clean and organized installation.
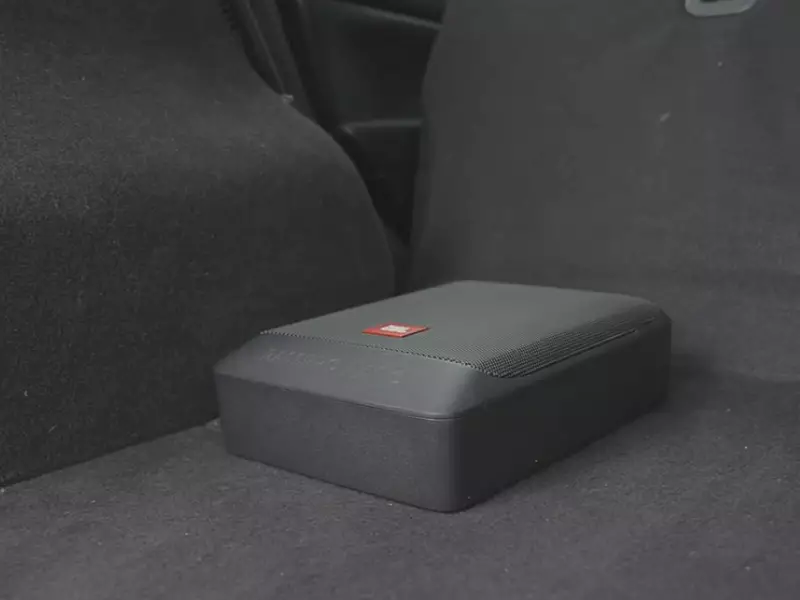
Mounting The Subwoofers
Determining the ideal subwoofer location in your car
Deciding on the optimal location for your subwoofers is crucial to achieve the best sound quality and ensure they fit seamlessly in your car’s interior. When determining the ideal subwoofer location, keep the following factors in mind:
- The size and shape of your car’s interior
- The type and dimensions of the subwoofers you plan to install
- The available space and potential obstructions, such as rear seats or storage compartments
- The desired impact on the overall sound system and bass response
Take time to carefully measure and visualize the available space in your car. Consider options like the trunk, rear seat areas, or custom enclosures that fit under seats or in spare tire wells. By considering these factors, you can determine the best subwoofer location that not only enhances the audio experience but also seamlessly integrates into your car’s design.
Building a subwoofer enclosure, if necessary
In some cases, building a custom subwoofer enclosure may be necessary to maximize the performance and functionality of your subs. An enclosure helps control the sound and optimize bass reproduction by creating a sealed or ported space around the subwoofers.
To build a subwoofer enclosure:
- Measure the dimensions of the subwoofers and consider their recommended enclosure specifications for optimal performance.
- Select suitable materials, such as medium-density fiberboard (MDF), to construct the enclosure.
- Design and cut the panels based on the desired enclosure type, whether it’s sealed or ported.
- Assemble the panels using appropriate fasteners and adhesives, ensuring sturdy construction.
- Seal any gaps or seams with caulk to eliminate air leaks that could compromise sound quality.
Building a subwoofer enclosure tailored to your specific system and car’s dimensions can significantly enhance the audio performance, providing clean and accurate bass reproduction.

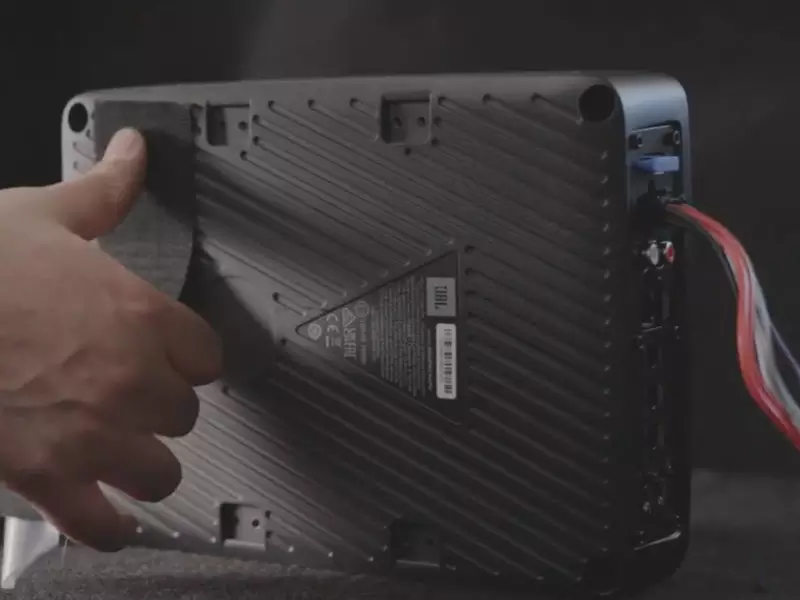
Securing the subwoofers to the installation area
Once you’ve determined the ideal subwoofer location and, if necessary, built an enclosure, it’s time to secure the subwoofers to the installation area. Follow these steps:
- Place the subwoofers in their designated location, ensuring they are aligned correctly and positioned securely.
- Use mounting brackets, screws, or nails designed for car audio installations to secure the subwoofers in place.
- Verify that the subwoofers are tightly secured, minimizing any potential vibrations and ensuring they won’t become dislodged during vehicle movement.
By securely fastening the subwoofers, you’ll prevent them from shifting or causing unwanted rattling noises while enjoying your favorite music.
Connecting The Subwoofers
When it comes to installing subs in a car, one of the most important steps is connecting the subwoofers to the amplifier. This step ensures that you can enjoy powerful and immersive bass while driving. Here’s a step-by-step guide on how to connect the subwoofers to the amplifier:
Connecting the subwoofers to the amplifier
The first thing you need to do is identify the positive and negative terminals on your subwoofers. Usually, the positive terminal is marked with a ‘+’ sign, while the negative terminal is marked with a ‘-‘ sign. Make sure to check the user manual or the manufacturer’s instructions to verify the correct terminals.
Once you have identified the terminals, take the positive wire from the subwoofer and connect it to the positive terminal on the amplifier. Similarly, connect the negative wire from the subwoofer to the negative terminal on the amplifier. Ensure that the connections are secure and tight to avoid any loose connections, which can affect the sound quality.
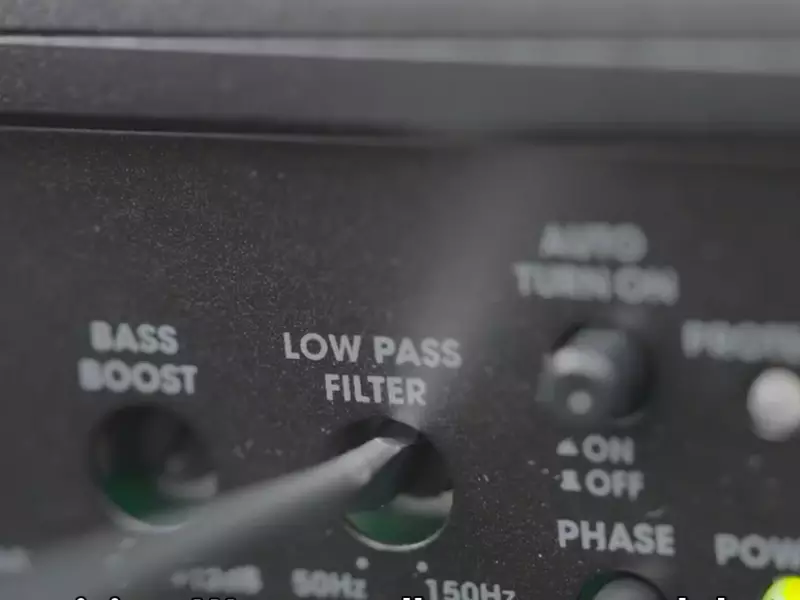
Adjusting the amplifier settings for optimal sound quality
After connecting the subwoofers to the amplifier, it’s time to adjust the amplifier settings for optimal sound quality. Start by setting the gain control on the amplifier to a low position. This will prevent distortion and allow you to gradually increase the volume without compromising the sound quality.
Next, adjust the low-pass filter on the amplifier. This filter controls the frequency range that the subwoofers will reproduce. Set it according to your personal preference, keeping in mind that setting it too high may result in muffled or overpowering bass, while setting it too low may produce weak or thin bass.
Additionally, you can fine-tune the bass boost feature on your amplifier. This feature enhances the low-frequency response of the subwoofers. Be cautious not to set it too high, as it can distort the sound and potentially damage the subwoofers.
Connecting the amplifier to the head unit
Now that the subwoofers and amplifier are connected and the settings are adjusted, it’s time to connect the amplifier to the head unit of your car’s stereo system. Locate the preamp outputs on your head unit. These outputs are typically labeled as “sub out” or “line out.”
Take the RCA cables and connect one end to the preamp outputs of the head unit. Then, connect the other end to the corresponding RCA inputs on the amplifier. Ensure that the connections are secure and free from any interference or static noise. You may need to use a ground loop isolator if you encounter any noise issues.
Testing the subwoofers and making necessary adjustments
Lastly, it’s important to test the subwoofers and make any necessary adjustments to ensure optimal sound performance. Play a song with a prominent bassline and gradually increase the volume to evaluate the output of the subwoofers.
If the bass sounds distorted or overpowering, you can lower the gain control on the amplifier. Conversely, if the bass seems weak or lacking, you can gradually increase the gain control. Fine-tune the low-pass filter and bass boost settings as needed until you achieve the desired sound quality.
Remember, every car’s audio system is unique, so it might take some trial and error to find the perfect settings for your subwoofers. Take the time to listen carefully and make adjustments as necessary to ensure an immersive and enjoyable audio experience.
Securing And Reassembling
Securing Loose Wires and Cables
After successfully connecting your subwoofer and amplifier, it’s crucial to secure any loose wires and cables to ensure a clean and safe installation. Untidy wires not only look unsightly, but they can also become a hazard if left unsecured. To secure loose wires and cables, follow these steps:
- Start by identifying any loose wires and cables that are hanging or dangling.
- Using zip ties or cable clips, fasten the loose wires and cables to nearby existing wiring or any available secure mounting points.
- Ensure that the cables are neatly organized and placed away from any moving parts or potential sources of heat.
- Zip ties or cable clips should be placed at regular intervals along the length of the wiring to provide consistent support and prevent any sagging.
By securing your wires and cables properly, you will prevent any potential damage that may occur due to vibrations or accidental tugging. Additionally, a clean and organized wiring setup will make future maintenance or upgrades much easier.
Reinstalling Interior Panels and Trim Pieces
Now that the wiring is secure, it is time to reassemble the interior panels and trim pieces that were removed during the installation process. Follow these steps to ensure a proper reinstallation:
- Refer to your car’s manual or online resources to determine the correct order and location for each interior panel or trim piece.
- Carefully align each piece with its corresponding mounting points.
- Gently press the panel or trim piece into place, making sure it fits snugly and flush with the surrounding surfaces.
- If necessary, use the appropriate screws or clips to secure the panel or trim piece in place.
- Repeat this process for each interior panel or trim piece until your car’s interior is fully reassembled.
Take your time during this step to ensure that each panel or trim piece is properly aligned and secured. This will not only give your car’s interior a professional look but also prevent any rattling noises that may occur if the panels are loosely fitted.
Securing the Subwoofer Enclosure
If you are installing a subwoofer enclosure in your car, it’s essential to secure it properly to prevent any movement or damage while on the road. Here’s how you can secure the subwoofer enclosure:
- Position the subwoofer enclosure in the desired location within your car’s trunk or rear compartment.
- Ensure that the enclosure is placed securely and does not obstruct any necessary storage space or compromise safety.
- Attach the subwoofer enclosure to the car’s structure using appropriate mounting brackets or hardware.
- Make sure the subwoofer enclosure is tightly secured and does not move or rattle when the car is in motion.
Securing the subwoofer enclosure properly will not only protect it from potential damage but also enhance the overall sound quality by preventing unwanted vibrations. Once the enclosure is securely fixed, you can enjoy a powerful and immersive audio experience in your car.
Remember to double-check all the connections, wire routes, and mounting points to ensure everything is secure and properly in place. By adequately securing and reassembling the components of your car’s audio system, you can enjoy high-quality sound while driving without any worries.
Testing And Fine-Tuning
Once you have successfully installed the subwoofers in your car, it’s important to test and fine-tune the system to ensure optimal performance. Testing the subwoofers for distortion or unwanted noise, adjusting the amplifier settings for desired bass levels, and fine-tuning the subwoofer system are crucial steps towards achieving a high-quality audio experience. In this section, we will delve into each of these steps and provide you with the necessary guidance to get the most out of your car audio system.
Testing the subwoofers for distortion or unwanted noise
Before enjoying the powerful bass from your new subwoofers, it is essential to check for any distortion or unwanted noise. Here’s a simple procedure to test the subwoofers:
- Play a bass-heavy track at a moderate volume.
- Listen closely for any rattling, buzzing, or distorted sounds.
- If you notice any of these issues, carefully inspect the subwoofers and the surrounding components for loose screws or improper installation. Make any necessary adjustments or tighten screws accordingly.
- If the problem persists, you may need to consult a professional car audio technician.
Adjusting the amplifier settings for desired bass levels
Now that you have ensured the subwoofers are performing without any distortion or unwanted noise, it’s time to adjust the amplifier settings for the desired bass levels. Here’s how to do it:
- Start by setting all the amplifier’s EQ (Equalizer) settings to their default flat position.
- Gradually increase the bass level while playing a bass-heavy track.
- Listen carefully and make slight adjustments until you achieve the desired bass levels.
- Remember, it’s important to strike the right balance; too little bass may result in a weak audio experience, while excessive bass could lead to distortion.
Fine-tuning the subwoofer system for optimal performance
After testing and adjusting the amplifier settings, it’s time to fine-tune the subwoofer system to ensure optimal performance. Here are some tips for fine-tuning:
- Closely listen to various music genres and adjust the EQ settings on the amplifier to suit your preferences.
- Experiment with crossover settings to determine the most effective frequency range for your subwoofers.
- Consider adjusting the phase settings to achieve better synchronization between the subwoofers and the other speakers in your car.
- If your car audio system allows it, try different sound enhancement technologies such as bass boost or dynamic range compression to further enhance the audio experience.
By following these steps and fine-tuning your subwoofer system, you can achieve a perfectly balanced and powerful audio experience in your car. Enjoy the deep, rich bass and immerse yourself in the music like never before.
Troubleshooting Common Issues
Installing subs in a car can be an exciting upgrade for any audio enthusiast. However, just like any other installation, it is not without its challenges. In this section, we will look at some common issues that you may encounter when installing subs in your car and how to troubleshoot them effectively.
Identifying and fixing wiring problems
One of the most common issues when installing subs in a car is wiring problems. These problems can range from loose connections to faulty cables, and they can severely affect the performance of your subwoofer. To identify and fix wiring problems, follow these steps:
- Start by checking all the connections. Make sure that the power and ground wires are securely connected to their respective terminals. Also, ensure that the RCA cables are plugged in correctly and that there are no loose connections.
- If you suspect that a specific cable is faulty, you can perform a simple continuity test using a multimeter. This will help you determine if the cable is transmitting the signal effectively or if it needs replacing.
- Another common wiring issue is a short circuit. This occurs when the positive and negative wires touch each other or another metal surface. To fix a short circuit, carefully inspect all the wiring and make sure that they are properly insulated.
Addressing issues with the amplifier or head unit
The amplifier and head unit are crucial components in any car audio system, and problems with either can affect the performance of your subs. If you are experiencing issues with your amplifier or head unit, try the following troubleshooting steps:
- Check the power supply to the amplifier. Ensure that it is securely connected and that there are no loose or damaged wires. If the power supply is working fine, move on to the next step.
- Inspect the settings on your head unit. Make sure that the balance, fade, and subwoofer levels are adjusted correctly. If necessary, consult your head unit’s manual for guidance on how to configure these settings properly.
- If you are still experiencing issues, it is possible that either the amplifier or head unit is faulty. In this case, you may need to seek professional help or consider replacing the defective component.
Troubleshooting excessive bass or low output levels
Another common issue when installing subs in a car is excessive bass or low output levels. This can be frustrating, especially when you are looking for a well-balanced sound. To troubleshoot this problem, follow these steps:
- Start by checking the gain settings on your amplifier. Adjusting the gain can help you find the sweet spot where the bass is balanced and not overpowering. Consult your amplifier’s manual for instructions on how to adjust the gain properly.
- If the gain settings are correct, the problem could be with the enclosure. Ensure that the subwoofer is properly sealed in the enclosure, and that there are no air leaks. Additionally, make sure that the size of the enclosure matches the specifications of your subwoofer.
- If none of the above steps solve the problem, it is worth considering the power supply. Insufficient power can result in low output levels. Make sure that the power supply to the amplifier is adequate for your subwoofer’s requirements.
Troubleshooting common issues when installing subs in a car can sometimes be a time-consuming process. However, by following these steps and being patient, you can ensure that your subs are performing at their best.
Enhancing Your Car Audio System
Installing a subwoofer in your car can take your audio experience to a whole new level. If you’re tired of the lackluster bass in your current system or want to add depth and richness to your music, a subwoofer is the perfect solution. Not only does it provide powerful low-frequency sound, but it can also enhance the overall balance of your car’s audio system. In this article, we will explore some additional steps you can take to further enhance your car audio system, ensuring you have the best possible sound quality.
Upgrading other components for a balanced sound
A subwoofer is just one piece of the puzzle when it comes to achieving a balanced and high-quality audio system in your car. Upgrading other components can make a significant difference in the overall sound performance. Consider replacing your factory speakers with aftermarket ones that have higher power handling and improved frequency response. This will ensure that all the elements of your music, from the booming bass to the crisp highs, are reproduced accurately and with clarity. Additionally, investing in a high-quality amplifier can provide the necessary power to drive the speakers and subwoofer, resulting in a more dynamic and immersive audio experience. Remember, a well-balanced sound system is key to achieving audio perfection.
Adding sound-deadening materials for improved audio quality
One common problem faced by car audio enthusiasts is unwanted noise and vibrations that can adversely affect the overall sound quality. Adding sound deadening materials to your car’s interior can help reduce these issues and improve the clarity and definition of your audio. The insulation properties of materials like mass-loaded vinyl and butyl-based mats can minimize rattles, resonances, and road noise, allowing you to enjoy your music without distractions. Installing these materials on doors, trunk, and roof panels can create a more controlled acoustic environment where the subwoofer and speakers can perform at their best.
Utilizing equalizers or sound processors for further customization
If you’re looking to fine-tune your audio system’s performance, consider utilizing equalizers or sound processors. These devices allow you to adjust and tailor the sound to your specific preferences. With an equalizer, you have precise control over the audio frequencies, allowing you to boost or cut certain ranges to achieve the desired sound signature. Sound processors, on the other hand, offer advanced signal processing capabilities, including time alignment and crossover controls, which can further optimize the sound imaging and staging. By utilizing these tools, you can customize the audio to suit your musical taste and the acoustic properties of your car’s interior.
In conclusion, enhancing your car audio system goes beyond just installing a subwoofer. Upgrading other components, adding sound deadening materials, and utilizing equalizers or sound processors can all contribute to achieving a well-balanced and immersive audio experience. So, whether you’re a bass enthusiast or an audiophile seeking the best sound quality on the road, these steps will surely take your car audio setup to the next level.
Maintenance Tips And Best Practices
Maintaining your subwoofers and amplifiers is crucial to ensure optimal performance and longevity. By following these maintenance tips and best practices, you can keep your audio system in top shape.
Keeping the subwoofers and amplifier clean and free from dust
Regular cleaning is essential to prevent the build-up of dust and debris that can affect the sound quality. Here are a few steps to keep your subwoofers and amplifier clean:
- Start by powering off your car audio system and disconnecting the amplifier.
- Use a soft, lint-free cloth to gently wipe the exterior surfaces of the subwoofers and amplifier to remove any dust or dirt.
- For hard-to-reach areas, you can use a small brush or compressed air to blow away the dust particles.
- Do not use harsh cleaning agents or solvents as they can damage the equipment.
- Regularly clean the grilles or ports to maintain optimal airflow and prevent any sound distortion. Refer to the manufacturer’s instructions for specific cleaning recommendations.
Checking and tightening connections regularly
Loose connections can cause poor sound quality or even damage your subwoofers and amplifiers. To ensure everything is securely connected, follow these steps:
- Power off your audio system and disconnect the amplifier.
- Inspect all the wires, cables, and connections for any signs of wear or corrosion.
- Tighten any loose connections using a suitable tool.
- Verify that the connections are properly seated and secure.
- Ensure that the positive and negative terminals are correctly connected to prevent any electrical issues.
Avoiding excessive volume levels to prevent damage
Listening to music at excessively high volume levels not only risks damaging your hearing but also puts a strain on your subwoofers and amplifiers. Follow these guidelines to avoid potential damage:
- Adjust the volume to a level that is comfortable and clear, but not excessively loud.
- Listen for any distortion or clipping sounds, which indicate that you may be pushing the system beyond its limits.
- Be mindful of the bass boost settings, as too much bass can cause the subwoofers to bottom out and potentially damage them.
- Remember that prolonged exposure to high-volume levels can lead to fatigue and reduced system lifespan.
By incorporating these maintenance tips and best practices into your routine, you can enjoy optimal performance and longevity from your car’s subwoofers and amplifier.
Frequently Asked Questions For How To Install Subs In A Car
Can I Install A Subwoofer In My Car Myself?
Yes, you can install a subwoofer in your car yourself. Just follow the instructions carefully and ensure proper wiring, placement, and securing.
Is It Easy To Install Subs?
Yes, installing subs is generally easy.
Can You Put Subs In A Car With A Stock Radio?
Yes, you can install subs in a car with a stock radio. Just make sure to connect the subs to an amplifier and connect the amplifier to the stock radio using a converter or line output converter. This will enable the stock radio to power the subs and improve the audio quality.
What Is Required To Install A Subwoofer?
To install a subwoofer, you need a subwoofer enclosure, amplifier, wiring kit, and a power source. First, choose a suitable location in your vehicle for the subwoofer and amplifier. Then, connect the amplifier to the car’s power supply and the subwoofer to the amplifier.
Finally, make sure all connections are secure and test the subwoofer’s sound output.
Conclusion
To sum it up, installing subs in a car may seem daunting at first, but with the right guidance and a few simple steps, it can be a rewarding DIY project. By following the tips and techniques outlined in this blog post, you’ll be well on your way to enjoying enhanced audio quality and a more immersive sound experience while driving.
Remember to choose the right equipment, follow the instructions carefully, and make any necessary adjustments to achieve the desired sound. Happy installing!