To install a sub in your car, you’ll need to locate a suitable mounting location and secure it properly using brackets or screws. Then, connect the subwoofer wires to the amplifier or receiver with the appropriate wiring harness, making sure all connections are secure and tight.
Factors To Consider When Selecting A Car Subwoofer
When it comes to enhancing the audio quality of your car, a subwoofer is an essential component. However, with so many options available in the market, selecting the right subwoofer can be overwhelming. To make your decision easier, there are a few factors you should consider. These factors will help you choose a subwoofer that is compatible with your car’s audio system, suits your power requirements, and fits perfectly within your available space. Let’s dive into the key factors:
Compatibility with the Car’s Audio System
One of the most important factors to consider when selecting a car subwoofer is its compatibility with your car’s audio system. You need to ensure that the subwoofer can seamlessly integrate with your existing setup. Start by checking the power output of your car’s head unit or amplifier, as this will determine the subwoofer’s power requirements.
Size and Power Handling
The size and power handling of the subwoofer are crucial considerations. Subwoofers come in different sizes, typically ranging from 8 to 15 inches. The size you choose will depend on the available space in your car and your preferences for bass response. Additionally, pay attention to the subwoofer’s power handling capability, which is measured in watts. It’s important to select a subwoofer that can handle the power output of your car’s amplifier to avoid any distortion or damage.
Type of Subwoofer (Component, Enclosed, or Powered)
The type of subwoofer you choose plays a significant role in the overall audio performance. There are three main types: component, enclosed, and powered subwoofers.
- Component Subwoofer: This type of subwoofer requires separate amplification and enclosure. It provides excellent customization options and allows for a personalized audio experience.
- Enclosed Subwoofer: Enclosed subwoofers come with a pre-installed subwoofer and enclosure. They are relatively easy to install and ideal for individuals looking for a hassle-free setup.
- Powered Subwoofer: Powered subwoofers have a built-in amplifier, making them a self-contained audio solution. They are perfect for those who want a compact and straightforward installation without compromising on performance.
Consider your specific requirements and preferences when choosing the type of subwoofer that best suits your needs. Each type has its advantages and disadvantages, so take the time to research and select the one that aligns with your audio goals.
By considering these factors—compatibility with your car’s audio system, size and power handling, and the type of subwoofer—you can make an informed decision when selecting a car subwoofer. Not only will it ensure a seamless integration into your existing setup, but it will also enhance your audio experience with deep and impactful bass, taking your car audio system to the next level.
Gathering The Necessary Tools And Materials
Before you begin the installation process, it is crucial to gather all the necessary tools and materials. This will ensure a smooth and hassle-free installation of your subwoofer in your car. From the subwoofer itself to the mounting brackets and connectors, each component plays a vital role in delivering that deep, booming bass you crave.
Subwoofer
The first and foremost item you need is the subwoofer. This is the powerhouse that produces low-frequency sound waves and gives your music that extra punch. Choose a subwoofer that fits within the specifications of your car and meets your audio preferences. Whether you opt for a powered or passive sub, make sure it is the right size for your vehicle and compatible with your sound system.
Amplifier
To amplify the audio signal coming from your head unit to the subwoofer, you will need an amplifier. This device boosts the power of the signal and provides the necessary juice for your subwoofer to perform at its best. Look for an amplifier that matches the power requirements of your subwoofer and can fit seamlessly into your car’s audio setup.
Speaker Wire
A high-quality speaker wire is essential for connecting your amplifier to the subwoofer. This wire is responsible for carrying the amplified audio signal from the amplifier’s output to the subwoofer’s input terminals. Make sure to choose a speaker wire that is thick enough to handle the power output of your amplifier and has good conductivity to ensure minimal signal loss.
RCA Cables
RCA cables are used to connect the subwoofer output on your head unit or amplifier to the subwoofer input. These cables transmit the audio signal with high fidelity and are typically color-coded for easy identification. Ensure that you choose RCA cables with good shielding to minimize interference and unwanted noise.
Power Wire and Fuse
The power wire carries the necessary electrical current from your car’s battery to the amplifier. It is essential to choose a power wire with the right gauge to handle the current requirements of your amplifier. Additionally, installing a fuse near the battery connection will protect your system from power surges and prevent any potential damage.
Mounting Brackets and Screws
To securely install the subwoofer in your car, you will need mounting brackets and screws. These accessories provide stability and ensure that the subwoofer remains in place, even during bumps and vibrations. The mounting brackets should be compatible with your subwoofer and fit snugly within your vehicle’s mounting location.
Connectors and Terminal Blocks
Lastly, connectors and terminal blocks are necessary to establish proper electrical connections. These components enable you to connect the speaker wire, RCA cables, and power wire to the subwoofer and amplifier. Make sure to choose connectors and terminal blocks that are suitable for the wire gauges and provide a secure and reliable connection.
By gathering all the necessary tools and materials mentioned above, you are now ready to embark on the exciting journey of installing a subwoofer in your car. Remember, using high-quality components and paying attention to detail will ensure optimal performance and an immersive audio experience.
Assessing the car’s Interior For Installation Space
Before you start installing a subwoofer in your car, it is essential to assess the interior space of your vehicle. By doing so, you can determine the most suitable location for installing your subwoofer, ensuring optimal performance and minimal space constraints. This guide will assist you in assessing your car’s interior for installation space, covering the identification of potential mounting locations, determination of the optimal subwoofer position, and consideration of space constraints and accessibility.
Identifying Potential Mounting Locations
In order to optimize the sound quality and ensure the subwoofer’s effective performance, it is crucial to identify potential mounting locations within your car. These locations generally include:
- Rear Trunk Area:
The rear trunk area is one of the most common areas for installing subwoofers. It offers ample space and is often convenient for accessing and connecting the subwoofer to your car’s audio system.
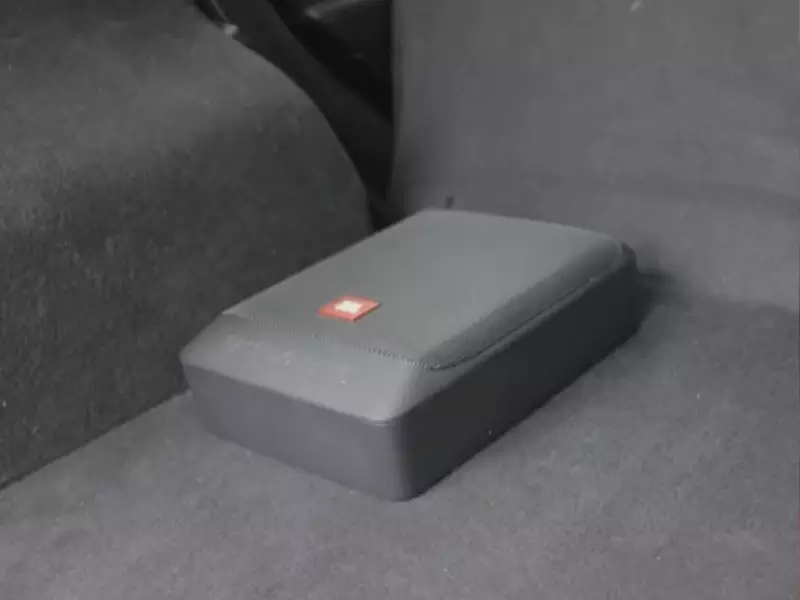
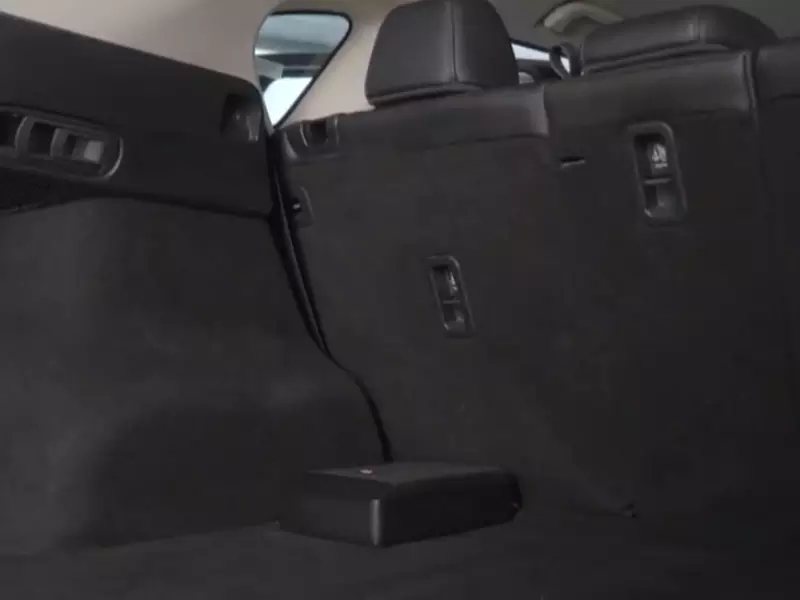
- Under the Seat:
Another potential mounting location is underneath the seats of your car. This option is particularly suitable in cases where trunk space is limited or if you prefer a more discrete subwoofer installation.
- Door Panels:
Some cars have sufficient space within the door panels to accommodate a smaller subwoofer. This location can provide a unique audio experience and is worth considering if you are aiming for a custom audio setup.
Determining the Optimal Subwoofer Position
Once you have identified potential mounting locations, the next step is to determine the optimal position for your subwoofer. To do so, consider the following guidelines:
- Maximizing Sound Quality:
Place the subwoofer where it can produce the best sound quality and bass response. Experiment with different positions within the identified mounting locations to find the sweet spot that offers optimal low-frequency sound reproduction.
- Considering Wiring and Connectivity:
Ensure that the chosen position allows for easy wiring and connectivity. Make sure you have sufficient access to power outlets and audio inputs to facilitate a smooth installation process.
- Minimizing Vibrations:
To prevent unwanted vibrations and rattling sounds, secure the subwoofer in a position where it can be firmly mounted. This mitigates potential disturbances while enhancing the overall audio experience.
Considering Space Constraints and Accessibility
When assessing the car’s interior for installation space, it is crucial to consider any space constraints and accessibility issues that may arise. Here are some important factors to keep in mind:
- Available Space:
Take into account the dimensions of your chosen subwoofer and compare them with the available space to ensure a proper fit. Avoid congested areas that may interfere with the subwoofer’s performance or cause damage.
- Maintenance and Repairs:
Consider how accessible the subwoofer will be for future maintenance or repair needs. Choosing a location that allows for easy troubleshooting and component replacement can save you time and hassle in the long run.
- Weight Distribution:
Account for weight distribution within the car to maintain a balanced and stable driving experience. Ensure that the chosen location does not excessively impact vehicle weight distribution, potentially affecting your car’s handling.
By meticulously assessing your car’s interior for installation space, you can make informed decisions about the subwoofer’s placement, resulting in an optimized audio experience.
Disconnecting the car’s Battery For Safety
When it comes to installing a subwoofer in your car, one of the most crucial steps is disconnecting the car’s battery. This is necessary for your safety and to prevent any electrical mishaps during the installation process. In this article, we will explain the importance of disconnecting the battery, as well as guide you through locating the battery and disconnecting the negative terminal.
Understanding the Importance of Disconnecting the Battery
Before getting started with the installation of your car subwoofer, it’s essential to comprehend the significance of disconnecting the battery. By doing so, you eliminate the risk of electrical shocks and short circuits. When you disconnect the battery, you break the electrical circuit, ensuring that no power flows to the stereo or any other components you’ll be working on. This ensures your safety and protects the audio system from any potential damage due to accidental surges or wiring mishaps during the installation process.
Locating the Battery and Disconnecting the Negative Terminal
To begin disconnecting the car’s battery, you need to first locate it. In most vehicles, the battery is typically located under the hood. However, in some models, it might be placed in the trunk or under the rear seat. Consult your car’s owner manual if you’re unsure about the precise location of the battery.
Once you’ve located the battery, follow these steps to disconnect the negative terminal:
- Put on a pair of gloves and safety glasses for added protection.
- Identify the negative terminal, usually marked with a “-” sign or the letters “NEG.” Remember that the negative terminal is usually the black cable.
- Using a wrench, loosen the nut securing the negative cable to the battery terminal.
- Gently remove the negative cable from the battery terminal and ensure it does not come into contact with any metal parts or the positive terminal.
By following these steps, you have successfully disconnected the car’s battery, ensuring a safe environment for installing your car subwoofer. Remember to store the disconnected negative cable away from the battery, so it doesn’t accidentally reconnect.
Now that you’ve safely disconnected the car’s battery, you can proceed with the installation process of the subwoofer in your car without worrying about any electrical hazards. Just be sure to double-check the battery connection before turning on the car after the installation is complete.
Connecting The Subwoofer To The Car’S Audio System
Routing the Power Wire through the Car’s Firewall
When it comes to connecting your subwoofer to the car’s audio system, one crucial step is routing the power wire through the car’s firewall. This ensures that the power wire is securely connected to the battery and provides the necessary power for the subwoofer to function optimally.
To route the power wire through the car’s firewall, follow these simple steps:
- Locate the car’s firewall, which is the barrier between the engine compartment and the interior of the car.
- Identify an existing hole or create a new one. A pre-existing grommet or an unused opening can serve as the entry point for the power wire.
- Carefully feed the power wire through the hole, ensuring it is not in contact with any moving parts or sharp edges that could potentially damage it.
- Once the power wire is through the firewall, secure it in place using wire ties or adhesive clips, ensuring it is positioned away from any hot components or areas prone to moisture.
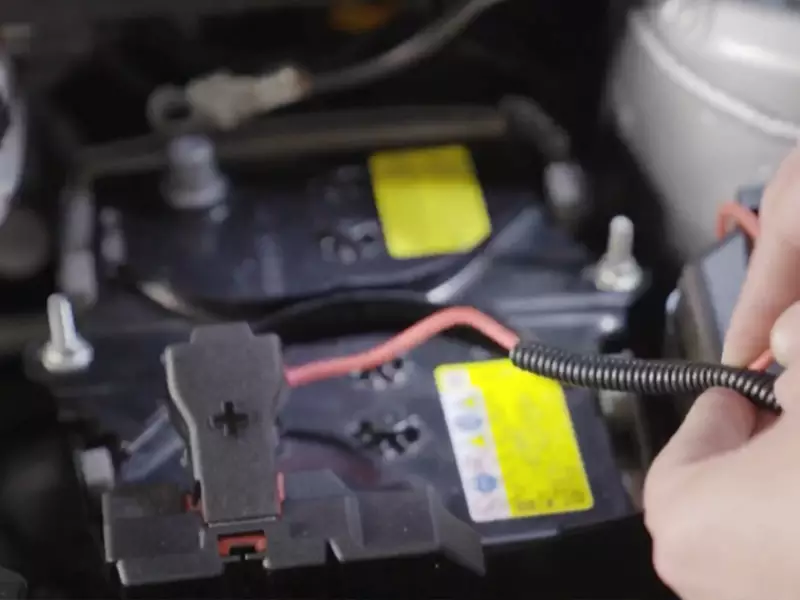
Connecting the Power Wire to the Battery
To ensure that the subwoofer receives the required power supply, it is essential to connect the power wire to the car’s battery. Follow these steps to properly connect the power wire to the battery:
- First, locate the positive and negative terminals on the car battery. The positive terminal is typically marked with a “+” sign, while the negative terminal is marked with a “-” sign.
- Using a wire crimper or stripper, remove a small portion of insulation from the end of the power wire.
- Connect the positive terminal of the battery to the positive (red) wire from the power wire. Ensure a tight and secure connection.
- Connect the negative terminal of the battery to the negative (black) wire from the power wire. Again, ensure a secure connection.
- Once the connections are secure, consider adding a fuse near the battery to protect your system from power surges.
Running the RCA Cables and Speaker Wire to the Amplifier
Now that the power wire is properly connected to the battery, it’s time to focus on running the RCA cables and speaker wire to the amplifier. This step is crucial for establishing the audio connection between the subwoofer and the car’s audio system.
Here’s how you can run the RCA cables and speaker wire to the amplifier:
- Identify a suitable path from the car’s head unit (stereo) to the area where the amplifier will be installed.
- Use wire ties or adhesive clips to secure the RCA cables and speaker wire along the chosen path, ensuring they are kept away from any heat sources or moving parts.
- If necessary, use tools like a panel removal tool or a trim removal tool to safely remove any panels or trim pieces that may obstruct the path.
- Ensure that the cables and wire are neatly organized and do not create any potential hazards or obstructions within the car.
Connecting the RCA Cables and Speaker Wire to the Subwoofer
Finally, it’s time to connect the RCA cables and speaker wire to the subwoofer, bringing your audio system installation nearing completion. Follow these steps to ensure a reliable connection:
- Identify the input jacks on the subwoofer, which are usually located on the rear panel.
- Connect the RCA cables to the corresponding input jacks on the subwoofer. The connectors are color-coded, with red representing the right channel and white or black representing the left channel.
- Securely tighten the connectors to ensure a solid connection and prevent any signal loss or interference.
- Connect the speaker wire to the appropriate terminals on the subwoofer, ensuring that the positive (+) terminal is connected to the corresponding positive (+) terminal and the negative (-) terminal to the matching negative (-) terminal.
- Once all the connections are made, verify that each connection is secure and firmly in place. This will ensure optimal performance and audio quality from your subwoofer.
With the power wire routed through the car’s firewall, connected to the battery, and the RCA cables and speaker wire properly connected to the subwoofer, you’re almost done with the installation process. Now, all that’s left is to do some final checks and adjustments before enjoying an enhanced audio experience in your car.
Mounting And Securing The Subwoofer In The Car
When it comes to installing a subwoofer in your car, one crucial step is mounting and securing the subwoofer properly. This ensures that the subwoofer stays in place while driving and delivers optimal sound quality. In this post, we’ll cover two important aspects of mounting and securing a subwoofer in your car: using mounting brackets and screws, and adjusting the subwoofer’s position for optimal sound quality.
Using Mounting Brackets and Screws to Secure the Subwoofer
To securely mount the subwoofer in your car, you’ll need to use a combination of mounting brackets and screws. Mounting brackets are specially designed to hold the subwoofer and provide stability while driving. Here’s a step-by-step guide on how to use mounting brackets and screws to secure your subwoofer:
- Start by positioning the subwoofer in the desired location within your car. Make sure it doesn’t obstruct any other important components or interfere with the seating arrangements.
- Using the mounting brackets, align them with the mounting holes on the subwoofer and the designated mounting points in your car. Ensure that the brackets are securely attached to both the subwoofer and the car.
- Once the brackets are in place, use screws of appropriate size to secure the brackets tightly. Make sure to tighten the screws adequately, but be careful not to over-tighten them as it may damage the subwoofer or the car’s interior.
- Double-check the stability of the subwoofer by gently pushing and pulling on it. If it wobbles or moves excessively, reposition the brackets or tighten the screws further until it feels firmly secured.
Adjusting the Subwoofer’s Position for Optimal Sound Quality
The position of the subwoofer in your car plays a significant role in achieving optimal sound quality. Here are a few tips to help you adjust the subwoofer’s position for the best audio experience:
- Experiment with different locations in your car to find the optimal position for the subwoofer. It can be placed in the trunk, under a seat, or even in a custom enclosure, depending on the available space and your preference.
- Avoid placing the subwoofer directly against a wall or any other surface, as it can cause unwanted vibrations and distortions in the sound.
- Consider using a subwoofer isolation pad or foam to reduce vibrations and improve the overall sound quality.
- Once you’ve found the ideal position, secure the subwoofer using the mounting brackets and screws as described earlier.
By using mounting brackets and screws to secure the subwoofer and adjusting its position for optimal sound quality, you can enhance your car audio system and enjoy a more immersive listening experience.
Adjusting The Amplifier Settings
Once you have successfully installed the subwoofer in your car, it’s important to fine-tune the amplifier settings to ensure optimal sound quality. Adjusting the amplifier settings allows you to control the gain, low-pass filter, and volume balance of the subwoofer, giving you a richer and more immersive audio experience.
Setting the Gain
The gain setting on your amplifier controls the output power of the subwoofer. It’s essential to set the gain correctly to prevent distortion and damage to the subwoofer and speakers. To set the gain, follow these steps:
- Start by playing a piece of music with heavy bass.
- Gradually increase the gain knob until you hear distortion in the audio.
- Once you hear distortion, back off the gain slightly until the sound is clean and crisp.
- Remember not to set the gain too low, as it can result in weak bass output.
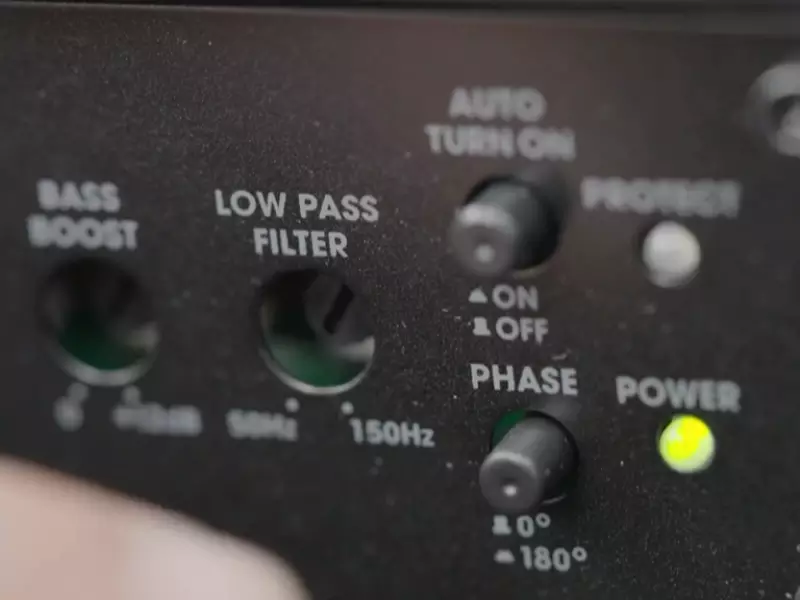
Adjusting the Low-Pass Filter
The low-pass filter is responsible for directing only low-frequency sounds to the subwoofer. This helps in reducing distortion and interference with the other speakers in your car. To adjust the low-pass filter, follow these steps:
- Set the low-pass filter to its highest frequency value.
- Gradually decrease the frequency until it blends seamlessly with the other speakers.
- Ensure the transition between the subwoofer and the other speakers is smooth, without any noticeable gaps or overlaps in sound.
Balancing the Subwoofer’s Volume with the Car’s Speakers
It’s crucial to find the right balance between the subwoofer and the car’s speakers to create a harmonious audio experience. To achieve this, follow these steps:
- Play a song that covers a full range of frequencies.
- Gradually increase the subwoofer volume until it complements the sound from the car’s speakers.
- Pay attention to the overall audio balance, ensuring that the bass is not overpowering and the other speakers are not overshadowed.
By following these steps and adjusting the amplifier settings, you can fine-tune the sound of your subwoofer in your car to achieve the perfect audio experience. Remember to make small adjustments and listen carefully to find the optimal settings that suit your preferences.
Testing the subwoofer’s Sound Quality
Playing Various Types of Music to Gauge Bass Response
Once you have successfully installed a subwoofer in your car, the next step is to test its sound quality. Testing the subwoofer’s performance will help you determine if it provides the desired bass response. One effective way to do this is by playing various types of music that showcase different bass levels and frequencies.
A diverse selection of music genres, including hip-hop, rock, electronic, and classical, can help you assess the subwoofer’s ability to reproduce bass accurately. By playing these genres, you can gauge whether the subwoofer adds depth and richness to the low frequencies or if it overpowers the other sounds in the audio.
When testing with hip-hop or electronic tracks, focus on how well the subwoofer handles deep bass tones. These genres tend to have heavy bass lines and sub-bass frequencies, which require a subwoofer that can deliver clear and impactful low-end sound. Pay attention to any distortion or muddiness in the bass notes, as this may indicate a need for adjustments.
Classical and rock music, on the other hand, can help you evaluate the subwoofer’s ability to reproduce mid-bass frequencies. Listen closely to instruments such as drums and bass guitars. The subwoofer should enhance the low-end impact of these instruments without overpowering other elements of the music.
Making Adjustments to Fine-Tune the Subwoofer’s Performance
After playing various types of music, you may find that some adjustments are necessary to fine-tune the subwoofer’s performance. Here are a few adjustments you can consider:
- Adjusting the Gain: The gain control allows you to adjust the volume of the subwoofer. Ideally, you should set the gain to a level where the subwoofer blends seamlessly with your car’s speakers. Too high of a gain can result in overpowering bass, while too low can make the subwoofer’s impact less noticeable.
- Tweaking the Crossover: The crossover determines the frequency range at which the subwoofer operates. By adjusting the crossover, you can ensure that the subwoofer reproduces only the low frequencies, leaving the higher frequencies to the other speakers in your car.
- Balancing the EQ: Experiment with the equalizer settings in your car’s audio system to find the right balance for the subwoofer. Boosting the bass frequencies slightly can enhance the low-end response, but be mindful not to go overboard as it may result in distortion.
Remember, fine-tuning the subwoofer’s performance is a subjective process. What sounds great to one person may not necessarily sound the same to another. Take the time to experiment with different settings and listen carefully to the audio output. Trust your ears and make adjustments according to your personal preference.
Troubleshooting Common Subwoofer Installation Issues
Installing a subwoofer in your car can greatly enhance your audio experience, but like any installation, it can come with its fair share of challenges. Troubleshooting common issues that may arise during the installation process is crucial for achieving optimal sound quality and performance. In this section, we will explore some common subwoofer installation issues and provide solutions to address them.
Identifying and Fixing Grounding Issues
Grounding issues are a frequent cause of subwoofer installation problems. When the grounding is not set up correctly, it can result in noise, distortion, or even no sound at all. To troubleshoot this issue, follow these steps:
- Check the connection between the amplifier’s ground wire and the car’s chassis. Make sure it is secure and free of corrosion or dirt.
- Verify that the ground wire has a solid contact surface with the chassis metal. Sanding the contact area can help establish a better connection.
- Ensure that the ground wire is properly sized for the amplifier. An undersized wire can lead to inadequate grounding.
- Consider using a separate ground for your subwoofer. This can help eliminate potential interference from other components in the car’s electrical system.
Addressing Wiring Problems or Poor Sound Quality
Wiring problems can result in poor sound quality or intermittent operation of your subwoofer. To troubleshoot wiring issues, follow these steps:
- Inspect the wiring connections between the amplifier, subwoofer, and head unit. Make sure they are secure and properly connected.
- Check for any signs of frayed or damaged wires that may be affecting the signal flow. Replace or repair any damaged wires.
- Ensure that the speaker wire polarity is correct. Positive and negative terminals should be connected properly to achieve optimal sound reproduction.
- Consider using high-quality cables and wires to minimize signal loss and interference.
Poor sound quality can also be caused by incorrect settings on the amplifier. Refer to the user manual or manufacturer’s instructions to adjust the amplifier settings for optimal sound reproduction.
Seeking Professional Assistance if Necessary
If you have exhausted all troubleshooting steps and are still experiencing issues with your subwoofer installation, it may be time to seek professional assistance. A professional car audio technician can diagnose and repair any complex issues that you may be facing.
Remember, a properly installed subwoofer can greatly enhance your car audio experience, so don’t let common installation issues discourage you. By addressing grounding issues, troubleshooting wiring problems, and seeking professional assistance if necessary, you can ensure that your subwoofer installation is a success.
Frequently Asked Questions Of How To Install Sub In Car
Can I Install A Subwoofer In My Car Myself?
Yes, you can install a subwoofer in your car yourself. It’s a straightforward process that doesn’t require advanced technical skills. Just follow the provided instructions, and you’ll be able to enhance your car’s audio system with a subwoofer on your own.
Is It Easy To Install Subs?
Yes, installing subs is relatively easy.
What Is Needed To Install A Subwoofer In A Car?
To install a subwoofer in a car, you will need a subwoofer, an amplifier, speaker wires, a subwoofer enclosure, and a power source. Connect the subwoofer to the amplifier using the speaker wires, and place it in the enclosure. Lastly, connect the amplifier to the power source.
How Much Does It Cost To Get A Sub Installed?
The cost of getting a sub-installed varies depending on factors such as the type of subwoofer, complexity of installation, and your location. It is best to contact a professional audio installer or car audio shop for accurate pricing.
Conclusion
To put the final touch on your car audio system, installing a subwoofer is essential. By following the step-by-step guide provided in this blog post, you can easily enhance your driving experience with deep and impactful bass. Remember to gather all the necessary tools, locate the ideal position, and follow the wiring instructions carefully.
With a little patience and effort, you’ll be enjoying incredible sound quality and immersive music on every drive. Start installing your subwoofer today and elevate your in-car audio to the next level.