To install a satellite radio antenna in your car, find a suitable location on the exterior for the antenna and secure it using the adhesive or magnetic mounting provided. Then, route the antenna cable into your car and connect it to your satellite radio receiver.
Assessing Your Car’s Compatibility
When it comes to installing a satellite radio antenna in your car, it’s essential to assess your car’s compatibility before diving into the installation process. By doing so, you can ensure a smooth and successful upgrade to your car’s audio system. In this article, we will walk you through the necessary steps to assess your car’s compatibility and find the perfect satellite radio antenna for your vehicle.
Checking for a built-in receiver
The first step in assessing your car’s compatibility is to check if it has a built-in receiver. Many newer car models come equipped with a satellite radio receiver, allowing you to easily connect and integrate a satellite radio antenna. To determine if your car has a built-in receiver, follow these steps:
- Start by examining your car’s audio system. Look for any indicators or labels that mention “satellite radio” or “XM radio.” These labels often indicate the presence of a built-in receiver.
- Next, consult your car’s manual. Check the section that covers the audio system or entertainment options. Look for any information regarding satellite radio compatibility or the presence of a receiver.
- If you’re still unsure, try tuning into a satellite radio channel. Use the radio selector knob or seek button to browse through the available channels. If you can tune into satellite radio channels, it’s a clear sign that your car has a built-in receiver.
Understanding the different antenna types
Once you’ve determined that your car has a built-in receiver, it’s time to familiarize yourself with the different types of satellite radio antennas available. There are two main types:
- Magnetic Mount Antennas: These antennas are the most common and user-friendly option. They feature a strong magnet at the base, allowing you to easily attach them to the top of your car’s roof. Magnetic mount antennas do not require any drilling or permanent modifications to your car’s exterior.
- Glass Mount Antennas: These antennas are designed to be mounted on your car’s windshield or rear window. They use a suction cup or adhesive base to attach securely to the glass. Glass mount antennas provide a discreet and clean installation, as they are hidden from view.
Choose the right antenna for your car’s make and model
Now that you understand the different antenna types, it’s crucial to select the right one that is compatible with your car’s make and model. It’s important to note that not all antennas are compatible with every car. To find the right antenna for your car, follow these steps:
- Research antenna compatibility for your specific car make and model. Look for information from reputable manufacturers or consult car audio specialists. They often provide compatibility charts or recommendations for different vehicles.
- Consider the installation process and your personal preference. If you’re comfortable with a straightforward installation, a magnetic mount antenna might be the best option. However, if you prefer a cleaner and hidden installation, a glass mount antenna might be the better choice.
Gathering The Required Tools And Materials
Before you can begin installing a satellite radio antenna in your car, you need to gather all the necessary tools and materials. Having everything readily available will save you time and ensure a smooth installation process. In this section, we will discuss the components of a satellite radio antenna kit and the additional tools needed for the installation process.
Satellite Radio Antenna Kit Components
When purchasing a satellite radio antenna kit, it typically includes the following components:
| Component | Description |
|---|---|
| Antenna | The main component that receives the satellite radio signals. |
| Cable | A cable that connects the antenna to the satellite radio receiver in your car. |
| Mounting bracket | A bracket is used to secure the antenna to your car. |
| Adhesive pads | Pads that help to secure the cable along the car’s interior. |
| Instructions | A guide that provides step-by-step instructions on how to install the antenna. |
Additional Tools Needed for the Installation Process
In addition to the components provided in the kit, you will need a few additional tools to complete the installation process. These tools include:
- Power drill and drill bits
- Tape measure
- Screwdriver set
- Trim removal tool
- Electrical tape
- Wire strippers
- Zip ties
These tools will be essential for mounting the antenna, connecting the cable, and securing it in place. It’s important to have them on hand to ensure a successful installation.
With all the necessary tools and materials ready, you can proceed to the next step of installing the satellite radio antenna in your car. Be sure to carefully follow the instructions provided in the kit for a professional and trouble-free installation.
Preparing For The Installation
Before you begin the installation process of a satellite radio antenna in your car, it is important to adequately prepare. This involves finding the ideal location for antenna placement, ensuring a clear line of sight for optimal signal reception, and cleaning and preparing the car’s surface for mounting.
Finding the ideal location for antenna placement
Choosing the right location for your satellite radio antenna is crucial for receiving the best possible signal. Look for a spot on your car’s exterior that has a clear view of the sky, away from any obstructions that could hinder signal reception.
While the rear deck of your car might seem like a convenient location, keep in mind that it can sometimes be obstructed by the car’s body or other objects. Instead, consider options like the roof or trunk lid, which often provide better reception due to their higher vantage points.
Ensuring a clear line of sight for optimal signal reception
Having a clear line of sight is essential for strong and uninterrupted satellite radio reception. To achieve this, aim to install the antenna in a location that is free from any physical barriers, such as roof racks, bike carriers, or spoilers. These objects can interfere with the antenna’s ability to pick up signals, resulting in weak or erratic reception.
Additionally, consider the surrounding environment. Avoid parking your car near tall buildings, trees, or other structures that could potentially obstruct the antenna’s line of sight to the sky. By finding a location with an unobstructed view, you increase the chances of getting the clearest and most consistent signal possible.
Cleaning and preparing the car’s surface for mounting
Before mounting the satellite radio antenna, it is crucial to clean and prepare the surface where it will be installed. Start by washing the area thoroughly with soap and water, ensuring any dirt, debris, or residue is removed. This will allow for a secure and long-lasting attachment of the antenna.
Next, dry the cleaned area completely using a cloth or towel. It’s crucial to ensure the surface is dry, as any moisture can affect the adhesive’s effectiveness or even damage your vehicle’s paintwork.
Finally, if needed, use isopropyl alcohol to further clean the surface. This will remove any remaining grease or contaminants and help the adhesive bond firmly with the car’s surface. Once the area is clean and dry, you are ready to proceed with the antenna installation.
Installing The Satellite Radio Antenna
Installing a satellite radio antenna in your car is a fairly simple process that can greatly enhance your driving experience. With a reliable antenna, you can enjoy clear, uninterrupted signals and access to a wide range of radio stations. In this guide, we will walk you through the step-by-step process of installing your satellite radio antenna, ensuring optimal performance and reception.
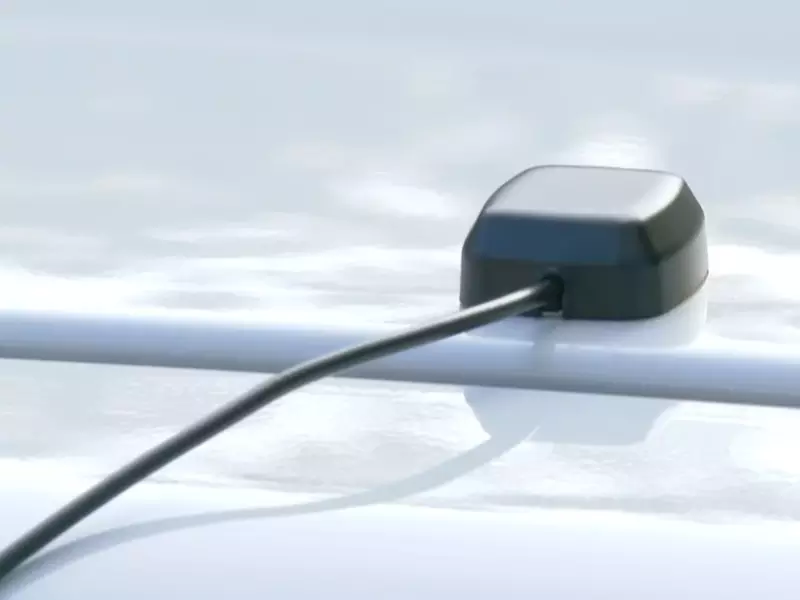
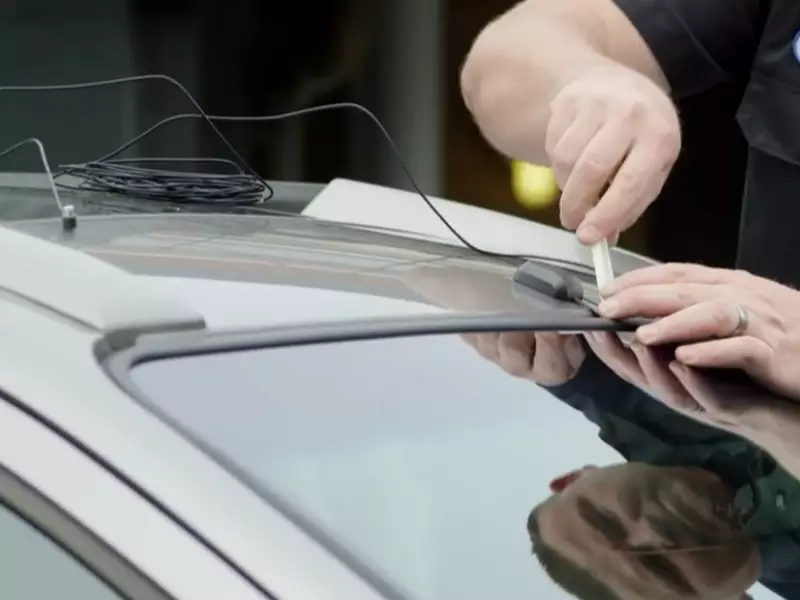
Mounting the antenna on the chosen location
The first step in installing your satellite radio antenna is to find the ideal location on your car to mount it. This can be your car’s roof, trunk, or even a window. It’s important to choose a spot that is clear of any obstacles that may interfere with signal reception, such as large metal objects or other antennas.
Once you have determined the best location, use a strong adhesive or mounting screws to secure the antenna in place. Make sure it is firmly attached to avoid any movement while driving, which can affect signal quality.
Securing the antenna in place for stability
Ensuring stability is crucial in maintaining a reliable satellite radio signal. To achieve this, you can use additional methods to secure the antenna in place.
One option is to use a weatherproof sealant around the antenna’s base. This will not only provide a watertight seal, protecting the antenna from the elements but also prevent any vibrations that may loosen the mounting.
Alternatively, you can use zip ties or clamps to secure the antenna to a stable part of your car, such as roof racks or utility brackets. This will provide an extra layer of stability, minimizing any potential movement that could impact your satellite radio signal.
Running the antenna cable through the car’s interior
After mounting the satellite radio antenna, the next step is to run the antenna cable through your car’s interior. This ensures a clean and professional installation while minimizing any potential cable interference or damage.
Start by identifying the path you want the cable to take, ensuring it avoids any sources of interference, such as other electrical cables or moving parts. Use cable clips or adhesive tape to neatly secure the cable along the chosen route. It’s essential to keep the cable away from any sharp edges or areas where it may become pinched or damaged.
Finally, connect the antenna cable to your satellite radio receiver in the car. Ensure the connection is secure and check for any signal loss or interference. Adjust the cable routing if needed to optimize signal quality.
By following these steps, you can successfully install a satellite radio antenna in your car, enhance your radio listening experience, and enjoy a wide variety of channels and programs wherever you go.
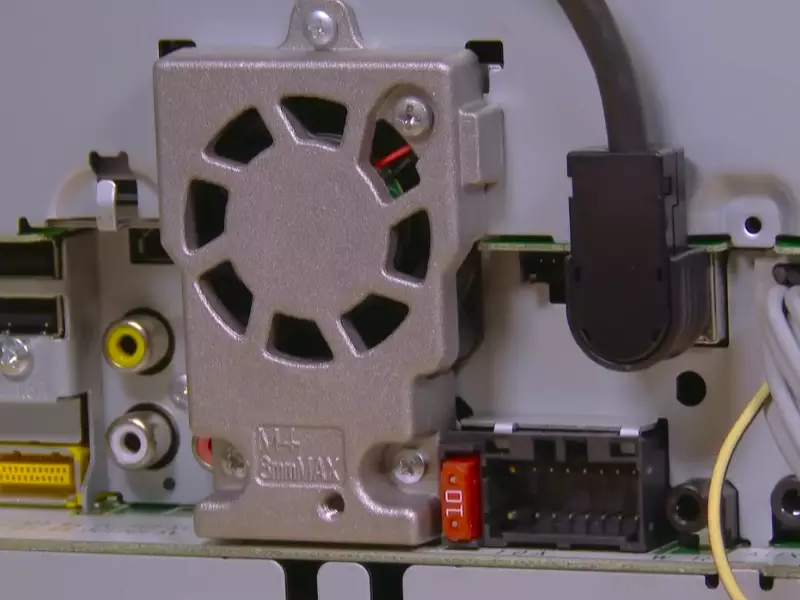
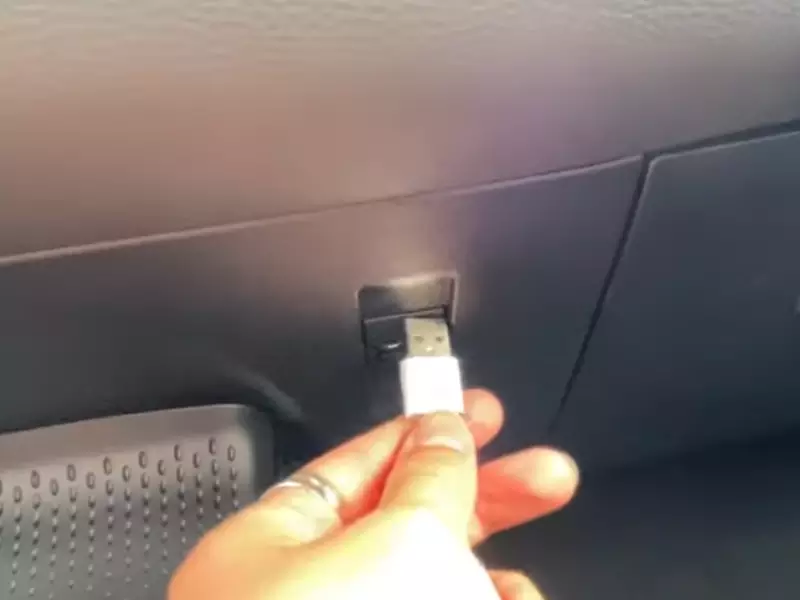
Connecting The Antenna To The Receiver
Once you have successfully installed the satellite radio antenna in your car, the next step is to connect it to the receiver unit. Properly connecting the antenna to the receiver is crucial for optimal signal reception and audio quality. In this section, we will guide you through the process of connecting the antenna cable to the receiver unit and testing the connection for signal reception.
Identifying the appropriate connectors for your receiver
Before connecting the antenna cable to the receiver, it’s important to identify the appropriate connectors for your specific receiver unit. Different receivers may have different types of connectors, so you need to ensure compatibility. Refer to the user manual or specifications of your receiver to determine the type of connector required. The two common types of connectors are F-type and SMB connectors.
| Connector Type | Description |
|---|---|
| F-type | A threaded coaxial connector is commonly used in satellite and cable TV installations. |
| SMB | A small push-on/pull-off connector commonly used in automotive applications. |
Connecting the antenna cable to the receiver unit
Once you have identified the appropriate connector type, you can proceed to connect the antenna cable to the receiver unit. Follow these steps to ensure a proper connection:
- Locate the antenna input port on the receiver unit.
- Insert the connector of the antenna cable into the corresponding input port.
- Tighten the connector gently but firmly to secure the connection.
Ensure that the connection is tight enough to prevent any signal loss or interference. Avoid applying excessive force as it can damage the connectors or the receiver unit.
Testing the connection for signal reception
After connecting the antenna cable to the receiver unit, it is essential to test the connection for signal reception. Follow these steps to ensure proper signal reception:
- Turn on your car stereo system and set it to the satellite radio mode.
- Tune in to a satellite radio channel and listen for any audio interruption or distortion.
- If you experience weak signal strength or poor audio quality, adjust the antenna placement or reconnect the antenna cable to ensure a secure connection.
By testing the connection and making necessary adjustments, you can ensure optimal signal reception and enjoy uninterrupted satellite radio in your car.
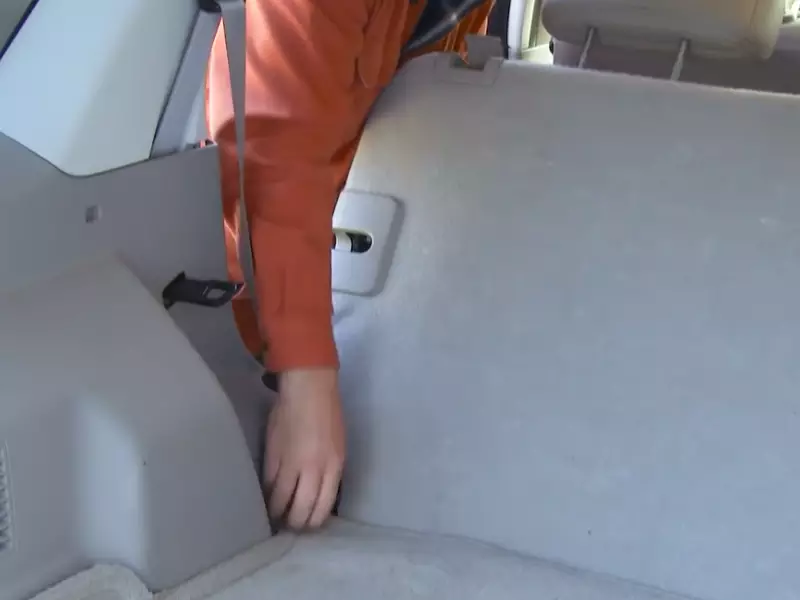
Securing And Concealing The Antenna Cable
Tidying up the cable routing inside the car
To ensure a clean and organized installation, it is important to tidy up the cable routing inside your car. Messy cables not only look unprofessional but can also be a potential hazard, getting tangled or obstructing important car components. Here are some steps to tidy up the cable routing inside your car:
- Identify the most direct and secure path for the antenna cable to run from the exterior of your car to the satellite radio receiver. This path should avoid any moving parts or potential sources of damage.
- Secure the cable using cable clips or adhesive loops along the chosen path. Make sure the clips or loops are designed to hold cables securely and prevent them from moving or falling out of place.
- When securing the cable, ensure it is not pulled too tight as this can cause strain on the connectors and lead to signal loss.
- Use zip ties to group any excess cable length together and prevent it from hanging or getting in the way.
- If necessary, gently tuck the cable under the carpet or trim panels to conceal it further.
Preventing damage to the cable during installation
During the installation process, it is crucial to take steps to prevent damage to the antenna cable. Here are some tips to prevent cable damage:
- Avoid sharp edges or metal surfaces that could potentially cut or scrape the cable. If necessary, use grommets or rubber sleeves to protect the cable at points where it passes through metal or sharp edges.
- Be cautious when routing the cable around tight corners or areas where it may get pinched. Ensure the cable has enough slack and is not stretched or excessively bent.
- Use a cable protector or conduit for added protection, especially if the cable is routed through areas with high foot traffic or where it may come into contact with heavy objects.
Concealing the cable for a clean and professional look
Concealing the antenna cable can give your car installation a clean and professional appearance. Here are some methods to conceal the cable:
- Use wire loom or split tubing to cover and protect the cable along exposed areas. This will provide a neat and uniform look while also providing some additional protection.
- If possible, route the cable along existing wiring harnesses or cable channels in the car. This will help hide the antenna cable and make it less noticeable.
- Consider using adhesive-backed cable management solutions, such as raceway or conduit, to secure and conceal the cable along trim panels or under the carpet.
- For a more discreet installation, you can feed the cable through the gaps in the car’s interior trim. However, be careful not to interfere with any components or mechanisms.
Testing And Calibrating The Antenna
Now that you have successfully installed the satellite radio antenna in your car, it’s time to make sure it’s working optimally. Testing and calibrating the antenna is crucial to ensure a strong and clear reception of your favorite satellite radio stations. By following a few simple steps, you can ensure that you are getting the best performance out of your antenna.
Checking the signal strength and quality
Before you start adjusting the antenna, it is important to check the signal strength and quality of your satellite radio. This will give you a baseline to compare with after any adjustments you make. Here’s how you can do it:
- Tune in to a satellite radio station that you frequently listen to.
- Pay attention to the signal strength and quality indicators on your radio display. A high-quality signal is indicated by a clear and crisp sound, while a weak signal may result in dropouts or static.
- Note down the signal strength and quality readings for future reference.
Adjusting the antenna for improved reception
If you notice that the signal strength or quality is not up to par, you may need to adjust the satellite radio antenna for improved reception. Here are some steps you can follow:
- Locate the antenna on your car. It is usually mounted on the roof, trunk, or rear window.
- Make sure the antenna is properly mounted and secure. Loose or damaged connections can negatively affect reception.
- Gently adjust the angle and position of the antenna to maximize signal reception. If your antenna is mounted on the roof, try adjusting the angle by rotating it slightly. For antennas mounted on the rear window, you can try moving it up or down.
- While adjusting the antenna, keep an eye on the signal strength and quality indicators on your radio display. Make small adjustments and test the reception after each adjustment to find the optimal position.
- Once you are satisfied with the reception, tighten the mounting screws or clips to secure the antenna in place.
Troubleshooting common antenna installation issues
If you are still experiencing issues with your antenna reception, there might be some common installation problems that need to be addressed. Here are a few troubleshooting tips:
- Check the cable connections: Ensure that all the cable connections are secure and properly plugged in. Loose or faulty connections can result in signal loss.
- Inspect the antenna cable: Look for any visible damage or breakage in the antenna cable. If you find any, consider replacing the cable to improve reception.
- Reduce interference: Keep the antenna away from any obstructions such as metal objects or other electronic devices that might interfere with the signal.
- Update your satellite radio receiver: Check for any available firmware updates for your satellite radio receiver. Updating the firmware can often resolve compatibility issues and improve performance.
- Contact customer support: If you have tried all the troubleshooting steps and still can’t resolve the issue, don’t hesitate to reach out to the customer support of your satellite radio provider. They will be able to assist you further.
Enjoying Satellite Radio In Your Car
Activating your satellite radio subscription
Once you have installed the satellite radio antenna in your car, the next step is to activate your subscription. Activating your satellite radio subscription is a simple process that allows you to unlock a world of entertainment and information on the go.
- Before activating your subscription, ensure that your satellite radio antenna is properly connected and that you have a clear view of the sky. This will ensure optimal reception and prevent any interruptions in service.
- To activate your subscription, visit the website of the satellite radio service provider or call their customer support helpline. Provide them with the necessary information, such as your radio’s serial number and the ESN (Electronic Serial Number).
- After verifying your information, the satellite radio service provider will activate your subscription. This may involve setting up a payment plan, selecting a subscription package, and providing your billing information.
- Once your subscription is activated, you may need to refresh your radio’s signal. This can usually be done by tuning in to a specified channel or by following the instructions provided by the satellite radio service provider.
Exploring the wide range of available channels
With your satellite radio subscription activated, it’s time to explore the wide range of available channels. Satellite radio offers an extensive selection of channels that cater to a variety of interests, from music and sports to news and talk shows. Here’s how you can make the most out of your satellite radio experience:
- Take the time to browse through the available channels and familiarize yourself with the different genres and content offerings.
- Create a personalized list of favorite channels for quick and easy access. This will allow you to quickly switch between your preferred channels without having to navigate through the entire channel lineup.
- Try out different channels and genres that you may not typically listen to. Satellite radio is a great opportunity to discover new music and expand your horizons.
- Take advantage of the additional features offered by your satellite radio service provider, such as on-demand content or personalized recommendations. These features can enhance your listening experience and provide you with even more entertainment options.
Tips for Maximizing Your Satellite Radio Experience
To ensure that you make the most out of your satellite radio experience, here are some tips to keep in mind:
- Position your satellite radio antenna in a location that provides the best possible reception. Avoid areas with heavy obstructions, such as tall buildings or dense foliage.
- Regularly update your channel presets to reflect your changing preferences. This will ensure that you always have easy access to your favorite channels and content.
- Take advantage of the pause, rewind, and replay features available on some satellite radio receivers. This allows you to never miss a beat and catch up on anything you may have missed.
- Consider investing in a car mount or docking station for your satellite radio receiver. This will provide a secure and convenient way to access your receiver while driving.
- Explore the various accessories available for satellite radio, such as external speakers or Bluetooth adapters. These can enhance your listening experience and provide additional functionality.
Maintaining And Troubleshooting The Satellite Radio Antenna
Your satellite radio antenna is a crucial component that ensures uninterrupted reception of your favorite radio stations. By following a few simple maintenance and troubleshooting steps, you can ensure optimal performance and enjoy an exceptional audio experience while driving.
In this section, we will discuss regular cleaning and inspection of the antenna to address issues such as signal loss or poor reception. Additionally, we will explore seeking professional assistance if necessary.
Regular cleaning and inspection of the antenna
Regularly cleaning and inspecting your satellite radio antenna is essential to maintain its performance. Dust, dirt, and debris can accumulate on the antenna, potentially causing signal interference. To keep your antenna in top shape, follow these simple steps:
- Begin by inspecting the antenna for any visible damage or loose connections. Check for signs of wear and tear, such as frayed cables or bent connectors. Repair or replace any damaged components promptly to ensure optimal signal reception.
- Wipe down the antenna surface using a soft, lint-free cloth to remove any dust or dirt. Avoid using abrasive materials that could scratch the antenna. If necessary, you can dampen the cloth with water or a mild cleaning solution, being careful not to wet any electrical components.
- Inspect the mounting location of the antenna. Ensure that it is securely fastened and properly aligned. Over time, vibrations from the car’s movement or external factors can cause the antenna to become loose. Regularly tighten the mounting screws if necessary to maintain a stable connection.
- Periodically check the cables and connectors for any signs of damage or corrosion. Clean the connectors with a contact cleaner spray or isopropyl alcohol to remove any dirt or oxidation that may affect the signal quality.
Addressing common issues like signal loss or poor reception
Despite proper maintenance, you may encounter common issues such as signal loss or poor reception. Here are some troubleshooting tips to help you address these problems:
- Check the antenna placement: Ensure that the antenna is placed in an open area without obstruction from other objects, such as metal or thick glass. Placement near the car’s window or on the roof generally provides the best reception.
- Verify the cable connections: Inspect the cables and connectors to ensure they are firmly connected and undamaged. Loose connections or damaged cables can cause signal loss. Reconnect or replace any faulty cables or connectors.
- Adjust the antenna position: Experiment with the antenna’s position to find the best reception. Try rotating or repositioning the antenna to optimize signal strength. In some cases, moving the antenna a few inches can make a significant difference in reception quality.
- Check for signal interference: Other electronic devices in your car, such as power cables or phone chargers, can interfere with the satellite radio signal. Keep these devices away from the antenna and cables to minimize interference.
Seeking professional assistance if necessary
If you have tried all the troubleshooting steps and are still experiencing issues with your satellite radio antenna, it may be time to seek professional assistance. Certified technicians have the expertise and specialized equipment to diagnose and repair complex antenna-related problems. Contact your satellite radio service provider or an authorized car audio specialist to ensure a comprehensive evaluation and resolution of the issue.
Maintaining and troubleshooting your satellite radio antenna ensures a continuous and satisfying radio experience in your car. By regularly cleaning and inspecting the antenna, addressing common issues, and seeking professional assistance when needed, you can enjoy high-quality satellite radio reception throughout your journeys.
Recommended Satellite Radio Antenna Accessories
When it comes to enjoying your favorite satellite radio channels in your car, having the right accessories can make all the difference. Along with a high-quality satellite radio antenna, there are several recommended accessories that can enhance your listening experience.
From antenna boosters and amplifiers to mounting brackets and protective covers, these accessories ensure optimal signal strength, alternative installation options, and long-term durability.
Antenna boosters and amplifiers for enhanced signal strength
One of the key factors in receiving a strong satellite radio signal is the quality of your antenna. Although a high-quality antenna is a good starting point, sometimes you may encounter signal issues due to obstructions or weak reception. In such cases, an antenna booster or amplifier can come to the rescue.
These accessories are designed to enhance the signal strength of your antenna, ensuring that you receive crystal-clear audio and uninterrupted playback. With an antenna booster or amplifier, you can say goodbye to signal dropouts and enjoy your satellite radio with ease.
Mounting brackets and accessories for alternative installation options
If the standard installation method for your satellite radio antenna is not suitable or practical for your car, mounting brackets and accessories offer alternative installation options. These accessories allow you to securely mount your antenna in different locations, such as on the roof, trunk, or even the side mirrors of your vehicle.
By providing flexibility in antenna placement, mounting brackets and accessories ensure optimal signal reception and reduce potential aesthetic concerns. Whether you have a compact car, an SUV, or a truck, these accessories enable you to customize the installation of your satellite radio antenna according to your specific needs.
Protective covers and weatherproofing solutions for long-term durability
To protect your satellite radio antenna from the elements and ensure its long-term durability, it is recommended to invest in protective covers and weatherproofing solutions. These accessories shield your antenna from harsh weather conditions, UV rays, dust, and other potential damages. By keeping your antenna well-protected, you can extend its lifespan and preserve its performance.
Additionally, weatherproofing solutions can aid in preventing water ingress, ensuring that your antenna remains functional even in wet and rainy conditions. With the help of these accessories, you can enjoy uninterrupted satellite radio entertainment for years to come.
Frequently Asked Questions On How To Install Satellite Radio Antenna In Your Car
How To Install Siriusxm Antenna In Car?
To install a SiriusXM antenna in your car, first find a suitable location on the roof or trunk. Remove any obstacles and clean the area. Connect the antenna to the XM receiver using the provided cable. Run the cable neatly along the interior, avoiding any pinch points or sharp edges.
Finally, connect the antenna to the XM receiver and test for signal strength.
Can You Mount Satellite Radio Antenna Inside Car?
Yes, you can mount a satellite radio antenna inside your car.
Do I Need A Special Antenna For Sirius Radio In My Car?
No, you don’t need a special antenna for Sirius radio in your car.
How Do I Get Satellite Radio In My Older Car?
To get satellite radio in your older car, you can install a satellite radio receiver, which connects to your car’s audio system. This allows you to access satellite radio channels and enjoy a wide range of music, news, and entertainment options while on the road.
Conclusion
Installing a satellite radio antenna in your car doesn’t have to be a complicated process. By following a few simple steps, you can enjoy high-quality reception and a wide range of radio channels on the go. Remember to carefully choose the location for your antenna, ensure a secure and stable installation, and connect it to your satellite radio receiver.
With these tips, you’ll be on your way to experiencing an enhanced audio experience while driving. Happy listening!