To install a roof rack on your car, follow these steps: First, check the instructions provided with the roof rack kit for specific details on installation. Then, locate the mounting points on your vehicle’s roof and attach the rack with the necessary hardware, ensuring a secure fit.
Roof racks are valuable accessories for car owners who need extra space to transport large or bulky items. Whether it’s for carrying sporting equipment, luggage, or other items, installing a roof rack can greatly increase a vehicle’s versatility. However, knowing the proper installation process is crucial to ensure the rack is securely attached and won’t cause any damage or safety hazards.
We will guide you through the steps to successfully install a roof rack on your car, allowing you to make the most of its additional storage capacity.
Factors To Consider When Selecting A Roof Rack
When it comes to enhancing the storage capacity of your vehicle, installing a roof rack is an excellent option. Whether you need to transport luggage, sports equipment, or any other bulky items, a roof rack provides a convenient solution. However, selecting the right roof rack for your car is crucial to ensure proper fitment, safety, and functionality. Here are some essential factors to consider when choosing a roof rack:
Car Make and Model
The first consideration when selecting a roof rack is your car’s make and model. Different vehicles have varying specifications and requirements, and it’s important to choose a roof rack that is compatible. Manufacturers typically design and produce roof racks specifically for certain car models, ensuring proper fitment and weight distribution. Before making a purchase, double-check the compatibility list provided by the roof rack manufacturer to ensure a perfect fit.
Roof Type
Another factor to take into account is the roof type of your car. Roof racks are available in various designs suitable for different roof styles, such as bare roofs, raised side rails, flush side rails, or fixed points. Each type requires a specific roof rack system for secure attachment. For example, a bare roof may require roof rack feet and crossbars, while raised side rails may only require a compatible crossbar system. Make sure to identify your car’s roof type and select a roof rack that matches it.
Weight Capacity
Before loading up your roof rack with heavy gear, it’s essential to check the weight capacity of both the roof rack and your car’s roof. Exceeding the weight limit could compromise your vehicle’s stability and safety. The weight capacity of a roof rack is typically specified by the manufacturer and varies depending on the system’s design and construction. Make sure to consider the combined weight of your cargo and any additional accessories (such as bike racks or kayak carriers) when selecting a roof rack that can safely accommodate your needs.
Mounting System Options
The mounting system of a roof rack plays a crucial role in its ease of installation, versatility, and stability. There are several mounting options available, including rain gutter mounts, crossbar systems, and track systems. Rain gutter mounts are suitable for vehicles with gutters along the roof edges, while crossbar systems attach to factory-installed or aftermarket roof rails. Track systems provide additional adjustability and compatibility options. Consider your car’s specific mounting points and choose a roof rack with a system that offers secure and convenient installation.
By considering these key factors when selecting a roof rack for your car, you can ensure a proper fit, optimal weight capacity, and a reliable mounting system. Take the time to research and choose a roof rack that matches your car’s make and model, roof type, weight requirements, and mounting system preferences. With the right roof rack, you can confidently hit the road, knowing you have the extra storage space needed for your adventures.
Types Of Roof Racks
When it comes to installing a roof rack on your car, it’s important to consider the type of roof rack that best suits your vehicle and your specific needs. There are several types of roof racks available, each designed to fit different types of car roofs. In this post, we’ll explore the different types of roof racks and help you determine which one is right for you.
Roof rails
If your car has roof rails, you’re in luck! Roof rails are the most common type of roof rack and are typically integrated into the design of the vehicle. These rails run along the length of the car roof, providing a secure and sturdy base for attaching roof racks or crossbars. Roof rails are often found on SUVs, station wagons, and some sedans. They are a versatile option that allows for easy installation and removal of roof racks.
Bare roof
For cars that don’t have roof rails or any pre-installed rack system, a bare roof rack is the best option. A bare roof rack typically consists of four feet or towers that are clamped or anchored directly to the car roof. These feet create a stable base for attaching crossbars, allowing you to securely transport various types of cargo or outdoor equipment. When installing a bare roof rack, it’s important to use a fitting kit that matches your car’s make and model to ensure proper attachment.
Raised side rails
If your car has raised side rails, you have a great foundation for installing a roof rack. Raised side rails are similar to roof rails but are higher off the car roof, providing additional clearance for bulky items. These rails typically run from the front to the back of the vehicle and can be used as attachment points for roof racks or crossbars. To install a roof rack on a car with raised side rails, you’ll need a fitting kit that is compatible with your specific vehicle’s raised rail design.
Flush side rails
Flush side rails are similar to raised side rails but sit flush against the car roof instead of being raised. These rails are usually sleek and low-profile, giving your car a more streamlined look. While flush side rails may not provide as much clearance as raised side rails, they can still accommodate various roof rack systems. When installing a roof rack on a car with flush side rails, it’s important to choose a rack system that is specifically designed for flush rails to ensure a secure and stable attachment.
In conclusion, understanding the different types of roof racks is essential when it comes to installing one on your car. Whether you have roof rails, a bare roof, raised side rails, or flush side rails, there’s a roof rack option that will suit your vehicle and cargo transporting needs.
Cleaning And Inspecting The Roof Surface
Before you install a roof rack on your car, it is important to thoroughly clean and inspect the roof surface. This step ensures that the roof is in optimal condition and provides a secure foundation for the rack. In this section, we will discuss how to remove dirt and debris from the roof, as well as how to check for any damage or rust.
Remove dirt and debris
- Clean the roof using a mild detergent and water solution. Avoid using harsh chemicals that may damage the finish of your car.
- Gently scrub the surface with a soft sponge or cloth to remove any dirt or grime. Pay special attention to the areas where the roof rack will be installed.
- Rinse the roof thoroughly with clean water to remove any remaining soap residue.
- Dry the roof surface completely using a clean towel or allow it to air dry.
Check for any damage or rust
Inspecting the roof for damage and rust is crucial to ensure the safety and durability of the roof rack installation.
- Start by visually examining the roof surface for any visible signs of damage, such as dents, cracks, or scratches.
- Run your hand gently across the roof to feel for any irregularities or rough patches that may indicate hidden damage.
- If you notice any areas of rust, use a wire brush to remove the rust particles.
- Apply a rust neutralizer or primer to the affected areas to prevent further corrosion.
- Once the neutralizer or primer has dried, you can touch up the area with a color-matched paint to restore the appearance of the roof.
By thoroughly cleaning and inspecting the roof surface, you can ensure that your car is ready for the installation of a roof rack. This will not only provide a secure base for the rack but also help maintain the overall condition and appearance of your vehicle. Remember, a little extra effort at the beginning can go a long way in ensuring a smooth and successful roof rack installation.

Assembling The Roof Rack Components
Installing a roof rack on your car can greatly enhance its versatility and allow you to transport large items such as bicycles, luggage, or even kayaks. Before you begin the installation process, it’s essential to gather all the necessary parts and review the manufacturer’s instructions for assembly. In this section, we will guide you through assembling the roof rack components step by step.
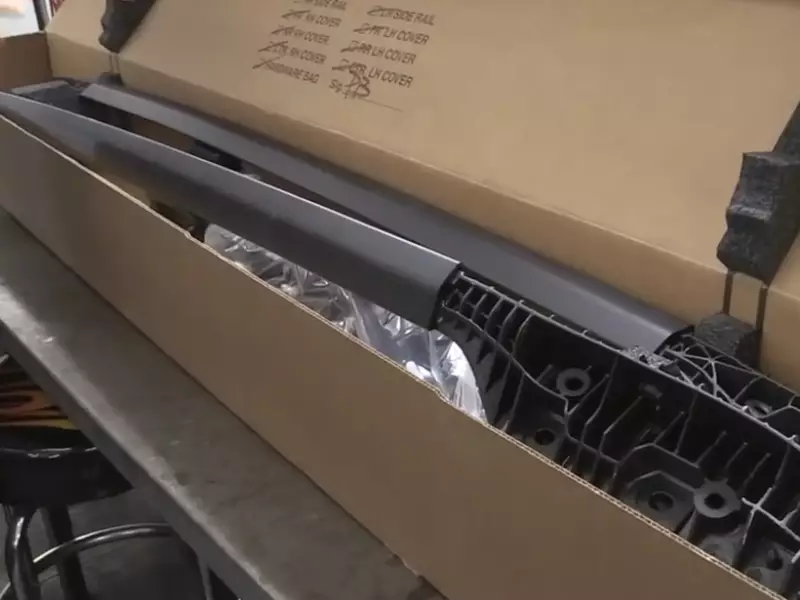
Gather all the necessary parts
Before you start assembling your roof rack, ensure that you have all the required components ready. It’s frustrating to begin the installation process and realize that you’re missing an essential part. Refer to the manufacturer’s instructions or user manual for a comprehensive list of parts.
Some common parts you may need to gather include:
- Roof rack crossbars
- Mounting feet or towers
- Bolts, nuts, and washers
- End caps or covers
- Installation tools (e.g., Allen wrench, screwdriver)
Follow the manufacturer’s instructions for assembly
Manufacturers usually provide detailed step-by-step instructions to ensure proper installation and usage of their roof rack systems. It’s crucial to follow their guidelines closely. Failure to do so may result in an incorrectly assembled roof rack, affecting its functionality and potentially leading to accidents.
Here are some important points to keep in mind when assembling your roof rack:
- Read the instructions thoroughly before beginning. Familiarize yourself with the different components and their roles.
- Identify the appropriate mounting points on your car’s roof. Consult your vehicle’s manual if you need clarification.
- Attach the mounting feet or towers to the roof rack crossbars according to the manufacturer’s specifications. Use the provided screws, bolts, and washers, ensuring they are tightened securely.
- Place the assembled roof rack onto your car’s roof, aligning it with the mounting points. Double-check that the rack is centered and symmetrical.
- Securely fasten the roof rack to your car using the recommended tightening torque. Avoid over-tightening, as it may damage the components or your vehicle.
- After installation, give the roof rack a gentle shake to test its stability. If it moves excessively or feels loose, recheck the assembly and make necessary adjustments.
By following these steps, you can confidently assemble your roof rack, ensuring a reliable and secure attachment to your car. Remember to refer back to the manufacturer’s instructions throughout the process, and do not hesitate to seek professional assistance if needed.
Installing Roof Rails
One of the key steps in installing a roof rack on your car is positioning and securing the roof rails. The roof rails serve as the foundation for the roof rack, providing stability and support for your cargo. In this section, we will guide you through the process of positioning the roof rails, securing them with screws or bolts, and tightening them to ensure a secure fit.
Positioning the roof rails on the car roof
The first step in installing roof rails is determining the optimal position on your car’s roof. The position may vary depending on the make and model of your car, as well as the type of roof rack you have. Here’s a step-by-step guide to help you position the roof rails correctly:
- Start by consulting the installation manual or instructions provided by the roof rack manufacturer. This will give you specific guidelines for your car’s make and model.
- Place the roof rails on top of your car’s roof, aligning them with the designated roof rack mounting points. These are usually located along the edges of the roof.
- Ensure that the roof rails are parallel to each other and centered on the roof.
- Take measurements to ensure equal spacing between the roof rails on both sides of the car.
Securing the roof rails with screws or bolts
Once you have positioned the roof rails correctly, it’s time to secure them to the car’s roof using screws or bolts, depending on the roof rack system you are installing. Follow these steps:
- Select the appropriate screws or bolts provided with your roof rack system.
- Insert the screws or bolts through the mounting holes on the roof rails.
- Place washers over the screws or bolts to provide additional support.
- Tighten the screws or bolts using an appropriate tool, such as a screwdriver or wrench.
Tightening the roof rails to ensure a secure fit
After securing the roof rails with screws or bolts, it’s important to ensure they are tight and secure. This will prevent any movement or shifting of the roof rails while the car is in motion. Follow these steps to properly tighten the roof rails:
- Check each screw or bolt to ensure it is firmly tightened. If any screws or bolts are loose, tighten them further until they are secure.
- Inspect the roof rails for any signs of movement or loosening. If you notice any, tighten the screws or bolts in those areas.
- Test the stability of the roof rails by applying gentle pressure and checking for any wobbling or shifting.
Once you have positioned, secured, and tightened the roof rails, you are ready to move on to the next step of installing your roof rack. The roof rails serve as a solid foundation for your roof rack, ensuring a safe and secure attachment to your car’s roof.
Installing Bare Roof Rack
If you love outdoor adventures, having a roof rack on your car can make your life so much easier. Whether you’re taking a road trip or simply need extra storage space, a roof rack is a must-have accessory. In this guide, we’ll walk you through the process of installing a bare roof rack on your car.
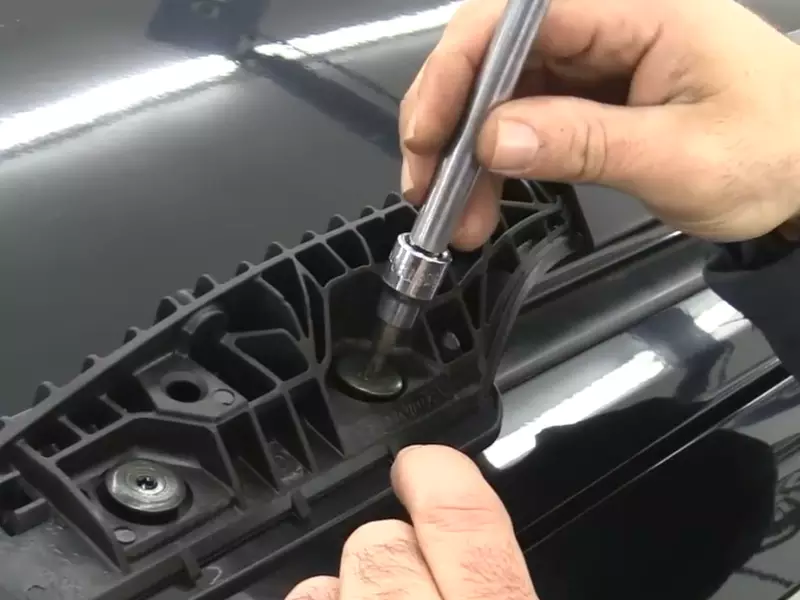
Attaching the foot packs to the roof of the car
The first step in installing a bare roof rack is attaching the foot packs to your car’s roof. These foot packs act as the base for your roof rack, securely holding it in place. Follow these steps to ensure a proper installation:
- Start by opening the vehicle’s doors and ensuring the roof is clean and dry.
- Refer to the manufacturer’s instructions to determine the correct placement of the foot packs on your car.
- Once you’ve identified the correct position, place the foot packs on the roof of your car.
- Ensure that the foot packs are centered and aligned with the vehicle’s roof rails or existing mounting points.
- Lift up the rubber strip on each foot pack and tighten the provided bolts to secure the foot packs to the roof. Make sure they are firmly in place.
Adjusting the crossbars to the desired position
Once the foot packs are securely attached to the roof, it’s time to adjust the crossbars to your desired position. Follow these steps for a proper adjustment:
- Unfold the crossbars and place them on top of the foot packs.
- Position the crossbars evenly on each side of the vehicle, ensuring they are parallel to each other.
- Check the manufacturer’s instructions for any specific guidelines on crossbar positioning for your car model.
- Slide the crossbars along the foot packs to your desired position. It’s important to leave enough space for any accessories or cargo you plan on carrying.
- Once you’ve found the perfect position, secure the crossbars by tightening the locking mechanism or bolts provided by the manufacturer.
Securing the crossbars to the foot packs
To complete the installation process, you need to secure the crossbars to the foot packs. Follow these steps for a secure fit:
- Double-check that the crossbars are properly aligned and tightened in the desired position.
- Make sure the locking mechanism on each foot pack is engaged and secure.
- You can give the crossbars a gentle tug to ensure they are securely locked into place.
- Once you’re confident that the crossbars are locked and secure, inspect the entire setup to ensure everything is stable and in place.
Installing a bare roof rack on your car might seem like a daunting task at first, but by following these step-by-step instructions, you’ll have it done in no time. With your new roof rack installed, you’ll be ready to hit the road with all your gear safely and securely stowed away.
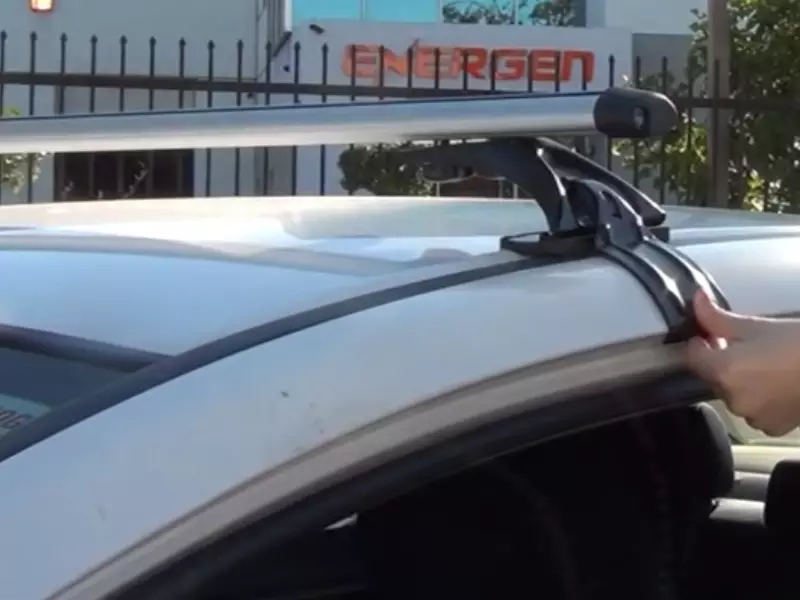
Installing Raised Side Rails
Placing the roof rack on the raised side rails
When it comes to installing a roof rack on your car, one of the key steps is placing it on the raised side rails. The raised side rails provide stability and support for the roof rack, ensuring that it stays securely in place while you travel. Here’s how you can easily place the roof rack on the raised side rails:
- Start by measuring the width of your vehicle’s roof. This will help you determine the placement of the roof rack on the raised side rails.
- Position the roof rack on top of the raised side rails, aligning it with the measurements you obtained earlier. Make sure the rack is centered and evenly positioned.
- Gently lower the roof rack onto the raised side rails, ensuring that it rests securely and evenly on both sides. Apply light pressure to ensure it is properly seated.
Locking the roof rack into place
Once you have placed the roof rack on the raised side rails, the next step is to lock it into place. This is crucial to ensure that the roof rack remains stable and secure during your journey. Follow these simple steps to lock the roof rack:
- Locate the locking mechanism on the roof rack. This could be a latch, a lever, or a similar locking mechanism depending on the type of roof rack you are installing.
- Engage the locking mechanism by firmly pressing it down or sliding it into place. You may hear a click or feel a slight resistance when the lock is properly engaged.
- Double-check to ensure that the roof rack is securely locked into place. Gently tug on the rack to confirm that it doesn’t move or slide.
Checking for stability and proper fit
Before hitting the road, it’s essential to check for stability and proper fit of the roof rack on the raised side rails. This will help prevent any potential accidents or damage during your journey. Here’s how you can do a quick stability check:
- Stand outside your vehicle and observe the roof rack from different angles. Make sure it appears level and aligned with the raised side rails.
- Give the roof rack a firm shake to test its stability. It should not wobble or feel loose.
- Inspect the attachment points of the roof rack on the raised side rails. Ensure that they are securely fastened and there are no signs of damage or wear.
If everything looks stable and the fit is proper, you’re good to go! Your roof rack is now installed on the raised side rails, ready to carry your gear and enhance your outdoor adventures.
Installing Flush Side Rails
Installing a roof rack on your car is a great way to increase storage space and haul large items with ease. One popular type of roof rack installation involves attaching it to the flush side rails on your car. This method provides a sleek and seamless look while still providing the functionality you need. In this guide, we’ll walk you through the step-by-step process of installing a roof rack on flush side rails, from attaching the rack to adjusting it to the desired position, and finally locking it into place.
Attaching the roof rack to the flush side rails
To begin, make sure you have the necessary tools and equipment for the installation. Most roof rack systems come with all the required components, including crossbars, mounting brackets, and hardware. Once you have everything ready, follow these steps:
- Place the crossbars in the desired position on the flush side rails of your car.
- Attach the mounting brackets to the crossbars, ensuring that they align properly with the flush side rails.
- Using the provided screws or bolts, secure the mounting brackets to the flush side rails, tightening them securely.
Once the roof rack is securely attached to the flush side rails, proceed to the next step to adjust its position.
Adjusting the rack to the desired position
Properly positioning your roof rack is crucial for optimal functionality and safety. Follow these steps to adjust the rack to the desired position:
- Loosen the mounting brackets slightly to allow for adjustments.
- Slide the crossbars along the flush side rails to the desired position.
- Ensure that the crossbars are evenly spaced and parallel to each other.
- Tighten the mounting brackets securely to lock the rack into place.
Now that you have adjusted the rack to the desired position, it’s time to lock it into place to ensure a secure and stable installation.
Locking the rack into place
Locking your roof rack provides an extra layer of security to prevent theft or accidental detachment while on the road. Here’s how you can lock the rack into place:
- Check if your roof rack system includes locking mechanisms.
- If provided, insert the locking cores into the designated slots on the mounting brackets.
- Securely tighten the locking cores to prevent unauthorized removal of the roof rack.
Once the rack is locked into place, give it a gentle shake to ensure a firm and stable installation. Congratulations! You’ve successfully installed a roof rack on your car’s flush side rails.
Distributing The Weight Evenly
When it comes to installing a roof rack on your car, it’s important to ensure that the weight is distributed evenly. This not only enhances the stability and balance of your vehicle but also helps to prevent any potential damage to the roof rack and the items you’re transporting. In this section, we’ll explore two key factors to consider when distributing the weight evenly: ensuring equal weight distribution on the crossbars and avoiding overloading one side of the roof rack.
Ensuring Equal Weight Distribution on the Crossbars
One of the first things to keep in mind when installing a roof rack is to ensure equal weight distribution on the crossbars. This means that the weight of your cargo should be evenly distributed across the entire length of the crossbars rather than being concentrated in one area. To achieve this, follow these steps:
- Arrange your items on the crossbars in a way that spreads the weight evenly. For example, if you’re carrying multiple objects, place them in a staggered pattern rather than stacking them on top of each other.
- Consider using additional accessories such as cargo boxes or bags which provide compartments and sections to help distribute the weight evenly.
- Double-check that each side of the crossbars has a roughly equal load. You can do this by comparing the height or visually assessing the weight distribution.
By ensuring equal weight distribution on the crossbars, you’ll benefit from improved stability, reduced strain on the roof rack, and a safer driving experience.
Avoiding Overloading One Side of the Roof Rack
Another crucial aspect to consider is avoiding overloading one side of the roof rack. Unevenly distributed weight can lead to a lopsided vehicle, compromising its balance, and potentially causing damage to the roof rack or your belongings. To prevent this, keep the following tips in mind:
- Place larger and heavier items at the center of the roof rack, spreading the weight evenly between both sides.
- If you’re carrying long items, like a kayak, consider mounting them diagonally to balance the weight distribution.
- When loading your cargo, regularly check to ensure that one side isn’t significantly heavier than the other. Make any necessary adjustments to rebalance the weight.
- Avoid overloading the roof rack beyond its weight capacity, as this can greatly impact the weight distribution.
By adhering to these guidelines, you’ll not only ensure an even weight distribution on your roof rack but also enhance the overall safety and performance of your vehicle during transportation.
Securing The Load
When installing a roof rack on your car, it is crucial to secure the load properly to ensure the safety of both your cargo and other drivers on the road. In this section, we will discuss different methods of securing the load using straps, bungee cords, or cargo nets. Additionally, we will highlight the importance of double-checking the tightness of the straps before driving.
Using straps, bungee cords, or cargo nets to secure the load
There are several options available to secure your cargo on the roof rack of your car. You can choose to use straps, bungee cords, or cargo nets depending on the type and size of the load. Each method has its advantages, so let’s take a closer look:
| Method | Advantages |
|---|---|
| Straps |
|
| Bungee cords |
|
| Cargo nets |
|
Double-checking the tightness of the straps before driving
Before hitting the road, it is imperative to ensure that the straps are securely tightened. The last thing you want is for your cargo to become loose or detached during transit. To double-check the tightness of the straps, follow these simple steps:
- Inspect each strap, ensuring there are no signs of wear or damage.
- Position yourself at different angles to get a comprehensive view of how the straps are securing the load.
- Tug and test each strap to ensure it is firmly holding the load in place.
- Confirm that all straps are evenly tightened, avoiding any imbalances.
By taking these precautions, you can minimize the risk of your load shifting or falling off the roof rack while driving. Remember, safety always comes first when it comes to securing your cargo!
Regular Cleaning And Inspection
Regular cleaning and inspection of your car’s roof rack is crucial to ensure its functionality and longevity. Over time, dirt, debris, and weather elements can accumulate on the rack, causing it to deteriorate. Additionally, wear and damage can occur due to frequent use or accidental bumps. By following a routine cleaning and inspection process, you can keep your roof rack in top condition and extend its lifespan.
Removing dirt and debris from the roof rack
To start, you need to remove any dirt, dust, and debris that have accumulated on your roof rack. This can be done using a soft-bristle brush or a microfiber cloth. Gently sweep away the loose particles, ensuring to reach all the nooks and crannies. Pay special attention to areas where dirt tends to build up, such as crevices and connectors. By keeping your roof rack clean, you prevent any debris from causing scratches or corrosion.
Checking for any signs of wear or damage
Next, you should thoroughly inspect your roof rack for any signs of wear or damage. Begin by examining the straps, mounting brackets, and other fasteners. Look for any signs of fraying, cracking, or looseness. Tighten any loose components and replace any damaged parts immediately to maintain the rack’s structural integrity.
In addition, inspect the crossbars and their attachment points. Ensure that they are securely fastened and free from rust or corrosion. Examine the rubber pads or grips that come in contact with your car’s roof. Make sure they are intact and not overly worn. Damaged or worn-out pads should be replaced promptly to prevent any potential damage to the roof paint.
Finally, check the overall stability of the roof rack by giving it a gentle shake. If you notice any excessive movement or unusual noises, it might indicate a loose connection or a structural problem. Address the issue promptly to prevent accidents or further damage.
By regularly cleaning and inspecting your roof rack, you ensure its optimal performance and minimize the risk of any unfortunate incidents. Implementing this simple maintenance routine will help you enjoy your adventures with a secure and reliable roof rack for years to come.
Lubricating Moving Parts
When it comes to installing a roof rack on your car, one important aspect that should not be overlooked is lubricating the moving parts. Proper lubrication ensures the smooth operation of hinges and locks, prevents rust and corrosion, and extends the lifespan of your roof rack.
Applying lubricant to hinges and locks to ensure smooth operation
Before installing your roof rack, it is crucial to apply lubricant to the hinges and locks. This simple step will ensure that these moving parts operate effortlessly, allowing easy adjustment and placement of your roof rack.
To lubricate the hinges, start by cleaning them with a clean cloth to remove any existing debris or dirt. Once the hinges are clean, apply a small amount of lubricant directly onto them. Make sure to work the lubricant into the hinges by moving them back and forth. This will help the lubricant penetrate the moving parts, reducing friction and allowing for smooth operation.
Moving on to the locks, use a similar approach. Clean the lock mechanism thoroughly to remove any dirt or grime that may hinder its functionality. Once clean, apply a lubricant directly onto the lock, making sure to reach all areas. Gently insert and remove the key several times to distribute the lubricant and ensure proper lubrication of the lock mechanism.
Remember, a well-lubricated roof rack not only makes installation easier but also reduces the risk of damage to the moving parts.
Preventing rust and corrosion
In addition to ensuring smooth operation, lubricating the moving parts of your roof rack also helps prevent rust and corrosion. As your roof rack is exposed to the elements, it is important to protect it from the damaging effects of moisture and oxidation.
Before applying lubricant, thoroughly inspect the hinges and locks for any signs of rust or corrosion. If necessary, use a wire brush or sandpaper to remove any existing rust. Once the surface is clean, apply a rust-resistant coating, such as anti-rust spray or primer, before proceeding with the lubrication process.
When selecting a lubricant, opt for one that provides corrosion protection. Look for lubricants that specifically mention rust and corrosion prevention on the label. Applying such a lubricant to the hinges and locks will provide an additional layer of protection, shielding the moving parts from moisture and oxidation.
Remember: lubricating your roof rack’s moving parts not only ensures smooth operation but also helps prevent rust and corrosion, prolonging the lifespan of your roof rack.
Storing And Removing The Roof Rack
Properly Storing the Roof Rack When Not in Use
One of the most important aspects of owning a roof rack is knowing how to properly store it when it’s not in use. By taking the time to store your roof rack correctly, you can ensure its longevity and keep it in excellent condition for future use.
The first step in storing your roof rack is to clean it thoroughly. Remove any dirt, debris, or residue that may have accumulated during your travels. This not only helps to keep your roof rack looking good, but it also prevents any potential damage that could be caused by corrosion or rust.
Once your roof rack is clean, it’s time to dismantle it. Follow the manufacturer’s instructions carefully to ensure that you remove all the components in the correct order. Make sure to keep track of all the parts and keep them in a safe place. You may want to consider using a storage bag specifically designed for roof rack components to keep everything organized.
After disassembling the roof rack, it’s important to find a suitable storage area. Ideally, you should store your roof rack in a clean, dry, and secure location, such as a garage or shed. This helps to protect it from the elements and minimizes the risk of damage.
| Do: | Don’t: |
|---|---|
| Ensure the roof rack is completely dry before storing it to prevent mold or mildew growth | Store the roof rack in direct sunlight, as prolonged exposure can cause damage to the materials |
| Store the roof rack in a bag or container to prevent dust and debris buildup | Leave the roof rack exposed to extreme temperature fluctuations |
| Check the storage area periodically to ensure it remains clean and dry | Store heavy objects on top of the roof rack, as it may cause damage or deform the components |
By following these guidelines, you can ensure that your roof rack is ready for use whenever you need it. Properly storing your roof rack not only extends its lifespan, but it also makes the process of reinstalling it onto your car much smoother.
Following the Manufacturer’s Instructions for Removing the Roof Rack
When it comes to removing your roof rack from your car, it’s crucial to follow the manufacturer’s instructions to ensure a safe and efficient process. Different roof racks may have unique installation methods, so it’s essential to consult the instruction manual specific to your roof rack model.
- Park your car on a level surface and engage the parking brake to prevent any possible movement.
- Locate the attachment points of your roof rack on your car’s roof. These are typically indicated by small arrows or labels.
- Use the required tools, such as a wrench or screwdriver, to loosen the bolts or screws that secure the roof rack to your car. Follow the specified tightening or loosening directions outlined in the manual to prevent any damage to your vehicle.
- As you remove each bolt or screw, carefully detach the roof rack from your car, ensuring a steady and controlled motion.
- Once the roof rack is completely detached, place it in a safe location as instructed in the previous section on proper storage.
Remember, the manufacturer’s instructions are designed to provide the safest and most effective method for removing your roof rack. Following these instructions not only guarantees a smooth detachment process but also helps to prevent any accidental damage to your vehicle.
Frequently Asked Questions For How To Install Roof Rack On Car
Can You Install A Car Roof Rack Yourself?
Yes, you can install a car roof rack yourself. It is a DIY task that requires following the instructions provided with the rack. Ensure proper placement and secure fastening for safe and effective usage.
How Easy Is It To Install A Roof Rack On A Car?
Installing a roof rack on a car is quite easy. The process involves attaching the rack to the car’s roof using clamps or screws. Simply follow the manufacturer’s instructions and ensure that the rack is secure before use. It is advisable to have someone assist you during the installation.
What Is Needed To Install Roof Rack?
To install a roof rack, you will need a compatible roof rack system specific to your vehicle’s make and model. Additionally, you will require the appropriate tools, such as wrenches or screwdrivers, to securely attach the rack to your car’s roof.
Follow the manufacturer’s instructions for proper installation.
How Do You Secure A Roof Rack To A Car?
To secure a roof rack to a car, follow these steps: 1. Place the rack on the car roof. 2. Align the rack with the mounting points on the roof. 3. Use the provided hardware to attach the rack firmly to the roof.
4. Double-check that all bolts are securely tightened. 5. Make sure the rack is evenly distributed and does not obstruct any vehicle features.
Conclusion
Installing a roof rack on your car doesn’t have to be a daunting task. With these simple steps, you can easily enhance your vehicle’s versatility and storage capacity. Whether you’re an outdoor enthusiast or simply need extra space for your belongings, installing a roof rack is a great solution.
By following the instructions provided in this blog post, you’ll be able to successfully install a roof rack and enjoy all the benefits it offers. So, go ahead and take the leap – transform your car into a convenient and versatile traveling companion!