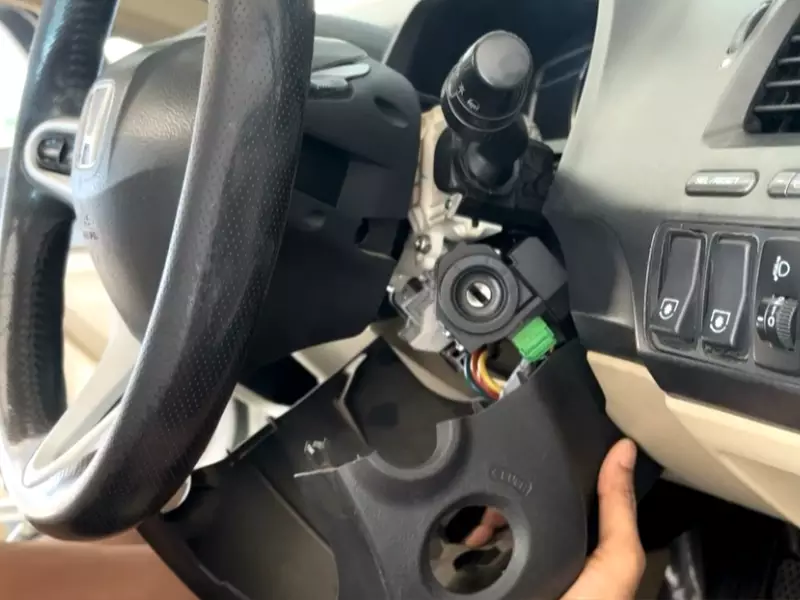
To install a push start button, you will need to follow a specific set of steps. First, locate and remove the ignition switch panel.
Then, connect the necessary wires to the push start button and mount it onto the panel.
Understanding The Basics Of Push Start Button Systems
Installing a push start button in your vehicle can bring a touch of modern convenience and style to your driving experience. Unlike traditional key ignition systems, push start buttons offer a seamless way to start your car with just a simple touch. In this article, we will dive into the basics of push start button systems, exploring the differences between push start buttons and traditional key ignition systems, as well as the benefits of installing a push start button.

Push Start Button vs Traditional Key Ignition Systems
Push start button systems have gained popularity due to their ease of use and advanced technology. Here’s a comparison between push start buttons and traditional key ignition systems:
| Push Start Button Systems | Traditional Key Ignition Systems |
|---|---|
| Eliminates the need for an actual key | Requires using a physical key to start the car |
| Starts the engine with a simple push of a button | Requires manually turning the key in the ignition |
| Immobilizer technology ensures better vehicle security | Relies on traditional key-based security |
| Enhances the overall aesthetics of the vehicle’s interior | No significant impact on the interior design |
Benefits of Installing a Push Start Button
There are several advantages to installing a push start button in your vehicle:
- Convenience: With a push start button, starting your car becomes effortless. No more fumbling with keys or turning the ignition. Simply hop in, press the button, and you’re on your way.
- Modernized Driving Experience: Installing a push start button instantly gives your car a modern touch. It adds a sleek and sophisticated feel to your vehicle’s interior, elevating the overall driving experience.
- Enhanced Security: Push start button systems often come with advanced immobilizer technology, making it harder for potential car thieves to bypass the security measures. The added security can bring peace of mind to vehicle owners.
- Keyless Entry: In many cases, push start button systems are integrated with keyless entry systems. This feature allows you to enter your vehicle without reaching for your keys, further streamlining your daily routine.
- Resale Value: Upgrading your vehicle with a push start button can significantly increase its resale value. Potential buyers are often attracted to modern features and advanced technology, making your car more desirable on the market.
Overall, installing a push start button in your car offers convenience, modernization, security, and a boost in resale value. So, why not take the leap and enjoy the benefits of this innovative technology?
Gathering The Necessary Tools And Materials
Are you ready to upgrade your car with a push start button? Installing a push start button can give your vehicle a modern touch and add convenience to your daily drive. Before you begin the installation process, it is crucial to gather all the necessary tools and materials. This will help ensure a smooth and successful installation. In this article, we will provide you with a list of essential tools required for the installation and recommend materials that will contribute to a successful push start button installation.
List of tools required for installation
To properly install a push start button in your car, you’ll need the following tools:
- Screwdriver set
- Wire stripper
- Wire crimping tool
- Electrical tape
- Heat gun
- Drill
- Drill bits
- Socket set
- Test light
- Zip ties
These tools will empower you to complete the installation process efficiently and effectively. Having them on hand will prevent any delays or interruptions during the installation, allowing you to finish the project with ease.
Recommended materials for a successful installation
Aside from the necessary tools, it is equally important to use the right materials to ensure a successful push start button installation. Here are some materials we recommend:
- High-quality push start button kit
- Connectors and terminals
- Electrical wires
- Fuse taps
- Wire loom
- Heat shrink tubing
- Velcro or adhesive pads
- Electrical tape
Investing in high-quality materials is crucial to ensure the longevity and durability of your push start button installation. Using reliable connectors, terminals, and electrical wires will provide a secure and stable connection, minimizing the chances of any electrical issues down the line. Additionally, using fuse taps will help protect your vehicle’s electrical system and prevent any potential damage.
Moreover, utilizing wire loom, heat shrink tubing, and electrical tape will help organize and protect the wiring, ensuring a clean and professional-looking installation. Lastly, utilizing Velcro or adhesive pads to mount the push start button will provide a secure and convenient location within reach.
By gathering the necessary tools and materials before starting the installation process, you can approach the project with confidence. Following the installation steps diligently and using the right tools and materials will result in a successful push start button installation, adding a touch of luxury and convenience to your driving experience.
Preparing The Vehicle For Installation
Before installing a push start button in your vehicle, it is important to properly prepare the vehicle to ensure a smooth and successful installation. This involves disconnecting the battery and locating the ignition system components. In this section, we will discuss how to perform these steps effectively.
Disconnecting the battery
The first step in preparing your vehicle for the installation of a push start button is to disconnect the battery. This is an essential safety precaution that will prevent any accidental electrical shocks or short circuits during the installation process.
To disconnect the battery, follow these simple steps:
- Locate the vehicle’s battery, which is usually located in the engine bay or the trunk.
- Identify the negative terminal of the battery, which is usually labeled with a minus (-) sign.
- Using a wrench or a socket, loosen the nut on the negative terminal.
- Once the nut is loosened, carefully remove the negative cable from the terminal.
- Ensure that the cable is securely kept apart from the battery terminal to avoid accidental contact.
By disconnecting the battery, you are effectively cutting off the power supply to the vehicle’s electrical system, ensuring a safe installation process.
Locating the ignition system components
The next step in preparing your vehicle for the installation of a push start button is to locate the ignition system components. These components include the ignition switch, ignition harness, and ignition wires.
To locate these components, follow these steps:
- Refer to your vehicle’s owner manual to find the location of the ignition switch.
- Once you have located the ignition switch, identify the ignition harness that connects to it.
- Trace the ignition harness to locate the ignition wires connected to it.
It is important to properly identify these components to ensure a proper connection and installation of the push start button.
In conclusion, when preparing your vehicle for the installation of a push start button, it is crucial to disconnect the battery and locate the ignition system components. Following these steps will help you ensure a safe and successful installation.
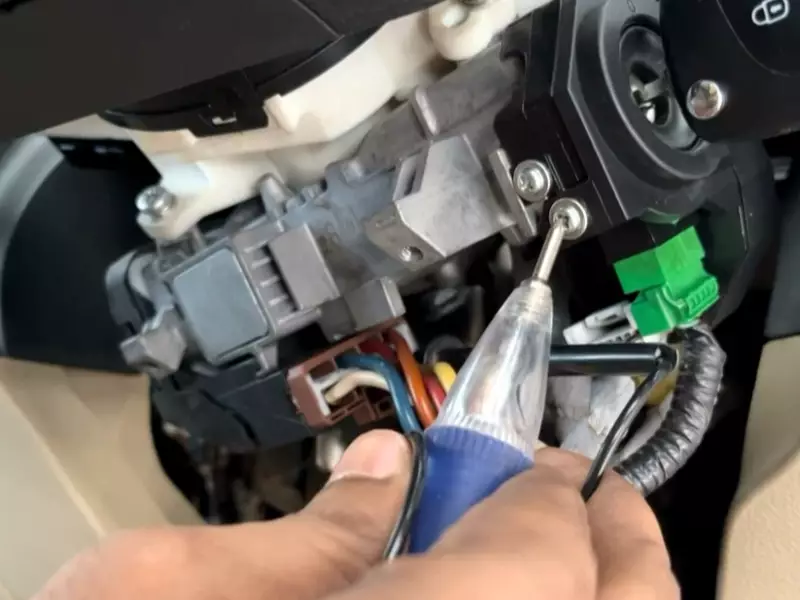
Wiring The Push Start Button System
Identifying the wiring harness and its connections
Before you can begin wiring your push start button system, it is important to identify the wiring harness and its connections. This will ensure that you have a clear understanding of how the system is set up, making the installation process much smoother.
To identify the wiring harness and its connections, follow these steps:
- Locate the main wiring harness in your vehicle. This harness is typically found near the ignition switch or under the dashboard.
- Identify the necessary wires for the push start button installation. These usually include the ignition wire, accessory wire, ground wire, and starter wire.
- Once you have identified the necessary wires, use a wire stripping tool to remove a small section of insulation from each wire. This will expose the copper wire underneath.
- Use a multimeter or voltage tester to confirm the function of each wire. This will ensure that you are connecting the push start button correctly to the existing ignition system.
- Make note of the wire colors and functions to reference later during the installation process.
Connecting the push start button to the ignition system
Once you have identified the wiring harness and its connections, it’s time to connect the push start button to the ignition system. Follow these steps:
- Find a suitable location to mount the push start button. This is typically on the dashboard or center console area.
- Using a drill and appropriate-sized drill bit, make a hole in the chosen location to accommodate the push start button.
- Insert the push start button into the hole and secure it in place using the provided mounting hardware.
- Referencing the wire colors and functions identified earlier, connect the corresponding wires from the push start button to the ignition system.
- Use crimp connectors or solder each connection to ensure a secure and reliable connection.
- Once all connections are made, use zip ties or electrical tape to neatly organize and secure the wiring.
Ensuring proper grounding of the system
Proper grounding is essential for the functionality and safety of your push start button system. Follow these steps to ensure a proper ground:
- Locate a suitable grounding point near the push start button. This can be a metal chassis or a designated grounding point in your vehicle.
- Use a wire brush or sandpaper to remove any paint or debris from the grounding point.
- Connect the ground wire from the push start button to the cleaned grounding point.
- Ensure the connection is secure by tightening any screws or bolts.
- Check the functionality of the push start button before finalizing the installation. If it does not work as intended, double-check all connections and grounding.
By properly wiring the push start button system, you can enjoy the convenience and modernization it brings to your vehicle. Take the time to accurately identify the wiring harness and its connections, connect the push start button to the ignition system, and ensure proper grounding. This will result in a successful installation and a seamless integration of the push start button into your vehicle.
Installing The Push Start Button
When it comes to upgrading your vehicle, installing a push start button can add a touch of modernity and convenience to your driving experience. Gone are the days of fumbling with keys to start your car. With a push start button, you can start your vehicle with just the push of a button. In this guide, we will walk you through the step-by-step process of installing a push start button, ensuring that your installation goes smoothly and efficiently.
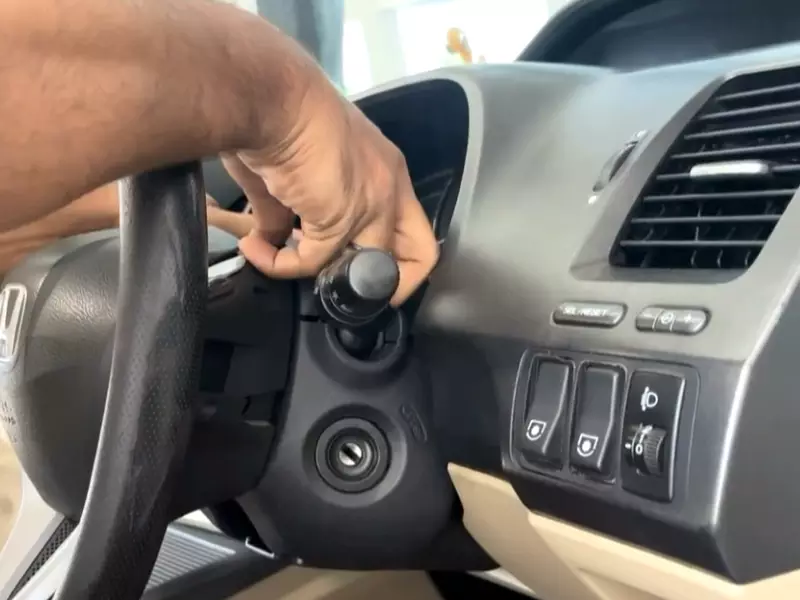
Mounting the push start button in a suitable location
The first step in installing a push start button is to determine the most suitable location for it. The button should be easily accessible to the driver, typically within reach of the steering wheel or dashboard. Consider a location that is not obstructed by other controls or accessories to ensure convenient and safe usage.
To mount the push start button, follow these steps:
- Locate a flat surface on your vehicle’s dashboard or center console where you want to install the push start button. Ensure that the surface is clean and free from any dirt or debris.
- Using a pencil or marker, mark the mounting holes of the push start button on the chosen location.
- If your push start button comes with a mounting bracket, attach it to the marked location using screws or adhesive, following the manufacturer’s instructions.
- Position the push start button onto the mounting bracket or directly onto the marked location, aligning the mounting holes.
- If the push start button requires wiring, carefully route the wires behind the dashboard or center console to avoid any interference with other components.
Securing the button with screws or adhesive
Once you have mounted the push start button in the desired location, the next step is to secure it in place. Depending on the design of the button and mounting bracket, you can either use screws or adhesive to ensure a secure attachment.
If using screws, follow these steps:
- Insert the screws through the mounting holes of the push start button and into the pre-drilled holes on the mounting bracket or chosen location.
- Using a screwdriver, tighten the screws until the button is firmly secured in place.
If using adhesive, follow these steps:
- Apply adhesive to the back of the push start button.
- Press the button firmly against the mounting bracket or chosen location and hold it in place for the recommended curing time specified by the adhesive manufacturer.
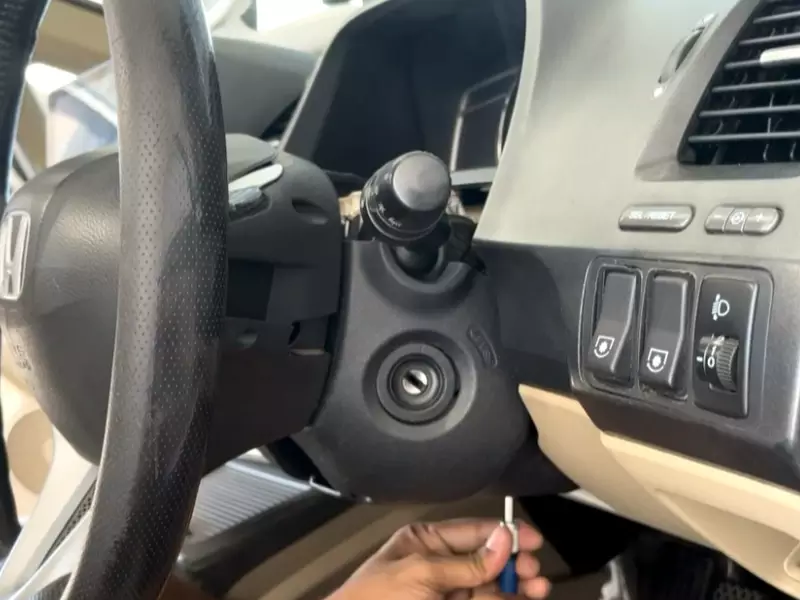
Testing the functionality of the installed button
With the push start button securely mounted, it’s time to test its functionality to ensure proper installation. Follow these steps to test the button:
- Ensure that your vehicle’s ignition is off and the key is removed from the ignition slot.
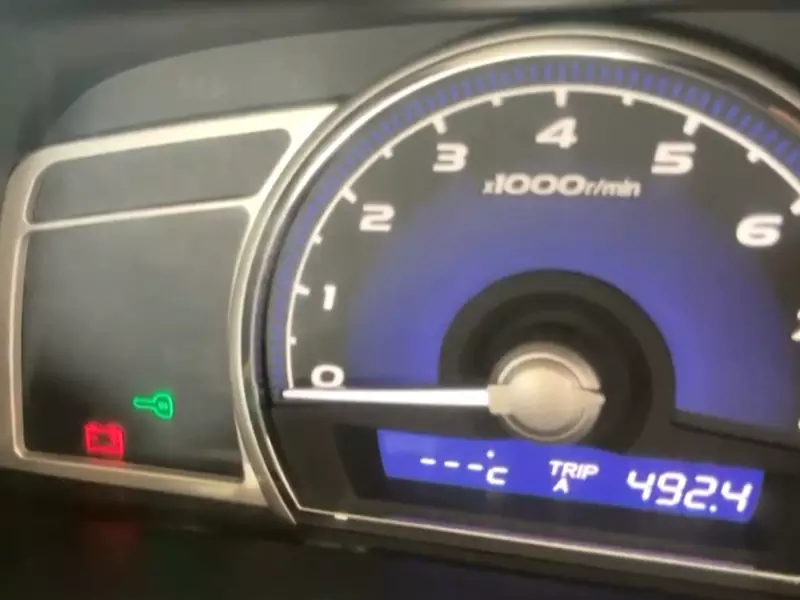
- Press the push start button to start the vehicle. If the button lights up and the engine starts, congratulations! Your push start button is functioning correctly.
- Repeat the process a few times to ensure consistent functionality.
If the push start button does not work as expected, double-check the wiring connections and consult the manufacturer’s instructions or seek professional assistance if needed.
Common Issues And Solutions
Installing a push start button in your car can be a convenient upgrade, but like any new addition to your vehicle, it may come with its own set of challenges. In this section, we will discuss common issues that you may encounter when installing a push start button and provide you with some effective solutions to help you troubleshoot. Let’s dive in!
Push start button not functioning properly
If you find that your push start button is not functioning as expected, there could be a few underlying causes. Here are some possible issues and their corresponding solutions:
- Improper wiring connections: Check the wiring connections to ensure they are properly secured. Loose connections can prevent the push start button from working. Refer to the manufacturer’s instructions or seek the help of a professional if needed.
- Lockout feature: Some push start button systems have a lockout feature that requires you to engage the brake pedal before the button will work. Make sure you are following the proper sequence: step on the brake pedal, press the push start button, and release the brake pedal.
- Weak battery: A weak or low battery can cause the push start button to malfunction. Check your battery voltage using a multimeter and consider replacing it if necessary. Regularly maintaining your vehicle’s battery can prevent such issues in the long run.
Engine not starting after installation
If you have successfully installed the push start button but your engine fails to start, these are some potential causes and solutions:
- Ignition switch compatibility: Ensure that the ignition switch you are using is compatible with your vehicle’s make and model. If it is not, the engine may not start. Consult the product manual or reach out to the manufacturer for guidance.
- Programming error: Some push start button systems require programming to sync with your vehicle’s immobilizer system. Follow the programming instructions carefully and make sure the programming is completed successfully. If you are unsure, it is recommended to seek professional assistance.
- Faulty starter motor: If the engine does not start at all, it is possible that the starter motor is faulty. Test the starter motor using a voltmeter or have a qualified mechanic inspect it for issues.
Remember, installing a push start button may require technical expertise. If you encounter any difficulties during the installation process or troubleshooting, it is always advisable to seek professional help to ensure a safe and accurate installation.
Tips For A Smooth Installation Process
Properly installing a push start button in your vehicle can provide a convenient and modern upgrade to your car’s ignition system. Follow these tips to ensure a smooth installation process and enjoy the benefits of this innovative feature.
Double-checking all connections before testing
Before proceeding with the installation, it’s crucial to double-check all connections to prevent any potential issues. Inspect the wiring harness, ensuring that each wire is securely connected and properly insulated. Take your time and verify each connection to avoid any loose or faulty connections that could cause problems in the future.
Following the manufacturer’s instructions carefully
To guarantee a successful installation, it’s essential to carefully read and follow the manufacturer’s instructions. These instructions are designed to guide you through the process and provide specific details that may vary based on the make and model of your vehicle. By strictly adhering to these instructions, you can minimize the risk of errors and ensure a seamless installation.
Testing the push start button before finalizing the installation
Before concluding the installation process, it is crucial to test the push start button functionality. Connect the battery and turn the ignition on to verify that the button works properly. Test the button multiple times to ensure consistency and that there are no issues with the wiring or connections. This step will give you peace of mind and reassurance that the installation was successful.
Fully securing all components
Once you have confirmed that the push start button is functioning correctly, it’s important to securely fasten all components. Double-check that all wires are neatly organized and tucked away to prevent any accidental damage or interference with other vehicle components. Use zip ties or mounting brackets, if necessary, to keep everything in place and ensure long-term durability.
Taking precautions during the installation process
During the installation, it’s essential to take certain precautions to protect both yourself and your vehicle. Make sure to disconnect the battery before starting any work to prevent electrical shock or damage. Additionally, avoid using excessive force when handling components to minimize the risk of breaking or damaging them. By following these precautions, you can avoid unnecessary mishaps and ensure a safe installation process.
Consulting a professional if unsure or inexperienced
If you are uncertain or lack experience with automotive electrical systems, it is advisable to seek assistance from a professional. They have the necessary knowledge and expertise to handle complex installations. It’s better to be safe than sorry when it comes to your vehicle’s electrical system, so don’t hesitate to reach out for professional help if needed.
By following these tips, you can ensure a smooth installation process for your push start button. Remember to prioritize safety and adhere to manufacturer instructions for optimal results. Upgrade your vehicle’s ignition system and enjoy the convenience and modernity that a push start button brings to your driving experience.
Safety Measures To Follow During Installation
Installing a push start button in your vehicle can not only add a touch of modernity but also enhance your driving experience. However, it is crucial to prioritize safety during the installation process to prevent any mishaps or damage to your vehicle.
Properly handling electrical components
When installing a push start button, it’s important to handle the electrical components with the utmost care. Here are some safety measures to follow:
- Before beginning the installation, ensure that the vehicle’s electrical system is completely turned off. Disconnect the battery to avoid any risk of electric shock or short circuits.
- Wear appropriate protective gear such as gloves and safety glasses to prevent any injuries while handling electrical components.
- Be gentle when connecting or disconnecting wires to avoid any damage to the wires or the vehicle’s electrical system. Carefully follow the manufacturer’s instructions for proper wiring and connection.
- If you encounter any loose or damaged wires during the installation, replace them immediately to ensure the safety and functionality of the push start button.
Avoiding accidental activation of the ignition system
Accidental activation of the ignition system can lead to unexpected starting of the vehicle, which can be dangerous during the installation process. Here are some measures to prevent accidental activation:
- Ensure that the push start button is not connected to any power source or the ignition system until the installation is complete. This will prevent the accidental starting of the vehicle.
- Double-check all connections and wiring before reconnecting the battery and enabling the ignition system. Make sure that the push start button is securely installed and functioning properly.
- Test the push start button after installation to ensure it initiates the ignition system smoothly and without any hiccups.
- If you notice any issues or malfunctions with the push start button during or after installation, consult a professional technician or the manufacturer for assistance.
By following these safety measures during the installation of a push start button, you can enjoy the convenience of this modern feature while ensuring the well-being of yourself and your vehicle.
Frequently Asked Questions Of How To Install Push Start Button
Can I Get A Push Start Button Installed In Any Car?
Yes, a push start button can be installed in most cars for added convenience. However, it is recommended to consult a professional to ensure compatibility and proper installation.
How Do I Get My Push Button To Start?
To start your push button, follow these steps:
1. Ensure the device is adequately powered and the battery is working.
2. Press down firmly on the push button.
3. Hold the button for a few seconds until the device powers on.
4. If the push button still doesn’t work, consult the user manual or seek technical support. Note: The specific process may vary depending on the device.
How Do You Put A Push Button Start Car In Accessories?
To put a push-button start car in accessories mode, press the ignition button without touching the brake pedal. The car’s electrical systems will turn on, allowing you to use features like the radio and windows, without starting the engine.
How Do You Wire A Push Button Switch?
To wire a push button switch, follow these steps:
- Identify the terminals on the switch.
- Connect one wire to the common terminal and another wire to the normally open terminal.
- Connect the other ends of the wires to the desired circuit.
- Secure the connections using electrical tape or wire nuts.
- Test the switch to ensure it functions properly.
Conclusion
To sum up, installing a push start button in your vehicle can elevate both the convenience and security of your driving experience. By following the step-by-step guide provided in this blog post, you can successfully complete the installation process. Enjoy the seamless ignition and effortless start that a push start button provides, and make your driving journey even more enjoyable.
Unlock the potential of your vehicle and embrace the future of automotive technology.