To install new tires, first, remove the old tires and make sure the new tires are the correct size and type for your vehicle, then carefully align and tighten the lug nuts. Proper tire installation is crucial for your safety and the performance of your vehicle.
Whether you’re replacing worn-out tires or upgrading to a new set, it’s important to know the proper procedure for installing them. This article will guide you step-by-step on how to install new tires on your vehicle, ensuring a smooth and hassle-free process.
By following these instructions, you’ll be able to enjoy the benefits of fresh tires, including improved traction, better handling, and increased fuel efficiency. So, let’s dive in and learn how to install new tires correctly.
Factors To Consider When Selecting New Tires
Installing new tires on your vehicle is an important decision that can greatly impact its performance, safety, and fuel efficiency. With numerous options available in the market, it’s essential to consider several factors to ensure you make the right choice. Here are the key factors to keep in mind when selecting new tires:

Vehicle Type and Size
The type and size of your vehicle play a crucial role in determining the appropriate tires for installation. Each vehicle has specific tire requirements based on its weight, design, and usage. For example, trucks and SUVs typically require tires with higher load ratings and deeper treads to support heavy loads and provide better traction off-road. On the other hand, passenger cars generally benefit from tires designed to offer a smooth and comfortable ride. To choose the correct tire size, refer to your vehicle’s owner’s manual or the sidewall of your existing tires.
Weather Conditions
The weather conditions in your area are another important consideration when selecting new tires. If you live in an area with frequent rain or snow, opting for all-season or winter tires can significantly enhance your vehicle’s safety and handling. These tires are specifically designed to provide better traction on wet or icy roads. Conversely, if you reside in a region with predominantly dry and hot climates, performance tires with enhanced grip and handling capabilities may be more suitable.
Performance and Mileage
The desired performance and mileage of your tires should be taken into account. High-performance tires offer improved handling and responsiveness, making them ideal for sporty driving enthusiasts. On the other hand, touring tires prioritize comfort and noise reduction, resulting in a smooth and quiet ride. Additionally, consider the mileage warranty offered by different tire manufacturers. Longer mileage warranties indicate greater durability and longevity.
Budget Considerations
When selecting new tires, it’s important to consider your budget. Tire prices can vary significantly based on factors such as brand, tire type, and quality. It’s worth investing in higher-quality tires that offer better performance and safety features, even if they may be slightly more expensive. However, if your budget is limited, there are still plenty of reliable and affordable options available. Prioritize your needs and align them with your budget to make the best decision.
By considering these factors when selecting new tires, you can ensure that your vehicle is equipped with the right tires to optimize its performance, safety, and longevity.
Ensuring Safety And Accessibility
When it comes to installing new tires on your vehicle, safety and accessibility should be top priorities. By following proper procedures and taking necessary precautions, you can ensure a smooth and secure tire installation process. This blog post will guide you through the essential steps to install new tires, so let’s dive in.
Parking the vehicle on a level surface
Parking your vehicle on a level surface is crucial to ensure stability during the tire installation process. This will prevent any unexpected movements or accidents as you work on your tires. Choose a flat and solid surface, such as a driveway or a parking lot, to park your vehicle.
Engaging the parking brake
Before you begin the tire installation, engage the parking brake. This will prevent your vehicle from rolling or shifting while you work. Make sure the parking brake is properly engaged and holding the vehicle securely in place.
Gathering necessary tools and equipment
To install new tires effectively, you’ll need a few essential tools and equipment. Gather the following items to ensure you have everything you need:
| Tire iron | A jack | A lug wrench | Tire pressure gauge |
| Wheel chocks | New tires | Valve stem caps | A torque wrench |
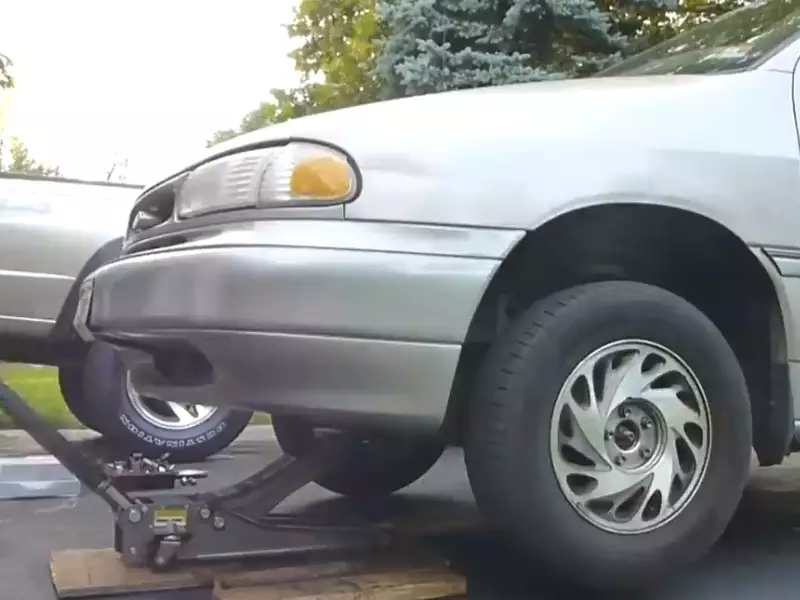
Lifting the vehicle using a jack
Now it’s time to lift your vehicle using a jack, ensuring the proper safety measures are followed:
- Locate the designated jack points on your vehicle. Refer to your vehicle’s manual for the exact location.
- Place wheel chocks behind the wheels that are diagonally opposite to the ones you’ll be working on. This will ensure the vehicle remains stable.
- Position the jack under the appropriate jack point and begin to raise the vehicle slowly and steadily. Be cautious not to exceed the jack’s weight capacity.
- Once the vehicle is lifted, use a lug wrench to loosen the lug nuts on the wheel you’ll be removing.
- Completely remove the lug nuts and carefully take off the old tire.
By following these steps, you can safely install new tires on your vehicle. Remember to observe precautionary measures and use the correct tools and techniques. Ensuring safety and accessibility throughout the process will help maintain the performance and longevity of your new tires.

Removing The Old Tires
When it comes to installing new tires on your vehicle, one of the first steps is removing the old tires. This process requires a few simple tools and some careful inspection to ensure optimal performance from your new set of tires.
Loosening lug nuts with a wrench or tire iron
The first step in removing the old tires is to loosen the lug nuts. These nuts secure the tire to the wheel, and they can be quite tight. You’ll need a wrench or a tire iron to loosen them.
To begin, locate the lug nuts on each wheel. Typically, there are five or six nuts per tire. Position your wrench or tire iron over the lug nut and turn it counterclockwise. Apply firm pressure to break the initial resistance. If the nuts are particularly tight, you can use your foot to add extra leverage, ensuring a tight grip on the wrench or tire iron.
Tip: It’s a good idea to loosen the lug nuts slightly before raising the vehicle to remove the tires completely. This prevents the tire from spinning while you are trying to loosen the nuts.
Raising the vehicle further to remove the tires
Once you have loosened the lug nuts, it’s time to raise the vehicle further, allowing enough clearance to remove the tires. To do this, you’ll need a jack or an automotive lift.
Position the jack or lift underneath a designated lifting point on the vehicle. These points are typically indicated by the manufacturer and can be found in the vehicle’s manual. Carefully follow the instructions provided by the jack or lift manufacturer for proper placement and operation.
Begin lifting the vehicle, gradually raising it until there is enough room to easily remove the tires. Take caution to ensure the vehicle is stable and securely supported before proceeding to remove the tires.
Inspecting the old tires for damage or wear
Before disposing of the old tires, it’s crucial to inspect them for any signs of damage or excessive wear. This step is important because it can provide valuable insights into the performance and condition of your vehicle.
Closely examine each tire for cuts, bulges, or any uneven wear patterns. Additionally, check the tread depth to ensure it meets the legal requirements in your area. If any of the tires are significantly damaged or worn, it’s recommended to replace them to maintain optimal safety and performance.
Tip: If you notice uneven wear patterns, it may indicate an issue with your vehicle’s alignment or suspension. Consider having these components inspected and repaired if necessary before installing the new tires.
By following these steps to remove the old tires, you’ll be well on your way to a smooth tire installation process. Remember to always prioritize safety and carefully inspect the tires for any potential issues. With this methodical approach, you’ll soon be ready to enjoy the benefits of fresh, high-quality tires on your vehicle.
Mounting The New Tires
When it comes to installing new tires on your vehicle, the process can seem daunting. However, with the right approach and following proper steps, mounting new tires can be a much easier task. In this guide, we will walk you through the process of orienting the tire in the correct direction, placing the tire onto the wheel hub, securing the tire using lug nuts, and tightening the lug nuts in a star pattern to ensure proper installation.
Orienting the tire in the correct direction
The first step in mounting your new tires is to ensure they are oriented in the correct direction. Many tires have a specific tread pattern designed for optimal performance and safety. To determine the correct orientation, look for directional arrows or markings on the sidewall of the tire. These arrows indicate the intended rotation direction of the tire.
You can use these arrows as a guide when mounting the tires to ensure they are facing the right way. It’s important to note that mounting tires in the wrong direction can affect their performance, traction, and overall safety.
Placing the tire onto the wheel hub
Once you have determined the correct orientation, it’s time to place the tire onto the wheel hub. Start by aligning the lug holes on the wheel hub with the corresponding holes on the tire. Carefully position the tire on the hub, making sure it sits flat and securely.
It’s important to handle the tire with care to avoid any damage to the tire or the wheel. Be cautious and avoid dropping the tire or placing it on sharp or rough surfaces that could puncture or harm the tire.
Securing the tire using lug nuts
With the tire in place on the wheel hub, it’s time to secure it using lug nuts. Lug nuts are the fasteners that hold the tire and wheel assembly onto the vehicle. They are typically tightened with a lug wrench or a torque wrench.
Start by placing the lug nuts onto the wheel studs and hand-tighten them until they are snug. Make sure to thread the lug nuts evenly and securely. Avoid cross-threading, as this can damage the studs and lead to improper alignment.
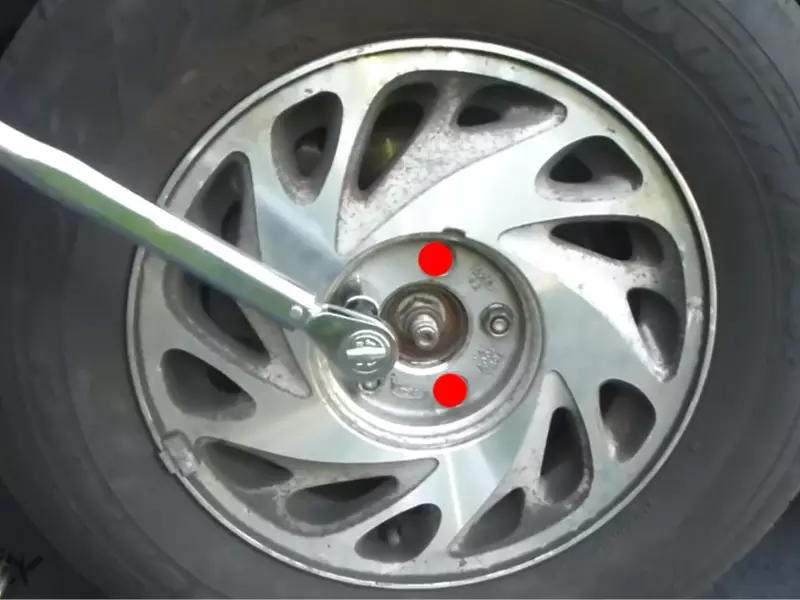
Tightening the lug nuts in a star pattern
To ensure even and proper tightening of the lug nuts, it’s important to follow a star pattern. This pattern helps distribute the clamping force evenly across the wheel, resulting in a secure and balanced connection.
Using a lug wrench or torque wrench, start tightening the lug nuts in a star pattern. Begin by tightening the lug nut that is opposite to the one you started with and continue in a crisscross or star pattern until all lug nuts are tightened.
It’s crucial to tighten the lug nuts gradually and in small increments to avoid over or under-tightening. Refer to your vehicle’s manual or consult a professional for the recommended torque specifications for your specific vehicle.
Conclusion
Mounting new tires might seem like a challenging task, but by following the correct steps and paying attention to the details, you can ensure a successful installation. Remember to orient the tires in the correct direction, place the tire onto the wheel hub securely, use lug nuts to secure the tire, and tighten the lug nuts in a star pattern. By doing so, you can enjoy a safe and smooth ride with your new set of tires.
Inflating The Tires To The Correct Pressure
One essential step in installing new tires is ensuring they are inflated to the correct pressure. Proper tire inflation not only ensures optimal performance and longevity of the tires but also contributes to your safety on the road. In this section, we will discuss the necessary steps to inflate your tires to the correct pressure.
Using a Tire Pressure Gauge to Check Current Pressure
The first step in inflating your tires to the correct pressure is to determine their current pressure using a tire pressure gauge. This handy tool allows you to accurately measure the air pressure inside each tire.
To check the current pressure, follow these steps:
- Remove the valve cap from the tire valve stem.
- Attach the tire pressure gauge to the valve stem and press it firmly to ensure a tight seal.
- Read the pressure displayed on the gauge. It is important to note that the recommended pressure can be found either on the tire itself or in the vehicle’s manual.
Referring to the Vehicle’s Manual for Recommended Pressure
Knowing the recommended pressure for your specific vehicle is crucial for proper tire inflation. The manufacturer’s guide, typically found in the vehicle’s manual, provides this information. It is important to follow these guidelines to ensure optimal performance.
Refer to your vehicle’s manual to find the recommended tire pressure. The recommended pressure might vary based on factors such as load distribution, driving style, and weather conditions. Make sure to take these factors into account while inflating your tires.
Inflating the Tires Using an Air Compressor or Gas Station Pump
Once you have determined the correct pressure, it’s time to inflate your tires. There are two common methods for inflating tires: using an air compressor or a gas station pump. These tools provide sufficient air pressure to fill the tires to the desired level.
Here’s how you can inflate your tires:
- Locate a nearby air compressor or gas station with a tire-inflating service.
- If using an air compressor, connect the hose to the tire’s valve stem and ensure a secure connection.
- If using a gas station pump, attach the pump’s nozzle to the valve stem.
- Add air in short bursts, periodically checking the pressure with the tire pressure gauge.
- Once the desired pressure is reached, remove the hose or nozzle and replace the valve cap securely.
Checking the Pressure Again After Inflation
After inflating the tires, it is vital to recheck the tire pressure to ensure that it matches the recommended level. This ensures consistent and accurate inflation.
Follow these steps to double-check the tire pressure:
- Reattach the tire pressure gauge to each valve stem and read the pressure again.
- If the pressure does not match the recommended level, add or release air accordingly until it does.
By following these steps, you can effectively inflate your tires to the correct pressure, contributing to optimal tire performance, fuel efficiency, and safer driving conditions.
Torquing The Lug Nuts
Using a Torque Wrench to Tighten Lug Nuts to the Manufacturer’s Specification
When it comes to installing new tires, one of the most critical steps is torquing the lug nuts. This ensures that the wheels are properly secured to your vehicle, preventing accidents and potential damage.
To torque the lug nuts correctly, you’ll need a torque wrench. This tool allows you to tighten the nuts to the specific torque specified by the manufacturer. The torque value is usually expressed in foot pounds (ft-lbs) or Newton meters (Nm).
Ensuring Even Torque Across All Lug Nuts
Even torque distribution is key to maintaining balance and stability in your vehicle. Uneven torque can result in problems such as vibration, wheel misalignment, and even wheel separation. To ensure even torque across all lug nuts, follow these steps:
- Start by tightening the lug nuts in a star pattern or in a crisscross pattern. This helps distribute the torque evenly.
- Apply moderate pressure while tightening, but avoid excessive force. Over-tightening the lug nuts can lead to stripped threads or warped brake rotors.
- Repeat the pattern, gradually increasing the torque with each round until you reach the manufacturer’s specified torque value.
Double-Checking the Tightness of Lug Nuts after Torquing
Once you’ve torqued all the lug nuts to the recommended specification, it’s essential to double-check their tightness. This extra step ensures that none of the lug nuts have come loose during the torquing process. Follow these steps to double-check:
- Use the torque wrench to inspect each lug nut individually, starting from the first nut tightened. Apply gentle force to check if there is any movement or give.
- If you notice any looseness, immediately tighten the affected lug nut to the correct torque value. Failure to address loose lug nuts can lead to wheel wobbling or even detachment.
- Continue checking the tightness of each lug nut until you’ve inspected them all.
By following these steps and using a torque wrench, you can ensure the lug nuts are properly tightened and your new tires are securely installed. Remember, regular maintenance and periodic checks are essential for safe and reliable driving. Double-checking the tightness of the lug nuts is a crucial step that should never be overlooked.
Lowering The Vehicle And Removing The Jack
Once you have successfully installed the new tires on your vehicle, it’s time to carefully lower the vehicle back to the ground and remove the jack. This step is crucial to ensure the safety of both yourself and your vehicle. Follow the instructions below to accomplish this task smoothly and efficiently.
Carefully lowering the vehicle to the ground
When it comes to lowering your vehicle, it’s important to proceed with caution to avoid any accidents or damage to the tires. Start by locating the jack handle, which is usually stored in the trunk or under a seat. Insert the handle into the designated slot on the jack and turn it counterclockwise to lower the vehicle. Remember to lower the vehicle slowly and steadily to maintain balance.
If you are unsure how far to lower the vehicle, refer to your vehicle’s owner’s manual for guidance. The manual often provides information on the recommended height for the vehicle to be off the ground. Take your time and ensure that all four tires make contact with the ground simultaneously before proceeding to the next step.
Removing the jack and storing it properly
Now that the vehicle is safely on the ground, it’s time to remove the jack. This step is necessary to free up space and ensure the jack is stored properly to prevent any future damage or accidents.
Start by carefully loosening the handle of the jack and removing it from the designated slot. Place the handle back in its storage location for safekeeping. Next, slowly release the pressure from the jack by turning the handle counterclockwise. This will allow the jack to retract and return to its original position.
Once the jack is fully retracted, carefully remove it from underneath the vehicle. Take a moment to inspect the jack for any signs of damage or wear. If you notice any issues, it’s essential to address them before using the jack again. Clean the jack if necessary and store it in a secure location in your vehicle, ensuring it is properly secured to prevent it from rolling around while driving.
By following these steps, you will successfully lower your vehicle and remove the jack after installing new tires. Remember, safety should always be the top priority when working on your vehicle. By taking your time and following the proper procedures, you can ensure a smooth and accident-free tire installation process.
Inspecting The New Tires For Proper Installation
Installing new tires on your vehicle is an important maintenance task that directly affects your safety on the road. To ensure a successful installation, it is crucial to inspect the new tires for any issues that may arise during or after the installation process. By thoroughly checking the tire pressure, sidewalls, tread, and lug nuts, you can be confident in the proper installation of your new tires.
Checking the tire pressure again
After receiving your new tires, it is crucial to double-check the tire pressure before installation. Proper tire pressure is essential for optimal performance, fuel efficiency, and tire lifespan. Utilize a tire pressure gauge to measure the pressure of each new tire, making sure it matches the manufacturer’s recommended PSI (pound per square inch) specifications. If the pressure is too low or too high, adjust it accordingly to ensure a balanced and safe driving experience.
Inspecting the tire sidewalls and tread for any issues
Before mounting the new tires on your vehicle, closely inspect the sidewalls and tread for any signs of damage or irregularities. Pay attention to any cuts, bulges, or cracks on the sidewalls, as they can indicate structural weakness that may lead to tire failure. Additionally, examine the tread depth and pattern to ensure it meets the legal requirements and provides sufficient traction on various road conditions.
If you notice any abnormalities, it is advisable to consult a professional tire technician for further evaluation. They can determine whether the tires are safe for installation or if they need to be replaced or repaired.
Ensuring all lug nuts are securely tightened
During the installation process, it is vital to pay special attention to the tightening of the lug nuts. These nuts secure the tires to the wheel hub and play a crucial role in maintaining the integrity of the tire installation. Use a torque wrench or a lug wrench to tighten the lug nuts to the manufacturer’s recommended torque specifications. Ensure each lug nut is tightened uniformly and securely, following a diagonal pattern to evenly distribute the pressure.
By properly inspecting the new tires for correct installation, you can enhance your driving safety and extend the lifespan of your tires. Remember to double-check the tire pressure, inspect the tire sidewalls and tread for any issues, and ensure all lug nuts are securely tightened. Performing these critical steps will give you peace of mind and confidence as you embark on your next journey.
Test Driving And Monitoring Tire Performance
Once you have installed new tires on your vehicle, it is essential to test drive and monitor their performance to ensure a smooth and safe ride. This step is crucial as it allows you to detect any issues such as vibrations, unusual noises, or handling characteristics that may indicate problems with the new tires.
Take a Short Test Drive to Check for Any Vibrations or Issues
Before hitting the road, take a short test drive to evaluate the performance of the new tires. This will help you identify any vibrations or issues that might arise, ensuring optimal driving comfort and safety. During the test drive, pay attention to the following factors:
- Acceleration: Observe the acceleration of the vehicle to check for any vibrations or unusual noises that may indicate alignment problems.
- Braking: Pay attention to the braking performance. If there is a delay in response or you experience pulling to one side, it could indicate an issue with the tire pressure or alignment.
- Steering: Evaluate the steering response. If it feels loose or unresponsive, it may be a sign of improper tire installation or alignment.
By thoroughly examining these aspects during the test drive, you can ensure that the new tires are performing optimally, providing a smooth and comfortable driving experience.
Monitoring the Tire Performance During Normal Driving Conditions
Once you have completed the test drive, it is important to monitor the tire performance during normal driving conditions. This practice will help you identify any persistent issues that might not be evident during a short test drive. Here are some key points to keep in mind while monitoring tire performance:
- Handling: Pay attention to how the vehicle handles various road surfaces and corners. Any sudden changes in handling characteristics may indicate problems with the tires.
- Noises: Listen carefully for any unusual noises coming from the tires. Be particularly mindful of grinding, squealing, or thumping sounds, which may indicate issues with the tire tread or wheel alignment.
- Ride Comfort: Assess the overall comfort of the ride. If you feel excessive vibrations or bumps, it could be a sign of imbalanced tires or suspension problems.
By staying vigilant and monitoring the tire performance during your regular drives, you can quickly identify and address any potential problems, ensuring a safe and enjoyable driving experience.
Being Mindful of Any Unusual Noises or Handling Characteristics
While driving with the new tires, stay alert and be mindful of any unusual noises or handling characteristics that may arise. Some warning signs to watch out for include:
- Pulling to one side while driving straight.
- Increased road noise or vibrations.
- Uneven tire wear.
- Difficulty maintaining control on wet or slippery surfaces.
If you notice any of these issues or any other irregularities, it is crucial to address them promptly. Consult a professional tire technician to inspect your tires and diagnose the problem accurately. Remember, regular monitoring and timely maintenance will help you ensure the longevity and performance of your new tires.
Frequently Asked Questions On How To Install New Tires
Can You Install New Tires Yourself?
Yes, you can install new tires yourself.
What Is The Process Of Putting New Tires On?
To put new tires on, start by loosening the lug nuts with a wrench. Lift the car with a jack and remove the old tires. Align the new tire with the wheel studs and tighten the lug nuts. Lower the car and double-check the tightness of the lug nuts.
What Should I Do After Getting New Tires?
After getting new tires, ensure proper inflation according to the recommended PSI. Regularly check tire pressure and tread depth for optimal performance and safety. Schedule regular rotations and alignments as per manufacturer guidelines. Maintain adequate tire maintenance like cleaning and visual inspections.
Can Tires Be Installed Incorrectly?
Tires can be installed incorrectly, leading to safety risks and premature wear.
Conclusion
Installing new tires is a crucial part of regular vehicle maintenance. By following the step-by-step instructions mentioned in this blog post, you can ensure a smooth and safe installation process. Remember to check the tire pressure, alignment, and balance after installation to maximize their lifespan and performance.
Stay proactive in maintaining your tires and enjoy a comfortable and efficient driving experience. Happy driving!