To install neon lights under a car, position the lights in the desired location and secure them using mounting brackets and screws.
Preparing For Installation
If you’re looking to give your car a touch of style and enhance its visual appeal, installing neon lights under your car is a fantastic option. Not only does it provide a unique and eye-catching aesthetic, but it also adds a touch of personality to your vehicle. However, before diving into the installation process, it’s crucial to prepare adequately. This step ensures a smooth and hassle-free installation experience, while also prioritizing safety. Here are some essential steps to take when preparing to install neon lights under your car.

Gather the necessary tools and materials:
Before starting the installation process, it’s vital to gather all the necessary tools and materials. This ensures that you have everything you need at hand, avoiding any unnecessary interruptions or delays. Here’s a list of the tools and materials you’ll need:
| Tools | Materials |
|---|---|
|
|
Ensure safety measures are in place:
The safety of yourself and others should always be a top priority when modifying your car. When installing neon lights under your car, it’s essential to take certain safety measures to prevent accidents and ensure a secure installation. Here’s what you need to keep in mind:
- Disconnect the car battery before starting any electrical work to avoid potential shocks or short circuits.
- Wear appropriate safety gear, such as gloves and safety goggles, to protect yourself from any accidents or injuries.
- Follow the manufacturer’s instructions and guidelines when working with the neon light kit to ensure proper installation and prevent any mishaps.
- Securely mount and fasten the neon lights to avoid them coming loose while driving, which may become a hazard to other motorists.
- Avoid drilling or cutting into any vital car components or wiring. Always double-check the location you intend to install the lights to prevent any damage to the car’s internal systems.
By gathering the necessary tools and materials and adhering to safety measures, you’re well on your way to a successful neon light installation. Stay tuned for the next steps in our series on how to install neon lights under your car!
Understanding the car’s Electrical System
Understanding the Car’s Electrical System
Familiarize yourself with the car’s electrical wiring
When installing neon lights under your car, it is crucial to have a good understanding of your car’s electrical system. This knowledge will help you navigate through the installation process smoothly and ensure that the neon lights function properly. Familiarizing yourself with the electrical wiring of your car is the first step towards a successful installation.
Identify the suitable power source for the neon lights
Once you are familiar with the car’s electrical wiring, the next step is to identify the suitable power source for the neon lights. You need to find a power source that can handle the voltage and current requirements of the neon lights. This will ensure that the lights operate efficiently and do not put any additional strain on your car’s electrical system.
To identify the suitable power source for the neon lights, you can refer to your car’s owner manual or consult with a professional. In most cases, the car’s battery is a common power source. However, it is important to ensure that the power source you choose has the necessary capacity to handle the neon lights.
Before proceeding with the installation, always disconnect the car’s battery to avoid any accidental electrical discharge. This will provide a safe working environment and prevent any potential damage to your car’s electrical system.
When connecting the neon lights to the power source, it is recommended to use a fuse to protect both the lights and the car’s electrical system from any short circuits or overloads. This will prevent any potential damage and ensure the longevity of the neon lights.
To sum up, understanding your car’s electrical system is crucial before installing neon lights. Familiarizing yourself with the electrical wiring and identifying the suitable power source are essential steps in ensuring a successful installation. By following these guidelines, you can enjoy the vibrant illumination of neon lights under your car while ensuring the safety and longevity of your car’s electrical system.
Mounting The Neon Lights
Mounting neon lights under your car can instantly give it a stylish and attention-grabbing look. But to achieve the desired effect, it’s essential to properly install and secure the lights. In this section, we’ll guide you through the process of mounting the neon lights on your car’s undercarriage. So, let’s dive in and transform your car into a head-turner!
Select the ideal location for the neon lights placement
Before diving into the installation process, it’s crucial to carefully select the ideal location for your neon lights placement. This decision depends on both your personal preference and the legal regulations in your area. Here are a few factors to consider:
- Visibility: Choose a spot where the neon lights will be clearly visible, enhancing the overall look of your car.
- Protection: Ensure that the neon lights are shielded from any potential damage caused by road debris or bumps.
- Legal compliance: Check your local traffic regulations to ensure that neon lights are allowed and understand any limitations on color or positioning.
Please note that mounting neon lights in areas obstructed by the car’s body or parts may diminish their visual impact and defeat the purpose of adding them in the first place. Take your time to consider the best location, as this will greatly contribute to the overall aesthetic appeal.
Securely attach the neon lights to the car’s undercarriage
Now that you’ve identified the ideal placement, it’s time to securely attach the neon lights to your car’s undercarriage. Follow these steps to ensure a stable and reliable installation:
- Clean the undercarriage: Before attaching the lights, thoroughly clean the surface where they will be mounted. This helps the adhesive or mounting brackets to adhere more effectively.
- Apply adhesive or use brackets: Depending on the type of neon lights you have, you may use adhesive or brackets to secure them. If using adhesive, carefully apply it to the back of the light strips and press firmly against the cleaned surface. If brackets are needed, follow the manufacturer’s instructions and securely attach them to the undercarriage.
- Test for stability: Once the lights are attached, gently shake the car to ensure they are firmly secured. If any lights appear loose, readjust them and repeat the testing process until everything is stable.
Remember that while it’s important to securely attach the neon lights, you must also ensure that the installation process doesn’t damage any crucial components of your vehicle. If you’re not confident in performing this step yourself, it’s always a good idea to seek professional help.
By following these steps, you’re well on your way to installing neon lights under your car in a visually appealing and secure manner. Stay tuned for the next section, where we’ll provide tips on wiring the neon lights for optimal performance.
Wiring The Neon Lights
Properly wiring the neon lights is a crucial step when it comes to installing them under your car. This step ensures that the lights are connected to the power supply and that the wiring is routed and concealed properly to prevent any damage. Here’s a step-by-step guide on how to wire the neon lights:
Connect the neon lights to the power supply
Start by locating the power supply for the neon lights. This is usually a 12-volt power source connected to your car’s electrical system. Ensure that the power supply is turned off before proceeding.
- Inspect the wiring of the neon lights and identify the positive and negative wires. The positive wire is typically marked with a red color or a plus (+) sign, while the negative wire is marked with black or a minus (-) sign.
- Connect the positive wire of the neon lights to the positive terminal of the power supply. This can be done by stripping a small portion of the wire and attaching it securely to the terminal.
- Similarly, connect the negative wire of the neon lights to the negative terminal of the power supply. Ensure that the connections are tight and secure to prevent any loose connections.
Properly route and conceal the wiring to avoid damage
Once the neon lights are connected to the power supply, it’s important to route and conceal the wiring properly to prevent any damage or accidents. Follow these steps to ensure the wiring is safely installed:
- Identify the best path to route the wiring under the car. It’s important to choose a route that avoids any hot or moving parts, such as the exhaust system or suspension components. This will prevent the wiring from getting damaged due to heat or excessive movement.
- Secure the wiring using appropriate clips or zip ties along the chosen route. This will keep the wiring in place and prevent it from hanging loosely or coming into contact with any sharp edges.
- Conceal the wiring by using protective wire loom or conduit. This will provide an extra layer of protection and prevent the wires from being exposed to the elements or getting snagged on any objects.
By following these steps, you can ensure that the neon lights are properly wired and the wiring is securely routed and concealed. Taking these precautions will not only enhance the aesthetic appeal of your car but also prevent any potential damage to the lights or your vehicle’s electrical system.
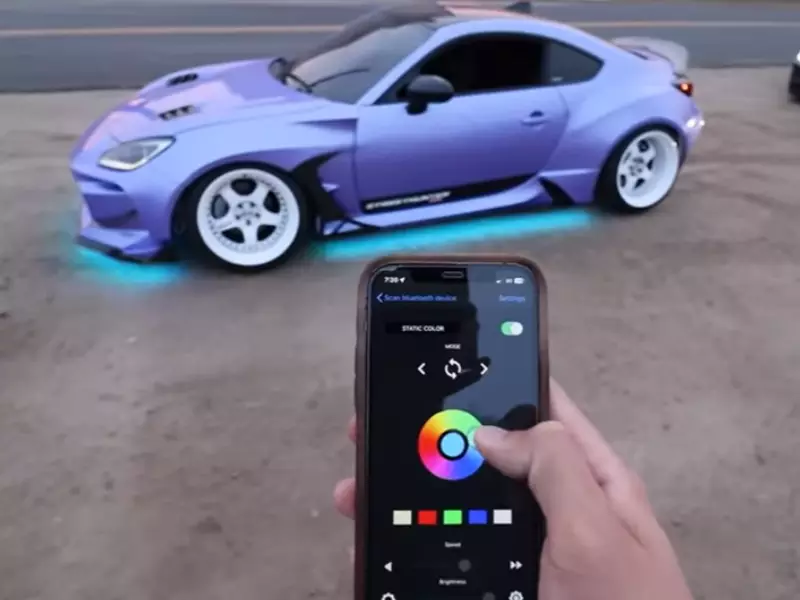
Connecting The Control System
Once you have successfully installed the neon lights under your car, the next step is connecting the control system. This is an important step as it determines how your neon lights will function and respond to different settings. In this section, we will guide you through the process of installing the control system and connecting it to both the power source and the neon lights.
Install the control system for the neon lights
To begin with, make sure you have the control system kit handy. This usually includes a control module, a remote control, and all the necessary wiring. Find a suitable location inside your car to mount the control module. Keep in mind that it should be easily accessible for future adjustments. A popular spot is under the dashboard or in the center console.
Once you have chosen the location, use the provided screws or adhesive to secure the control module in place. This will prevent it from moving or vibrating during driving. Ensure that the control module is well-positioned and securely attached.
Next, locate the wiring harness that comes with the control system. This harness will typically have multiple wires with different connectors. Refer to the instruction manual or the labeling on the wires to identify the correct connections.
Using the appropriate splicing or soldering techniques, connect the wires from the control module to the corresponding wires of your neon lights. Before making any connections, it’s crucial to double-check that you have matched the colors and connectors correctly. This will help avoid any confusion or issues later on.
Connect the control system to the power source and neon lights
Now that the control module is securely installed and connected to the neon lights, it’s time to bring power to the system. Locate a suitable power source in your vehicle, such as a spare fuse slot or the car’s battery. It’s recommended to use an inline fuse to protect the control system and your vehicle’s electrical components.
If using a spare fuse slot, remove the appropriate fuse and insert the fuse tap provided in your control system kit. Reinsert the original fuse into the fuse tap, ensuring a secure connection. Connect the power wire from the control module to the fuse tap. This will draw power from the vehicle’s electrical system.
If connecting directly to the car’s battery, find a nearby ground point to attach the control module’s ground wire. Use a suitable screw or bolt to fasten the ground wire securely. Connect the power wire from the control module to the positive terminal of the battery using an appropriate connector.
Finally, connect the remaining wires from the neon lights to the corresponding outputs on the control module. These outputs are usually labeled according to the specific light functions, such as “power,” “ground,” “color,” or “mode.” Make sure each wire is securely connected to the control module.
Once all the connections are in place, carefully tuck away any excess wiring and secure it using zip ties or electrical tape. This will help prevent any loose wires from interfering with your driving experience.
Now that you have successfully connected the control system, it’s time to test your neon lights. Turn on the power source and use the remote control to adjust the lighting effects, colors, and patterns. Enjoy the stunning and eye-catching visual display as you cruise down the road with your newly installed neon lights!
Testing And Troubleshooting
Before hitting the road with your newly installed neon lights under your car, it’s crucial to verify their correct functioning. This step ensures that you can enjoy a safe and vibrant driving experience while also showcasing your unique style. However, if any issues arise during the testing process, it’s essential to troubleshoot them promptly to ensure optimal performance. In this guide, we’ll walk you through both verifying the correct functioning of the neon lights and troubleshooting any problems that may arise.
Verify the correct functioning of the neon lights
To ensure your neon lights are working correctly, follow these simple steps:
- Start by turning on your car’s ignition switch. Remember, for safety reasons, never connect or disconnect any wires while the ignition is turned on.
- Gently tap the wire connected to the positive terminal of the battery onto the positive wire of the neon lights. This will create a connection and should result in the neon lights turning on.
- If the lights don’t turn on, double-check the connections and ensure they are secure. Loose or faulty connections can prevent the neon lights from functioning correctly.
- If the connections are secure but the lights still don’t turn on, check the fuse. A blown fuse can disrupt the circuit and prevent power from reaching the neon lights.
- Replace the fuse if necessary and repeat the previous steps to verify the correct functioning of the neon lights.
By following these steps, you can promptly identify any issues with the neon lights and address them effectively.
Troubleshoot any issues that may arise
If you encounter any issues during the testing process, use the following troubleshooting techniques:
- Check the wiring: Examine the wiring connections and ensure they are secure. Look for any loose or damaged wires that may be causing the problem. Replace or repair any faulty wiring.
- Inspect the switch: If the neon lights don’t turn on even after verifying the wiring, check the switch. Ensure it’s properly connected and functioning correctly. Consider replacing the switch if necessary.
- Test the power source: If the neon lights still don’t work, check the power source. Test the battery and ensure it’s delivering adequate power. Consider using a multimeter to measure the voltage and diagnose any issues.
- Seek professional assistance: If troubleshooting the neon lights proves challenging or if you lack the necessary experience, it’s best to consult a professional. They can provide expert guidance and resolve any complex issues swiftly.
By following these troubleshooting techniques, you can identify and address any issues that may arise during the testing process, ensuring the optimal performance of your neon lights under the car.
Finishing Touches
When it comes to installing neon lights under your car, attention to detail is key. While you may have completed the main steps of the installation process, there are still a few finishing touches to consider. These final steps will not only ensure the longevity of your neon lights, but also add a polished look to your car’s overall aesthetic. In this section, we will discuss two essential steps to conclude your neon lights installation: securely fastening any loose wiring or components, and giving your installation a final inspection.
Securely fasten any loose wiring or components
Before you hit the road, it is crucial to double-check that all wiring and components are firmly secured. Loose connections can lead to lights flickering or failing altogether, so it’s important to address any potential issues. Start by inspecting each wiring connection point. If you notice any loose wires, use wire connectors or electrical tape to reattach them securely.
If there are any loose components, such as control boxes or power adapters, use zip ties or fasteners to secure them in place. This will prevent them from shifting during driving, reducing the risk of damage or disconnection.
Give your neon lights installation a final inspection
Before considering your neon lights installation complete, it’s vital to give it a thorough final inspection. This step ensures that everything is in working order and provides an opportunity to address any potential issues before hitting the road.
Start by turning on your lights and checking each individual neon tube for any signs of malfunction, such as dimness or irregular flashing. Pay close attention to the wiring connections and ensure they are not overheating or emitting unusual odors.
| Inspection Checklist: |
|---|
| Check each neon tube for proper functionality. |
| Inspect wiring connections for signs of overheating, burning, or damage. |
| Ensure all lighting effects, such as color changes or scrolling patterns, are functioning correctly. |
| Verify that the control switches or remotes are working as intended. |
By following this final inspection checklist, you can identify and rectify any potential issues before hitting the road. Once you are satisfied with your neon lights installation, you can confidently showcase your vibrant car lighting system and turn heads wherever you go.
Maintenance And Care Tips
Neon lights are a fantastic addition to any car, providing a vibrant and eye-catching display that can make your vehicle stand out from the crowd. To ensure that your neon lights continue to look their best and last for a long time, it’s important to take proper care of them. Here, we will discuss some essential maintenance and care tips to keep your neon lights shining bright.
Learn how to effectively clean and maintain the neon lights
Cleaning and maintaining your neon lights is crucial to ensure they stay in optimal condition. Here are some tips to help you keep your neon lights looking their best:
- Regular dusting: Dust tends to accumulate on the surface of the neon lights over time. To remove the dust, you can use a soft, microfiber cloth or a brush with gentle bristles. Gently wipe the surface of the lights, making sure not to apply too much pressure to avoid any damage.
- Use mild cleaning solutions: In some cases, you may notice that the neon lights have become dirty or sticky. For stubborn dirt or debris, you can use a mild cleaning solution. Mix a small amount of gentle dish soap with warm water and apply the solution to a clean cloth. Wipe the surface of the lights with the damp cloth and then use a dry cloth to remove any excess moisture.
- Avoid using harsh chemicals: Harsh chemicals, such as ammonia or bleach, can damage the neon lights. It’s important to avoid using any abrasive cleaners or harsh chemicals when cleaning your neon lights. Stick to mild cleaning solutions and gentle cleaning tools to preserve the quality of the lights.
Understand the best practices for prolonging their lifespan
Prolonging the lifespan of your neon lights is essential for getting the most out of your investment. By following these best practices, you can ensure that your neon lights last for a long time:
- Avoid excessive heat: Neon lights are sensitive to extreme temperatures, especially heat. It’s crucial to keep the lights away from heat sources, such as direct sunlight or hot car engine parts. Excessive heat can cause the lights to degrade faster and may lead to permanent damage.
- Protect from moisture: Neon lights are not waterproof, so it’s important to protect them from moisture. Avoid driving in heavy rain or through deep puddles, as the water can seep into the lights and cause damage. Additionally, consider applying a protective coating or sealant to the lights to add an extra layer of protection against moisture.
- Check for loose connections: Periodically check the connections between the neon lights and the power source. Loose connections can lead to flickering lights or complete malfunction. Ensure that all connections are secure and tight to avoid any issues.
Taking care of your neon lights with regular cleaning and adhering to best practices for maintenance can extend their lifespan and keep them looking their best for years to come. By investing a little time and effort into maintaining your neon lights, you can enjoy their vibrant glow and make your car a true attention-grabber on the road.
Frequently Asked Questions For How To Install Neon Lights Under Car
Do Underglow Lights Drain Your Battery?
Underglow lights can drain your vehicle’s battery if left on for extended periods. The lights draw power from the battery, so it’s essential to use them responsibly to avoid battery drain.
How Do I Add Underglow To My Car?
To add underglow to your car, follow these steps: 1. Choose an underglow kit that fits your car’s specifications. 2. Thoroughly clean the area where you will install the underglow lights. 3. Position and secure the lights under your car with adhesive or mounting brackets.
4. Connect the lights to the car’s electrical system, ensuring proper wiring and grounding. 5. Test the underglow lights to ensure they are working correctly and comply with local regulations.
How Do You Hook Up Neon Lights To A Car?
To hook up neon lights to your car: 1. Select a suitable location to mount the lights. 2. Connect the positive wire to the car’s battery terminal. 3. Ground the negative wire to a metal part of the car’s frame.
4. Route the wires through the engine bay to the interior of the car. 5. Connect the wires to a switch or controller for easy operation.
How Do You Stick Led Lights Under A Car?
To stick LED lights under a car, follow these steps: – Clean the surface where the lights will go. – Use adhesive pads or strips to attach the lights to the car’s chassis. – Secure the wiring using clips or adhesive tape.
– Connect the LED lights to a power source, like the car’s battery. – Test the lights to ensure they’re working properly.
Conclusion
Adding neon lights under your car can give it a unique and eye-catching look. By following the step-by-step guide in this blog post, you can easily install neon lights on your own. Remember to choose high-quality lights, gather all the necessary tools, and take safety precautions.
With a little time and effort, you’ll have a vibrant and stylish ride that’s bound to turn heads wherever you go. So, get started and let your car shine bright!