To install a lower control arm, first, jack up your vehicle and secure it with jack stands. Then, remove the existing control arm by loosening the bolts and disconnecting any attached components.
Install the new control arm by aligning it with the mounting points on the frame and suspension, then tighten the bolts to the manufacturer’s specifications. Finally, reconnect any components that were disconnected and lower the vehicle off the jack stands.
Installing a lower control arm is an essential task in maintaining the suspension system of a vehicle. Over time, control arms may wear out or suffer damage, leading to an unstable and unsafe driving experience. By replacing the control arm, you can restore the proper functioning of the suspension and ensure a smooth ride. However, understanding the process of installing a lower control arm is crucial for the successful completion of this task.
In this guide, we will provide you with step-by-step instructions on how to install a lower control arm properly, ensuring your vehicle’s safety on the road. So, let’s dive in and learn the necessary steps to accomplish this task effectively.
Understanding The Function And Significance Of Lower Control Arms
When it comes to the suspension system of a vehicle, the lower control arms play a crucial role in maintaining stability and control. These arms are an integral part of the front suspension, connecting the wheel hubs to the frame or chassis of the vehicle. In this section, we will delve into the explanation of lower control arms in a vehicle suspension system and discuss their significant role in ensuring a smooth and secure driving experience.
Explanation of lower control arms in a vehicle suspension system
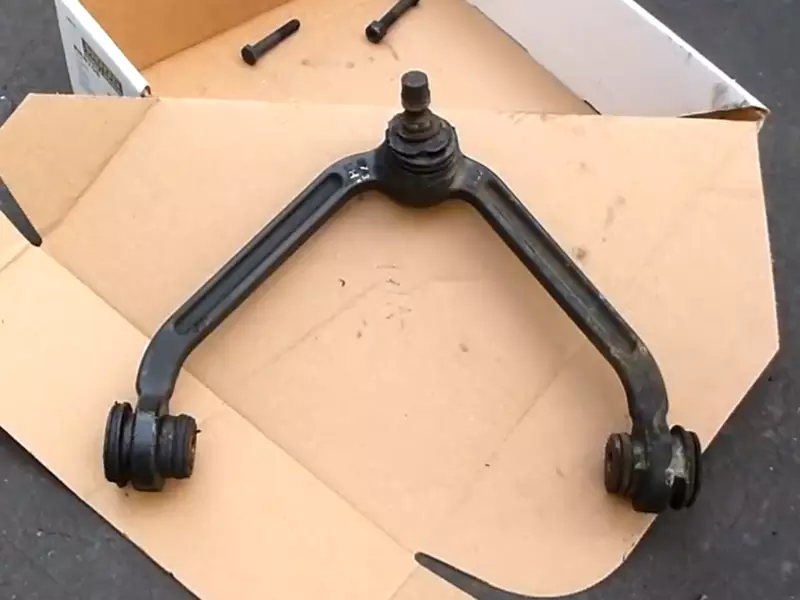
Before we discuss the role and significance of lower control arms, it’s essential to have a clear understanding of their function within the suspension system. Lower control arms, also known as A-arms, are a vital component of the front suspension setup in most vehicles. They are generally made of strong and durable materials such as steel or aluminum, ensuring optimal strength and stability.
The primary function of lower control arms is to connect the wheel hubs or spindles to the vehicle’s frame or subframe. This connection allows the tires and wheels to move up and down independently while keeping them aligned with the vehicle’s body and maintaining proper suspension geometry.
Discussing the role of lower control arms in maintaining stability and control
Lower control arms play a pivotal role in maintaining stability and control while driving. Here are some key points highlighting their significance:
- Stability: Lower control arms are responsible for absorbing and managing the forces applied to the wheels, especially during cornering or uneven road surfaces. The arms ensure that the wheels stay in contact with the road, providing stability and preventing excessive body roll.
- Control: By connecting the wheels to the vehicle’s frame, lower control arms enable precise control over the wheel’s movement. This allows for accurate steering response and enhanced maneuverability, contributing to a safer and more enjoyable driving experience.
- Suspension Alignment: Lower control arms help maintain proper suspension alignment, which is crucial for even tire wear and optimal handling. They work together with other suspension components to ensure that each wheel performs as intended, maximizing overall performance and comfort.
- Impact Absorption: As part of the suspension system, lower control arms help absorb and distribute the impact forces generated by bumps, potholes, and other road irregularities. This minimizes the transfer of these forces to the vehicle’s chassis, enhancing ride comfort and reducing the risk of damage to other components.
In conclusion, lower control arms are integral to the suspension system of a vehicle, contributing to stability, control, and overall performance. Understanding their function and significance can help drivers appreciate the importance of maintaining and installing high-quality control arms to ensure a smooth and reliable driving experience.
Essential Tools For The Installation Process
When it comes to installing a lower control arm, having the right tools is crucial. Using the correct tools not only makes the installation process easier but also ensures a successful outcome. Here is a list of specific tools you will need for the job:
List of specific tools needed for the job
To ensure a smooth installation process, make sure you have the following tools ready:
- Jack and jack stands
- Wrench set
- Torque wrench
- Hammer
- Pry bar
- Ball joint separator
- Socket set
- Pliers
- Wire brush
- Penetrating lubricant
Having these tools on hand will give you the necessary equipment to remove and install the lower control arm effectively.
Importance of using the correct tools for a successful installation
Using the correct tools is essential for a successful lower control arm installation. Here’s why:
- Efficiency: Having the right tools ensures that you can work efficiently and complete the installation process in a timely manner. This is especially important if you have other tasks to attend to or a limited amount of time for the installation.
- Accuracy: The correct tools enable you to perform the installation accurately, ensuring that every component is properly secured and aligned. This helps prevent issues such as misalignment, uneven wear, and premature part failure.
- Safety: Using the right tools reduces the risk of accidents and injuries during the installation process. They are designed to provide a secure grip, proper leverage, and prevent damage to the surrounding components.
- Longevity: By using the appropriate tools, you minimize the chances of damaging the lower control arm or other related parts. This increases the longevity of your suspension system and reduces the need for future repairs or replacements.
In conclusion, having the specific tools required for installing a lower control arm ensures efficiency, accuracy, safety, and longevity. Make sure you have the necessary tools before you embark on this task to ensure a successful installation.
Required Materials For Lower Control Arm Installation
When it comes to replacing or installing a lower control arm, having the right materials is essential for a successful and long-lasting result. Using high-quality materials not only ensures the stability and safety of your vehicle but also guarantees a smooth and comfortable ride. In this guide, we will discuss the list of materials needed for the installation and emphasize the importance of using top-grade components.

List of materials needed for the installation
Before diving into the installation process, it is crucial to gather all the necessary materials. Below is a comprehensive list of the items you will need:
| Materials | Quantity |
|---|---|
| Lower control arm | 2 (one for each side) |
| Control arm bushings | 2 (one for each side) |
| Ball joints | 2 (one for each side) |
| Coil spring compressor | 1 |
| Wrench set | 1 |
| Socket set | 1 |
| Torque wrench | 1 |
| Jack | 1 |
| Jack stands | 2 |
| Penetrating oil | 1 can |
| Thread-locking compound | 1 tube |
It is important to note that the quantity mentioned in the table is for the installation of both sides of the vehicle.
Now that you have a complete list of the required materials, it is crucial to ensure that each component is of high quality. Using inferior or substandard materials can result in premature wear and tear, leading to costly repairs and even compromised safety. Investing in top-grade lower control arms, control arm bushings, ball joints, and other necessary parts will not only save you money in the long run but also provide you with peace of mind.
Additionally, always remember to follow the manufacturer’s instructions and torque specifications when installing the lower control arm. This ensures the proper alignment and functioning of the newly installed components, ultimately prolonging the lifespan of your vehicle’s suspension system.
Installing a lower control arm requires a set of specific materials. By using the right components and relying on high-quality materials, you can ensure a durable and reliable suspension system that will withstand the test of time.
Inspecting and Preparing the Vehicle for the Installation
Prior to installing the lower control arm, it is essential to thoroughly inspect and prepare your vehicle. Follow these steps:
Step 1: Gather the Required Tools and Parts
Before you begin, ensure you have all the necessary tools and parts readily available. This includes:
- Jack and jack stands
- Wrenches and socket set
- Torque wrench
- Hammer
- New lower control arm
- New bushings and hardware
Step 2: Examine the Old Lower Control Arm
Carefully inspect the existing lower control arm for any signs of damage or wear. Look for issues such as cracked bushings, bent components, or excessive corrosion. If necessary, take note of these issues to address during the installation process.
Step 3: Clean and Prepare the Mounting Area
Thoroughly clean the mounting area where the new lower control arm will be installed. Remove any dirt, rust, or debris that could interfere with a proper fit. Use a wire brush or sandpaper to smooth out any rough surfaces.
Step 4: Lubricate Bushings and Bolts
Apply a suitable lubricant to the bushings and bolts of the new lower control arm. This will aid in the smooth movement and prevent premature wear.
Step 5: Refer to the Vehicle Manual or Guidelines
Take the time to consult your vehicle’s manual or manufacturer’s guidelines for any specific instructions or torque specifications related to the installation of the lower control arm. Adhering to these guidelines will ensure a proper and secure fit.
By following the above safety precautions and inspecting/ preparing your vehicle accordingly, you are now ready to proceed with the installation of the lower control arm. Stay tuned for the next section, where we will guide you through the step-by-step process of installing the lower control arm.
Removing The Old Lower Control Arms
Step-by-step instructions for removing the old lower control arm
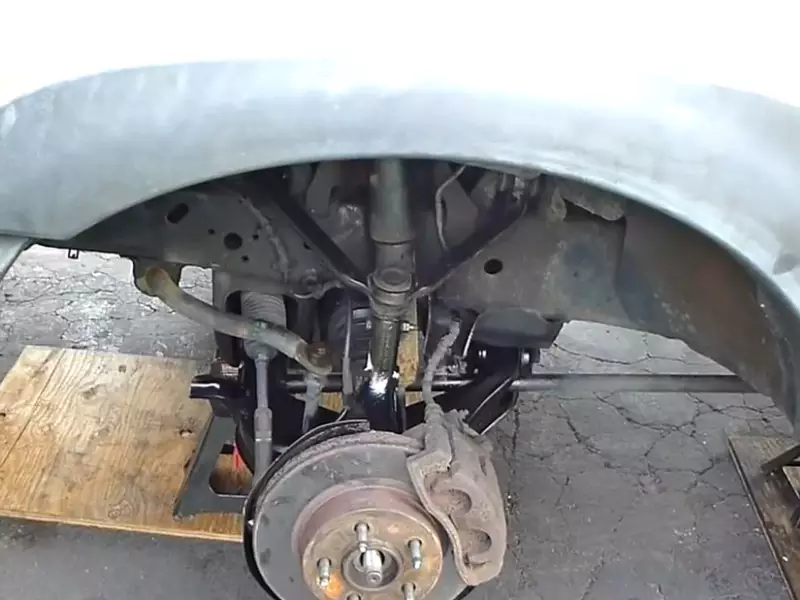
When it comes to maintaining your vehicle’s suspension system, knowing how to properly remove and replace components like the lower control arm is essential. The lower control arm connects the chassis to the front wheels, providing stability and allowing for smooth handling. Whether you’re dealing with a worn-out control arm or simply want to upgrade to a new one, follow these step-by-step instructions to remove the old lower control arm.
1. Prepare the vehicle: Start by ensuring that your vehicle is parked on a flat and stable surface. Engage the parking brake and chock the rear wheels to prevent any movement. Safety is crucial, so it’s recommended to wear safety glasses and work gloves throughout the process.
2. Loosen lug nuts: Use a lug wrench or impact wrench to loosen the lug nuts on the wheel or wheels associated with the control arm you are replacing. It’s essential to loosen the lug nuts before raising the vehicle to ensure stability.
3. Lift the vehicle: Using a jack, lift the front end of the vehicle off the ground until the wheels are completely off the surface. Place jack stands under the vehicle’s frame near the control arm mounting points for added security.
4. Remove suspension components: Start by disconnecting any components that are attached to the control arm, such as the sway bar link, tie rod end, and ball joint. Depending on the vehicle, you may need various tools, such as a wrench or socket set, to loosen and remove these components.
5. Unbolt the control arm: Locate the bolts securing the control arm to both the frame and the spindle assembly. Use a combination of a socket set and a breaker bar to remove these bolts. Keep in mind that some vehicles may require separating the ball joint from the control arm or spindle before completely removing the control arm.
6. Remove the old control arm: With all the bolts detached, the old control arm should now be free to remove. Carefully maneuver the control arm away from the vehicle, making sure not to damage any surrounding parts or components.
Tips for dealing with rusted or stubborn components
Dealing with rusted or stubborn components during the removal process can be a common challenge. Here are some tips to help you overcome these obstacles:
- Apply penetrating oil: If you encounter rusted or seized bolts, apply a generous amount of penetrating oil to the affected area. Allow it to penetrate for a few minutes or even overnight, if possible, to help loosen the rust and make removal easier.
- Use heat: In extreme cases, where penetrating oil may not be effective, heating the bolts with a propane torch can help to break the rust bonds. Take caution not to damage surrounding components or cause fires during this process.
- Use a breaker bar: If you’re facing tight or stubborn bolts, a breaker bar can provide additional leverage to help loosen them. This bar, when paired with the appropriate socket, allows for greater force to be applied, aiding in the removal process.
- Tap with a hammer: Tapping gently on a stubborn bolt or component with a hammer can help to break any corrosion or rust bonds. Be careful not to strike too hard or damage the surrounding area.
- Consider professional help: If all else fails or you’re uncomfortable with the removal process, it’s always best to consult a professional mechanic. They have the experience and tools necessary to deal with rusted or stubborn components safely and efficiently.
By following these step-by-step instructions and utilizing the tips mentioned, you’ll be able to confidently remove the old lower control arm from your vehicle. Remember, safety should always be a top priority, and if you are unsure about any part of the process, it’s best to seek professional assistance.
Installing The New Lower Control Arms
Installing the new lower control arms is a critical step in ensuring the proper functioning and stability of your vehicle. It is essential to follow step-by-step instructions for a successful installation. Failing to do so can lead to unsafe driving conditions and potentially costly repairs in the future. In this section, we will provide you with a comprehensive guide on how to install the new lower control arms, highlighting critical points to ensure a proper installation.
Step-by-Step Instructions for Installing the New Lower Control Arm
Now that you have removed the old lower control arms, it’s time to install the new ones. Follow these step-by-step instructions to ensure a smooth installation process:
- Position the new lower control arm: Place the new lower control arm in the correct position, aligning it with the mounting points on the chassis and the knuckle. Make sure it is properly aligned before proceeding to the next step.
- Tighten the mounting bolts: Insert the mounting bolts through the control arm and hand-tighten them initially. Gradually tighten the bolts using a torque wrench and the manufacturer’s recommended torque specifications. Ensure that the bolts are tightened to the specified torque, but be careful not to overtighten them as it can damage the control arm or the chassis.
- Install the bushings and nuts: If your lower control arm comes with replaceable bushings, install them in the designated positions. Then, insert the nuts onto the bolts and tighten them securely.
- Connect the control arm to the sway bar: If your vehicle has a sway bar and it was disconnected during the removal process, reattach it to the lower control arm using the appropriate bolts and nuts. Ensure that all connections are tight and secure.
- Double-check the installation: After completing the installation, visually inspect the lower control arm to ensure that all bolts, bushings, and nuts are properly installed and tightened. Confirm that there is no excessive play or movement in the control arm when gently shaking it.
It’s worth noting that the installation process may vary depending on the specific make and model of your vehicle. Refer to the manufacturer’s instructions or consult a professional for any model-specific guidelines.
Proper installation of the new lower control arm is crucial for the smooth functionality of your vehicle’s suspension system and overall safety. Taking the time to follow these step-by-step instructions will help ensure a successful installation. So, get ready to enjoy a smoother and more comfortable ride with your newly installed lower control arms!
Reassembling And Testing
Reassembling and Testing
After successfully installing the lower control arms in your vehicle, the next crucial step is to reassemble the remaining components. This is an important stage in the process as it ensures that all parts are properly aligned and attached, allowing for optimal performance and functionality.
Reassembling the remaining components after installing the lower control arms
Now that the lower control arms are securely in place, it’s time to reassemble the remaining components of your vehicle’s suspension system. This typically includes the sway bar links, tie rod ends, steering knuckle, and the wheel hub assembly.
When reassembling these components, it is crucial to follow the manufacturer’s guidelines and torque specifications to ensure proper installation. This will help prevent any issues such as component failure or premature wear.
Here’s a step-by-step guide for reassembling the remaining components:
- Start by attaching the sway bar links to the lower control arms. Make sure to tighten the fasteners to the specified torque.
- Next, connect the tie rod ends to the steering knuckle. Again, follow the recommended torque specifications.
- Attach the wheel hub assembly to the steering knuckle and tighten the fasteners securely.
- Finally, double-check all connections and ensure that all components are properly aligned and tightened. This will help maintain the stability and performance of your vehicle’s suspension system.
Importance of thorough testing for functionality and safety
Once the reassembly process is complete, it is crucial to thoroughly test the functionality and safety of your vehicle’s suspension system. This step is often overlooked but is of utmost importance as it ensures that everything is working as it should and that you can confidently drive your vehicle without any concerns.
Here are some essential tests to conduct:
- Perform a visual inspection to check for any visible signs of misalignment or abnormalities. Look for any loose connections or damaged components.
- Take your vehicle for a test drive, paying close attention to how it handles and maneuvers. Listen for any unusual noises such as clunking or squeaking.
- Test the suspension system by driving over various road surfaces, including bumps and potholes, to ensure that it can absorb shocks and maintain stability.
- If you notice any issues during the testing process, it is essential to address them promptly. Consult with a professional mechanic if necessary.
By thoroughly testing your newly installed lower control arms and the entire suspension system, you can ensure that your vehicle is safe to drive and that all components are functioning optimally. This will provide you with peace of mind and confidence in your vehicle’s performance on the road.
Identifying Potential Issues During The Installation Process
Installing a lower control arm can be a complex process that requires attention to detail and careful consideration. However, even with the best intentions, problems may arise during the installation. In this section, we will discuss some common issues that you may encounter and provide troubleshooting tips and solutions to help you overcome them.
Discussing common problems that may arise during the installation
While installing a lower control arm, it’s important to be aware of potential issues that can occur. By identifying these problems early on, you can find suitable solutions and ensure a successful installation. Some common problems include:
- Misalignment: One of the most common issues during the installation process is misalignment of the control arm. This can be caused by improper placement or incorrect positioning of the control arm. To avoid this, make sure to carefully measure the placement and alignment before securing the arm in place.
- Difficulty in Bolt Installation: Another issue that may arise is difficulty in installing the bolts. This can happen due to corrosion, damaged threads, or improper positioning. One solution is to clean the threads with a wire brush and apply lubricating oil to make the installation smoother. In case of damaged threads, consider replacing the bolts.
- Noise or Vibration: Sometimes, after the installation, you may experience noise or vibration while driving. This could indicate a problem with the control arm or suspension system. Check for loose or worn-out components, such as bushings or ball joints, and replace if necessary.
Providing troubleshooting tips and solutions
Addressing the problems that may arise during the installation process promptly can save you time and frustration in the long run. Here are some troubleshooting tips and solutions for common issues:
Misalignment:
- Ensure proper alignment by using a measuring tool and double-checking the placement of the control arm.
- Avoid over-tightening the bolts as this can lead to misalignment. Follow the manufacturer’s recommended torque specifications.
Difficulty in Bolt Installation:
- Inspect the bolts for any signs of damage or corrosion. Replace faulty bolts to ensure a secure installation.
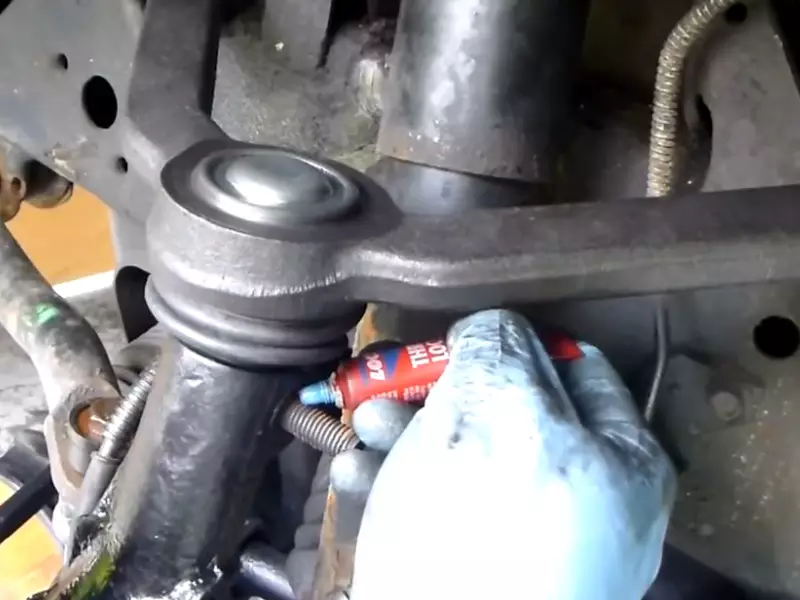
- Apply a thread-locking compound to prevent bolts from coming loose due to vibrations.
Noise or Vibration:
- Check all components of the control arm and suspension system for signs of wear or damage.
- Tighten any loose components and replace worn-out parts, such as bushings or ball joints.
- Consider upgrading to higher-quality components to reduce noise and vibrations.
By being aware of potential issues and following these troubleshooting tips, you can overcome any challenges that arise during the installation process. Remember, if you are unsure about any step, it’s always best to consult a professional for guidance.
Common Mistakes And How To Avoid Them
When it comes to installing a lower control arm, there are several common mistakes that can be easily avoided with the right guidance. Knowing what these mistakes are and how to prevent them can make a significant difference in the success of your installation. In this section, we will highlight some of these mistakes and offer valuable advice on how to avoid them.
Highlighting mistakes often made during lower control arm installation
During the installation of a lower control arm, it is crucial to be aware of the following common mistakes:
- Incorrect alignment of the control arm
- Using incorrect torque specifications
- Not properly securing the control arm bushings
- Failing to inspect and replace worn components
- Improperly torquing the ball joint or tie rod end
Offering guidance on how to prevent these mistakes for a successful installation
To ensure a successful installation and prevent these common mistakes, follow these valuable guidelines:
- Proper alignment: Before beginning the installation, make sure to carefully align the control arm to the correct position. Consult the vehicle’s manual or seek professional advice if needed.
- Correct torque specifications: Always refer to the manufacturer’s recommended torque specifications for fasteners and follow them diligently. Using a torque wrench is highly recommended to achieve the appropriate torque.
- Securing control arm bushings: Inspect the control arm bushings for any signs of wear or damage. Use the proper tools and techniques to ensure the bushings are securely in place during installation.
- Inspect and replace worn components: Take the time to thoroughly inspect all components related to the lower control arm, such as ball joints and tie rod ends. If any parts show signs of wear or damage, replace them before proceeding further.
- Properly torque ball joint and tie rod end: It is crucial to correctly torque the ball joint and tie rod end to the manufacturer’s specifications. Over or under torquing can lead to premature failure or incorrect vehicle alignment.
By following these guidelines and paying attention to the common mistakes mentioned, you can avoid potential pitfalls and ensure a successful lower control arm installation. Taking the time to do the job properly will not only save you from future problems but also contribute to a safer and smoother driving experience.
Tips From Professional Mechanics
When it comes to installing a lower control arm, the process can be quite intimidating for those with little experience. However, with the right guidance and advice from professional mechanics, you can ensure a smooth and efficient installation. In this article, we’ll be sharing insider tips and best practices to help you complete the installation process with confidence.
Advice from Experienced Mechanics on Best Practices for the Installation
Installing a lower control arm requires precision and careful attention to detail. Here are some expert tips you should keep in mind:
- 1. Gather the Necessary Tools: Before you begin the installation, make sure you have all the required tools on hand. This includes a torque wrench, sockets, a ball joint separator, pry bar, and a sturdy jack and jack stands.
- 2. Safety First: Safety should always be your top priority when working on your vehicle. Before starting, ensure that the vehicle is securely supported on jack stands and that the wheels are properly chocked to prevent any accidental movement.
- 3. Follow the Manufacturer’s Instructions: Each vehicle model may have specific instructions for control arm installation. It’s crucial to refer to the manufacturer’s guidelines and follow the recommended torque specifications for tightening the nuts and bolts.
- 4. Inspect the Control Arm: Before installing the new control arm, thoroughly inspect it for any signs of damage or defects. Look for worn-out bushings, corrosion, or any other visible issues. If you notice any problems, replace the control arm before proceeding with the installation.
- 5. Properly Position the Control Arm: When installing the new control arm, ensure it is positioned correctly and aligned with the mounting points. Improper alignment can affect the vehicle’s suspension system and overall performance.
Sharing Insider Tips to Ensure a Smooth and Efficient Installation Process
Here are some additional tips shared by professional mechanics to help you during the installation process:
- 1. Use a Lubricant: Applying a lubricant to the control arm bushings can make the installation easier and prevent any unnecessary friction. This will also help prolong the lifespan of the control arm.
- 2. Undo the Suspension Components Gradually: When removing the old control arm, it is recommended to gradually loosen the suspension components. This will help prevent any sudden release of tension and make the removal process smoother.
- 3. Tighten Nuts and Bolts Gradually: When tightening the nuts and bolts, it’s essential to do it gradually and in a cross-pattern sequence. This ensures even pressure distribution and minimizes the risk of component misalignment.
- 4. Test for Proper Torque: After installing the lower control arm, it’s important to check the torque of the nuts and bolts again. This ensures proper tightening and helps avoid any potential issues down the road.
Following these professional tips and best practices will help you install the lower control arm correctly, ensuring optimal performance and safety for your vehicle. Remember to always prioritize safety and consult a professional if you’re unsure about any step of the process.
Maintaining And Inspecting Lower Control Arms
Lower control arms are an integral part of a vehicle’s suspension system, helping to support the weight of the vehicle and maintain stability during cornering and braking. Regular maintenance and inspections are crucial to ensure the longevity and proper functioning of the lower control arms. In this section, we will discuss some essential tips on how to properly maintain and inspect lower control arms, as well as identify signs of wear or damage that may require replacement.
Tips on how to properly maintain and inspect lower control arms for longevity
- Regular cleaning: Lower control arms are exposed to dirt, debris, and road salt, which can cause corrosion and weaken the metal. It’s important to clean the control arms regularly using a mild soap and water solution and a soft brush. Make sure to rinse thoroughly and dry completely to prevent any moisture buildup.
- Lubrication: Applying a high-quality lubricant to the control arm bushings and pivot points helps reduce friction and wear. It’s recommended to use a silicone-based lubricant that is compatible with the control arm materials. Be sure to follow the manufacturer’s instructions and avoid over-lubricating, as excessive lubrication can attract dirt and debris.
- Torque checks: Over time, the nuts and bolts connecting the control arms to the chassis can loosen due to vibrations and normal wear. Regularly inspect and tighten the fasteners to the manufacturer’s recommended torque specification. Use a torque wrench to ensure proper tightening without over-tightening.
Signs of wear or damage that may require replacement
Despite proper maintenance, lower control arms can still experience wear and damage over time. It’s important to regularly inspect the control arms for any signs that indicate the need for replacement. Here are some common signs of wear or damage:
- Excessive play or looseness: If you notice excessive play or looseness in the control arms, it may indicate worn-out bushings or ball joints. This can lead to poor handling, uneven tire wear, and a noticeable decrease in vehicle stability.
- Cracks or bends: Inspect the control arms visually for any visible cracks or bends. These structural deformities can compromise the integrity of the arms and should be addressed immediately.
- Unusual noises: Pay attention to any unusual squeaks, clunks, or rattles coming from the front suspension. These noises can indicate worn-out or damaged control arm components.
- Uneven tire wear: Misaligned or damaged control arms can cause uneven tire wear, most commonly seen as excessive wear on the inner or outer edges of the tires. Regularly inspect your tires and look for signs of uneven wear patterns.
Regular maintenance and timely replacement of worn or damaged lower control arms are essential to ensure continued safe and smooth operation of your vehicle. By following these tips and keeping a vigilant eye for signs of wear or damage, you can prolong the lifespan of your lower control arms and maintain optimal performance.
Frequently Asked Questions On How To Install Lower Control Arm
Can I Change Lower Control Arms Myself?
Yes, you can change lower control arms yourself. It is a task that can be performed by car owners who have basic mechanical knowledge. Ensure you have the necessary tools and follow proper safety precautions. If unsure, it is recommended to consult a professional mechanic.
How Much Is Labor To Install Lower Control Arm?
Labor costs for installing a lower control arm can vary based on factors such as location and the specific vehicle. However, on average, labor for this type of installation can range from $150 to $300.
Is It Ok To Just Replace 1 Lower Control Arm?
Yes, it is usually fine to replace just one lower control arm. However, it is recommended to replace both at the same time to ensure even wear and optimal performance.
How Long Does It Take To Replace A Lower Control Arm?
Replacing a lower control arm typically takes about 2-3 hours. However, the time may vary depending on the vehicle model and the expertise of the mechanic. It is always recommended to consult with a professional for an accurate estimate.
Conclusion
To sum it up, installing a lower control arm is an essential task that ensures the smooth operation and stability of your vehicle’s suspension system. By following the step-by-step guide outlined you can confidently tackle this job on your own.
Remember to prioritize safety, gather the necessary tools, and take your time to ensure a proper installation. With a little patience and attention to detail, you’ll be back on the road with improved handling and performance in no time. Happy wrenching!