To install a license plate on the front of your car, first, locate the two mounting holes on the front bumper. Then, use screws or fasteners to attach the license plate securely to the bumper.
Make sure the plate is straight and level before tightening the screws. License plates are essential for identifying vehicles on the road, and it is a legal requirement to display them properly. While most people are familiar with installing a rear license plate, knowing how to install one on the front of a car is equally important.
Whether you are a new driver or have recently purchased a vehicle, understanding the correct procedure for front license plate installation will ensure compliance with local laws and regulations. In this guide, we will provide simple and straightforward instructions for securely mounting your license plate, allowing you to drive legally and avoid any potential penalties.

Gathering The Necessary Tools And Materials
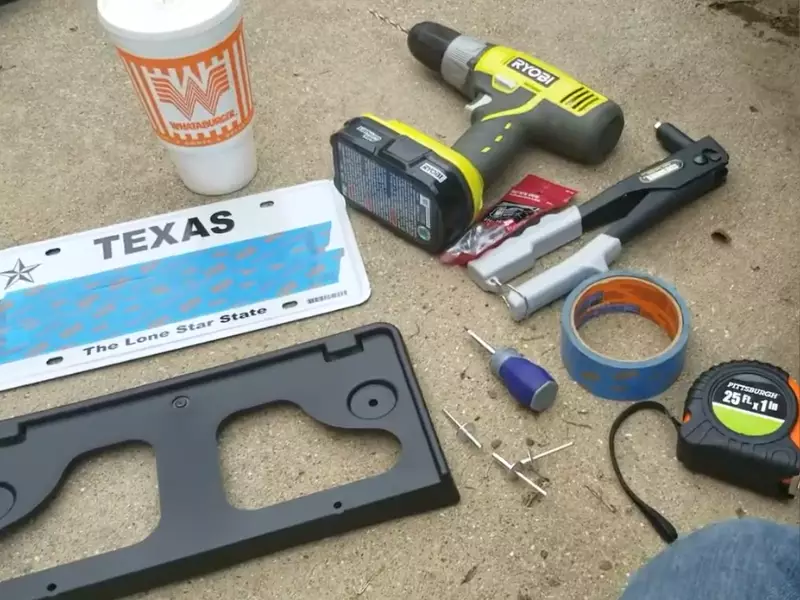
Before you can install a license plate on the front of your car, it’s important to gather all the necessary tools and materials. By having everything ready beforehand, you’ll be able to complete the installation process smoothly and efficiently. Here are the essential items you’ll need:
License plate
The first item you need is, of course, the license plate itself. This is a necessary requirement for every vehicle and serves as a unique identification code for your car. Ensure that your license plate is valid and up to date, adhering to your local regulations.
License plate frame (optional)
While not mandatory, a license plate frame can enhance the appearance of your car and protect the edges of the license plate from damage. If you decide to use one, make sure it fits the dimensions of your license plate and complements the overall style of your vehicle.
Screwdriver
A screwdriver is an essential tool for attaching your license plate to the front of your car. Depending on the type of screws or bolts used, you will need either a flathead or a Phillips-head screwdriver. Ensure that the screwdriver you choose is appropriate for the job at hand.
Screws or bolts
When it comes to attaching the license plate, you’ll need screws or bolts that are suitable for this purpose. Make sure you have the right size and type of fasteners to securely mount the license plate onto your car’s front bumper or grille.
Tape measure or ruler
It’s important to properly position your license plate on the front of your car. To ensure accuracy and symmetry, a tape measure or ruler will come in handy. Use this tool to measure and mark the appropriate distances to align and center your license plate correctly.
Pen or marker
Lastly, have a pen or marker ready to mark the drill holes on your car’s front bumper or grille. This will help guide the placement of the screws or bolts and ensure that they are positioned correctly.
By gathering these essential tools and materials, you’ll be fully prepared to install your license plate on the front of your car. With everything in place, you can move on to the next steps of the installation process with confidence and ease.
Preparing Your Car For License Plate Installation
Installing a license plate on the front of your car is a necessary step to ensure that you are in compliance with local laws and regulations. Before proceeding with the installation, it is important to familiarize yourself with the specific requirements for license plate display in your area. This includes understanding the rules regarding the placement, visibility, and aesthetics of the license plate. In this section, we will discuss the key considerations you need to keep in mind when preparing your car for license plate installation.
Ensuring compliance with local laws and regulations
Before you start the installation process, it is crucial to ensure that you are in compliance with the local laws and regulations governing license plate display. Failure to adhere to these rules can result in fines or even legal repercussions. To make sure you are following the proper guidelines, check your state’s Department of Motor Vehicles (DMV) website or consult your local law enforcement agency.
Familiarizing yourself with local requirements for license plate display
Once you are aware of the laws and regulations, familiarize yourself with the specific requirements for license plate display in your area. This may include guidelines on the size, color, and font of the license plate characters, as well as any additional registration stickers or tags that need to be displayed. By understanding these requirements, you can avoid any potential issues with law enforcement and ensure that your license plate is displayed correctly.
Choosing the right location for the license plate
When it comes to choosing the location for your license plate, there are a few factors to consider. First and foremost, make sure that the plate is placed in a location that is visible to law enforcement and other drivers. The placement should not obstruct the view of any necessary lights or features on the front of your vehicle.
Additionally, consider the aesthetics of the location. You may want to choose a spot that is symmetrical and visually appealing, such as the center of the bumper or grille. However, be mindful of any specific requirements in your area regarding the placement of the license plate.
| Factors to consider when choosing the location: |
|---|
| Visibility to law enforcement and other drivers |
| Obstruction of lights or features on the front of the vehicle |
| Compliance with local requirements |
| Symmetry and aesthetic appeal |
By carefully considering these factors, you can choose a location for your license plate that is both compliant with local regulations and aesthetically pleasing.
In conclusion, preparing your car for license plate installation involves ensuring compliance with local laws, familiarizing yourself with the specific requirements, and choosing the right location for the plate. By following these steps, you can display your license plate properly and avoid any potential legal issues.
Installing The License Plate
Installing a license plate on the front of your car is a simple task that can be done with just a few tools. This step-by-step guide will walk you through the process of cleaning the area, attaching the license plate frame, aligning the frame with the license plate holes, securing the frame to the car, and finally, mounting the license plate onto the frame. By following these steps, you can ensure that your license plate is securely and properly installed on your car.
Cleaning the area where the license plate will be installed
Before you begin the installation process, it’s important to clean the area where the license plate will be installed. This will ensure that the license plate adheres properly to the car and stays in place. Start by using a mild soap and water solution to clean the area. Gently scrub the area with a soft cloth or sponge to remove any dirt, debris, or residue. Rinse the area thoroughly and dry it with a clean cloth to ensure a clean and dry surface for the license plate.
Removing any dirt or debris
After cleaning the area, inspect it for any remaining dirt or debris. Use a soft brush or cloth to remove any stubborn dirt or debris that may be stuck on the surface. Ensure that the area is completely clean and free from any particles that could prevent the license plate from adhering properly.
Attaching the license plate frame (if applicable)
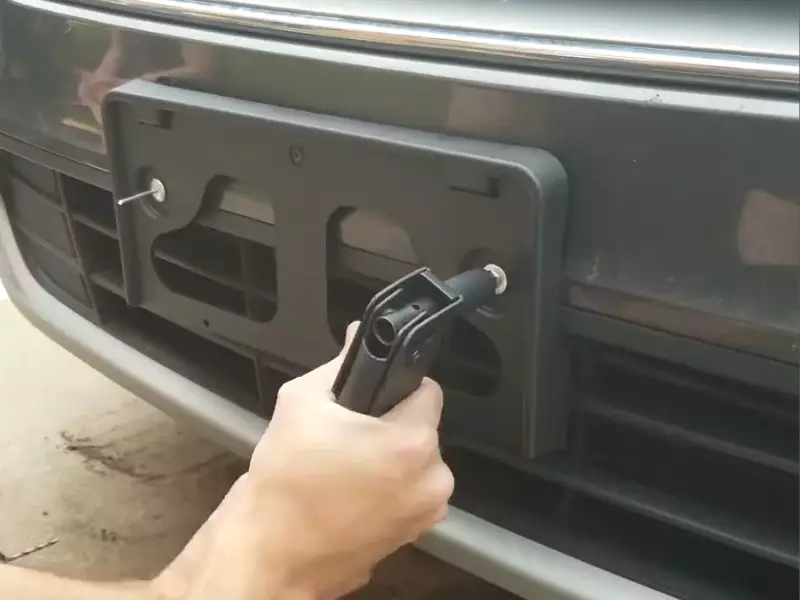
If your car has a license plate frame, you will need to attach it before installing the license plate. Place the license plate frame over the area where the license plate will be installed and ensure that it is centered and aligned. Use the mounting holes on the license plate frame as a guide for placement.
Aligning the frame with the license plate holes
Once the license plate frame is in position, align it with the pre-drilled holes on the license plate. Ensure that the frame is straight and level before proceeding to the next step.
Securing the frame of the car with screws or bolts
With the frame aligned and in position, use screws or bolts to secure it to the car. Insert the screws or bolts through the mounting holes on the license plate frame and tighten them securely using a screwdriver or wrench. Ensure that the frame is securely attached to the car to prevent any movement or rattling.
Mounting the license plate onto the frame (if applicable)
If your license plate does not come with a frame, you can skip this step. However, if you do have a license plate frame, you will need to mount the license plate onto the frame. Align the license plate holes with the corresponding holes on the frame and ensure that they are lined up.
Inserting screws through the holes and tightening them securely
Once the license plate and frame are aligned, insert screws through the holes and tighten them securely using a screwdriver or wrench. Make sure to tighten the screws evenly to avoid any imbalance or crookedness in the license plate.
Congratulations! You have successfully installed your license plate on the front of your car. By following these steps, you can ensure that your license plate is securely and properly attached, complying with the necessary regulations. Keep in mind that it is important to regularly check the condition of your license plate and secure it if any signs of wear or damage occur.
Attaching The License Plate Directly To The Car
When it comes to installing a license plate on the front of your car, attaching it directly to the car’s bumper or grille is a popular and convenient option. In this section, we will walk you through a step-by-step process on how to securely attach your license plate using a few simple tools and techniques. Follow these instructions to have your license plate properly secured and ready to hit the road.
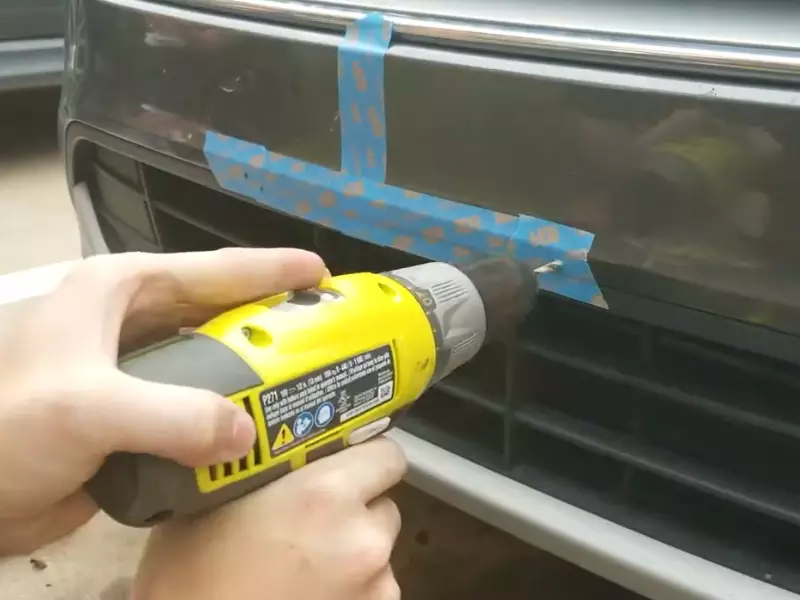
Measuring and marking the optimal location for the license plate
Before you begin attaching your license plate, it is important to measure and mark the optimal location on your car’s bumper or grille. This will help ensure that the license plate is positioned correctly and does not obstruct any important elements such as headlights or sensors.
Using a tape measure or ruler, carefully measure the ideal placement for your license plate. This will typically be in the center of the bumper or grille, at a height that allows for easy visibility. Take note of these measurements for later reference.
Marking the spot with a pen or marker
Once you have determined the optimal location, mark it using a pen or marker. This will create a clear indication of where the license plate should be positioned.
Make sure to use a pen or marker that is visible and water-resistant, as it will need to withstand various weather conditions over time. A bold and waterproof marker is ideal for this purpose.
Aligning the license plate with the markings
Once you have marked the ideal spot, align your license plate with the markings. Ensure that the plate is positioned upright and parallel to the ground. Take your time to make precise adjustments to achieve a seamless look.
Making sure it is level and centered
As you align the license plate, it is crucial to ensure that it is level and centered. Use a level tool or compare the plate’s position to nearby elements on the car, such as the headlights or logo. Making these small adjustments will result in a professional and balanced appearance.
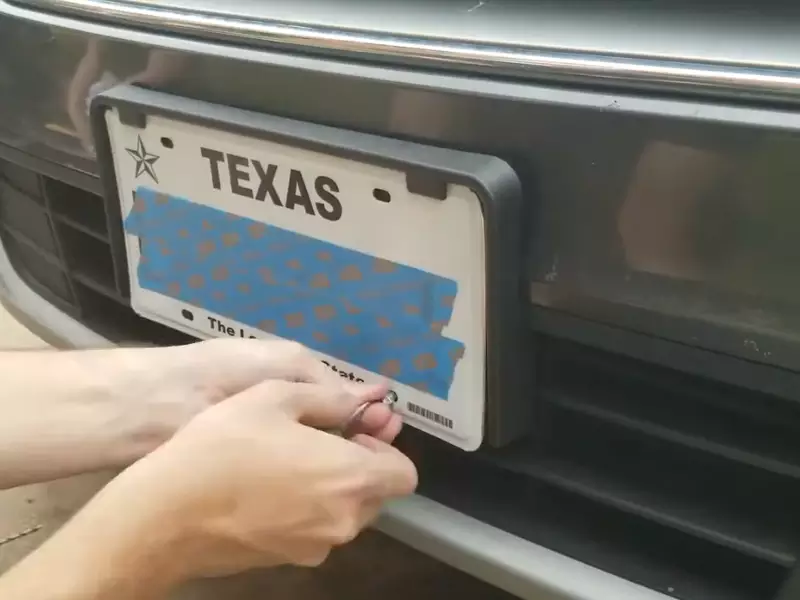
Inserting screws or bolts through the license plate holes
With the license plate correctly aligned and centered, it’s time to secure it to the car. Insert screws or bolts through the license plate’s holes, ensuring that they will securely hold the plate in place.
Using a screwdriver to tighten them securely
Using a screwdriver, tighten the screws or bolts securely. Ensure that they are tightened enough to prevent any movement or shifting of the license plate while driving.
Take care not to overtighten, as this could damage the plate or the car’s surface. Striking a balance between secure and gentle tightening is key.
In conclusion, installing a license plate on the front of your car directly is a straightforward process. By measuring, marking, aligning, and securely tightening the plate, you can have it perfectly attached in no time. Enjoy peace of mind knowing that your license plate is properly installed, complying with legal requirements while adding a personal touch to your vehicle.
Troubleshooting And Tips
Installing a license plate on the front of your car is a simple task that adds the finishing touch to your vehicle’s appearance. However, sometimes issues can arise during the installation process. In this section, we will address common problems and provide helpful tips to ensure a successful installation of your front license plate.
Addressing common issues during installation
It’s not uncommon to encounter a few challenges when installing a front license plate. Here are two of the most common problems and how you can address them:
Stripped screws or bolts
If you find that the screws or bolts meant for securing your license plate are stripped, it can hinder the installation process. To tackle this issue, you can try the following solutions:
- Use a pair of pliers to grip the stripped screw or bolt and carefully turn it counterclockwise to loosen it.
- If the screw or bolt is too damaged to be removed manually, you can use a screw extractor tool to grip and remove it.
- Consider replacing the stripped screws or bolts with new ones of the same size.
Crooked or misaligned license plate
A crooked or misaligned license plate not only looks unappealing but can also affect its visibility. Here’s how you can correct this issue:
- Loosen the screws or bolts that hold the license plate in place.
- Adjust the plate until it is straight and aligned with the vehicle’s body.
- Tighten the screws or bolts securely to ensure the plate remains in the correct position.
Tips for a successful installation
To ensure a successful installation of your front license plate, here are some useful tips:
Using adhesive backing for added stability
If you want to enhance the stability of your license plate, consider using adhesive backing. This will provide extra reinforcement and reduce the chances of the plate becoming loose or falling off.
Regularly checking the license plate for secure attachment
It’s important to regularly check the license plate to ensure it remains securely attached. Vibrations and normal wear and tear can cause the screws or bolts to loosen over time. By regularly inspecting the attachment, you can catch any issues early and re-tighten the screws or bolts if necessary.
Maintenance and care for your license plate
Proper maintenance and care for your license plate can prolong its lifespan and keep it looking its best. Here are some tips:
Cleaning and polishing the plate
Regularly clean your license plate with mild soap and water to remove dirt, grime, and debris. For extra shine, you can use a non-abrasive metal polish to polish the plate.
Replacing damaged or worn-out plates
Over time, license plates can become damaged or worn out due to exposure to the elements. If you notice any cracks, rust, or fading on your license plate, it’s a good idea to replace it. This will ensure that the plate remains legible and compliant with regulations.
By addressing common installation issues and following these tips, you can successfully install a license plate on the front of your car and keep it in great condition for years to come.
Frequently Asked Questions On How To Install License Plate On Front Of Car
How Do You Put A Front License Plate On Without Holes?
To put a front license plate on without holes, you can use adhesive mounting tape, a bracket that attaches to the grille, or a magnetic plate holder. These options allow you to securely display your license plate without drilling into the bumper or front panel of your vehicle.
How Do You Attach A Front Number Plate?
To attach a front number plate, follow these steps:
- Clean the surface of the vehicle where the plate will be attached.
- Use adhesive tape or screws to secure the plate in place.
- Make sure the plate is level and centered.
- Double-check local regulations for any specific requirements.
- Regularly check the plate’s condition and reattach if necessary.
What If My Car doesn’t have A Front License Plate Holder In Wisconsin?
If your car doesn’t have a front license plate holder in Wisconsin, you are required to obtain one. Wisconsin law mandates the display of both front and rear license plates on all vehicles. Failure to comply may result in a fine or other penalties.
What If My Car doesn’t have A Front License Plate Holder In Missouri?
If your car doesn’t have a front license plate holder in Missouri, you may face a fine. Missouri law requires vehicles to display license plates on both the front and back. It’s important to comply with the regulations to avoid any penalties.
Conclusion
Installing a license plate on the front of your car is a simple process that can be completed with ease. By following the step-by-step instructions outlined in this blog post, you can ensure that your license plate is securely and correctly mounted.
Remember to use the appropriate tools, adhere to local regulations, and regularly check the condition of your license plate. With this knowledge, you’ll be able to quickly and effectively install a license plate on the front of your car. Safe travels!