To install a license plate holder, simply follow these steps: align the holder with the license plate holes, insert screws or bolts through the holes, and tighten them using a screwdriver or wrench until secure. Now, let’s delve into a brief introduction.
License plate holders serve as a protective and decorative addition to your vehicle. These holders are not only essential for ensuring the license plate stays intact but also allow you to exhibit personalized designs or slogans. Installing a license plate holder is a relatively straightforward process that does not require extensive automotive knowledge or special tools.
In this guide, we will outline the steps involved in properly installing a license plate holder, ultimately helping you keep your license plate secure and stylish on the road.
Choosing The Right License Plate Holder
When it comes to installing a license plate holder, it is important to choose the right one that not only adds a touch of personal style to your vehicle but also provides durability and functionality. Here are three key factors to consider when selecting the perfect license plate holder:
Consider the Material and Durability
The material of the license plate holder plays a vital role in its durability and longevity. While there are various options available, such as plastic, metal, and carbon fiber, it is essential to choose a material that can withstand the elements and resist damage from weather conditions like rain, snow, and UV rays.
A metal license plate holder, crafted from stainless steel or aluminum, is highly recommended for its strength and resistance to rust. If you prefer a lightweight option without compromising on toughness, then a carbon fiber license plate holder would be the perfect choice.
Regardless of the material, make sure the license plate holder is designed to hold the standard license plate size of your country or state. It should securely hold the plate in place, preventing any rattling or displacement when driving on rough terrain or at high speeds.
Check for Compatibility with your Vehicle Model
When selecting a license plate holder, it is crucial to ensure compatibility with your vehicle model. Different car models have varying dimensions for their license plate mounts, so it’s essential to choose a holder that fits seamlessly without any modifications.
Before making a purchase, check the product description or consult the manufacturer’s website to determine if the license plate holder is specifically designed for your vehicle make and model. This will ensure a hassle-free installation process and prevent any compatibility issues that may arise later on.
Look for Easy Installation Features
Installation should be a breeze, even for those without much technical expertise. Look for a license plate holder that offers easy installation features, allowing you to mount it quickly and securely.
Some license plate holders come with pre-drilled holes and mounting hardware, ensuring a straightforward installation process. Others may have innovative snap-on designs or adhesive-backing options, eliminating the need for drilling or additional tools.
If you prefer a DIY approach, convenience is key. Choose a license plate holder that provides clear instructions and straightforward steps, enabling you to install it effortlessly.
By considering the material and durability, compatibility with your vehicle model, and ease of installation, you can select the perfect license plate holder that combines style and practicality. Ensure your license plate is properly displayed while adding a touch of personal flair to your vehicle.
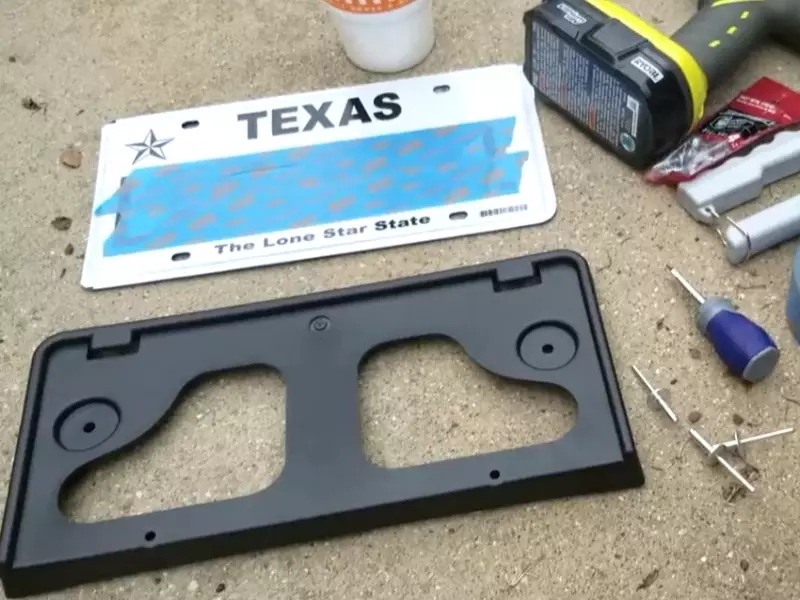
Gather The Required Tools And Materials
Before you jump into the process of installing a license plate holder, it is essential to gather all the necessary tools and materials to ensure a smooth and hassle-free installation. Having everything ready at hand not only saves time but also prevents any interruption in the middle of the process. Below, you’ll find a list of tools and materials you need for this task.
Screwdriver
A screwdriver is a must-have tool for installing a license plate holder. It allows you to securely fasten the screws and keep your license plate in place. Make sure you choose a screwdriver that matches the type of screws provided with your license plate holder kit to ensure a proper fit and easy installation.
License Plate Holder Kit
The license plate holder kit is the main component you need for the installation process. It typically includes the license plate frame, screws, screw caps, and any additional accessories required for mounting the license plate holder on your vehicle. Check the contents of the kit to ensure that you have everything needed for a successful installation.
Cleaning Solution
Before attaching the license plate holder, it is crucial to clean the surface of your vehicle where you’ll be mounting it. This ensures proper adhesion and prevents any dirt or residue from interfering with the installation. Choose a cleaning solution that is safe for the surface of your vehicle, such as an automotive glass cleaner or mild soap mixed with water. Avoid using harsh chemicals that may damage the paint or finish of your car.
Rag or Microfiber Cloth
A rag or microfiber cloth is necessary for cleaning the surface of your vehicle. It helps remove any dirt, dust, or grime that may be present, ensuring a clean and smooth surface for mounting the license plate holder. Make sure the cloth is clean and free from any debris that could scratch the surface of your car.
By gathering all these tools and materials beforehand, you’ll be well-prepared to install your license plate holder with ease. Now that you have everything you need, let’s move on to the next step.
Removing The Old License Plate Holder
When it comes to installing a new license plate holder, you need to start by removing the old one. This step-by-step guide will help you through the process, making it easy and hassle-free. Follow these simple instructions and get your old license plate holder off in no time.
1. Locate the Screws or Fasteners
The first thing you need to do is locate the screws or fasteners that are securing the old license plate holder to your vehicle. These screws or fasteners are typically found at the corners or along the edges of the holder. Take a close look to identify them.
2. Unscrew or Remove the Fasteners
Once you have identified the screws or fasteners, you can start unscrewing them or removing them as required. Use a screwdriver or any appropriate tool to do this task. Make sure to hold onto the screws or fasteners securely to avoid losing them.
If the screws are rusted or are difficult to remove, you can use a penetrating oil to loosen them up. Apply the oil carefully and allow it to sit for a few minutes before attempting to remove the screws again.
3. Carefully Remove the Old Holder
After removing all the screws or fasteners, it’s time to carefully remove the old license plate holder from your vehicle. Take your time and ensure you do not cause any damage to the surrounding area. If the holder is stuck or adhesive is used, gently pry it off using a flathead screwdriver or a plastic trim removal tool.
Once the old holder is detached, inspect the area for any remaining debris or residue. Clean it off using a clean cloth or a mild cleaning solution. This will ensure a clean surface for installing the new license plate holder.
Now that you have successfully removed the old license plate holder, you can proceed with the installation of the new one. Look out for our next blog post on “How to Install a License Plate Holder” for a step-by-step guide.
Positioning The New License Plate Holder
Installing a new license plate holder on your vehicle is an important step to ensure proper display and secure attachment of your license plate. Correctly positioning the new holder is crucial to avoid any issues while on the road. In this section, we will guide you through aligning the holder with the vehicle’s mounting holes and ensuring the proper orientation, whether vertical or horizontal.
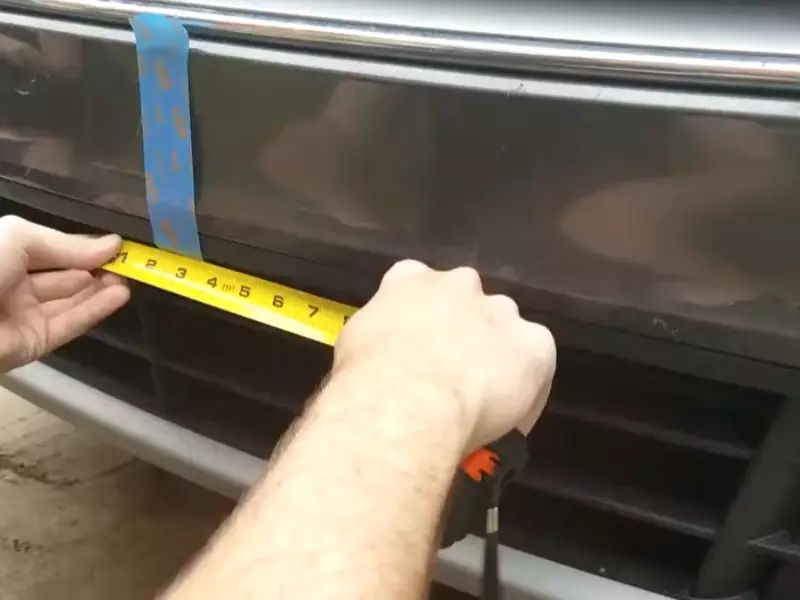
Align the Holder with the Vehicle’s Mounting Holes
Before starting the installation process, take a moment to locate the vehicle’s mounting holes for the license plate holder. These holes are typically found on the front and rear bumpers of the vehicle. Once you have identified the mounting holes, follow these steps to align the new license plate holder:
- Place the new license plate holder over the vehicle’s mounting holes, ensuring that the holes on the holder align with the holes on the vehicle’s bumper.
- Hold the license plate holder firmly in place and check if the alignment is correct.
- Adjust the position if necessary, making sure the holes are perfectly aligned.
Ensure Proper Orientation (Vertical or Horizontal)
After aligning the license plate holder with the mounting holes, the next step is to ensure the proper orientation of the holder. Depending on your preference and the design of your vehicle, you may choose to have the license plate displayed vertically or horizontally. Follow these guidelines to ensure the correct orientation:
| Vertical Orientation | Horizontal Orientation |
|---|---|
| Pros: | Pros: |
|
|
| Cons: | Cons: |
|
|
Consider these advantages and disadvantages to determine which orientation best suits your vehicle and personal preferences. Once you have made a decision, ensure that the license plate holder is positioned accordingly. By aligning the holder with the vehicle’s mounting holes and ensuring the proper orientation, you will successfully install a new license plate holder that enhances the appearance and functionality of your vehicle.
Attaching The New License Plate Holder
Attaching a new license plate holder to your vehicle is a simple process that can be done in just a few steps. Once you have purchased a license plate holder that fits your vehicle, you can follow these easy instructions to attach it securely.
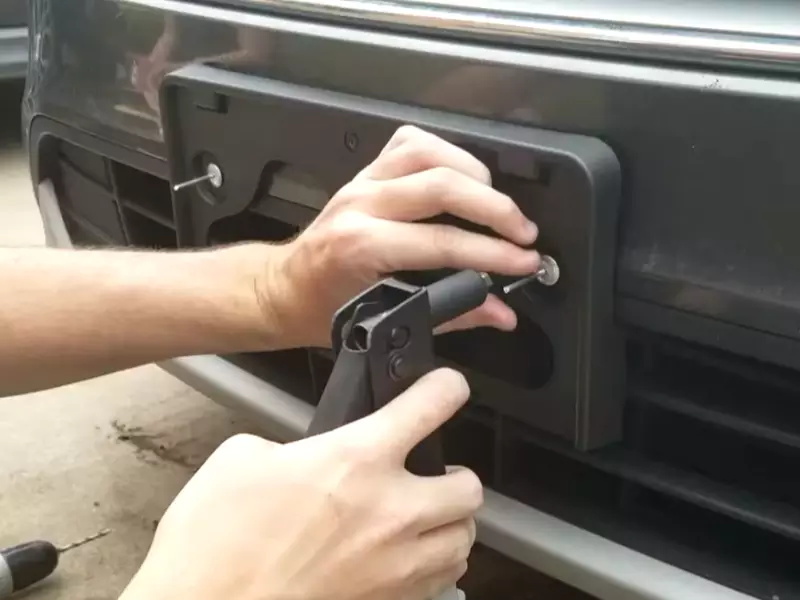
Insert Screws or Fasteners through the Mounting Holes
Before you begin, make sure you have the necessary tools for the job. You’ll need a Phillips head screwdriver or a socket wrench, depending on the type of screws or fasteners that came with your license plate holder.
Locate the mounting holes on the license plate holder and align them with the holes on your vehicle’s bumper or license plate bracket. Take your screws or fasteners and insert them through the mounting holes, ensuring they are fully seated.
If you’re using screws, make sure to use the appropriate size for your license plate holder and vehicle. Using screws that are too long can damage the bumper or license plate bracket, while screws that are too short may not hold the license plate holder securely.
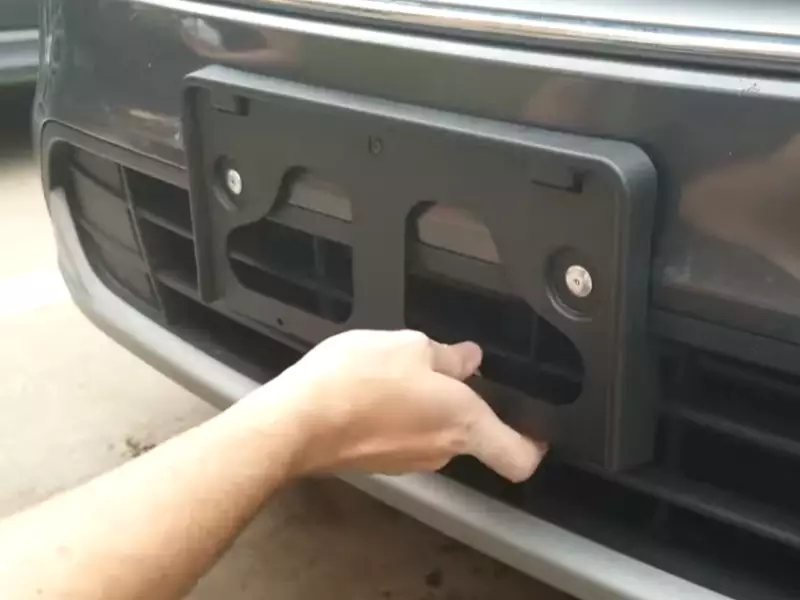
Tighten the Screws or Fasteners Securely
Once the screws or fasteners are inserted through the mounting holes, it’s time to tighten them securely. Use your screwdriver or wrench to turn the screws clockwise, applying enough pressure to ensure a tight fit.
Be careful not to overtighten the screws, as this can lead to stripped threads or damage to the license plate holder. Tighten the screws until they are snug, but not overly tight.
Double-check that the license plate holder is secure by gently tugging on it. If the holder moves or feels loose, tighten the screws or fasteners further until it is firmly in place.
Once you have attached the new license plate holder, step back and admire your handiwork. Ensure that the license plate is straight and centered within the holder, and make any necessary adjustments before hitting the road.
Now that you’ve successfully attached your new license plate holder, you can enjoy the peace of mind knowing that your license plate is securely in place. It’s a small but important step in keeping your vehicle legal and adding a personal touch to its appearance.
Securing The License Plate
Securing your license plate is an essential step when installing a license plate holder. Not only does it ensure that your plate stays in place, but it also helps to comply with legal requirements. In this section, we will guide you through the process of securing your license plate with clear and easy-to-follow steps.
Place the License Plate in the Holder
The first step in securing your license plate is to place it in the holder. Ensure that the plate is positioned correctly and aligns with the holes or slots on the holder. This will make it easier to insert the screws or fasteners and firmly secure the plate in place.
Insert Screws or Fasteners through the Plate Holes
Once the license plate is in place, it’s time to insert the screws or fasteners through the plate holes. Make sure to choose the appropriate screws or fasteners that are compatible with your license plate holder. Align the holes in the license plate with those on the holder, and insert the screws or fasteners through each hole.
If you are using screws, you may need a screwdriver to tighten them. Ensure that the screws are inserted firmly but not overly tightened, as this could damage the holder or plate. If you are using fasteners, follow the instructions provided by the manufacturer to correctly secure them.
Tighten the Screws or Fasteners to Secure the Plate
Once all the screws or fasteners are inserted, it’s important to tighten them properly to secure the license plate in place. Using a screwdriver or the appropriate tool, tighten each screw or fastener until they are snug. Be careful not to over tighten, as this can cause the plate or holder to crack or break.
After tightening, give the license plate a gentle tug to ensure it is securely fastened. If there is any movement or looseness, double-check the screws or fasteners to ensure they are tightened adequately.
In conclusion, securing your license plate is a straightforward process that involves placing it in the holder, inserting screws or fasteners through the plate holes, and tightening them properly. By following these steps, you can ensure that your license plate stays securely in place, giving you peace of mind while driving.
Double-Checking The Installation
Now that you have successfully installed your license plate holder, it’s important to double-check the installation to ensure that everything is secure and in place. By following a few simple steps, you can make sure that your license plate remains straight and secure, and that the holder is stable and durable. Let’s dive into the details:
Ensure the License Plate is Straight and Secure
Start by visually inspecting your license plate to ensure that it is straight and properly aligned within the license plate holder. A crooked license plate not only looks unattractive but may also violate traffic regulations and result in fines or penalties. Take a moment to adjust the position of the license plate if needed, making sure it sits securely within the holder.
Once you are satisfied with the alignment, gently shake the license plate to check for any wobbling or movement. The plate should remain firmly in place, indicating that it is securely fastened to the holder. If you notice any looseness, it’s crucial to tighten the screws or fasteners as necessary to prevent the plate from shifting while driving.

Test the Holder for Stability and Durability
The next step is to test the stability and durability of the license plate holder. A sturdy holder not only ensures that your license plate remains intact but also helps withstand the effects of various weather conditions and road bumps. Perform the following checks to ensure the overall quality of the holder:
- Examine the material: Check if the license plate holder is made of durable materials such as heavy-duty plastic or stainless steel. These materials offer superior strength and resistance, allowing the holder to withstand the test of time.
- Inspect the fasteners: Take a closer look at the screws or clips used to attach the license plate to the holder. They should be tight and secure, providing a reliable grip on the plate. If you notice any signs of rust or wear, consider replacing them with new ones to maintain the holder’s stability.
- Assess the design: Evaluate the overall design of the holder. Look for features like reinforcement bars or additional clamps that can enhance its stability. A well-designed holder is less prone to vibrations and rattling noises while driving.
- Consider weather resistance: If you live in an area with extreme weather conditions, it’s crucial to ensure that the license plate holder can withstand rain, snow, or heat without deteriorating. Look for holders that are specifically built to resist corrosion and fading caused by sun exposure or moisture.
By thoroughly double-checking the installation, you can be confident that your license plate holder is both functional and aesthetically pleasing. Remember to perform regular maintenance checks to ensure that the holder remains in top-notch condition. Now that you have successfully installed your license plate holder, it’s time to hit the road with peace of mind!
Cleaning And Maintenance
Maintaining a clean and well-maintained license plate holder is essential not only for appearance but also for ensuring its longevity. Regular cleaning and maintenance will help prevent dirt, grime, and rust from damaging your license plate holder and ensure it remains securely attached to your vehicle. In this section, we will discuss the simple yet effective cleaning and maintenance practices to keep your license plate holder in top condition.
Wipe down the License Plate Holder with a Clean Cloth
One of the easiest ways to keep your license plate holder clean is by regularly wiping it down with a clean cloth. This simple yet effective method helps remove dust, dirt, and other debris that may accumulate on the surface. By doing this, you not only maintain the appearance of your license plate holder but also prevent the build-up of grime that can lead to corrosion and damage.
Here’s a step-by-step guide on how to clean your license plate holder:
- Start by gathering a clean cloth or microfiber towel.
- Dampen the cloth with water or a mild cleaning solution.
- Gently wipe the entire surface of the license plate holder, paying extra attention to any areas with visible stains or dirt.
- Rinse the cloth if necessary and continue wiping until the surface is clean and free from debris.
- Once you have wiped down the license plate holder, use a separate dry cloth to remove any excess moisture and ensure it is fully dry.
Remember to avoid using abrasive materials or harsh cleaning products that may scratch or damage the surface of your license plate holder. A gentle yet thorough cleaning will maintain its appearance and keep it looking new for longer.
Regularly check and tighten screws or fasteners as needed
Over time, screws or fasteners used to secure the license plate holder can become loose due to vibrations and natural wear and tear. Regularly checking and tightening these screws is vital to ensure that your license plate holder remains securely attached to your vehicle.
Here is a quick step-by-step process to follow when checking and tightening screws or fasteners:
- Start by gathering a suitable screwdriver or wrench to fit the screws or fasteners used for your license plate holder.
- Inspect each screw or fastener and tighten any that may have become loose.
- Ensure that each screw or fastener is securely tightened but be careful not to overtighten, as this can cause damage.
- If any screws or fasteners are damaged or missing, replace them promptly to maintain the integrity of your license plate holder.
Regular checks and tightening of screws or fasteners will help prevent the license plate holder from becoming loose or detached. This simple maintenance habit can save you from potential issues and ensure your license plate remains securely in place.
Personalizing The License Plate Holder
Explore Customization Options
When it comes to personalizing your license plate holder, the possibilities are endless. With a wide range of customization options available, you can truly make your license plate holder reflect your own unique style and personality. Whether you want to add a touch of elegance or show off your vibrant and fun side, there are customization options to suit every taste.
Add Personal Touches or Accessories
One way to personalize your license plate holder is by adding personal touches or accessories. These can be anything from decorative frames to personalized decals or stickers. By adding these small yet eye-catching elements, you can transform a plain license plate holder into a statement piece that captures attention wherever you go.
If you’re looking to add a touch of sophistication, consider adding a sleek metal frame to your license plate holder. With options available in various finishes such as chrome or brushed metal, you can elevate the look of your car with a touch of class. Additionally, you can also opt for a frame that matches the color of your vehicle for a seamless and polished appearance.
If you’re someone who loves to express their creativity, there are various decals and stickers available in different shapes, sizes, and designs. From sports team logos to quirky and fun quotes, you can find a decal or sticker that perfectly captures your interests and showcases your personality.
Another way to add a personal touch is by incorporating accessories onto your license plate holder. For example, you can attach a keychain or a small charm that holds sentimental value to you. Not only does this add a unique touch to your license plate holder, but it also serves as a reminder of something or someone special in your life.
Frequently Asked Questions On How To Install License Plate Holder
How Do You Attach A License Plate Holder?
To attach a license plate holder, follow these simple steps:
1. Ensure you have the necessary tools, such as screws and a screwdriver.
2. Position the license plate holder over the designated spot on your vehicle.
3. Align the holes of the license plate holder with the mounting points on your vehicle.
4. Insert screws through the holes and tighten them securely using a screwdriver.
5. Double-check that the license plate holder is firmly attached and aligned with your license plate.
How To Install Front License Plate Bracket Without Drilling Holes?
To install a front license plate bracket without drilling holes, try using adhesive tape or Velcro strips. Clean the area on your car where the bracket will be attached, and then apply the tape or Velcro to both the car and the bracket.
Press firmly and allow it to set for a few hours before mounting the license plate.
How Do You Install A Tow Hook License Plate Holder?
To install a tow hook license plate holder, follow these steps:
1. Locate your car’s tow hook mounting point.
2. Attach the bracket to the tow hook, ensuring it’s secure.
3. Slide your license plate onto the bracket.
4. Tighten any screws or bolts to keep the plate in place.
5. Double-check the installation for stability and adjust if necessary.
How Do You Install A Front License Plate Holder On A Tesla?
To install a front license plate holder on a Tesla, follow these steps: 1. Locate the designated mounting holes on the front bumper. 2. Align the holder with the holes and insert the screws provided. 3. Tighten the screws securely, ensuring the holder is properly fastened.
4. Place the license plate in the holder and attach it with the provided screws. 5. Double-check that the plate is securely mounted.
Conclusion
Installing a license plate holder is a simple yet important task that can enhance the functionality and aesthetics of your vehicle. By following the step-by-step guide we provided, you can ensure a smooth and hassle-free installation process. Remember to gather the necessary tools and materials beforehand, and take your time to complete each step correctly.
With a bit of patience and attention to detail, you’ll have your license plate holder securely in place in no time. So go ahead, give your vehicle that finishing touch it deserves!