To install a hitch receiver, first, prepare your tools and materials. Then, align and mount the hitch receiver onto the vehicle’s frame using the provided hardware and manufacturer’s instructions.
Introducing a hitch receiver into your vehicle’s system is a vital step towards enhancing its towing capabilities. Whether you plan to attach a bike rack, cargo carrier, or tow a trailer, a hitch receiver allows for easy connections. However, taking the plunge and installing a hitch receiver might seem daunting.
By following a straightforward process and using the right tools, you can effortlessly complete the installation at home. This article will guide you in the step-by-step installation process, ensuring that you are ready to take your vehicle on new towing adventures with a sturdy and reliable hitch receiver.
Choosing The Right Hitch Receiver
When it comes to installing a hitch receiver, one of the most important steps is choosing the right one for your vehicle. The right hitch receiver will ensure a safe and secure towing experience. In this section, we will discuss the factors to consider when selecting a hitch receiver. Understanding the towing capacity requirements is crucial, as it will dictate the type and size of the hitch receiver you need.

Factors to consider when selecting a hitch receiver
When choosing a hitch receiver, there are several factors to consider:
- Towing capacity: The first and most important factor to consider is the towing capacity of your vehicle. It’s essential to know the maximum weight your vehicle can tow to choose a hitch receiver that can handle the load. Refer to your vehicle’s owner’s manual or contact the manufacturer for this information.
- Hitch class: Hitch receivers come in different classes, each with its own towing capacity. The hitch class determines the weight capacity of the hitch receiver. The most common hitch classes are Class 1, Class 2, Class 3, and Class 4, with Class 1 being the lightest and Class 4 being the heaviest. Make sure to choose a hitch receiver that corresponds to your vehicle’s towing capacity.
- Receiver size: Hitch receivers also come in different sizes, such as 1.25 inches and 2 inches. The receiver size is matched to the hitch class and will depend on the type of accessories you plan to use, such as bike racks or cargo carriers. Ensure that the receiver size is compatible with any accessories you intend to use.
- Construction and materials: Hitch receivers can be made of different materials, including steel and aluminum. Steel is more durable and can withstand heavy loads, while aluminum is lighter and more resistant to corrosion. Consider the towing needs and the environment in which you’ll be using the hitch receiver to determine the appropriate material.
- Installation method: Hitch receivers can be installed using different methods, such as bolt-on or weld-on. Bolt-on installation is more common and allows for easier removal and replacement if needed. Weld-on installation provides a permanent attachment but may require professional assistance.
By considering these factors, you can choose the right hitch receiver that meets your towing needs and ensures a safe and smooth towing experience.
Gathering The Necessary Tools And Materials
Before you dive into installing a hitch receiver, it’s important to make sure you have all the necessary tools and materials at your disposal. Having everything you need ahead of time will save you from frustrating trips to the hardware store or delays in the installation process. To help you with this, we’ve compiled a list of the essential tools and materials you’ll need to successfully install a hitch receiver.
Tools required for hitch receiver installation
Here is a compiled list of the tools you will need to install a hitch receiver:
- Socket wrench set with appropriate-sized sockets: This versatile tool will allow you to tighten and loosen bolts with ease. Make sure to have a range of socket sizes to accommodate different bolt sizes.
- Torque wrench: It’s crucial to torque the bolts properly to ensure everything is secure. A torque wrench will help you achieve the correct torque specification.
- Adjustable wrench: This tool is handy for those hard-to-reach bolts that may require a different type of wrench.
- Jack stands Safety first! Jack stands are essential for supporting your vehicle while working under it. Never rely solely on a jack.
- Wire brush: You’ll need a wire brush to remove any rust or debris from the mounting points before attaching the hitch receiver.
- Drill and drill bits: In some cases, you may need to drill holes for the hitch receiver installation. Having a drill and the appropriate drill bits on hand will save you time and frustration.
- Ratchet strap or tow strap: These straps can be useful for holding the hitch receiver in place while you bolt it down.
Materials needed for a successful installation
Now that you know which tools to gather, let’s move on to the materials required for a successful hitch receiver installation:
- Hitch receiver kit: You’ll need to purchase a hitch receiver kit that is specifically designed for your vehicle make and model. This kit usually includes the hitch receiver, mounting hardware, and installation instructions.
- Bolts and nuts: Depending on your specific hitch receiver kit, you may need additional bolts and nuts for proper installation. Check the instructions to determine if any extra hardware is required.
- Threadlocker: To ensure a secure fit, it’s recommended to use thread locker on the bolts that will be holding the hitch receiver in place.
- Rust-resistant spray or paint: Applying a rust-resistant spray or paint to the exposed metal surfaces of the hitch receiver will help prolong its lifespan and keep it looking great.
- Electrical connector kit (optional): If you plan on towing trailers with lights, you may need an electrical connector kit to connect the trailer’s wiring to your vehicle’s electrical system.
Gathering the necessary tools and materials is the crucial first step in installing a hitch receiver. By having everything ready, you’ll be able to tackle the installation process smoothly and efficiently. Once you’ve gathered all the required items, you can move on to the next step of the installation process: preparing your vehicle for hitch receiver installation.
Preparing The Vehicle
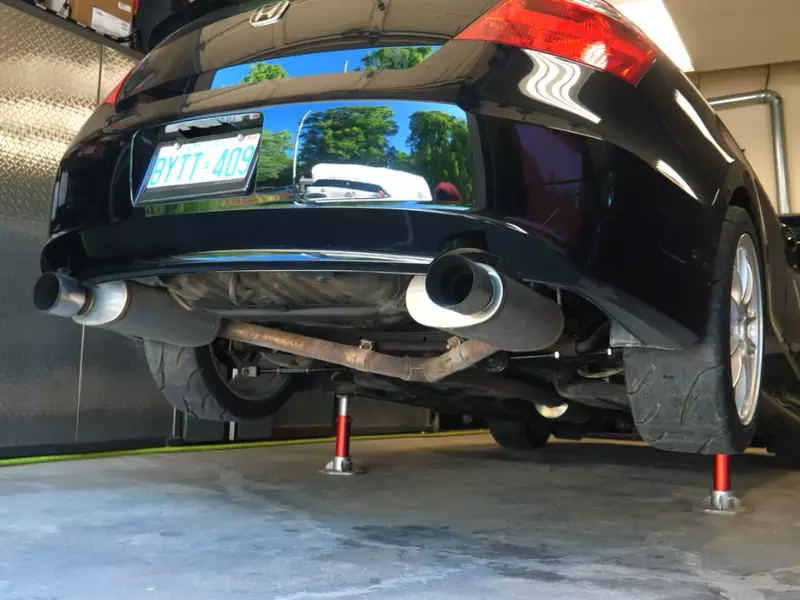
Before beginning the installation process, it is crucial to properly prepare your vehicle. This involves carefully examining the vehicle’s rear frame and clearing any obstructions or debris from the installation area. These preparatory steps will ensure a smooth and successful installation of your hitch receiver.
Examining the vehicle’s rear frame
Firstly, it is essential to closely examine the rear frame of your vehicle. Look for any existing hitch receiver or mounting points that might already be present. These can often be found underneath the rear bumper or along the frame rails. Check if these mounting points are intact and suitable for the installation of your hitch receiver.
Note: If your vehicle is equipped with a factory-installed hitch receiver or mounting points, you may skip the installation of a new hitch receiver as it is unnecessary.
Clearing any obstructions or debris from the installation area
Next, clear the installation area of any obstructions or debris that may hinder the installation process. This involves removing any bumper trim, license plate brackets, or other accessories that may obstruct access to the rear frame. Use a suitable tool, such as a wrench or power drill with appropriate attachments, to safely remove these components.
Once the area is cleared, carefully inspect the installation area for any dirt, rust, or other debris. It is crucial to have a clean and smooth surface for proper attachment of the hitch receiver. If needed, use a wire brush or stiff bristle brush to remove any stubborn dirt or rust from the rear frame.
Tip: Applying a rust inhibitor or protective coating to the cleaned area can help prevent future rust formation and prolong the lifespan of your hitch receiver.
By thoroughly examining the vehicle’s rear frame and clearing any obstructions or debris, you have successfully completed the first step in preparing your vehicle for hitch receiver installation. The next steps will involve attaching the receiver to the vehicle’s frame, aligning it correctly, and securing it firmly in place to ensure safety and reliability.
Installing The Hitch Receiver
Step-by-step guide to hitch receiver installation
If you’re someone who loves towing or simply needs extra cargo space for a road trip, installing a hitch receiver is an excellent idea. A hitch receiver not only provides a secure connection between your vehicle and trailer but also allows you to attach bike racks, cargo carriers, and more.
In this step-by-step guide, we’ll walk you through the process of installing a hitch receiver, including removing the rear bumper if necessary, positioning the hitch receiver onto the vehicle frame, attaching it securely, and ensuring proper fitment. Let’s get started!
Removing the rear bumper if necessary
Before installing the hitch receiver, you may need to remove the rear bumper of your vehicle. This step might vary depending on the make and model of your vehicle, so it’s essential to consult your vehicle’s manual for specific instructions. However, in most cases, you’ll need to locate and remove the mounting bolts located on both sides of the bumper. Use the appropriate wrench or socket to loosen and remove these bolts, ensuring to keep them safely aside.
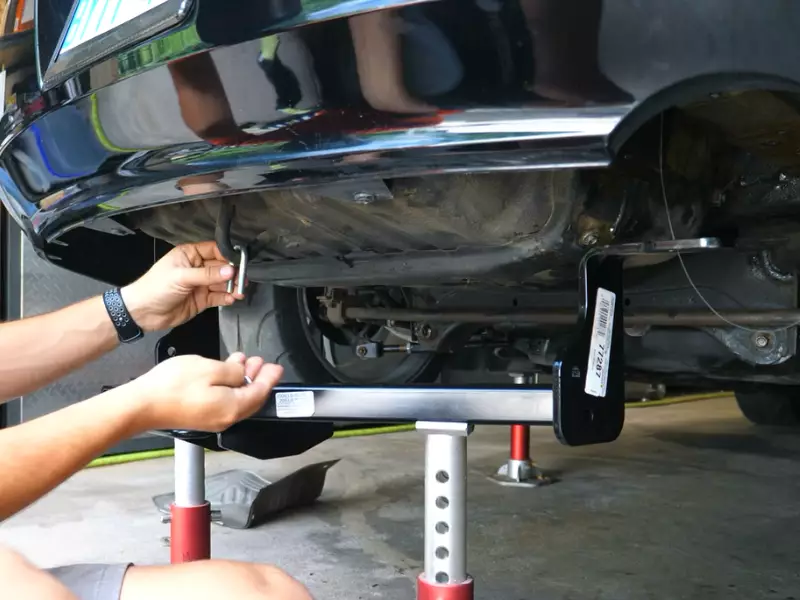
Positioning the hitch receiver onto the vehicle frame
Once the rear bumper is removed, it’s time to position the hitch receiver onto the vehicle frame.
- Carefully lift the hitch receiver and align it with the pre-drilled holes on the frame.
- Ensure that the hitch receiver is level and centered, as this will influence the overall towing performance. Double-check the alignment before moving on to the next step.
Attaching the hitch receiver to the vehicle frame securely
With the hitch receiver properly positioned, it’s now time to attach it securely to the vehicle frame.
- Use the provided bolts and washers to connect the hitch receiver to the pre-drilled holes on the frame.
- Start by hand-tightening the bolts to ensure they are aligned correctly.
- Then, using the appropriate wrench or socket, tighten the bolts gradually and evenly to secure the hitch receiver firmly to the frame.
- Take your time during this step to avoid any potential damage or misalignment.
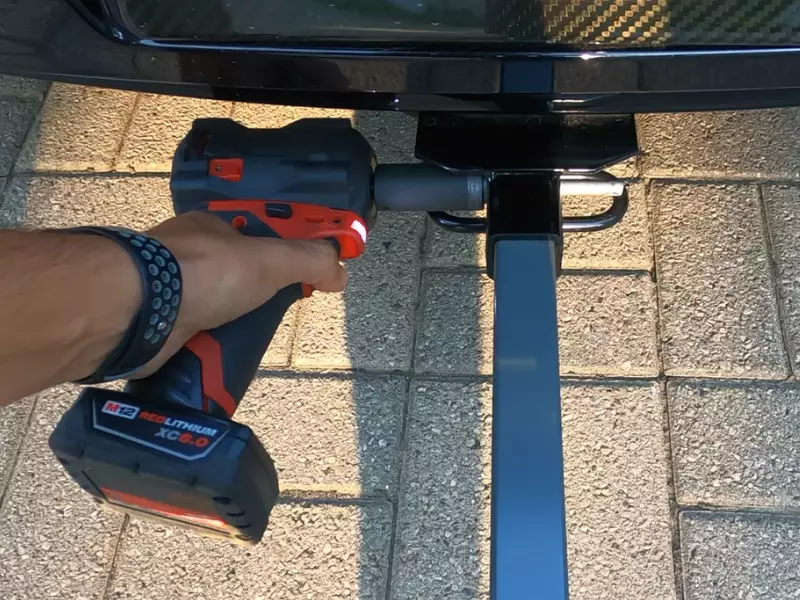
Tightening the bolts and ensuring proper fitment
After attaching the hitch receiver, it’s crucial to double-check the fitment and tighten the bolts further.
- Go through each bolt, tightening them firmly to ensure a secure connection.
- Make sure the hitch receiver is still level and centered. If necessary, use a torque wrench to tighten the bolts to the manufacturer’s recommended torque specification. This step is crucial to guarantee the stability and safety of your hitch receiver, so don’t rush through it.
Congratulations! You’ve successfully installed a hitch receiver onto your vehicle. Now, you can confidently tow your trailer or attach any hitch-mounted accessories with ease. Remember to perform regular maintenance checks to ensure the hitch receiver remains in optimal condition, allowing you to enjoy a hassle-free towing experience.
Wiring The Hitch Receiver
Installing a hitch receiver is an essential step for towing safely and effectively. However, it’s not just about bolting on the receiver; you also need to consider the wiring requirements for towing. Properly connecting the trailer wiring to your vehicle’s electrical system is crucial to ensure that all lights and signals are working correctly. In this section, we will dive into the details of understanding the wiring requirements for towing and connecting the trailer wiring to your vehicle.
Understanding the wiring requirements for towing
Before you start the installation process, it’s important to familiarize yourself with the wiring requirements for towing. Different vehicles may have different wiring setups, so referring to your vehicle’s manual or consulting a professional is recommended. Generally, a trailer’s electrical system includes brake lights, turn signals, marker lights, and sometimes, electric brakes.
Here are a few important things to consider when it comes to wiring for towing:
- Make sure your vehicle is equipped with the correct wiring harness for towing. If not, you may need to install a separate harness.
- Check if your vehicle’s electrical system is compatible with the trailer’s electrical system.
- Ensure that the wiring connections are secure and protected from damage.
- Verify that all lights and signals are functioning correctly before hitting the road.
Connecting the trailer wiring to the vehicle’s electrical system
Once you have a good understanding of the wiring requirements, you can proceed with connecting the trailer wiring to your vehicle’s electrical system. Follow these steps:
- Locate the wiring harness on your vehicle. It is typically located near the bumper or inside the trunk.
- Identify the wires for brake lights, turn signals, and marker lights. These wires may be color-coded for ease of identification.
- Connect the corresponding wires from the trailer to the vehicle’s wiring harness. Use butt connectors or solder the connections for secure and reliable connections.
- Test each lighting function to ensure they are working properly. Have someone assist you in checking the lights while you activate the respective functions from inside the vehicle.
It’s important to note that if your trailer is equipped with electric brakes, additional wiring and a separate brake controller may be required. This ensures proper and legal braking while towing.
By understanding the wiring requirements for towing and connecting the trailer wiring to your vehicle’s electrical system, you can ensure a safe and hassle-free towing experience. Take the time to double-check all connections and test all lights before heading out on your next towing adventure.
Safety Considerations
When it comes to installing a hitch receiver, ensuring that it is done safely is of utmost importance. By following safety standards and performing a final inspection for proper installation and alignment, you can have peace of mind knowing that your hitch receiver is secure and reliable. Let’s explore some key considerations to keep in mind when installing a hitch receiver.
Ensuring the hitch receiver installation meets safety standards
Before you start the installation process, it’s crucial to ensure that the hitch receiver you are installing meets all necessary safety standards. Be sure to purchase a hitch receiver specifically designed for your vehicle’s make and model, as not all hitch receivers are universal. Additionally, check the weight capacity of the hitch receiver to ensure that it aligns with your towing needs. Installing a hitch receiver that doesn’t meet the safety standards can put unnecessary strain on your vehicle, leading to potential accidents or damage.
When it comes to the installation process itself, it’s important to follow the manufacturer’s instructions precisely. Each hitch receiver model may have specific requirements and recommendations, so it’s essential to read and understand the instructions before starting. This will help you avoid any mistakes that could compromise the safety and stability of the hitch receiver.
Performing a final inspection for proper installation and alignment
After the hitch receiver is installed, it’s crucial to perform a final inspection to ensure that it is properly aligned and securely attached to the vehicle. This step is essential to prevent any accidents or damage during towing.
Start by visually inspecting the hitch receiver to make sure it is centered and level. Uneven alignment can cause stability issues, affecting the overall towing experience. Use a measuring tape if necessary to ensure that the hitch receiver is accurately positioned.
Next, check the attachment bolts and hardware for tightness. If any bolts are loose, tighten them until they are secure. This will prevent the hitch receiver from shifting or becoming detached while in use.
Finally, give the hitch receiver a firm shake or tug to test its stability. If you notice any excessive movement or hear unusual noises, it could indicate a problem with the installation. In such cases, it is recommended to seek professional assistance to address the issue properly.
In conclusion, ensuring the safety of your hitch receiver installation is vital for a successful and worry-free towing experience. By adhering to safety standards, carefully following the manufacturer’s instructions, and performing a thorough final inspection, you can have confidence in the security and reliability of your hitch receiver.
Frequently Asked Questions Of How To Install Hitch Receiver
Can I Install A Hitch Receiver Myself?
Yes, it is possible to install a hitch receiver yourself. Ensure you follow the appropriate instructions and safety guidelines to complete the installation successfully.
What Is The Difference Between A Tow Hitch And A Tow Hitch Receiver?
A tow hitch is a device that attaches to a vehicle, while a tow hitch receiver is the part that goes into the hitch. The receiver allows for different towing attachments to be easily inserted and removed.
Do You Need Wiring For A Hitch?
Yes, a wiring system is necessary for a hitch.
Can You Put A Hitch On A Toyota Corolla?
Yes, you can put a hitch on a Toyota Corolla. It’s possible to have a hitch installed on your Corolla for towing purposes.
Conclusion
To sum up, installing a hitch receiver doesn’t have to be a daunting task. By following the step-by-step guide outlined in this blog post, you can confidently equip your vehicle and enjoy the benefits of a hitch receiver. Remember to choose the right receiver for your vehicle, gather the necessary tools, and take your time during the installation process.
With practice, you’ll become well-versed in this handy skill. Happy towing!