To install a Graco car seat, begin by reading the instruction manual thoroughly. Place the base on the back seat and thread the seat belt through the designated slots.
Tighten the belt, ensuring it is securely fastened, and position the car seat on top of the base until it clicks into place. Double-check that the car seat is properly installed by giving it a firm tug.
Understanding The Importance Of Proper Installation
The significance of correctly installing a Graco car seat
Installing a car seat may seem like a trivial task, but it plays a crucial role in ensuring the safety of your child during car journeys. Understanding the importance of proper installation is key to protecting your little one from potential harm. In this section, we will delve into the reasons why correctly installing a Graco car seat is of utmost significance.
Ensuring your child’s safety during car journeys
One cannot stress enough the importance of keeping your child safe while traveling in a car. Road accidents can happen at any moment, and ensuring that your child is properly secured in a Graco car seat significantly reduces the risk of injury or even fatality in the event of a collision.
Research has shown that correctly using a car seat can reduce the risk of fatal injuries for infants by up to 71% and for toddlers by up to 54%. These statistics highlight how crucial it is to invest time and effort into properly installing your child’s Graco car seat.
Properly securing your child’s car seat for maximum impact protection
When you correctly install a Graco car seat, you are ensuring maximum impact protection for your child. By following the manufacturer’s instructions meticulously, the car seat will be optimally positioned to absorb and distribute the forces generated during a collision, minimizing the impact on your little one’s delicate body.
Properly securing the car seat also prevents it from moving around excessively during car journeys. This stability is crucial for ensuring that your child remains safe and comfortable throughout the ride, without being jolted or thrown around unexpectedly.
Preventing common installation mistakes for peace of mind
Incorrect installation of a car seat is a common mistake that parents make, often unknowingly. However, even the smallest error can have significant consequences. Some common installation mistakes include using loose or twisted straps, not fastening the seat tightly enough, or installing the car seat in the wrong direction.
By understanding the proper installation procedures for your Graco car seat, you can avoid these mistakes and gain peace of mind knowing that you have taken every precaution to ensure your child’s safety. Proper installation not only protects your child from harm but also allows you to drive with confidence, knowing that you have done everything in your power to protect your little one during car journeys.
Preparing For Installation
Before installing your Graco car seat, it’s important to properly prepare for the process. This will ensure a safe and secure installation, providing the best protection for your little one. In this section, we will discuss how to gather the required tools and equipment, as well as how to clean the car seat and inspect it for any damages or faults.
Gathering the required tools and equipment
To install your Graco car seat, you will need a few essential tools and equipment. Having everything ready beforehand will make the installation process much smoother and hassle-free. Here’s a checklist of the items you will need:
| Tools and Equipment |
|---|
| Graco car seat |
| Vehicle owner’s manual |
| Seat belt or LATCH system |
| Towel or cloth |
| Tape measure |
| Instruction manual |
| Soft-bristle brush |
Make sure you have all these tools and equipment readily available before starting the installation process. This will save you time and reduce any potential frustration.
Cleaning the car seat and inspecting for any damages or faults
Prior to installing your Graco car seat, it’s important to clean it thoroughly and inspect it for any damages or faults. This will ensure a safe and secure seat for your child. Here are the steps to follow:
- Remove any covers or padding from the car seat.
- Check for any visible dirt or stains on the seat and clean it using a mild soap and water solution.
- Inspect the car seat for any damages such as cracks, tears, or frayed straps.
- Ensure that all the seat’s components, including the harness and buckles, are in proper working condition.
- Use a tape measure to check if the car seat meets the height and weight requirements for your child.
- Inspect the expiration date of the car seat. Remember that car seats have an expiration date, typically around 6 years from the date of manufacture.
- If you notice any damages or faults, it’s best to contact the manufacturer for further guidance before proceeding with the installation.
By cleaning your car seat and inspecting it for any damages or faults, you can ensure that your child will be safe and secure during their car rides.
Now that you have gathered the required tools and equipment and have cleaned and inspected your Graco car seat, you are ready to move on to the next step – actually installing the car seat. Stay tuned for our next section where we will guide you through the installation process, step by step.
Step 1: Reading The Instruction Manual
Before embarking on the installation process of your Graco car seat, it is crucial to take the time to thoroughly read the instruction manual. Many parents may overlook this step, assuming that they can figure it out on their own or rely on previous experience with car seat installations. However, each car seat model is unique, with specific guidelines and requirements that must be followed to ensure the safety and proper installation of the seat.
The Importance of Thoroughly Reading the Manual Before Installation
Reading the instruction manual may seem like an obvious step, but it is one that should not be overlooked. The manual is designed to provide you with valuable information about your Graco car seat, including installation instructions, proper usage, and important safety precautions. By investing a few minutes of your time to read the manual, you can ensure that you are utilizing the seat correctly and maximizing its safety features.
Understanding the Specific Guidelines and Requirements for Your Graco Car Seat Model
Each Graco car seat model has its own set of guidelines and requirements for installation. These guidelines may vary in terms of the position of the seat, the use of specific harnesses or straps, and the proper installation in different types of vehicles. By reading the manual, you can gain a clear understanding of the specific requirements for your particular Graco car seat model, allowing you to install it in a way that adheres to the manufacturer’s recommendations.
Furthermore, the instruction manual may also provide information on other relevant topics such as adjusting the seat as your child grows, cleaning and maintenance instructions, and expiration dates. By familiarizing yourself with all of this information, you can ensure that you are using the Graco car seat correctly and making informed decisions regarding its installation and ongoing usage.
In conclusion, reading the instruction manual should be the first step in the process of installing your Graco car seat. By doing so, you can gain valuable information about your specific model, understand the guidelines and requirements for installation, and ensure that you are utilizing the car seat in the safest and most effective way possible.
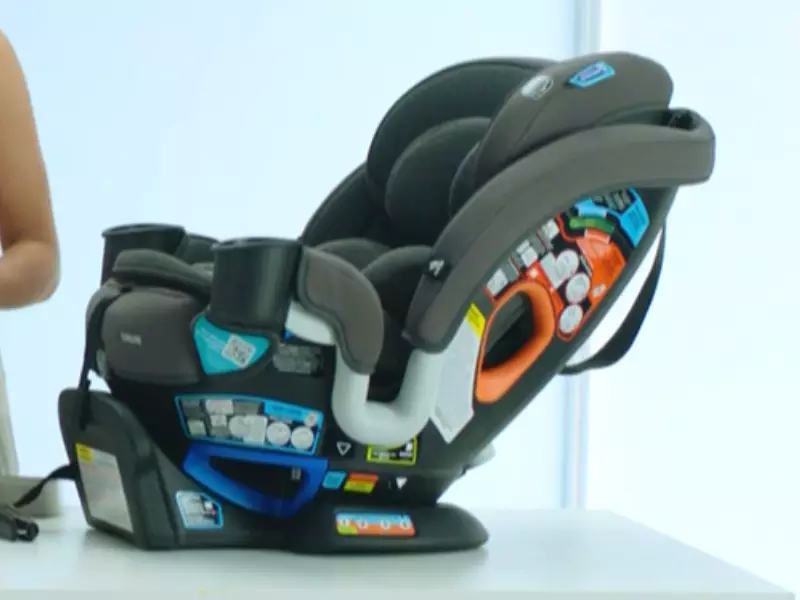
Step 2: Selecting The Appropriate Car Seat Position
Once you’ve chosen the right Graco car seat for your child, the next crucial step is to determine the appropriate car seat position. This decision depends on your child’s age and weight. Understanding the different car seat positions and their suitability will help keep your child safe and secure on every journey.
Exploring different car seat positions and their suitability for your child’s age and weight
When it comes to car seat positions, there are three main options: rear-facing, forward-facing, and booster seats. Each has its own safety features and is designed to accommodate specific age and weight ranges.
Rear-facing seats:
Rear-facing seats are recommended for infants and young children. These seats are designed to cradle and protect your child in the event of a frontal impact. The position allows the car seat to absorb the force of the collision and distribute it evenly across the child’s body. As a result, rear-facing seats provide maximum protection for your little one’s developing head, neck, and spine.
Forward-facing seats:
As your child grows, you may need to transition to a forward-facing seat. These seats are suitable for toddlers and young children. They offer a higher level of freedom and comfort compared to rear-facing seats. The harness system restrains your child securely, providing protection in the event of sudden braking or impact.
Booster seats:
When your child outgrows the forward-facing seat, it’s time to consider a booster seat. Booster seats elevate your child, ensuring that the seat belt fits them properly. These seats are ideal for older children who have outgrown the weight and height limits of forward-facing seats but are still too small to wear a seat belt without assistance.
Rear-facing, forward-facing, or booster seat: determining the best option for your child
Determining the best car seat position for your child depends on their age and weight. Here are some general guidelines to help you make the right decision:
| Age | Weight Range | Recommended Car Seat Position |
|---|---|---|
| Infants (0-2 years) | Up to 35 lbs | Rear-facing seat |
| Toddlers (2-4 years) | 22-65 lbs | Forward-facing seat |
| Young children (4-8 years) | 40-100+ lbs | Booster seat |
Note: The above weight ranges are general guidelines. Always refer to the specific weight and height limits set by the car seat manufacturer to ensure the utmost safety for your child.
By understanding the different car seat positions and their suitability for your child’s age and weight, you can confidently install your Graco car seat in the appropriate position. Remember, ensuring your child’s safety during every journey is of utmost importance.
Step 3: Prepping The Car For Installation
Before installing your Graco car seat, it’s important to properly prep your car for a safe and secure installation. This step involves removing any existing car seat or objects from the designated area and adjusting your vehicle’s seat and headrest to accommodate the car seat correctly. Paying attention to these details will help ensure the car seat is installed properly and provide optimal safety for your precious little one. Let’s dive into the specifics of this crucial step.
Removing any existing car seat or objects from the designated area
Start by thoroughly inspecting the designated area where you plan to install the Graco car seat. Ensure that there are no existing car seats or objects obstructing the installation. Some car models might have additional hooks or anchors that need to be removed to create a clean surface for the car seat installation.
It is essential to remove any loose objects such as toys, cushions, or debris from the designated area. These objects not only hinder the installation process but also pose potential risks during travel, such as projectiles in case of an accident. By removing any existing car seats or objects, you create a safe and clutter-free area dedicated solely to the installation of the Graco car seat.

Adjusting the vehicle’s seat and headrest to accommodate the car seat correctly
After clearing the designated area, it’s time to adjust your vehicle’s seat and headrest to ensure a proper fit for the Graco car seat. Start by moving the seat forward or backward to find the ideal position that allows sufficient room for the car seat’s base and ensures a snug fit. You want to strike the perfect balance between comfort and stability.
Next, adjust the vehicle’s headrest to accommodate the height of the car seat. Make sure the headrest is not pressing against the car seat but is positioned at a sufficient distance to provide a secure fit. This adjustment prevents any unnecessary pressure on the car seat and optimizes the protection it offers.
Additionally, you may want to consult your vehicle’s user manual for specific instructions on adjusting the seat and headrest. Each car model might have unique features or requirements that you need to consider during this preparation stage.
By taking the time to remove any existing car seat or objects from the designated area and adjusting the vehicle’s seat and headrest, you are setting the foundation for a successful and secure installation of your Graco car seat. This attention to detail ensures your little one’s safety and keeps them comfortable during your travels together.
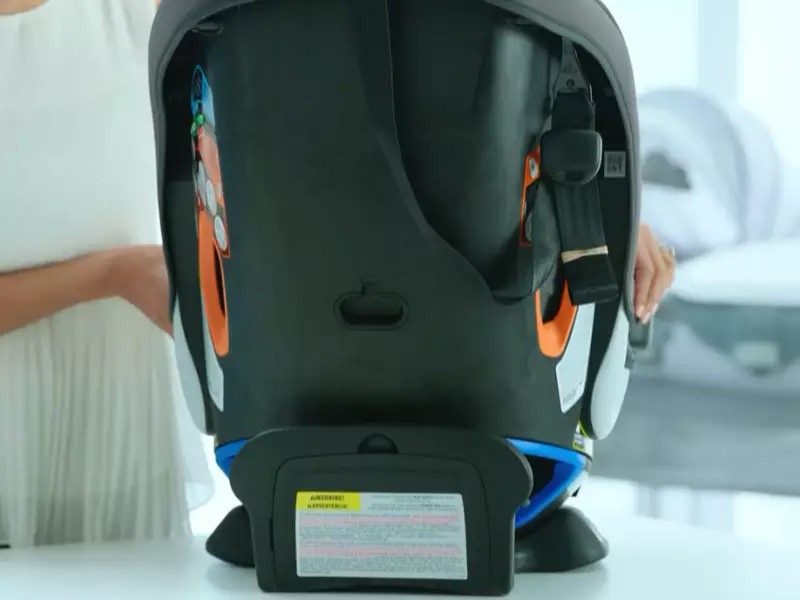
Step 4: Installing The Base Of The Graco Car Seat
Understanding the installation method for the base
Step 4 of installing your Graco car seat involves securing the base. Before getting started, it’s crucial to understand the installation method for the base. This ensures that you can properly secure the car seat and provide the necessary safety measures for your child.
Securing the base using the vehicle’s seat belt or LATCH system
There are two common methods for securing the base of your Graco car seat – using the vehicle’s seat belt or the LATCH system. Let’s take a closer look at each method:
Securing the base using the vehicle’s seat belt
The first method involves securing the base using the vehicle’s seat belt. Here’s a step-by-step guide to help you through the process:
- Position the car seat base in the desired location in your vehicle. Ensure that it is in the correct orientation, following the manufacturer’s instructions.
- Insert the vehicle’s seat belt through the appropriate slots in the base, typically located near the rear of the car seat.
- Pull the seat belt tight, removing any slack to achieve a secure fit.
- Ensure that the seat belt buckle is securely fastened and locked in place.
- Give the car seat base a firm shake to check for any excessive movement. If it moves more than an inch from side to side or front to back, adjust the seat belt tension until it is secure.
Securing the base using the LATCH system
The second method involves using the LATCH (Lower Anchors and Tethers for Children) system. This system is common in newer vehicles and simplifies the installation of child car seats. Follow these steps to secure the base using the LATCH system:
- Locate the lower anchors in your vehicle. These are typically identified by small, rectangular-shaped bars located in the seat crease.
- Attach the LATCH connectors from the car seat base to the lower anchors in your vehicle. Ensure that they are securely latched.
- Once attached, give the car seat base a firm shake to check for excessive movement. If it moves more than an inch from side to side or front to back, adjust the LATCH connectors until the base is secure.
Regardless of the method used, always refer to the manufacturer’s instructions and your vehicle’s owner manual to ensure proper installation of the Graco car seat base. Remember, a secure base is essential for the safety of your child during car rides. Take the time to install it correctly to give yourself peace of mind on the road.
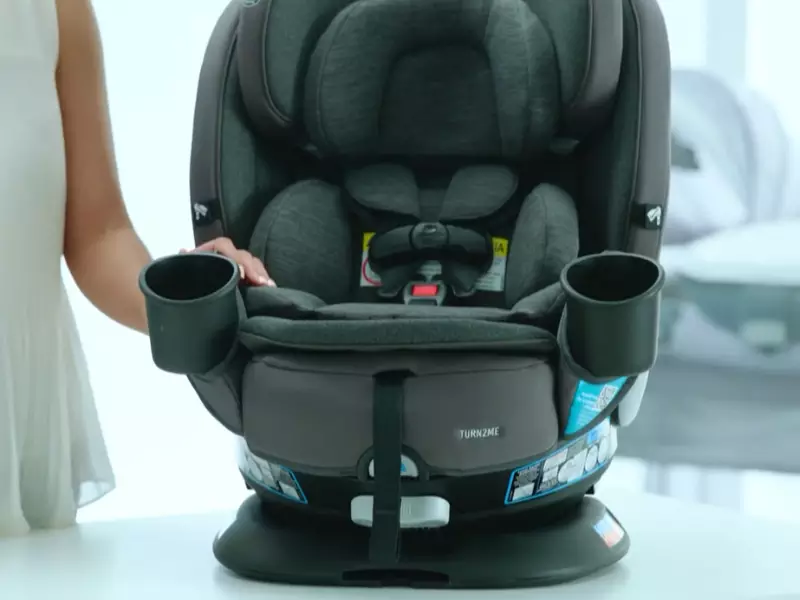
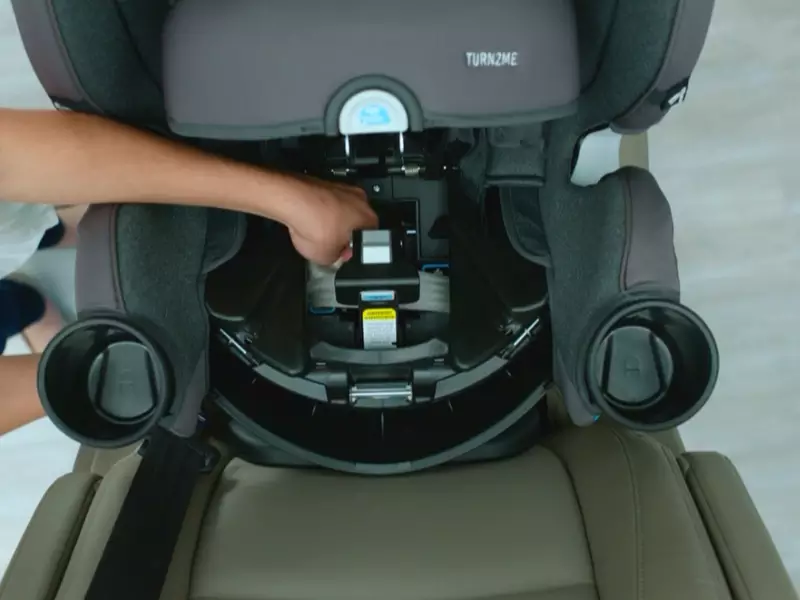
Step 5: Attaching The Car Seat To The Base
After ensuring that you have properly installed the base of your Graco car seat in your vehicle, the next crucial step is to attach the car seat securely to the base. This step is essential to guarantee the safety of your child during travel. Here, we will guide you on how to properly position the car seat on the base and ensure a secure attachment using either the latch connectors or seat belt.
Properly positioning the car seat on the base
Firstly, make sure that the car seat is properly positioned on the base. This involves checking if the car seat is aligned with the indicators provided by Graco for the correct installation. These indicators usually include a level indicator to ensure the car seat is at the correct recline angle. Refer to the Graco car seat’s instruction manual for specific guidance on positioning the seat on the base.
Ensuring a secure attachment through the use of the latch connectors or seat belt
To attach the car seat securely to the base, Graco provides two options: the latch connectors or the seat belt. Both methods are designed to ensure a tight and secure connection. Let’s explore each option:
Using the latch connectors:
- Locate the latch connectors on the base. These connectors are usually made of sturdy straps with metal hooks or buckles.
- Attach the latch connectors to the corresponding anchor points in your vehicle. These anchor points are often located in the crease of the vehicle’s back seat or marked by labels.
- Push the car seat firmly into the base while tightening the latch connectors. Ensure there is no excessive slack in the straps by firmly pulling on them until the connection is snug.
Using the seat belt:
- Position the car seat on the base.
- Thread the seat belt through the designated belt path provided by Graco. This path is specifically designed to ensure proper installation.
- Buckle the seat belt and pull it tight while pressing down on the car seat to compress it into the base.
- Confirm that the seat belt is locked and there is no slack. Check your vehicle’s seat belt locking mechanism or consult the car seat manual for instructions on how to properly lock the seat belt.
Remember, regardless of the attachment method you choose, always make sure the car seat is attached securely to the base. Give it a gentle tug to verify there is no excessive movement or play. This step is crucial in maintaining the integrity of the car seat’s installation and ensuring the safety of your child.
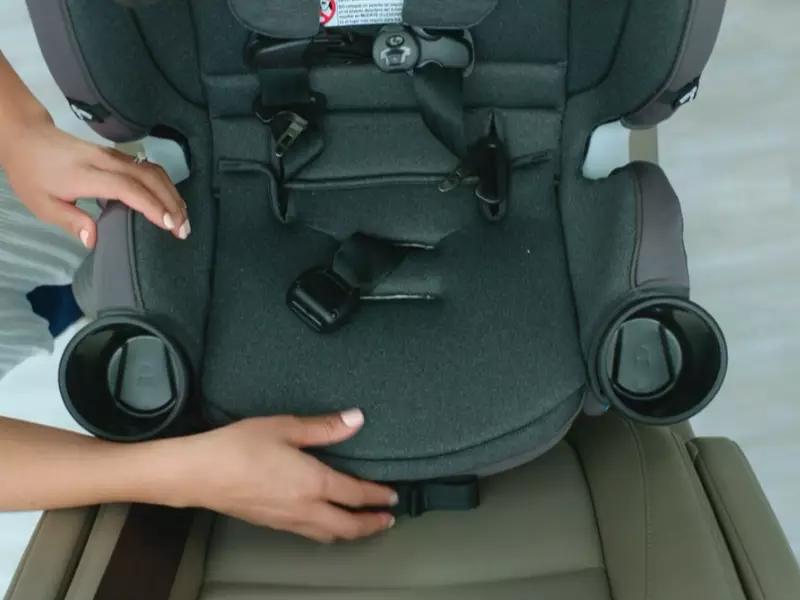
Step 6: Adjusting The Harness Straps
In order to ensure your child’s safety while riding in the Graco Car Seat, it is crucial to properly adjust the harness straps. This step is important because it ensures that the straps are snug and secure, providing optimal protection for your little one. In this section, we will guide you through the process of adjusting the harness straps to fit your child’s body perfectly.
Properly fitting the harness straps to your child’s body
To begin, it is essential to adjust the harness straps to fit your child’s body properly. The straps should be snug but not too tight, allowing for easy movement and comfort. Follow these steps to achieve the perfect fit:
- Start by loosening the harness straps by pulling the adjuster strap located at the bottom of the car seat. This will allow you to easily place your child in the seat without any restrictions.
- Next, place your child in the car seat and buckle them in.
- Once your child is securely fastened, locate the adjuster strap at the front of the car seat near their hips.
- Pull the adjuster strap to tighten the harness straps. You should be able to fit only one finger between the straps and your child’s collarbone. Make sure the straps lay flat and are not twisted.
- Check if the straps are at the appropriate height for your child’s shoulders. They should be at or just above their shoulders for rear-facing installations, and at or just below their shoulders for forward-facing installations.
- Ensure that the chest clip is positioned at armpit level to keep the straps properly aligned. This clip adds an extra layer of security and helps keep your child securely in place during the ride.
Adjusting the chest clip and ensuring a snug fit without being too tight
In addition to properly fitting the harness straps, it is also crucial to adjust the chest clip for a snug yet comfortable fit. Here’s how to do it:
- First, ensure that the chest clip is centered and positioned at your child’s armpit level.
- Place the buckle tongues into the buckle and press until you hear a click sound, indicating that it is securely fastened.
- Check that the chest clip is not too loose or too tight. It should be snug enough to hold the shoulder straps in place without digging into your child’s chest.
- Remember, the chest clip acts as an additional safety measure, keeping the shoulder straps correctly positioned on your child’s shoulders.
By properly adjusting the harness straps and chest clip, you can ensure that your child is well-protected and comfortable during every car ride. Take the time to adjust these features properly, following the manufacturer’s instructions, to provide maximum safety for your little one.
Step 7: Evaluating The Installation
Once you have successfully followed all the previous steps to install your Graco Car Seat, it is essential to evaluate the installation to ensure optimal safety for your child. This step involves checking for proper installation, including stability and security, as well as identifying potential issues or common mistakes to avoid. By completing this evaluation, you can have peace of mind knowing that your car seat is installed correctly and securely.
Checking for proper installation, including stability and security
Now that you have completed the installation process, it is time to evaluate the stability and security of your Graco Car Seat. This step ensures that the seat is correctly installed and provides maximum protection for your little one during car rides. To check for proper installation, follow these guidelines:
- Check the position of the car seat. Ensure that it is securely fastened and does not move more than an inch in any direction when gently tugged.
- Ensure the base of the car seat is level. Use a level indicator or check the positioning guides provided by Graco to ensure that the car seat base is level with the ground.
- Inspect the harness straps. Ensure that the straps are properly tightened and adjust them if necessary. They should fit snugly against your child’s body, with no slack or gaps.
- Check the chest clip. Make sure the chest clip is positioned at your child’s armpit level to keep the harness straps in the correct position.
- Verify the lap belt or LATCH system. If you have used the seat belt to secure the car seat, check that it is tightly fastened. If you have used the LATCH system, ensure that it is properly attached and secure.
- Examine the overall stability of the car seat. Shake the car seat from side to side and front to back to check for any excessive movement. The car seat should be firmly anchored and not shift or wobble.
By following these steps, you can ensure that the installation of your Graco Car Seat is secure and stable, providing your child with the utmost safety during car rides.
Identifying potential issues or common mistakes to avoid
During the evaluation process, it is important to be aware of potential issues or common mistakes that may compromise the safety of the installation. By recognizing and addressing these issues, you can rectify them and ensure that your car seat is correctly installed. Here are some common mistakes to avoid:
- Incorrect positioning of the car seat base: Ensure that the base is level and not tilted too far back or forward.
- Inadequate harness strap adjustment: Check that the harness straps are properly tightened and snug against your child’s body.
- Improper use of the chest clip: Ensure that the chest clip is at the correct height.
- Loose seat belt or LATCH system: Double-check that the seat belt or LATCH system is tightly secured.
- Excessive movement or instability: If the car seat moves excessively or feels unstable, recheck the installation and make any necessary adjustments.
- Failure to follow the manufacturer’s instructions: Always refer to the Graco Car Seat manual for proper installation procedures.
By avoiding these common mistakes and addressing any potential issues, you can ensure that your Graco Car Seat is installed correctly and that your child is safe and secure while traveling in the car.
Step 8: Understanding Car Seat Safety Tips
Additional Safety Measures to Enhance Your Child’s Protection During Car Rides
The installation process of your Graco car seat is just one step toward ensuring your child’s safety during car rides. To further enhance their protection, it’s important to be aware of and implement additional safety measures. By regularly checking for recalls and maintaining the car seat’s cleanliness and functionality, you can create a secure environment for your little one. Here are some key tips to keep in mind:
Regularly Checking for Recalls
Car seat manufacturers occasionally identify potential safety issues with their products, leading to recalls. It’s crucial that you stay updated on any recalls related to your Graco car seat. To do this, you can:
- Register your car seat with Graco or the relevant manufacturer to receive recall notifications directly.
- Visit the official website of the manufacturer regularly to check for any recall announcements.
- Subscribe to auto safety newsletters or follow reliable sources to receive recall information.
When a recall is issued, make sure to follow the instructions provided by the manufacturer to rectify the issue promptly. This will ensure your child’s continued safety.
Maintaining the Car Seat’s Cleanliness and Functionality
A clean and properly functioning car seat is essential for your child’s safety. To maintain your Graco car seat’s cleanliness and functionality, consider the following tips:
- Regularly inspect the car seat for any signs of damage or wear and tear.
- Clean the car seat according to the manufacturer’s instructions, using a mild soap and water solution.
- Avoid using harsh chemicals or abrasive cleaners that could damage the car seat.
- Pay attention to the expiration date of the car seat and replace it when necessary.
| TIP: | Consider using a car seat cover or liner to protect the car seat from spills and dirt. |
|---|---|
| Regularly check the tightness and stability of the car seat’s harness straps and adjust them as needed. | |
| Ensure that the car seat is securely installed in your vehicle by following the manufacturer’s instructions and guidelines. |
By following these additional safety measures, you can provide an extra layer of protection for your child during car rides. Stay informed, regularly maintain your Graco car seat, and prioritize your little one’s safety on the road!
Step 9: Seeking Professional Assistance (If Necessary)
Recognizing when to consult a certified car seat technician
It’s important to know when to seek the expertise of a certified car seat technician. While installing a Graco car seat may seem straightforward, there are certain situations that may require professional assistance. If any of the following scenarios apply to you, it’s best to consult a certified technician:
1. Complicated Car Seat Installation
If you find yourself struggling with the installation process and can’t seem to get it right after following the manufacturer’s instructions carefully, it’s time to seek professional help. Certified car seat technicians have comprehensive knowledge and experience to overcome any complexities that may arise during installation.
2. Specific Vehicle Requirements
Each vehicle has unique structural characteristics, which can affect car seat installation. Some vehicles may require additional tools or specific methods to ensure a secure fit. If you’re unsure about whether your vehicle requires any special considerations, a certified technician can provide guidance and expertise.
3. Special Circumstances
Certain special circumstances may warrant the assistance of a certified car seat technician. If you have a preemie or a child with special needs, or if your vehicle has integrated safety features that could impact car seat installation, it’s advisable to consult a professional. They can evaluate the situation and make necessary adjustments to guarantee your child’s safety.
How to locate certified technicians or agencies in your area
Finding certified car seat technicians or agencies in your area is crucial to ensure you receive reliable and expert assistance. Follow these steps to locate trusted professionals near you:
1. Check the Manufacturer’s Website
Most car seat manufacturers, including Graco, provide a list of certified technicians or agencies on their official websites. Visit the Graco website and navigate to the “Support” or “Installation Assistance” section to find a directory or search tool to locate professionals in your area.
2. Contact Local Law Enforcement or Fire Departments
Local law enforcement agencies and fire departments often have certified car seat technicians on staff. Reach out to these organizations and inquire about any assistance they can provide. They may offer installation events or be able to recommend independent technicians or agencies in the area.
3. Online Search Engines
Utilize online search engines to find certified car seat technicians in your area. Perform a search using keywords such as “certified car seat technician near me” or “Graco car seat installation experts.” Explore the search results, review websites, and testimonials to verify their certification and reputation before reaching out.
Remember, the safety of your child is of utmost importance, and seeking professional assistance, when necessary, ensures proper installation of your Graco car seat. Take the necessary steps to locate certified technicians or agencies in your area so you can have peace of mind knowing your child is secure during every car ride.
Frequently Asked Questions For How To Install Graco Car Seat
How Do I Install A Graco Car Seat Rear Facing?
To install a Graco car seat rear facing, first, locate the vehicle’s anchor points. Then, attach the seat’s lower anchors to the anchor points. Next, thread the seatbelt through the rear-facing belt path and buckle it. Finally, tighten the seatbelt and check for a secure fit.
Always refer to the car seat’s manual for specific instructions.
How Do You Install A Graco Infant Car Seat?
To install a Graco infant car seat, follow these steps:
1. Place the base securely in the back seat of your vehicle.
2. Thread the car’s seat belt through the designated slots and buckle it.
3. Tighten the seat belt to ensure a secure fit.
4. Attach the infant car seat to the base until you hear a click.
5. Double-check that the seat is properly installed and secure.
How Do You Install A Forward Facing Graco Car Seat?
To install a forward-facing Graco car seat, follow these steps:
1. Position the seat in the backseat of your car.
2. Secure the seat with the vehicle’s seat belt or the LATCH system.
3. Adjust the recline angle to match your child’s age and weight.
4. Ensure the seat is tightly secured and doesn’t move more than an inch.
5. Double-check the seat’s harness and make sure it fits snugly on your child.
How Do You Install A Graco 3 In 1 Car Seat?
To install a Graco 3 in 1 car seat, follow these steps:
1. Place the base in the back seat.
2. Thread the seat belt through the designated slots.
3. Buckle the seat belt and tighten it.
4. Adjust the recline angle if needed.
5. Attach the car seat to the base securely.
Conclusion
Installing a Graco car seat is an essential step to ensure your child’s safety while traveling. By following the step-by-step instructions provided in this blog post, you can easily install your Graco car seat and provide a secure and comfortable journey for your little one.
Remember to always refer to the car seat’s manual and follow the safety guidelines. Prioritize your child’s safety and enjoy worry-free travels with your Graco car seat.