To install daytime running lights inside headlights, follow these steps (around 120 words for a well-rounded introduction): Daytime running lights (DRLs) are an important safety feature that increases visibility during daylight hours. Installing DRLs inside the headlights of your vehicle can enhance both its appearance and functionality.
To begin, gather the necessary tools and materials, such as DRL kits, electrical connectors, and wire cutters. Disconnect the battery to ensure safety during the installation. Remove the headlight assembly and locate a suitable mounting position for the DRL kit.
Connect the wires according to the manufacturer’s instructions, making sure to secure them properly. Reassemble the headlights, ensuring they are aligned correctly, and reconnect the battery. Test the DRLs to ensure they are working correctly before hitting the road. Stay safe and visible with your newly installed DRLs.
Enhanced Visibility And Safety
Increased visibility during daytime
Installing daytime running lights (DRL) inside your headlights can greatly enhance the visibility of your vehicle during the daytime. These lights, which automatically turn on when the engine is running, emit a bright and distinct light that helps ensure your vehicle is visible to other drivers on the road.
By adding DRLs to your headlights, you are effectively increasing the chances of other drivers noticing your presence. This is especially important in low-visibility conditions such as fog, rain, or during sunrise or sunset, when the natural light may not be sufficient to make your vehicle stand out.
Not only do daytime running lights make your car more noticeable, but they also add a sleek and modern look to your vehicle. With their distinctive illumination, these lights create a bold and eye-catching appearance that can make your car stand out from the rest.

Reduced chance of accidents
Enhancing the visibility of your vehicle during the daytime with DRLs can significantly reduce the chances of accidents. When other drivers are more aware of your presence on the road, they can better anticipate your movements and avoid collisions.
Research has shown that vehicles with daytime running lights are involved in fewer daytime accidents compared to those without. This added safety feature acts as an extra layer of protection, providing you with peace of mind as you navigate through traffic.
In addition to improving your safety, DRLs can help improve the safety of other road users as well. Pedestrians, cyclists, and motorcyclists are more likely to notice your vehicle approaching, reducing the risk of accidents involving vulnerable road users.
Installing DRLs inside your headlights may seem like a small modification, but it can make a big difference when it comes to safety. By increasing visibility, you are taking proactive steps towards preventing accidents and protecting yourself and those around you.
In conclusion, the installation of daytime running lights inside your headlights provides enhanced visibility and safety for your vehicle. With an increased visibility during daytime, these lights help you stand out in various weather conditions and low-visibility situations. By reducing the chances of accidents, they act as a safety measure for both you and other road users. Installing DRLs is a simple yet effective way to ensure a safer driving experience.
Improved Aesthetics And Style
Installing daytime running lights (DRLs) inside your headlights not only enhances safety but also improves the aesthetics and style of your vehicle. With sleek and modern DRLs, your headlights will have a distinctive and eye-catching appearance that is sure to turn heads on the road. Let’s explore the various ways in which installing DRLs can uplift the aesthetic appeal of your vehicle.
Sleek and modern look
By incorporating DRLs inside your headlights, you can achieve a sleek and modern look for your vehicle. The LED lights used in DRLs emit a bright, white light that adds a contemporary touch to your headlights. The crisp and sharp illumination creates a stunning visual effect that enhances the overall appearance of your vehicle.
Moreover, DRLs are designed to seamlessly blend with the existing design of your headlights, giving them a factory-installed look. The integration of DRLs into your headlights makes your vehicle appear more sophisticated and up-to-date, elevating its overall style quotient.
Customization options
One of the major advantages of installing DRLs inside your headlights is the availability of customization options. Manufacturers provide a range of DRL designs to suit different preferences and vehicle models. Whether you prefer a subtle and understated DRL design or a bold and attention-grabbing one, you have the freedom to choose what best complements your style.
Additionally, many DRLs come with adjustable settings, allowing you to customize the intensity and pattern of the light. This level of customization ensures that you can create a unique and personalized look for your headlights, making your vehicle stand out from the crowd.
Furthermore, DRLs can be installed in various positions within your headlights, such as along the top edge or around the projector lens. This flexibility gives you the opportunity to experiment with different placements and create a customized lighting arrangement that suits your taste and style.
In conclusion, installing DRLs inside your headlights not only improves safety but also enhances the aesthetics and style of your vehicle. With their sleek and modern look and the available customization options, DRLs add a touch of elegance and personalization to your headlights, making your vehicle more visually appealing on the road.
Led Light Strips
High-Quality LED Light Strips
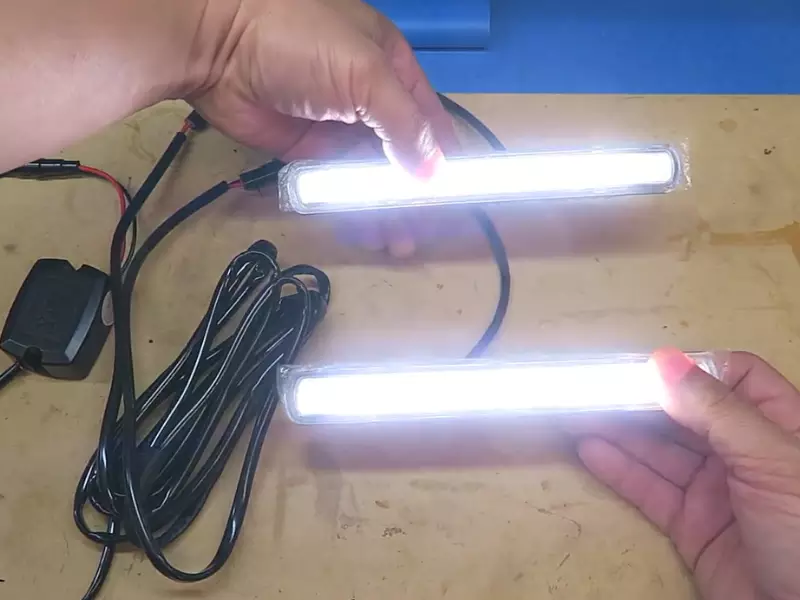
LED light strips are a fantastic option for installing daytime running lights (DRLs) inside your headlights. They provide a sleek and modern look that enhances both the appearance and functionality of your vehicle. When it comes to choosing the right LED light strips for your headlights, it’s crucial to select high-quality ones that are built to last.
High-quality LED light strips offer several benefits. Firstly, they are exceptionally bright, ensuring excellent visibility during daytime hours. They are also energy-efficient, meaning they consume less power and put less strain on your vehicle’s electrical system. This translates to a longer lifespan for both the LED light strips and your vehicle’s battery.
Another advantage of high-quality LED light strips is their durability. They are built to withstand harsh weather conditions, such as rain, snow, and extreme temperatures. This ensures that your DRLs will continue to perform at optimal levels regardless of the climate.
Proper Length to Fit Headlights
It’s essential to choose LED light strips that are the proper length to fit inside your headlights. Running strips that are too long may require cutting and repositioning, which can be a complex and time-consuming process. On the other hand, strips that are too short may not provide adequate coverage and may result in uneven lighting.
To determine the proper length of LED light strips for your specific headlights, it’s recommended to measure the inside dimensions carefully. Measure the distance from one end of the headlight to the other, ensuring accuracy by using a measuring tape or ruler. Once you have the measurements, look for LED light strips that match those dimensions or can be easily trimmed to fit.
It’s worth noting that some LED light strips come with cutting marks or designated cut points. These indicators make it easier to trim the strips to the correct length without compromising their functionality.
Installing properly sized LED light strips ensures a seamless integration into your headlights, resulting in a clean and professional-looking installation. It also maximizes the effectiveness of the DRLs, providing enhanced visibility and safety while on the road.
Wiring Harness
The wiring harness is a crucial component when it comes to installing daytime running lights (DRLs) inside headlights. It serves as the interface between the DRLs and the vehicle’s electrical system, ensuring a seamless and efficient installation. The wiring harness acts as a bridge, allowing the DRLs to draw power from the vehicle’s electrical system and transmit it to the lights.
One of the advantages of using a universal wiring harness is its compatibility with the vehicle’s electrical system. This means that regardless of the make or model of your vehicle, the universal wiring harness is designed to work in harmony with it. This eliminates the hassle of searching for a specific wiring harness that is compatible with your car.
Compatible with the vehicle’s electrical system
When installing DRLs, it is essential to ensure compatibility with the vehicle’s electrical system. The universal wiring harness takes care of this concern by being designed to work seamlessly with various vehicle makes and models. This compatibility ensures that the installation process is smooth and efficient.
With a universal wiring harness, you won’t have to worry about finding the right wiring connections or modifying your vehicle’s electrical system. The harness comes pre-wired with the necessary connectors and ensures that the DRLs integrate seamlessly with the existing electrical setup.
Easy installation process
The universal wiring harness simplifies the installation process. It eliminates the need for complex wiring configurations and reduces the risk of wiring mistakes. With its plug-and-play design, connecting the DRLs to the vehicle’s electrical system becomes a breeze.
The wiring harness typically includes detailed instructions that guide you step-by-step through the installation. Additionally, it may come with color-coded wires, making it even easier to identify the corresponding connections.
Ensures proper functionality
Not only does the universal wiring harness facilitate the installation process, but it also ensures that the DRLs function correctly. The harness is designed to handle the required voltage for the lights, protecting them from potential damage caused by fluctuations in the electrical system.
Moreover, the wiring harness also provides additional safety features, such as fuse protection, to prevent any electrical mishaps. Investing in a high-quality universal wiring harness guarantees that your DRLs will function properly and durably.
In conclusion, the universal wiring harness is an essential component in installing DRLs inside headlights. Its compatibility with the vehicle’s electrical system, easy installation process, and assurance of proper functionality make it a reliable and convenient choice. So, if you’re looking to enhance your vehicle’s visibility and safety, consider installing DRLs with a universal wiring harness.
Electrical Tape
Electrical tape is a strong and durable material that is essential when installing daytime running lights (DRLs) inside your headlights. This tape is designed to insulate and secure connections, providing a reliable and long-lasting solution. It plays a critical role in protecting the electrical components from moisture, vibrations, and other elements that can compromise their functionality.
Strong and durable
When it comes to securing the connections of your DRLs, electrical tape offers a strong and durable solution. Its adhesive backing ensures a tight and secure bond, preventing any loose connections that could lead to flickering or intermittent operation of your lights. This tape is designed to withstand various weather conditions, ensuring that your DRLs stay firmly in place, even during extreme temperatures or challenging driving conditions.
Insulate and secure connections
The primary function of electrical tape when installing DRLs is to insulate and secure connections. It acts as a protective barrier between the different electrical wires, preventing any potential short circuits or electrical hazards. By wrapping the taped connections tightly, you can prevent the wires from coming into contact with each other or with the metal surfaces of your headlights. This insulation not only enhances the safety of your installation but also helps maintain the longevity of your DRLs.
Throughout the installation process, it’s essential to use electrical tape to secure the individual connections. Start by stripping a small section of the wire insulation, exposing the bare copper. Then, twist the wires together neatly and wrap them tightly with electrical tape, ensuring complete coverage. This will ensure a secure and reliable electrical connection.
In addition to securing the connections, electrical tape also helps provide strain relief. It prevents the wires from being tugged or pulled, minimizing the risk of accidental disconnections. By securing the wires with electrical tape, you can have peace of mind knowing that your DRLs will remain functioning optimally without any interruptions.
With its versatility and durability, electrical tape is an indispensable tool when it comes to installing DRLs inside headlights. Its ability to insulate and secure connections plays a crucial role in maintaining the reliability and longevity of your lights. So, whether you are a DIY enthusiast or a professional installer, make sure to include electrical tape in your DRL installation toolkit.
Wire Cutters And Strippers
When installing daytime running lights inside headlights, precise cutting and stripping of wires is essential. By using the right tools, such as wire cutters and strippers, you can ensure clean and professional installations. This article will guide you through the process of using wire cutters and strippers effectively, resulting in a flawless integration of daytime running lights.
Precise cutting and stripping of wires
One of the key steps in installing daytime running lights inside your headlights is the precise cutting and stripping of wires. This is crucial to ensure a proper connection between the lights and the electrical system of your vehicle. To achieve this, follow these steps:
- Start by identifying the wires that need to be cut and stripped. Refer to the wiring diagram provided with your daytime running lights kit for guidance.
- Once you have identified the wires, carefully use wire cutters to cut them. Make sure to snip the wires cleanly and avoid leaving any frayed edges.
- After cutting the wires, it’s time to strip off the insulation. This allows you to expose the metal conductor inside for a proper connection.
To strip the wires, you will need a pair of wire strippers. These tools are designed to remove the insulation without damaging the underlying conductor. Follow these steps to strip the wires effectively:
- Choose the appropriate notch on your wire strippers that matches the gauge of the wire you are working with. This will prevent cutting into the conductor itself.
- Hold the wire firmly in one hand and position the wire strippers around the insulation.
- Squeeze the handles of the wire strippers gently and pull towards the end of the wire. The insulation should easily come off, revealing the metal conductor beneath.
- Repeat the process for each wire that needs to be stripped.
Clean, professional installations
Using wire cutters and strippers correctly is essential to achieve clean and professional installations of daytime running lights. By ensuring precise cutting and stripping of wires, you can avoid any connectivity issues or potential damage to your vehicle’s electrical system. This results in a seamless integration of the lights within your headlights, giving your vehicle a sleek and modern appearance.
Remember to follow the manufacturer’s instructions and safety guidelines when working with wire cutters and strippers. Always wear protective eyewear and exercise caution to prevent any injuries.
Heat Shrink Tubing
Protects and insulates connections
One crucial component of installing daytime running lights (DRLs) inside headlights is the use of heat shrink tubing. Heat shrink tubing is a versatile material that provides an added layer of protection and insulation to electrical connections. It is commonly used in automotive applications to safeguard connections and prevent electrical failures.
Heat shrink tubing is made of a specially designed polymer that shrinks when heat is applied, creating a tight seal around the wires. This tight seal not only protects the electrical connections from physical damage but also insulates them from harsh external elements.
When installing DRLs inside headlights, heat shrink tubing plays a vital role in securing the connections between the wires from the DRLs and the headlights’ power source. Encapsulating the connections, helps to prevent accidental short circuits and ensures a reliable and long-lasting electrical connection.
Prevents exposure to moisture and debris
Aside from protecting and insulating connections, heat shrink tubing also safeguards against exposure to moisture and debris. Moisture and debris can interfere with the proper functioning of electrical connections, leading to corrosion, poor conductivity, and even electrical failures.
The heat shrink tubing forms a waterproof barrier that shields the connections from moisture, preventing any potential damage or malfunctions. Additionally, it acts as a barrier against dust, dirt, and other debris that could accumulate inside the headlights, preserving the clarity of the light output.
By using heat shrink tubing, you are ensuring that the DRLs inside your headlights remain free from moisture-related issues and debris accumulation. This not only enhances the longevity of the DRLs but also maintains their optimal performance throughout their lifespan.
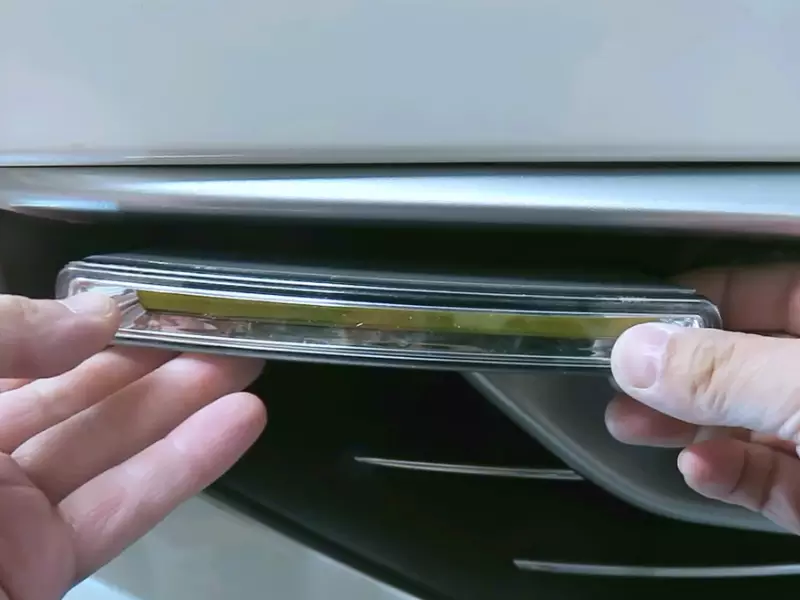
Preparing The Headlights
Before you can install daytime running lights inside your headlights, you need to properly prepare the headlights themselves. This involves removing them from your vehicle and making sure the headlight surface is clean and dry. Follow these steps to prepare your headlights for the installation process:
Remove the headlights from the vehicle
To begin, you will need to detach the headlights from your vehicle. This may vary depending on the make and model of your car, so refer to your vehicle’s manual or online resources for specific instructions. In general, the process involves:
- Locate the screws or clips holding the headlights in place.
- Use a screwdriver or other appropriate tool to remove these screws or release the clips.
- Gently pull the headlights away from the vehicle, being mindful of any wiring that may still be connected.
- If necessary, disconnect any wiring connections to fully remove the headlights.
Clean and dry the headlight surface
Once the headlights are removed, it’s important to clean and dry the surface where the daytime running lights will be installed. This ensures a secure and long-lasting installation. Follow these steps to properly clean the headlight surface:
- Using a mild cleaning solution, such as soap and water, wipe down the entire surface of the headlight. This helps to remove dirt, grime, and any other contaminants.
- Rinse the headlight thoroughly with clean water to ensure all cleaning residue is removed.
- Dry the headlight surface completely using a microfiber cloth or other lint-free towel. This helps to prevent any moisture from interfering with the installation process.
- Inspect the headlight surface for any remaining debris or residue. If necessary, repeat the cleaning process until the surface is clean and free of any contaminants.
By properly preparing your headlights, you are setting the stage for a successful installation of daytime running lights. Taking the time to remove the headlights from your vehicle and clean the surface ensures a secure and professional result. Now that your headlights are ready, you can proceed to the next steps of the installation process.
Measuring And Cutting The Light Strips
Before you can install daytime running lights inside your headlights, you’ll need to first measure and cut the LED light strips to the correct size. This crucial step ensures a seamless and professional installation. In this section, we’ll guide you through the process of measuring the length required for each headlight and cutting the LED light strips to size.
Measure the length required for each headlight
The first step in this process is measuring the length required for each headlight. Start by identifying the exact area where you want to install the light strips. It’s important to take accurate measurements to ensure a precise fit. To do this:
- Using a measuring tape, measure the length of the headlight from one end to the other. Make sure to measure both the top and bottom sections, as they may have different dimensions.
- Note down the measurement for each headlight separately. It’s a good idea to keep these measurements organized to avoid confusion later on.
Cut the LED light strips to size
Once you have the measurements for each headlight, it’s time to cut the LED light strips to size. This step requires precision to ensure the light strips fit perfectly inside the headlights. Follow these steps to accurately cut the light strips:
- Using a pair of sharp scissors or a utility knife, carefully cut the LED light strip at the appropriate measurement mark.
- Ensure that your cut is clean and straight, as any irregularities may affect the adhesive or result in an uneven installation.
Repeat this process for each headlight, cutting the LED light strips to match the measurements you took earlier. By taking your time and being meticulous during this step, you’ll guarantee a professional and seamless installation.
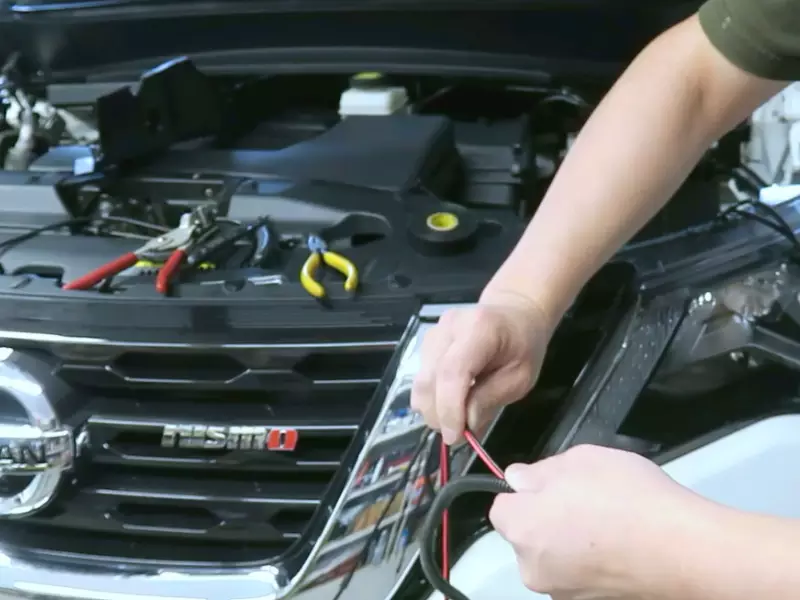
Wiring The Drls
Connect the positive and negative wires of the LED light strips
When it comes to wiring the DRLs inside your headlights, one of the crucial steps is connecting the positive and negative wires of the LED light strips. This ensures that the Daytime Running Lights function properly and provide the desired lighting effect. To do this, you will need a few tools and materials, including wire cutters, a wire crimper, electrical tape, and of course, the LED light strips themselves.
To begin, make sure you have identified the positive and negative wires on the LED light strips. These wires are usually color-coded, with red indicating the positive (+) wire and black indicating the negative (-) wire. Once you have identified the wires, follow these steps to connect them:
- Start by stripping off a small portion of the insulation from the ends of both the positive and negative wires using wire cutters. This will expose the metal core of the wires and allow for a secure connection.
- Next, take the positive wire from the LED light strip and twist it together with the positive wire from your vehicle’s wiring harness. This ensures a proper connection and prevents any loose ends.
- Using a wire crimper, crimp a wire connector or butt connector onto the twisted wires. This helps to secure the connection and prevent any accidental disconnections.
- Repeat the same process for the negative wires, twisting together the negative wire from the LED light strip with the negative wire from the wiring harness and using a wire connector to secure the connection.
- Once you have connected both the positive and negative wires, it is essential to insulate the connections using electrical tape. This provides extra protection against any moisture or unwanted electrical contact.
Use the wiring harness for a secure connection
To ensure a secure and reliable connection when installing your Daytime Running Lights inside the headlights, it is highly recommended to use a wiring harness. A wiring harness acts as an intermediary between the LED light strips and your vehicle’s electrical system, providing a clean and organized way to connect the DRLs.
A wiring harness typically consists of a bundle of wires with connectors at the end, specifically designed to fit your vehicle’s wiring. The connectors match the electrical connection points on the LED light strips, allowing for a hassle-free installation.
Here are the steps to use a wiring harness for a secure connection:
- Locate the wiring harness that comes with the LED light strip kit. This harness will have connectors on both ends, one for the LED light strips and the other for your vehicle’s wiring.
- Attach the connectors on the wiring harness to the corresponding connectors on the LED light strips. Make sure to match the positive and negative connections accurately.
- Once the connections are secure, route the wiring harness along the inside of the headlight housing, ensuring that it is neatly tucked away and does not obstruct any other components.
- Finally, connect the other end of the wiring harness to your vehicle’s electrical system. This is typically done by plugging the connectors into the existing wiring harness or using wire taps to splice into the appropriate wires.
By using a wiring harness, you not only ensure a secure connection but also simplify the installation process. The organized wiring allows for easy troubleshooting and maintenance, should the need arise.
Remember, proper wiring is crucial for the successful installation and functionality of your Daytime Running Lights. By following these steps and utilizing a wiring harness, you can enjoy enhanced visibility and safety on the road while adding a stylish touch to your vehicle.
Securing The Drls Inside The Headlights
When it comes to installing daytime running lights (DRLs) inside your headlights, it’s essential to secure them properly. This step ensures not only a clean and organized installation but also prevents any potential damage or malfunction of the lights. By following a few simple steps, you can secure the LED light strips inside the headlights without any hassle.
Position the LED light strips inside the headlights
Before securing the DRLs, it’s crucial to position the LED light strips properly inside the headlights. This step ensures optimal visibility and an aesthetically pleasing look. To position the light strips effectively:
- Carefully open the headlight housing to access the interior.
- Identify the ideal location within the headlights for the LED strips. Consider factors such as visibility, beam projection, and any obstructions that may interfere with the lights.
- Ensure that the LED light strips are evenly and symmetrically placed within the headlights for a balanced look.
Use adhesive or mounting clips for a secure fit
Once you have positioned the LED light strips inside the headlights, the next step is to secure them firmly. There are two commonly used methods for securing DRLs – adhesive and mounting clips. Let’s explore both options:
Adhesive
The adhesive is an effective and simple way to secure the LED light strips inside the headlights. Here’s how to use adhesive for a secure fit:
- Select a high-quality adhesive that is specifically designed for automotive applications.
- Clean the surface of the headlights thoroughly to ensure proper adhesion. Remove any dirt, dust, or grease using an automotive cleaning solution.
- Cut the adhesive into appropriate lengths and apply them to the backside of the LED light strips.
- Press the light strips firmly against the surface of the headlights, ensuring a strong bond between the adhesive and the headlight housing.
- Allow the adhesive to dry according to the manufacturer’s instructions before closing the headlight housing.
Mounting clips
If you prefer a more secure and adjustable method for securing the LED light strips, mounting clips are a great option. Follow these steps to use mounting clips:
- Ensure the mounting clips are compatible with your LED light strips and headlights.
- Position the mounting clips along the backside of the LED light strips.
- Place the LED light strips with the mounting clips inside the headlights.
- Adjust the mounting clips to provide a tight fit against the headlight housing.
- Double-check that the mounting clips securely hold the LED light strips in place.
Remember to test the functionality of the DRLs after securing them inside the headlights. Turn on your headlights and verify that the LED light strips illuminate properly. If any issues arise, double-check the positioning and secure fit of the DRLs.
By properly securing the DRLs inside the headlights, you can enjoy enhanced visibility and a professional installation. Take your time during the positioning and securing process to ensure a long-lasting and sleek look for your daytime running lights.
Testing And Adjusting The Drls
Reconnect the headlights to the vehicle’s electrical system
After successfully installing the daytime running lights (DRLs) inside your headlights, it’s time to reconnect them to your vehicle’s electrical system. This step is crucial to ensure that the DRLs are powered and function properly. Follow the steps below to reconnect the headlights:
- Inspect the wiring connections of the DRLs inside the headlights. Make sure that all the connections are secure and tightly fastened.
- Locate the wiring harness of the headlights on your vehicle. It is usually positioned near the headlights or tucked away behind the front grille.
- Match the corresponding wires from the DRLs to the wiring harness of the headlights. Refer to the installation guide or wiring diagram provided by the manufacturer to determine the correct connections.
- Connect the positive wire from the DRLs to the positive wire of the wiring harness, and similarly, connect the negative wire from the DRLs to the negative wire of the wiring harness.
- Ensure that the connections are securely fastened by tightening them with electrical tape or using wire connectors.
Now that you have successfully reconnected the headlights to the vehicle’s electrical system, it’s time to move on to the next step: testing and adjusting the DRLs.
Test the DRLs and adjust the brightness if necessary
Testing the DRLs is essential to ensure that they are functioning properly and emitting the desired brightness. Here’s how you can test and adjust the brightness of the DRLs:
- Turn on your vehicle’s ignition and switch on the headlights. The DRLs should automatically turn on once the headlights are activated.
- Observe the brightness of the DRLs. They should be clearly visible during the daytime and emit a bright light without causing any glare or discomfort to other drivers on the road.
- If the DRLs appear too dim or too bright, adjustment may be necessary. Locate the adjustment screws or knobs provided on the DRLs, which allow you to alter the brightness.
- Using a screwdriver or your fingers, turn the adjustment screws or knobs clockwise to increase the brightness, or counterclockwise to decrease the brightness.
- Make incremental adjustments and test the DRLs’ brightness after each adjustment until you achieve the desired level.
By following these steps, you can ensure that your DRLs are properly connected to the vehicle’s electrical system and emitting the appropriate level of brightness. Testing and adjusting the DRLs will contribute to enhancing visibility and safety on the road, making your driving experience more enjoyable.
Properly Seal The Headlights
Use silicone sealant to prevent moisture buildup
When it comes to properly sealing the headlights of your vehicle after installing daytime running lights, using silicone sealant is crucial. This versatile sealant acts as a powerful barrier against moisture buildup, ensuring the longevity and functionality of your headlights.
Moisture buildup inside headlights can be detrimental, leading to foggy lenses, reduced visibility, and even electrical damage. By applying silicone sealant around the edges of the headlights, you can effectively prevent this moisture from seeping in.
Here’s a step-by-step guide on how to use silicone sealant:
- Clean the headlight surface: Before applying the sealant, make sure the surface of the headlights is clean and dry. This will ensure proper adhesion.
- Apply the sealant: Carefully squeeze a small amount of silicone sealant onto a clean, disposable applicator or your finger. Start from one corner of the headlight and slowly work your way around, applying a thin and even layer of sealant. Be sure to cover any gaps or edges that may allow moisture to enter.
- Smooth out the sealant: Once you have applied the sealant, use a smooth, flat tool or your finger to evenly spread and smooth out the sealant. This will help achieve a seamless finish and ensure a watertight seal.
- Allow the sealant to cure: Let the silicone sealant cure according to the manufacturer’s instructions. This typically takes a few hours, but it’s best to wait for the recommended timeframe to ensure maximum effectiveness.
Ensure a watertight seal for durability
An important aspect of sealing the headlights properly is ensuring a watertight seal. This ensures not only the effectiveness of your installed daytime running lights but also the long-term durability of your headlights.
By creating a watertight seal, you minimize the risk of water damage, corrosion, and potential electrical failures. This is especially crucial if you frequently drive in rainy or wet conditions.
Here are a few tips to ensure a watertight seal:
- Inspect for gaps: Before applying the sealant, carefully inspect the edges and corners of the headlights for any gaps or openings that could potentially allow water to enter. Fill these gaps with silicone sealant before proceeding.
- Apply multiple layers: For added protection, consider applying multiple layers of silicone sealant. This will create a stronger and more watertight barrier, further safeguarding your headlights against moisture infiltration.
- Check for any signs of leakage: After sealing the headlights, it’s crucial to periodically check for any signs of leakage. If you notice water or condensation inside the headlights, promptly address the issue by reapplying sealant or considering professional assistance.
Remember, a properly sealed and watertight headlight not only enhances the aesthetic appeal of your vehicle but also ensures the safety and longevity of your daytime running lights. Take the time and effort to seal your headlights correctly, and you’ll enjoy clear visibility and peace of mind on the road.
Double-Check Electrical Connections
Verify all connections are secure and insulated
Double-checking the electrical connections is a crucial step when installing daytime running lights inside headlights. This ensures that the lights function properly and have a secure connection to avoid any potential electrical issues. Take the time to go over each connection and make sure they are all secure and tightly fastened.
Pay attention to polarity and wire color coding
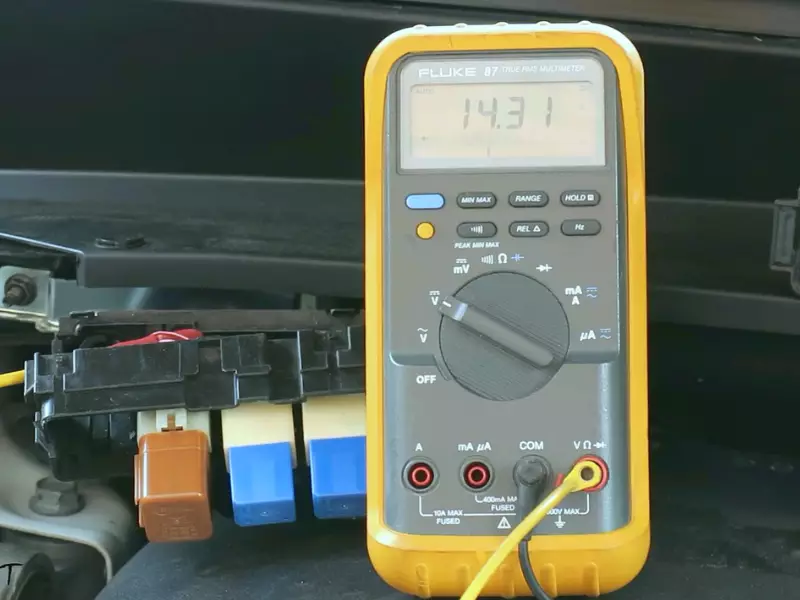
When dealing with electrical connections, it’s important to pay close attention to polarity and wire color coding. This ensures that you are connecting the right wires together and avoid any damage or improper functioning of the lights.
To verify polarity, you can use a multimeter or follow the manufacturer’s instructions. This will help you ensure that the positive and negative connections are correctly matched and prevent any potential short-circuiting.
Additionally, wire color coding can vary depending on the manufacturer or vehicle make and model. Take the time to familiarize yourself with the specific color coding of the wires you are working with. This will help you connect the right wires together and avoid any confusion.
It’s also a good idea to insulate the connections properly to protect them from moisture and prevent any potential short-circuits. You can use electrical tape or heat shrink tubing to cover the connections and keep them secure.
By paying attention to both polarity and wire color coding, you ensure that the connections are made correctly, minimizing the risk of any electrical issues and ensuring the proper functionality of your daytime running lights.
Regularly Inspect The Drls
Regularly inspecting the daytime running lights (DRLs) is crucial to ensure they are functioning properly. By checking for any signs of damage or malfunction and cleaning both the headlights and DRLs on a regular basis, you can enhance visibility and maintain a safe driving experience. Let’s dive deeper into each aspect:
Check for any signs of damage or malfunction:
It’s essential to examine your DRLs regularly for any indications of damage or malfunction. Here are a few easy steps to follow:
- Start by visually inspecting the DRLs from both the inside and outside of the vehicle. Look for any cracks, moisture buildup, or loose connections.
- If you notice any damage, consider consulting a professional to assess the situation. Trying to repair or replace the DRLs yourself may result in further complications.
- Remember to check the electrical connections as well. Loose or corroded connections can interrupt the proper functioning of the DRLs.
Clean the headlights and DRLs regularly:
Maintaining clean and clear DRLs ensures maximum visibility during daytime driving. Follow these simple steps to keep your DRLs and headlights spotless:
- Start by gathering the necessary materials, such as mild soap, water, microfiber cloth, and a soft-bristled brush.
- Prepare a soapy solution by mixing the mild soap with water in a bucket or container.
- Gently scrub the DRLs with the soft-bristled brush, making sure to remove any dirt or grime that has accumulated over time.
- Rinse the DRLs thoroughly with clean water to remove any soap residue.
- Once the DRLs have been rinsed, dry them using a microfiber cloth to avoid streaks or water spots.
Additionally, clean the headlights using the same method described above, as dirt or debris on the headlights can affect the visibility of the DRLs.
Regularly inspecting and cleaning the DRLs inside your headlights is an essential maintenance task that should not be overlooked. By checking for any signs of damage or malfunction and cleaning them regularly, you can ensure optimal visibility and safety while on the road.
Frequently Asked Questions Of How To Install Daytime Running Lights Inside Headlights
Where Do You Wire Daytime Running Lights?
Daytime running lights should be wired in the front of your vehicle, typically connecting to the existing headlight wiring system.
Do Daytime Running Lights Stay On With Headlights?
Daytime running lights and headlights are two separate lighting systems. Daytime running lights automatically turn on when the vehicle is operating, while headlights are manually controlled by the driver. Therefore, daytime running lights do not stay on with headlights.
How Do You Make Drl Work With Led Headlights?
To make DRL work with LED headlights, you need to ensure the DRL wiring is properly connected to the LED headlights. Consult the vehicle’s wiring diagram or seek professional assistance for the correct connection.
What Is The Daytime Running Light In The Headlights?
Daytime running lights are headlights that automatically turn on during the day. They improve visibility and help other drivers see your vehicle, increasing safety on the road.
Conclusion
Installing daytime running lights inside headlights is a simple and effective way to enhance visibility and safety while driving. By following the step-by-step instructions provided in this blog post, you can easily incorporate this feature into your vehicle. With the right tools and a little patience, you’ll be able to enjoy the benefits of improved visibility, increased safety, and a more stylish appearance.
So why wait? Get started on upgrading your headlights today!