To install car subwoofers and amp, first, gather the necessary tools and equipment. Here’s an easy step-by-step guide to get you started.
When it comes to upgrading your car’s audio system, installing car subwoofers and an amp can greatly enhance the overall sound quality. Not only do subwoofers add depth and richness to your music, but they also allow you to feel the bass.
Whether you’re a car audio enthusiast or just looking to improve your driving experience, learning how to install car subwoofers and an amp is a worthwhile endeavor. We’ll provide a simple step-by-step guide to help you install your subwoofers and amp with ease. So, let’s get started!
Gathering The Necessary Equipment
Choosing the Right Car Subwoofers and Amp
When it comes to upgrading your car’s audio system, adding subwoofers and an amp can make a significant difference in sound quality. But before you dive into the installation process, it’s essential to gather the necessary equipment. This includes choosing the right car subwoofers and amp that are compatible with your vehicle’s audio system.
To start, consider the size and power requirements of your car’s subwoofers and amp. The size of the subwoofer will determine the bass response, with larger sizes typically providing deeper and more powerful bass. Additionally, check the power handling capabilities of both the subwoofers and amp to ensure they can handle the output from your car’s audio system without distortion.
Ensuring Compatibility with Your Car’s Audio System
Before making a purchase, ensure that the car subwoofers and amp you choose are compatible with your vehicle’s audio system. Check the specifications of your car’s factory stereo or head unit to determine the power output, impedance, and wiring options available. This information will help you select subwoofers and an amp that work seamlessly with your car’s audio setup.
Furthermore, pay attention to the impedance matching between the subwoofers and amp. Matching the impedance will not only maximize the power transfer but also prevent overheating and potential damage to the equipment. Keep in mind that wiring setups may differ, so it’s crucial to choose subwoofers and an amp that match your desired configuration.
Gathering the Required Tools for Installation
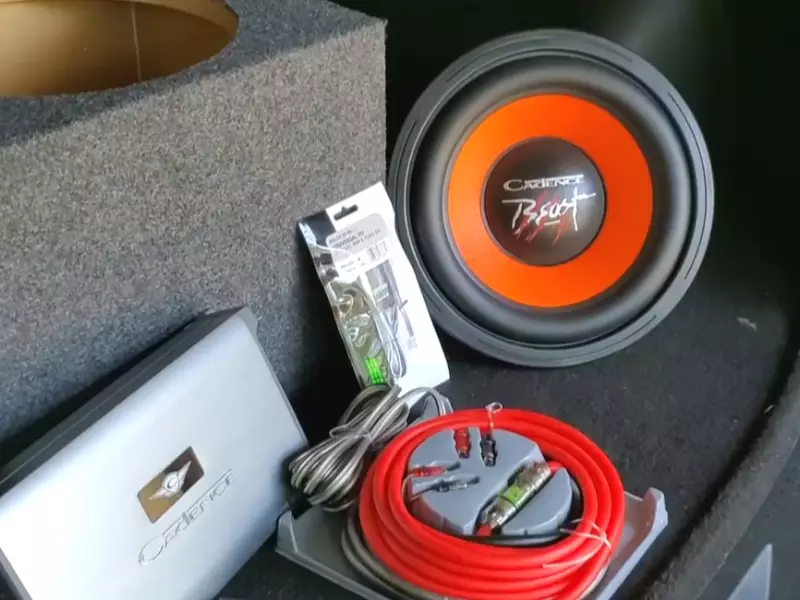
Now that you’ve chosen the right car subwoofers and amp for your vehicle, it’s time to gather the necessary tools for a successful installation. Here’s a list of tools you’ll need:
- Screwdriver set with various sizes
- Wire cutters and strippers
- Electrical tape or heat shrink tubing for secure connections
- Wiring kit with power and ground cables, fuse holder, and RCA cables
- Test light or multimeter for electrical testing
- Panel removal tools to safely access your car’s interior
- Drill and drill bits for mounting the subwoofers and amp
- Crimp connectors or soldering iron for secure wire connections
Having the right tools on hand will make the installation process smoother and ensure a professional-looking result. Additionally, it’s always a good idea to have some extra connectors and wiring in case you encounter any unexpected challenges during the installation.
By gathering the necessary tools and choosing the right car subwoofers and amp, you’ll be well-prepared to embark on the installation process. Remember to follow the manufacturer’s instructions and take your time to ensure a clean and secure installation. Once everything is set up correctly, you’ll be able to enjoy the powerful bass and enhanced audio experience in your car.
Understanding the car’s Electrical System
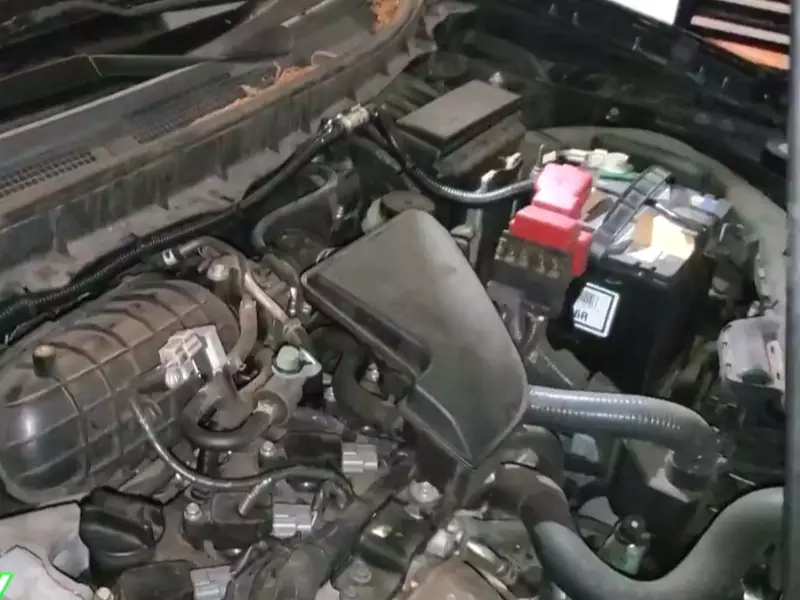
Familiarizing yourself with the car’s battery and fuse box
Before diving into the installation process of car subwoofers and an amp, it is crucial to have a clear understanding of the car’s electrical system. By familiarizing yourself with the car’s battery and fuse box, you can proceed with the installation process smoothly and efficiently.
Identifying the appropriate wiring connections
One of the most important aspects of installing car subwoofers and an amp is identifying the appropriate wiring connections. This step ensures that the audio system works seamlessly without any issues. To accomplish this, you need to locate the correct wiring connections for the subwoofer and amplifier.
To identify the appropriate wiring connections for the subwoofers, follow these steps:
- Locate the wiring coming from the head unit of your car’s audio system.
- Connect the RCA cables from the head unit to the input connectors on the amplifier.
- Ensure that the wiring is secure and properly connected to avoid any loose connections. This will prevent any interference or loss of sound quality.
- Connect the wiring from the amplifier to the subwoofers. Make sure to match the positive and negative terminals correctly to avoid any electrical issues.
By carefully identifying and connecting the appropriate wiring, you can ensure optimal performance from your car’s subwoofers and amp.
Checking the voltage requirements
Another crucial step in installing car subwoofers and an amp is checking the voltage requirements. This ensures that the electrical system can handle the power demands of the subwoofers and amplifiers.
Here’s how you can check the voltage requirements:
- Refer to the user manual or specifications of your subwoofers and amplifiers to determine their voltage requirements.
- Check the car’s battery voltage to ensure it meets the requirements of the audio system. If the voltage is lower, consider using a battery with a higher voltage capacity or investing in a voltage regulator.
- Inspect the fuse box to determine if any additional fuses or circuit breakers are necessary to support the power requirements of the subwoofers and amplifiers.
By checking the voltage requirements, you can prevent any potential damage to your car’s electrical system and ensure smooth operation of the subwoofers and amp.
Removing The Necessary Panels
Accessing the trunk or designated subwoofer area
If you’re a music enthusiast who loves to feel the bass pumping through your car, installing subwoofers and an amplifier can take your audio experience to a whole new level. To start this installation process, you need to gain access to the trunk or the designated subwoofer area in your car. Every vehicle is different, but most have a removable panel that allows you to reach this space.
Here are the steps to accessing the trunk or designated subwoofer area:
- Locate the trunk release lever or button inside your car.
- Activate the trunk release mechanism to open the trunk.
- Inspect the interior of the trunk to identify any panels or obstacles that need to be removed.
- Using a screwdriver or the appropriate tools, carefully remove the necessary panels that are blocking access to the subwoofer area.
- Set aside the removed panels in a safe location, ensuring they are easily accessible for reinstallation.
Removing interior panels or seats if needed
In some cases, accessing the subwoofer area may require removing interior panels or even seats. This step is necessary to create adequate space for the installation. Here’s how:
- Inspect the interior of your car, paying attention to the areas around the subwoofer location.
- If there are any interior panels obstructing the space, locate the screws or clips holding them in place.
- Using the appropriate tools, carefully remove the screws or clips, taking care not to damage the interior of your car.
- Set aside the removed panels in a safe location, ensuring they can be easily reinstalled when needed.
- If removing interior panels is not sufficient to create enough space, you may need to remove the seats. Refer to your car’s manual for the correct procedure to remove seats safely.
- Once you have removed the necessary panels or seats, you can move on to creating space for the subwoofers and amplifier.
Creating space for the subwoofers and amp
Now that you have successfully accessed the trunk or designated subwoofer area and removed any obstructing panels or seats, it’s time to create space for the subwoofers and amplifier.
Follow these steps to ensure proper space is available:
- Clear out any items or debris from the designated area, allowing enough space for the subwoofers and amp to fit securely.
- If necessary, use a tape measure to determine the dimensions of the subwoofers and amplifier to ensure they will fit within the available space.
- Consider using foam padding or sound-deadening material to line the area where the subwoofers and amp will be installed. This can help reduce vibrations and improve sound quality.
- Once you have prepared the space, you are ready to move on to the next steps of the installation process, such as wiring and securing the subwoofers and amplifier.
Mounting The Subwoofer Enclosure
Determining the ideal location for the subwoofer box
Mounting the subwoofer enclosure is an essential step in the installation process of car subwoofers and amps. To ensure a powerful and immersive audio experience, it is crucial to determine the ideal location for your subwoofer box. Here are some factors to consider:
- Space: Before choosing the location, evaluate the available space in your vehicle. Look for areas that can accommodate the size and shape of the subwoofer box without compromising passenger comfort or the functionality of other car components.
- Aesthetics: Consider the visual appeal of the installation. Mounting the subwoofer box in a way that is discreet and blends with the interior of the car enhances the overall appearance.
- Audio Quality: Finding the optimal location for the subwoofer box can significantly impact sound quality. Experiment with different positions to identify the spot that delivers the best bass response and enhances the overall audio experience.
- Accessibility: Ensure that the chosen location allows easy access to the subwoofer box for maintenance or adjustments if needed.
Securing the enclosure in place
Once you have determined the perfect location for the subwoofer box, it is vital to secure it in place to prevent unnecessary vibrations and movement during transit. Here are some steps to secure the enclosure:
- Prepare the surface: Clean the area where you plan to mount the subwoofer box. Remove any dirt, debris, or old adhesive to create a clean surface for attachment.
- Use adhesive or screws: Depending on the material of the enclosure and the surface it will be mounted on, you can use strong adhesive or screws to secure the box firmly. Make sure to follow the manufacturer’s instructions for the chosen method and use adequate force to ensure a secure attachment.
- Reinforce with brackets: If necessary, you can further reinforce the installation by adding metal brackets or braces to provide additional stability and prevent the enclosure from shifting.
Ensuring proper ventilation for the subwoofers
To maximize the performance and longevity of your subwoofers, proper ventilation is essential. Heat generated by the subwoofers can impact their efficiency and potentially cause damage. Here are some tips to ensure proper ventilation:
- Keep clearance: Maintain sufficient clearance between the subwoofers and any nearby surfaces, allowing air to flow freely around the enclosure. This prevents heat buildup and ensures optimal performance.
- Consider vented enclosures: Vented enclosures are designed specifically to promote airflow around the subwoofers. If possible, choose a vented enclosure to enhance ventilation and prevent overheating.
- Install cooling fans: If you anticipate running your subwoofers at high volumes for extended periods, consider installing cooling fans to actively dissipate heat and maintain proper operating temperatures.
By determining the ideal location, securing the enclosure, and ensuring proper ventilation for your car subwoofers, you can enjoy enhanced bass and audio quality while extending the lifespan of your equipment. Take the time to carefully complete these steps to achieve the best results in your car audio installation.
Wiring The Subwoofers To The Amp
Once you have chosen your car subwoofers and amplifier, it’s time to bring the low-end power to your vehicle’s sound system. Wiring the subwoofers to the amp is a crucial step in ensuring optimal bass performance and audio quality. In this section, we will walk you through the process of connecting the subwoofers to the amplifier, running the power wire from the battery, and grounding the amplifier for safety.
Connecting the subwoofers to the amplifier
Before connecting the subwoofers to the amplifier, it’s important to ensure that you have the appropriate cables and connectors. You will need speaker wire, RCA cables, and possibly a speaker wire to an RCA adapter.
To connect the subwoofers to the amplifier, follow these steps:
- Identify the positive (+) and negative (-) terminals on both the subwoofers and the amplifier.
- Take the speaker wire and strip off a small section of insulation from each end. This will expose the bare wire.
- Connect the bare wire to the positive terminal of the subwoofer and the corresponding positive terminal on the amplifier. Repeat this step for the negative terminals.
- Secure the connections by tightening the terminals or using crimp connectors.
- If you are using RCA cables, plug one end into the subwoofer output on the amplifier and the other end into the corresponding input on the subwoofer.
- Ensure all connections are secure and properly tightened.
Running the power wire from the battery
Running the power wire from the battery to the amplifier is an essential part of the installation process. This step requires careful planning to ensure safety and proper power distribution.
Follow these steps to run the power wire from the battery:
- Ensure that your vehicle’s engine is turned off and the battery is disconnected.
- Locate a suitable path to route the power wire from the battery to the amplifier. Avoid areas with high heat or moving parts.
- Measure the length of the power wire needed and cut it accordingly. It’s better to have a slightly longer wire than to come up short.
- Strip off a small section of insulation from one end of the power wire, exposing the bare wire.
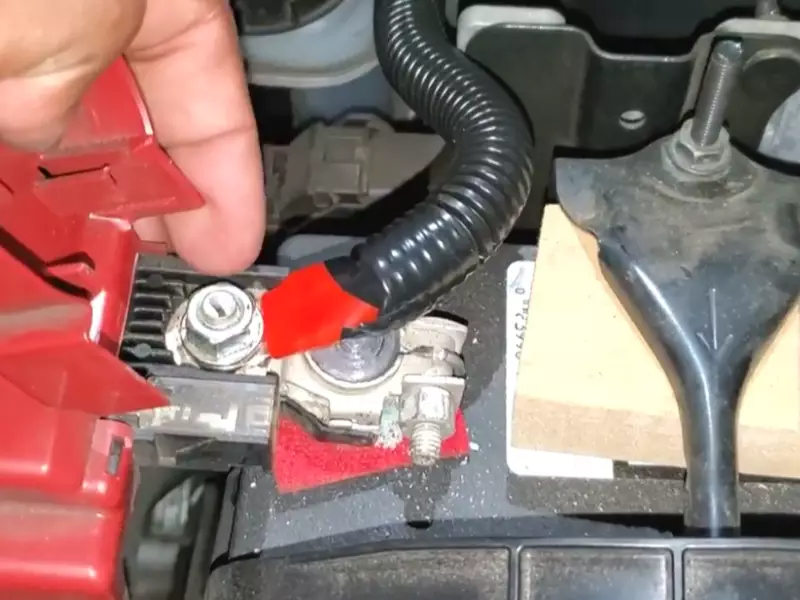
- Connect the stripped end of the power wire to the positive terminal of the battery. Ensure a tight connection.
- Route the power wire safely through the vehicle, securing it with clamps or zip ties as necessary.
- At the other end of the power wire, strip off another section of insulation and connect it to the positive terminal of the amplifier. Tighten the connection securely.
Grounding the amplifier for safety
Grounding the amplifier is an important safety measure to prevent electrical problems and potential damage to your vehicle’s electrical system.
Follow these steps to ground the amplifier:
- Identify a suitable grounding point near the amplifier. It should be a metal part of the vehicle’s chassis.
- Remove any paint or rust that could interfere with the grounding connection. Use sandpaper or a wire brush to clean the surface.
- Measure and cut a section of grounding wire to reach from the amplifier to the grounding point.
- Strip off a small section of insulation from each end of the grounding wire.
- Connect one end of the grounding wire to the grounding terminal of the amplifier and the other end to the chosen grounding point on the vehicle’s chassis.
- Ensure the connections are tight and secure.
Congratulations! You have successfully wired the subwoofers to the amplifier, run the power wire from the battery, and grounded the amplifier for safety. It’s important to double-check all connections before powering on your system to avoid any issues. Enjoy your new and improved car audio experience!
Connecting The Audio Source
When it comes to installing car subwoofers and amps, one crucial step is connecting the audio source. The audio source is where the sound signal originates from, and it plays a key role in delivering high-quality and powerful bass to your car’s audio system. In this section, we will discuss how to determine the audio source for the subwoofers, connect the speaker wire from the source to the amplifier, and adjust the gain and crossover settings for optimal sound quality.
Determining the audio source for the subwoofers
To determine the audio source for your subwoofers, you need to locate the output connections on your car stereo or head unit. These connections are usually labeled as “Subwoofer Out” or “Sub Out.” If your head unit doesn’t have dedicated subwoofer outputs, you can use the rear speaker outputs as the audio source. Make sure to consult your car stereo’s manual to identify the correct outputs.
Connecting the speaker wire from the source to the amplifier
Once you have determined the audio source, it’s time to connect the speaker wire from the source to the amplifier. To do this, you will need a high-quality speaker wire that matches the impedance of your subwoofers. Typically, a thicker wire with a lower gauge, such as 8 or 12 gauge, is recommended for subwoofer installations.
Start by cutting the speaker wire to the appropriate length, leaving a little extra for flexibility. Strip about half an inch of insulation from both ends of the wire, exposing the copper strands. Now, take the positive (+) and negative (-) ends of the wire and connect them to the corresponding terminals of the audio source and amplifier.
Adjusting the gain and crossover settings for optimal sound quality
Finally, to ensure you get the best sound quality from your subwoofer setup, you need to adjust the gain and crossover settings on your amplifier. The gain control allows you to match the input signal level of the amplifier to the output voltage of the audio source.
Start by setting the gain control to the minimum position. Gradually increase the gain until you hear distortion in the sound. Then, reduce the gain slightly to achieve a clean and powerful bass without distortion.
Next, adjust the crossover settings to determine the frequency range that the subwoofer will play. The crossover frequency is usually set between 80Hz and 120Hz, depending on the size and capabilities of your subwoofers. Experiment with different settings to find the sweet spot where the subwoofers blend seamlessly with the rest of your car audio system.
Remember to fine-tune the settings while listening to your favorite music tracks, as different genres and recordings may require slight adjustments for optimal performance.
Positioning And Securing The Amplifier
One of the most important steps in installing car subwoofers and an amp is properly positioning and securing the amplifier. This ensures optimal sound performance and prevents any damage or interference while driving. In this section, we will cover how to select an appropriate location for the amplifier, how to mount it securely, and how to ensure proper ventilation to prevent overheating.
Selecting an Appropriate Location for the Amplifier
When selecting a location for your car amplifier, it is important to consider both space availability and accessibility. Here are a few factors to keep in mind:
- Space: Look for areas in your car that have enough space to accommodate the amplifier. Ideally, it should be placed in a location that is not obstructing any other car components or wiring.
- Accessibility: Consider ease of access for installation and future maintenance. Choose a location that allows you to easily connect amplifier wiring, adjust settings, and check connections.
- Protection: Choose a location that offers some level of protection to the amplifier, such as under a seat or in the trunk. This helps prevent any accidental damage or exposure to the elements.
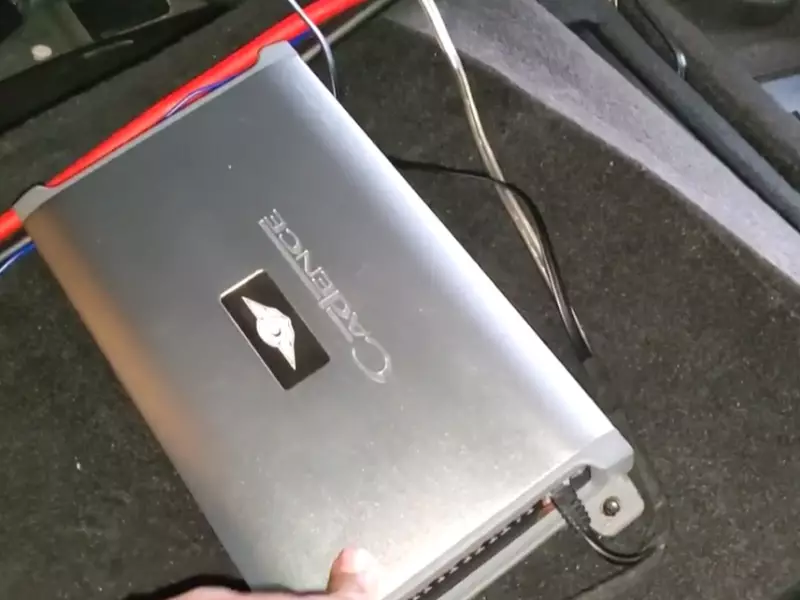
Mounting the Amplifier in a Secure Manner
Once you have identified a suitable location for your amplifier, the next step is to mount it securely. This prevents any movement or vibrations that could negatively impact sound quality or cause damage to the amplifier. Follow these steps:
- Clean the mounting surface: Before mounting the amplifier, ensure that the surface is clean and free from any dirt, debris, or residue. This promotes a strong and secure bond between the amplifier and the mounting surface.
- Use appropriate mounting hardware: Use the appropriate mounting hardware that came with your amplifier kit or purchase compatible hardware separately. This includes screws, brackets, and other mounting accessories.
- Secure the amplifier: Carefully position the amplifier in the selected location and use the mounting hardware to secure it firmly. Pay attention to any recommended orientation and ensure that the amplifier is securely fastened to prevent any movement.
Ensuring Proper Ventilation to Prevent Overheating
Proper ventilation is crucial for the longevity and performance of your car amplifier. Overheating can damage the amplifier and affect sound quality. Follow these tips to ensure proper ventilation:
- Avoid enclosed spaces: Do not place the amplifier in tight spaces or enclosed compartments where airflow is restricted.
- Leave space around the amplifier: Allow some clearance around the amplifier to promote airflow and prevent heat buildup. This could be achieved by positioning it away from other car components or using spacers.
- Install cooling fans: If necessary, install cooling fans near the amplifier to improve airflow and dissipate heat. This can be particularly beneficial in hot climates or if your amplifier tends to run hot.
By selecting an appropriate location, securely mounting the amplifier, and ensuring proper ventilation, you can optimize the performance and lifespan of your car subwoofers and amp installation. Taking the time to do it right will result in enhanced sound quality and an enjoyable listening experience during your journeys.
Connecting Power And Ground Wires
When it comes to installing car subwoofers and amps, connecting the power and ground wires is an essential step that ensures your system operates smoothly and reliably. In this section, we will guide you through the necessary steps to effectively connect your power and ground wires, providing you with a solid foundation for optimal sound performance.
Running the Power Wire from the Battery to the Amplifier
To supply your amplifier with the necessary power, you’ll need to run a power wire from the battery to the amplifier. This requires careful consideration of wire size and length to minimize voltage drop and ensure efficient power delivery.
To accomplish this, follow these steps:
- Identify a suitable route from the battery to the amplifier. Ensure the wire is not in close proximity to any moving parts or hot surfaces.
- Depending on the length of the route, choose an appropriate gauge of power wire to handle the current demand. Refer to a wire gauge chart to select the correct wire size.
- Loosen the battery terminal and connect the appropriate ring terminal to the positive terminal of the battery. Securely tighten the battery terminal afterward.
- Run the power wire through the firewall, ensuring it is appropriately protected using grommets or wire loom to prevent any damage.
- Route the power wire along the vehicle’s interior, away from any potential hazards such as sharp edges or excessive heat sources.
- Connect the power wire to the amplifier’s power input terminal. Ensure a secure connection by tightening the terminal securely.
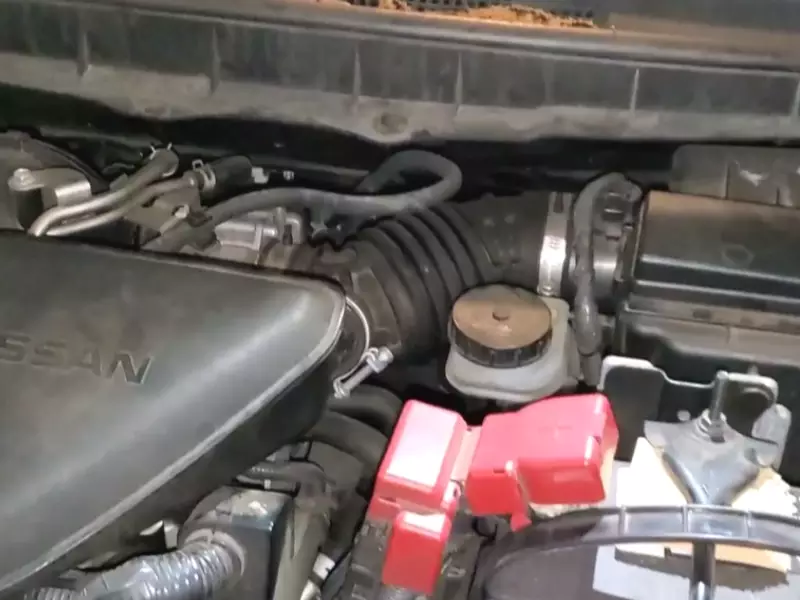
Establishing a Solid Ground Connection for the Amplifier
In addition to the power wire, establishing a solid ground connection is crucial for the amplifier to function properly. Without a good ground connection, your amplifier may experience performance issues or introduce unwanted noise into your audio system.
Follow these steps to establish a solid ground connection:
- Locate a suitable grounding point near the amplifier, preferably one directly connected to the vehicle’s chassis.
- Ensure the grounding point is free from rust, paint, or any other substances that may hinder a good electrical connection. Use sandpaper or a wire brush to clean the surface if necessary.
- Detach a small section of insulation from the ground wire, exposing bare metal.
- Securely affix the ground wire to the grounding point, ensuring a tight connection.
- Tighten the ground wire connection at the amplifier’s ground terminal, ensuring a secure fit.
Using Appropriate Fuse Protection for the Power Wire
When dealing with electrical currents, it’s crucial to prioritize safety. Installing appropriate fuse protection for the power wire safeguards your vehicle’s electrical system and components from potential damage caused by excessive current flow.
Follow these steps to ensure proper fuse protection:
- Select an appropriate fuse holder capable of accommodating the power wire size.
- Install the fuse holder within 18 inches of the battery to ensure quick access.
- Insert the appropriate fuse with the correct amperage rating for your amplifier. Refer to your amplifier’s manual for the recommended fuse rating.
By following these guidelines, you can confidently connect the power and ground wires of your car subwoofers and amp, setting the stage for an exceptional audio experience. Establishing a solid foundation for efficient power transfer and electrical safety ensures that your system performs optimally while protecting your valuable components.
Connecting The Audio Inputs And Outputs
To fully enjoy the powerful sound of your car subwoofers and amp, you need to ensure the proper connection of the audio inputs and outputs. This step is crucial for achieving optimal performance and clarity in your car audio system. By following the steps outlined below, you can seamlessly connect the various components and ensure a smooth audio experience.
Identifying the Input Options on the Amplifier
Before you can connect your audio source to the amplifier, it is essential to identify the input options available on the amplifier itself. Amplifiers usually have various input connectors, each serving a specific purpose. These connectors might include RCA inputs, high-level inputs, or a combination of both.
If your audio source has RCA outputs, you can connect them directly to the RCA input connectors on the amplifier using RCA cables. On the other hand, if your audio source does not have RCA outputs, you can utilize the high-level inputs on the amplifier. These inputs are designed to accept speaker wire connections directly from the audio source.
Connecting the Audio Source to the Amplifier’s Inputs
Once you have identified the input options on the amplifier, you can proceed to connect your audio source to the appropriate inputs. If you are using RCA inputs, simply plug one end of the RCA cable into the RCA output jacks on your audio source and the other end into the corresponding RCA input jacks on the amplifier. Make sure to match the left and right channels correctly to maintain stereo separation.
Alternatively, if you are using high-level inputs, you need to strip the ends of the speaker wire from your audio source. Separate the positive and negative wires, and then connect them to the corresponding positive and negative input terminals on the amplifier. Ensure that you securely tighten the terminals to ensure a solid and reliable connection.
Routing the Audio Outputs to the Appropriate Speakers
After connecting the audio source to the amplifier’s inputs, the next step is to route the audio outputs from the amplifier to the appropriate speakers in your car. This step ensures that the sound is distributed effectively and that each speaker receives the right signals.
You can refer to your car’s wiring diagram to identify the speaker wires and their corresponding connections. Once identified, attach the speaker wires from the amplifier’s outputs to the respective speaker terminals. Make sure to connect the positive (+) terminal of the amplifier to the positive (+) terminal of the speaker and the negative (-) terminal of the amplifier to the negative (-) terminal of the speaker.
Remember to carefully organize and secure all the wiring to prevent any unwanted interference or damage. Additionally, double-check all the connections to ensure they are tight and secure.
By correctly connecting the audio inputs and outputs, you can enjoy a powerful and immersive audio experience in your car. So, take the time to follow these steps and fine-tune your car subwoofers and amp for the best results.
Adjusting Amplifier Settings
Setting the gain and crossover frequency
One of the most crucial steps in installing car subwoofers and an amp is adjusting the amplifier settings. This ensures that your subwoofers deliver the right level of power and sound quality for your car audio system. The first setting to focus on is the gain, which controls the input sensitivity of the amplifier. Setting the gain correctly ensures that your subwoofers receive the right amount of power without distortion or clipping. To do this:
- Start by playing a track with a consistent bassline.
- Gradually increase the gain until you hear distortion or clipping.
- Then, reduce the gain slightly until the sound is clear and distortion-free.
Next, adjusting the crossover frequency is important to ensure that the appropriate frequencies are sent to your subwoofers. The crossover frequency determines the point at which the subwoofers start playing bass frequencies. You can adjust the crossover frequency as follows:
- Locate the crossover control on your amplifier.
- If your amplifier has a low-pass filter, set it to the desired frequency range for your subwoofers.
- If your amplifier does not have a built-in crossover, you can use an external crossover device or connect the main speakers to a separate amplifier with a high-pass filter.
Adjusting bass boost and equalizer settings
After setting the gain and crossover frequency, it’s time to fine-tune your amplifier’s bass boost and equalizer settings. These controls allow you to enhance specific frequencies and tailor the sound according to your preferences. Follow these steps to make adjustments:
- Start by setting the bass boost control to the middle or zero position.
- Play a track with a strong bassline that you are familiar with.
- Gradually increase the bass boost until you achieve the desired bass impact without sacrificing clarity.
- Additionally, adjust the equalizer settings to enhance or reduce specific frequency ranges according to your preference. For example, you can boost the low frequencies to emphasize the bass or reduce the high frequencies for a smoother sound.
Fine-tuning the amplifier for the desired sound
Once you have set the gain, crossover frequency, bass boost, and equalizer settings, it’s time to fine-tune your amplifier to achieve the desired sound quality. Here are a few tips:
- Listen to a variety of music genres to ensure the settings work well for different types of audio.
- Make minor adjustments to the settings if necessary, based on your personal preference.
- Remember that the acoustic characteristics of your car, such as its size and materials, can affect sound reproduction. Fine-tune accordingly for the best possible audio experience.
By following these steps and adjusting your amplifier settings correctly, you can optimize the performance of your car subwoofers and amp, creating a powerful and immersive audio experience on the go.
Testing The Subwoofers And Amplifier
Testing is a crucial step in the process of installing car subwoofers and an amplifier. It ensures that everything is working as expected and allows you to make any necessary adjustments for optimal performance. In this section, we will look at how to check for proper power and audio signal, ensure that the subwoofers are producing sound, and make any necessary adjustments for optimal performance.
Checking for proper power and audio signal
Before you start testing the subwoofers and amplifier, it’s important to ensure that there is proper power and audio signal. Here’s how you can do it:
- Ensure that the power cables are securely connected to the amplifier and the car’s battery. Loose connections can result in poor performance or no sound at all.
- Check the gain settings on the amplifier. Adjust them according to the manufacturer’s recommendations to prevent distortion and ensure optimal performance.
- Connect an audio signal source, such as a phone or MP3 player, to the amplifier. Play some music or a test tone to check if the audio signal is reaching the amplifier.
- If you don’t hear any sound, double-check all the connections and settings. Make sure the source device is not on mute and that the volume is turned up.
Ensuring the subwoofers are producing sound
Once you have confirmed that the amplifier is receiving a proper audio signal, it’s time to check if the subwoofers are producing sound. Here’s what you need to do:
- Start by setting the crossover frequency. This determines the range of frequencies that will be sent to the subwoofers. Adjust the crossover control on the amplifier to the desired frequency range.
- Play some bass-heavy music or a test tone that focuses on low frequencies. Gradually increase the volume on the amplifier to listen to the subwoofers.
- If you can’t hear any sound from the subwoofers, check the wiring connections. Ensure that the subwoofers are properly connected to the amplifier and that the wiring is not loose or damaged.
- Consider checking the polarity of the subwoofers. If the subwoofers are out of phase, the bass response may be weak. Reversing the wiring on one subwoofer can help correct the phase alignment.
Making any necessary adjustments for optimal performance
To make sure your car subwoofers and amplifier are performing at their best, you might need to make some adjustments. Here are a few things you can try:
- Experiment with the equalizer settings on your head unit or amplifier to fine-tune the sound. Adjust the bass, midrange, and treble levels to your liking.
- If you notice any distortion or clipping, reduce the gain or volume of the amplifier. This can help prevent damage to the subwoofers and improve overall sound quality.
- Potentially consider adding sound-deadening material to your car’s interior. This can help reduce vibrations and improve the overall bass response.
Testing your subwoofers and amplifier is essential to ensure that you get the most out of your car audio system. By following these steps, you can verify proper power and audio signal, ensure that the subwoofers are producing sound, and make any necessary adjustments for optimal performance. So go ahead and enjoy that deep, powerful bass!
Troubleshooting Common Issues
Installing car subwoofers and an amp can add a whole new level of bass and power to your car audio system. However, even with the most careful installation, issues can still arise. Troubleshooting these issues is crucial to ensure you get the best performance out of your subwoofers and amp.
Diagnosing problems with the installation
If you’re experiencing issues with your newly installed car subwoofers and amp, the first step is to diagnose the problem with the installation. Here are some steps to help you pinpoint the issue:
- Check the power supply: Ensure that the amp is receiving power by checking the power connections, fuses, and battery. Look for any loose connections or blown fuses that may be causing the problem.
- Inspect the ground connection: A poor ground connection can result in a range of issues, including distortion or sound loss. Make sure the ground wire is securely grounded to a clean metal surface of the vehicle.
- Verify the input connections: Check the RCA cables and speaker wires to ensure they are properly connected to both the amp and the head unit. Look for any loose or damaged connections that may be causing the problem.
Checking for loose connections or faulty wiring
Loose connections or faulty wiring can cause a variety of issues, including intermittent sound, distortion, or a complete loss of audio. Here’s how you can check for and resolve these issues:
- Inspect the speaker wires: Examine the speaker wires connected to the amp and subwoofers. Ensure that they are securely connected to their respective terminals. Replace any damaged or frayed wires to improve the audio signal.
- Check the RCA cables: Inspect the RCA cables connected to the head unit and amp. Make sure they are firmly connected and not damaged. Replace any faulty cables to improve the signal quality.
- Test the power and ground connections: Use a multimeter to test the power and ground connections of the amp. Ensure that they are providing the correct voltage and are securely connected. Tighten any loose connections to resolve potential issues.
Resolving issues with distortion or inadequate sound levels
Distortion or inadequate sound levels can be frustrating after installing car subwoofers and an amp. Follow these steps to troubleshoot and resolve such issues:
- Adjust the gain settings: The gain controls on your amp regulate the input sensitivity. Adjusting these settings can help eliminate distortion and optimize sound levels. Gradually increase or decrease the gain until the sound is clear and distortion-free.
- Ensure proper speaker impedance: Verify that the speaker impedance matches the amp’s recommended rating. Mismatched impedance can result in distorted or insufficient sound. Adjust the wiring or consider upgrading your speakers to match the amp’s requirements.
- Check the crossover settings: The crossover settings determine the frequency range of the subwoofers. Make sure the crossover is set to an appropriate frequency that complements your audio system. Incorrect settings can cause sound issues like muddy bass or inadequate treble.
By following these troubleshooting steps, you can rectify common issues with your car subwoofers and amp installation. Remember to take your time and double-check all connections and settings. With a little patience and attention to detail, you’ll be rewarded with powerful and crisp bass that enhances your driving experience.
Finalizing The Installation
Securing all wiring and connections
After all the wires and connections have been properly set up, it’s time to secure them to ensure everything stays in place. This step is crucial to prevent any potential damage or interference to the audio system. Start by organizing the wires neatly and using zip ties or tape to secure them along the car’s existing wire harnesses.
This will not only keep the installation looking clean but will also prevent any loose wires from getting tangled or caught on anything. Double-check all the connections to make sure they are tight and secure. This will help avoid any connectivity issues and ensure optimal performance from your car subwoofers and amp.
Reinstalling interior panels or seats
Once everything is secured, it’s time to put the car’s interior back together. Start by reattaching any panels or trim pieces that were removed during the installation process. Take your time to align them properly and make sure they snap or screw back into place securely.
If you had to remove seats for access to the wiring, carefully reinstall them by aligning the mounting brackets and tightening the bolts or screws. This step is important not only for aesthetics but also to ensure the safety and comfort of your passengers.
Testing the complete audio system for overall satisfaction
You’re almost done! Now it’s time to put the audio system to the test. Turn on your car’s ignition and start playing your favorite song or audio track. Pay close attention to the performance of the subwoofers, ensuring they produce clear and impactful bass without distorting or overpowering the rest of the audio.
Check each speaker in the car to ensure they are all functioning properly and producing a balanced sound. Adjust the equalizer settings if necessary to fine-tune the audio to your liking.
Don’t forget to test the audio system at different volume levels to ensure consistent performance in various scenarios. If you’re satisfied with the sound quality and overall performance, congratulations! You’ve successfully installed car subwoofers and an amp. Enjoy the enhanced audio experience during your drives.
Frequently Asked Questions On How To Install Car Subwoofers And Amp
How Much Does It Cost To Install Subwoofers And Amp In Car?
Installing subwoofers and an amp in a car can cost anywhere from $100 to $500, depending on the complexity of the installation and the quality of the equipment. It’s recommended to consult with a professional installer to get an accurate cost estimate for your specific car and desired setup.
Do I Need An Amp If I Install A Subwoofer?
Yes, you need an amp if you install a subwoofer. An amplifier boosts the audio signal sent to the subwoofer, improving its performance and providing the necessary power for loud and clear bass. It enhances the overall sound quality and ensures optimal functionality of the subwoofer.
Can You Hook Up A Subwoofer And Amp To A Stock Radio?
Yes, you can connect a subwoofer and amp to a stock radio. It improves the audio quality in your car without needing to replace the entire system.
How To Hook Up A Subwoofer To An Amp?
To hook up a subwoofer to an amp, first, locate the subwoofer output on your amp. Then, connect an RCA cable from the subwoofer output to the input on your subwoofer. Make sure to match the colors of the cables.
Finally, adjust the amp settings and your subwoofer is ready to go!
Conclusion
To wrap up, installing car subwoofers and an amp can enhance your driving experience with powerful and immersive sound. Following the steps mentioned earlier, you can confidently take on this DIY project. Remember to gather all the necessary tools, plan accordingly, and ensure safety throughout the installation process.
With proper guidance and attention to detail, you’ll be cruising down the road with impressive audio quality in no time. So, get ready to feel the bass and enjoy your favorite tunes on the go!