To install a car seat with a LATCH system, follow these steps carefully. Installing a car seat with a LATCH system is a crucial step in ensuring the safety of your child during car rides.
The LATCH (Lower Anchors and Tethers for Children) system provides an easier and more secure way to install car seats compared to using seat belts. In this guide, we will walk you through the steps to properly install a car seat using the LATCH system.
By the end of this article, you will have the knowledge and confidence to install your car seat safely and securely every time. So let’s dive in and learn how to install a car seat with a LATCH system.
Gathering The Necessary Tools And Equipment
Before you begin the process of installing a car seat with a LATCH system, it’s important to gather all the necessary tools and equipment. Having everything you need on hand will make the installation process much smoother and ensure that your little one stays safe and secure during every journey.
Checklist of items needed for installation
| Items | Description |
|---|---|
| Car seat with LATCH system | A car seat that is equipped with the LATCH system. Make sure it is suitable for your child’s age, height, and weight. |
| LATCH connectors | These are located on the car seat and will connect to the lower anchors in your vehicle. |
| Lower anchors | These are metal bars located in the crease of your vehicle’s seat, specifically designed to secure car seats. |
| Top tether strap | This strap is used to provide additional stability by connecting the top of the car seat to an anchor point in your vehicle. |
| LATCH weight limit | Check the weight limit specified by the car seat manufacturer to ensure that your child meets the requirements for LATCH installation. |
| Vehicle owner’s manual | Consult the owner’s manual for your specific vehicle to locate the lower anchors and understand any limitations or requirements. |
| Adjustable wrench or pliers | This tool may be needed to tighten the LATCH connectors or make any necessary adjustments. |
With this checklist, you can ensure that you have everything you need to install your car seat with a LATCH system correctly. By being prepared, you’ll be able to secure your little one safely and confidently, ready for any adventure on the road.
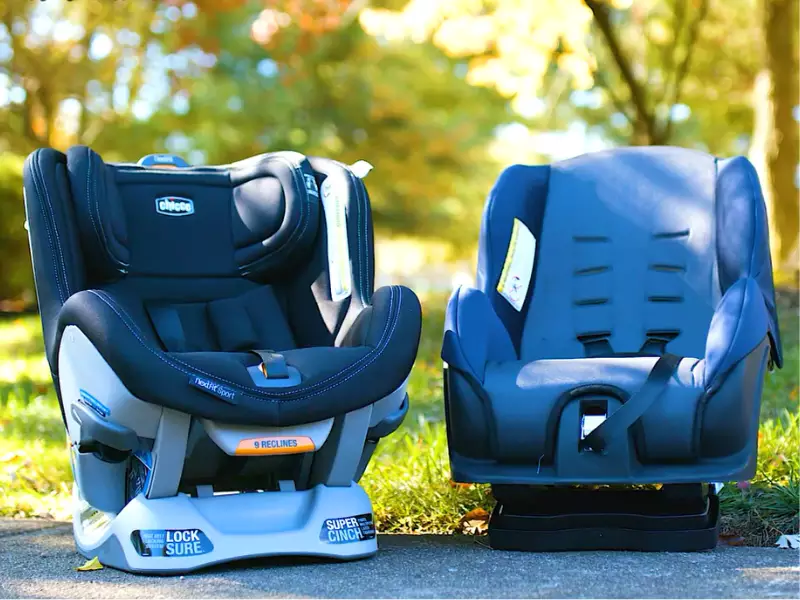
Understanding the types of car seats with LATCH systems
Car seats with LATCH systems come in different types to accommodate children of various ages and sizes. It’s important to understand these types before installing your car seat to ensure that you are using the correct method and equipment.
- Rear-facing car seats: Designed for infants and young children, these car seats are installed in the back seat facing the rear of the vehicle.
- Forward-facing car seats: As your child grows, they will transition to a forward-facing car seat that is installed facing the front of the vehicle.
- Convertible car seats: These versatile car seats can be used both rear-facing and forward-facing, allowing them to grow with your child.
- 3-in-1 car seats: These car seats can be used as a rear-facing seat, forward-facing seat, and eventually as a booster seat, providing even more flexibility.
By understanding the different types of car seats with LATCH systems, you can choose the appropriate option for your child’s age and size, ensuring their safety while on the road.
Safety Considerations Before Installation
Importance of reading the car seat instruction manual
Before you begin the installation process, it is crucial to take a moment and read through the car seat instruction manual. While it may seem like a tedious task, this step cannot be emphasized enough. The instruction manual provides key information specific to your car seat model and ensures that you have all the necessary knowledge to properly install the seat. Each car seat has unique features and installation methods, so it is essential to familiarize yourself with the instructions to ensure your child’s safety is not compromised.
Ensuring the car seat is appropriate for the child’s age and size
Another crucial safety consideration before installing a car seat is to ensure that the seat is appropriate for your child’s age and size. Car seats come in various categories designed for different stages of a child’s growth. These categories include rear-facing infant seats, forward-facing toddler seats, and booster seats for older children. It is important to carefully consider your child’s age, height, and weight to determine the appropriate type of car seat.
If your child’s age and size fall within the recommended range for a particular car seat, it is crucial to confirm that the seat itself is suitable. Check the manufacturer’s guidelines to ensure that the car seat meets the required safety standards and is certified by appropriate regulatory bodies. This step will provide you with peace of mind, knowing that the car seat is designed with your child’s safety in mind.
Installing a car seat with the latch system is a great way to enhance the safety and security of your child while traveling. However, before embarking on the installation process, it is essential to consider a few factors to ensure the utmost safety. By reading the car seat instruction manual thoroughly and ensuring the car seat is appropriate for your child’s age and size, you can confidently proceed with the installation knowing that every measure has been taken to protect your little one.
Locating The Latch System In Your Vehicle
Installing a car seat is an essential step in ensuring your child’s safety while on the road. The LATCH (Lower Anchors and Tethers for Children) system provides an easier and more secure method of attaching car seats compared to using the seat belt alone. Before you start the installation process, it’s important to locate the LATCH system in your vehicle. Let’s explore the different components and placement of the LATCH connectors.
Understanding the LATCH system components
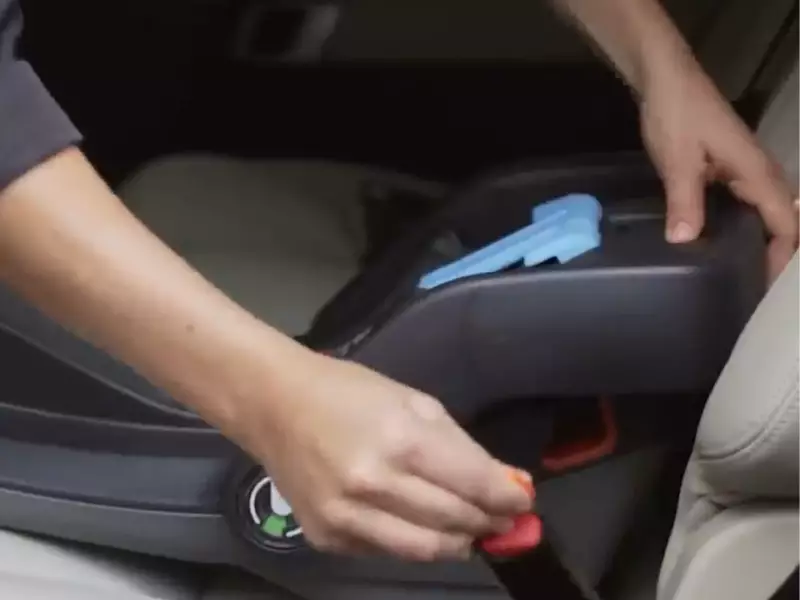
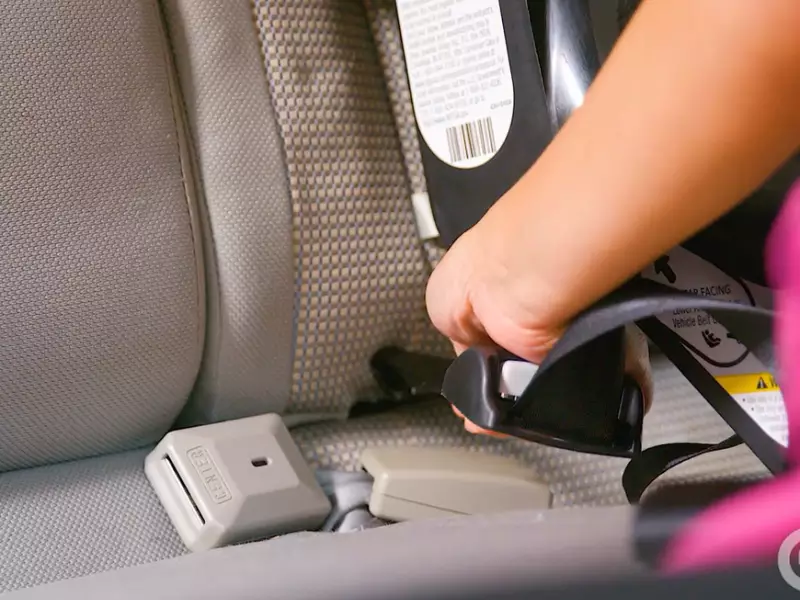
The LATCH system consists of two components: the lower anchors and the tether anchor. The lower anchors are typically located in the back seat of your vehicle and are designed to secure the car seat’s base. On the other hand, the tether anchor is a metal bar or loop that helps stabilize the car seat and prevent excessive forward movement in the event of a collision.
When locating the lower anchors, they are usually positioned between the seat cushions, where the seatback and seat bottom meet. In some vehicles, the lower anchors may be covered by a small flap or plastic piece, so you might need to feel around or refer to your vehicle’s manual for assistance. The tether anchor can usually be found either on the back of the seat or behind it, such as on the rear shelf or floor.
Different types of LATCH connectors and their placement in the car
There are two main types of LATCH connectors: the lower anchor connectors and the tether connectors. Understanding how they work and where they are located is important for a successful installation.
The lower anchor connectors are attached to the car seat and consist of various mechanisms. The most common type is a hook or bar that connects to the lower anchors in your vehicle. Some car seats may also have a push-button release system, while others use a J-shaped connector to secure the seat to the lower anchors.
When it comes to the placement of the lower anchor connectors, they are typically located on the sides or base of the car seat. It’s crucial to refer to your specific car seat’s manual for precise instructions on how to attach and position the lower anchor connectors.
On the other hand, the tether connectors are attached to the top back of the car seat and are used to connect to the tether anchor in your vehicle. The tether connector may consist of a metal hook or a strap with a hook or clip at the end. It’s important to route the tether connector over or around the back of the vehicle seat and connect it to the tether anchor securely.
Securing The Car Seat Base
Attaching the LATCH connectors to the anchor points in the vehicle
Before you can install the car seat base, you need to locate the anchor points in your vehicle. These anchor points are typically found in the back seat, between the seat cushions or on the rear shelf. They are specifically designed to secure car seats and provide additional stability in the event of a collision.
To attach the LATCH connectors to the anchor points, follow these steps:
-
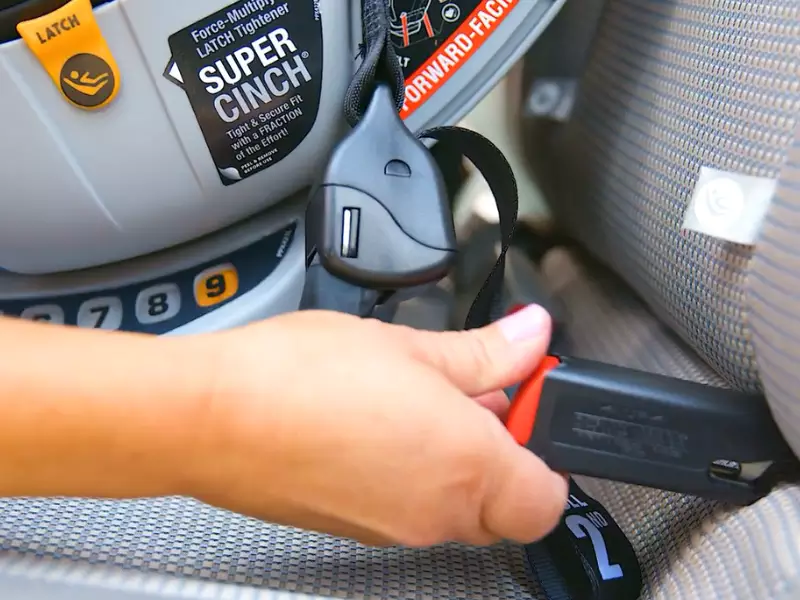
Identify the LATCH connectors on the car seat base. These connectors are usually located near the rear of the base and consist of a hook or a bar.
-
Position the car seat base so that the LATCH connectors align with the anchor points in your vehicle.
-
Insert the LATCH connectors into the anchor points until you hear a click or feel a secure connection. Make sure the connectors are fully engaged and cannot be easily detached.
Adjusting the LATCH straps for a secure fit
Once you have attached the LATCH connectors to the anchor points, it’s important to adjust the LATCH straps for a secure fit. This will help ensure that the car seat base is firmly in place and minimizes any excessive movement.
To adjust the LATCH straps, follow these steps:
-
Locate the LATCH strap adjustment mechanism. This can usually be found near the base of the car seat.
-
Pull the LATCH strap tight to remove any slack. The straps should be snug but not overly tight. It’s important to find the right balance to provide both security and comfort.
-
Check that the car seat base is secure by giving it a firm shake. If there is any excessive movement or looseness, readjust the LATCH straps until the base feels stable.
By following these steps, you can confidently secure the car seat base using the LATCH system. Remember to always consult the car seat manual for specific instructions and guidelines particular to your car seat model. Additionally, make sure to periodically check the installation for any signs of looseness or wear, as car seats can become less secure over time. Your child’s safety is paramount, and properly securing the car seat base is an important step towards providing a safe and comfortable ride.
Installing The Car Seat Onto The Base
Ensuring your child is safely secured in their car seat is of utmost importance. One key step in this process is installing the car seat onto the base properly. This ensures a secure fit and minimizes any potential risk during travel. In this section, we will cover the steps to properly align the car seat onto the base and secure it using the LATCH system.
Properly aligning the car seat onto the base
To install a car seat with the LATCH system, begin by properly aligning the car seat onto the base. Here’s how:
- First, ensure that the base of the car seat is positioned flat on the vehicle seat.
- Next, locate the lower anchors in your vehicle. These anchors are typically found in the crease of the vehicle seat.
- Connect the car seat’s lower anchors to the vehicle’s lower anchors. You might need to press down firmly to properly attach them.
- Make sure that the car seat is snugly fitted onto the base. There should be no excessive movement when you attempt to wiggle the car seat.
- Double-check that the car seat is aligned correctly and seated securely on the base before moving on to the next step.
Securing the car seat using the LATCH system
Once the car seat is properly aligned on the base, it’s time to secure it using the LATCH system. Follow these steps:
- Locate the top tether anchor point in your vehicle. This point can typically be found on the back of the vehicle seat, either on the seatback or the rear parcel shelf.
- Fasten the top tether strap of the car seat onto the top tether anchor point in your vehicle. Ensure that the strap is securely attached.
- Tighten the top tether strap until it is snug. This helps to further secure the car seat and reduce any potential forward movement.
- Ensure that all straps and buckles are free from twists and properly adjusted to fit snugly around your child.
By properly aligning the car seat onto the base and securing it using the LATCH system, you can provide a safe and secure environment for your child during car rides. Regularly check the installation to ensure it remains tight and secure. Regular maintenance is crucial for your child’s safety on the road.
Testing the car seat’s Stability
To ensure the safety of your little one, it is crucial to test the stability of the car seat once it is installed using the LATCH system. This step is crucial as it helps you determine whether the car seat is securely fastened and won’t move excessively in the event of sudden stops or collisions.
Applying force to the car seat to check for movement
After installing the car seat, it’s important to check for any movement or looseness. To do this, firmly grasp the car seat near the belt path and attempt to wiggle it from side to side and front to back. If the car seat moves more than an inch in any direction, it may not be properly installed or secured. In such cases, you will need to re-install or adjust the car seat until it is securely in place.
Proper positioning of the car seat’s harness
Another essential aspect of testing the car seat’s stability is ensuring proper positioning of the car seat’s harness. Start by securing your child into the car seat and ensuring that the harness straps sit flat against your child’s shoulders. The straps should not be twisted, and the chest clip should be positioned at armpit level.
Once your child is properly harnessed, give the harness straps a gentle tug to make sure they are snug and secure. This is to ensure that your child won’t be able to wiggle out of the harness or slide down in the seat during a ride.
Remember, testing the stability of the car seat and checking the position of the harness are vital to keeping your child safe. By following these simple steps, you can have peace of mind knowing that your little one is well-protected during car rides.
Adjusting The Car Seat For Comfort And Safety
Properly adjusting the car seat is essential for ensuring the comfort and safety of your little one during car rides. From adjusting the harness straps to setting the correct recline angle, each step plays a crucial role in providing a secure and cozy environment for your child. In this section, we will guide you through the process of adjusting the car seat for ultimate comfort and safety.
Properly adjusting the harness straps for a snug fit
The harness straps of the car seat play a vital role in securing your child and preventing any potential movements during a car ride. To ensure a snug fit, follow these steps:
- Place your child in the car seat and fasten the harness straps.
- Ensure that the straps are positioned at or just below your child’s shoulders. This will prevent any slippage or escape attempts.
- Check if the harness straps are tight enough by trying to pinch the straps near your child’s shoulders. If you can pinch any excess webbing, the straps need to be tightened.
- Adjust the straps by pulling on the harness adjustment strap or squeezing the harness adjuster lever until there is no slack left in the straps. Remember, always use the designated adjustment mechanism provided by the car seat manufacturer.
- Once the straps are snug, secure the chest clip at armpit level to prevent the straps from sliding off your child’s shoulders.
- Ensure that the harness straps lie flat and are not twisted. Twisted straps can cause discomfort and reduce the effectiveness of the harness.
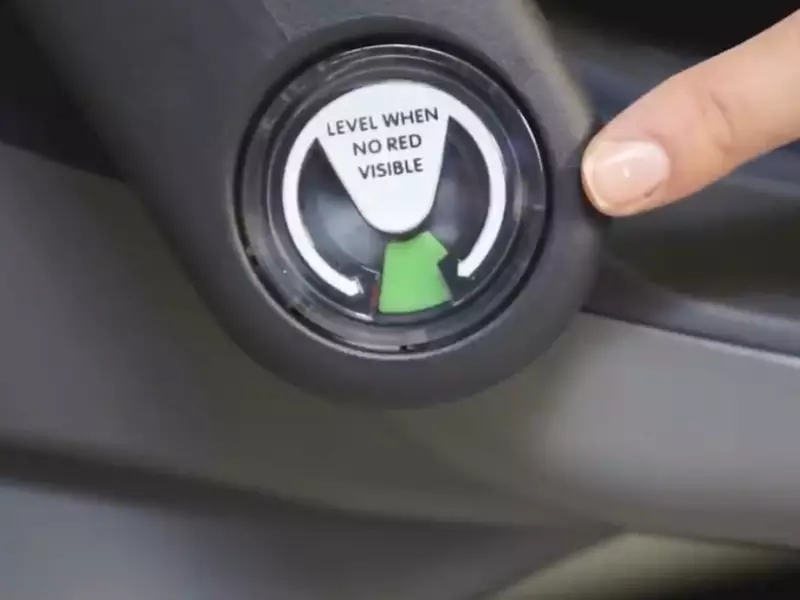
Ensuring the car seat is at the correct recline angle
The recline angle of the car seat is crucial for your child’s safety and comfort. Follow these steps to ensure the correct recline angle:
- Refer to the car seat’s manual to determine the correct recline angle based on your child’s weight and age.
- Make sure the car seat is installed in the appropriate rear-facing or forward-facing position, according to your child’s age and weight.
- Check the car seat’s recline indicator to align it with the recommended recline angle. The indicator can be a ball inside a level or a line going through a range of angle options.
- If necessary, adjust the recline angle by using the car seat’s built-in adjuster, often found at the base or back of the seat. Refer to the manual for specific instructions on adjusting the recline angle.
- Once adjusted, make sure the car seat is securely installed and does not move more than an inch in any direction when tested at the base.
By following these steps, you can ensure that your child’s car seat is properly adjusted for both comfort and safety. Remember, each car seat model may have unique adjustment mechanisms, so always refer to the manufacturer’s instructions for precise details.
Seeking Professional Help And Guidance
The safety of your child is of utmost importance, especially when installing a car seat. While it might seem simple to install a car seat with a LATCH system, there are certain cases where seeking professional help and guidance is necessary. In this section, we will discuss the importance of consulting a Child Passenger Safety Technician (CPST) for assistance and understanding when to seek professional installation services.
Consulting a Child Passenger Safety Technician for assistance
A Child Passenger Safety Technician (CPST) is a trained professional who specializes in the installation and correct use of car seats. Consulting a CPST can provide you with expert guidance and ensure that your car seat is properly installed and secured. These technicians are equipped with the knowledge and skills to examine your specific car and car seat combination, offering personalized advice tailored to your needs.
Here are some reasons why consulting a CPST is worth considering:
- Expertise: CPSTs undergo extensive training to become certified in car seat installation. They stay up-to-date with the latest safety regulations and can provide valuable insights and recommendations.
- Individualized Assistance: Every vehicle and car seat combination is different. A CPST can assess the compatibility of your car and car seat, ensuring a secure fit and optimal protection for your child.
- Educational Opportunity: By seeking help from a CPST, you have the opportunity to learn proper car seat installation techniques. This knowledge can empower you to install and adjust the car seat correctly on your own in the future.
Understanding when to seek professional installation services
While consulting a CPST should always be considered, there are specific scenarios where professional installation services become crucial:
- If you are a first-time parent: Installing a car seat for the first time can be overwhelming. Professional installation ensures that you start off on the right foot and provides peace of mind.
- If you have multiple children: Managing multiple car seats can be complex. A CPST can help you arrange and install car seats in a way that maximizes safety and comfort for all your children.
- If you have experienced difficulty or uncertainty during a self-installation attempt: If you’ve encountered challenges while attempting to install a car seat on your own, it’s vital to seek professional assistance. A CPST can identify and address any issues that may compromise the safety of your child.
Remember, the safety of your child should always be a priority. Considering the benefits of consulting a CPST and knowing when to seek professional installation services, you can have peace of mind knowing that your car seat is installed correctly, reducing the risk of injury in case of an accident.
Understanding The Limitations Of The Latch System
When it comes to installing a car seat, most parents are familiar with the LATCH (Lower Anchors and Tethers for Children) system. This innovative system was introduced to make car seat installation easier and more secure. While the LATCH system indeed offers convenience, it is crucial to understand its limitations to ensure the safety of your child.
Weight limits and expiration dates for LATCH usage
The LATCH system has specific weight limits that vary between car seats and vehicles. It is essential to consult the car seat and vehicle owner’s manuals for the exact weight limits. Typically, the weight limit for LATCH usage is around 65 pounds (29.5 kilograms) for the combined weight of the child and the car seat. It is important to note that once the weight exceeds this limit, you should transition to using the vehicle’s seat belt for installation.
Moreover, it is crucial to be aware of the expiration dates for LATCH attachments. Car seat manufacturers specify an expiration date because the materials used in the LATCH attachments can degrade over time, affecting their strength and reliability. Make sure to check the expiration date on your car seat and avoid using the LATCH system beyond that date.
Benefits of using the vehicle’s seat belt for installation
In addition to understanding the limitations of the LATCH system, it is beneficial to know the advantages of using the vehicle’s seat belt for car seat installation. While the LATCH system is convenient for its lower anchors, the seat belt provides a few advantages:
- Higher weight limit: Unlike the LATCH system, which has weight limits around 65 pounds, the seat belt can typically accommodate higher weights. This makes it suitable for older children or heavier car seats.
- Extended rear-facing options: Some car seats have extended rear-facing capabilities, allowing children to remain in the rear-facing position for a more extended period. However, these car seats often exceed the weight limit for LATCH usage. In such cases, using the vehicle’s seat belt is the only option for safe installation.
- Compatibility with center seating positions: The LATCH system is primarily designed for the outboard seating positions (the side seats). If you prefer to install your car seat in the center seating position, you will need to use the vehicle’s seat belt for proper installation.
While the LATCH system is a convenient option for car seat installation, it is essential to understand its limitations and know when to transition to using the vehicle’s seat belt. Be sure to consult the car seat and vehicle owner’s manuals for the specific weight limits and expiration dates associated with the LATCH system. By following these guidelines, you can ensure your child’s safety and enjoy peace of mind during your journeys.
Traveling With A Car Seat
When it comes to traveling with a car seat, ensuring your child’s safety is of utmost importance. Installing a car seat with a LATCH system can provide extra security and peace of mind during your journey. The LATCH system, which stands for Lower Anchors and Tethers for Children, is a standardized method for securing car seats in vehicles.
Tips for securing the car seat during travel
Securing your car seat correctly is crucial to ensure your child’s safety. Here are some tips to help you install your car seat with the LATCH system:
- Read the car seat manual: Before installing the car seat, thoroughly read the instruction manual provided by the manufacturer. It contains specific guidelines and installation steps for your particular car seat model.
- Locate the LATCH anchors: Familiarize yourself with the vehicle’s LATCH anchors. These anchors are usually found between the seat cushions, where the seatback and seat cushion meet. Check your vehicle’s owner’s manual if you’re having trouble locating them.
- Attach the lower anchors: The car seat should have lower anchor connectors that fit onto the vehicle’s LATCH anchors. Firmly push the connectors onto the anchors until you hear a click. Make sure the connectors are securely attached.
- Tighten the lower anchors: Once the connectors are attached, tighten the lower anchors by applying pressure to the car seat while pulling the LATCH straps tight. Ensure there is minimal movement and the car seat feels secure.
- Attach the top tether: If your car seat has a top tether strap, locate the tether anchor point in your vehicle. This can be found on the vehicle’s rear shelf, the back of the seat, or the floor. Attach the top tether strap to the tether anchor and tighten it to remove any slack.
Airline regulations and guidelines for using car seats on planes
If you plan to travel by plane and want to use your car seat on board, it’s important to be aware of airline regulations and guidelines. Here are a few key points to keep in mind:
- Check with the airline: Before your flight, contact the airline directly to inquire about their specific regulations and guidelines for using car seats on planes. Regulations may vary between airlines.
- Federal Aviation Administration (FAA) approval: Ensure that your car seat is FAA-approved for use on aircraft. Look for a label on the car seat that indicates it is certified for aircraft use. Most car seats with a 5-point harness are approved, but double-check to be sure.
- Seat dimensions and installation requirements: Different airlines may have specific seat dimensions and installation requirements for car seats. Be aware of these guidelines to ensure your car seat meets the necessary criteria.
- Securing the car seat on the plane: Once on board, follow the instructions provided by the flight attendants to secure the car seat properly. Ensure that the car seat is tightly installed and that the seat belt or aircraft-specific attachments are used correctly.
- Advantages of using a car seat on a plane: Using a car seat on a plane provides added safety and familiarity for your child. It can also give them a comfortable and secure place to sit during the flight.
By following these tips and being aware of airline regulations, you can safely and securely travel with your car seat using the LATCH system. Remember, ensuring your child’s safety during travel should always be a top priority!
Proper Maintenance And Care Of The Car Seat
Proper maintenance and care of your car seat is crucial to ensure its safety and longevity. This not only guarantees the well-being of your child but also helps to keep the car seat in good condition, allowing it to function as intended. In this section, we will explore two important aspects of car seat maintenance: cleaning and disinfecting the car seat, and regular inspections and maintenance of the LATCH system.
Cleaning and disinfecting the car seat
Keeping your car seat clean is essential to provide a hygienic environment for your child. Regular cleaning and disinfecting help to remove dirt, dust, germs, and stains that may accumulate over time. Here are some important steps to follow:
- Read the car seat’s instruction manual to understand the manufacturer’s recommended cleaning methods and any specific guidelines.
- Remove the car seat cover and carefully follow the instructions for washing or spot-cleaning it. Be sure to use a mild detergent and avoid bleach or harsh chemicals as these can damage the fabric.
- Wipe down the plastic, metal, and other non-fabric parts of the car seat using a damp cloth or mild soap solution. Rinse thoroughly and dry properly before reassembling the seat.
- For stubborn stains or odors, consider using a fabric-safe stain remover or an upholstery cleaner specifically designed for car seats. Always spot test on an inconspicuous area first.
- Allow the car seat and its components to air dry completely before reassembly.
Regular cleaning not only keeps your car seat looking fresh but also eliminates bacteria and allergens that may harm your child. By following these cleaning practices, you can maintain a clean and germ-free environment for your little one.
Regular inspections and maintenance of the LATCH system
The LATCH (Lower Anchors and Tethers for Children) system is a safety feature designed to secure car seats in vehicles. To ensure its proper functioning, regular inspections and maintenance are necessary. Here’s what you should do:
- Inspect the LATCH connectors for any signs of wear, damage, or deformation. If any issues are detected, contact the car seat manufacturer for guidance.
- Check that the LATCH belts and straps are tightly secured and properly adjusted. They should be free from twists, tangles, or fraying.
- Verify that the LATCH anchor points in your vehicle are not damaged or obstructed. Clear any debris or objects that may hinder the proper installation of the car seat.
- Regularly test the LATCH system by firmly tugging the car seat in different directions. It should remain securely in place without excessive movement.
- Refer to your car seat’s manual for the recommended inspection frequency and other specific maintenance instructions.
By conducting regular inspections and maintenance of the LATCH system, you can ensure that your car seat is always securely installed, providing maximum safety for your child on every journey.
Frequently Asked Questions For How To Install Car Seat With Latch System
How Do You Install A Car Seat Base Latch?
To install a car seat base LATCH, follow these steps:
- Locate the LATCH anchors in your vehicle.
- Connect the car seat base’s LATCH connectors to the anchors.
- Tighten the LATCH straps to ensure a secure fit.
- Test the installation by giving the car seat a firm tug in different directions.
- Double-check the owner’s manual for specific instructions and adjustments.
How Do You Install A Forward-Facing Car Seat With A Latch?
To install a forward-facing car seat with LATCH, locate the lower anchors in your vehicle, attach the LATCH connectors to them, and tighten the straps. Make sure the seat is secure by pushing and pulling on it. Read the car seat and vehicle manuals for specific instructions.
Should You Install Car Seat With Latch Or Seat Belt?
Install car seats using the LATCH system or the seat belt. Both methods are safe and approved, but check your car manual and the car seat instructions. LATCH is easier, while the seat belt is versatile and better for older cars.
Choose what works best for your specific situation.
Can You Install A Latch System In A Car?
Yes, you can install a LATCH system in your car. It is designed to make it easier and safer to properly install child car seats. The LATCH system uses lower anchors and tether anchors to secure the car seat. Make sure to follow the car seat and vehicle manufacturer’s instructions for proper installation.
Conclusion
Installing a car seat with the LATCH system is an important step to ensure your child’s safety. By following the manufacturer’s instructions and understanding the LATCH system components, you can securely install the car seat in your vehicle. Remember to check the tightness and positioning, and always double-check the seat’s installation before every trip.
By taking the time to properly install the car seat, you can have peace of mind knowing that your child is well-protected while traveling.