To install car LED strip lights, first, clean the desired area, peel off the adhesive backing, and stick the lights onto the surface. Then, connect the lights to the power source and test them to ensure they are working properly.
A well-installed LED strip light not only enhances the aesthetics of your car but also improves safety by providing additional visibility during nighttime driving. With a few simple steps, you can easily add LED strip lights to your car and enjoy the vibrant and stylish lighting effects.
So, let’s dive into the installation process and make your car stand out on the road.
Benefits Of Car Led Strip Lights
Installing LED strip lights in your car not only enhances its appearance but also offers a multitude of benefits. Whether you want to add a touch of style, improve visibility and safety on the road, or create a pleasant atmosphere inside your vehicle, car LED strip lights are the perfect solution. Let’s explore these benefits in detail!
Enhances visibility and safety
One of the primary advantages of car LED strip lights is their ability to enhance visibility and safety on the road. These lights illuminate your car’s interior, making it easier for you and your passengers to see the controls, maps, and other important details without distracting from driving. Additionally, LED strip lights can be positioned strategically to provide ambient lighting, ensuring a well-lit cabin that minimizes blind spots and helps you remain alert while driving.
Adds a stylish and personalized touch to your car
Car enthusiasts know that style is just as important as functionality. LED strip lights add a stylish and personalized touch to your vehicle, allowing you to create a unique and eye-catching interior. With a wide range of colors, brightness levels, and patterns to choose from, you can easily customize your car’s lighting to match your personality and preferences. Whether you prefer a vibrant and energetic ambiance or a subtle and elegant glow, LED strip lights can help you achieve the desired effect.
Creates a pleasant and ambient atmosphere inside the car
The ambience inside your car plays a significant role in creating a comfortable and enjoyable driving experience. LED strip lights create a pleasant and ambient atmosphere, transforming the interior into a cozy haven. By altering the color, intensity, and effects of the lights, you can create different moods for various occasions. Whether you want a relaxed atmosphere for a long drive or a vibrant setting for a night out, car LED strip lights can set the perfect tone.
In conclusion, car LED strip lights offer multiple benefits that go beyond mere aesthetics. By enhancing visibility and safety, adding a personalized touch to your car’s interior, and creating a pleasant and ambient atmosphere, these lights elevate your driving experience to new heights. Explore the options available and transform your car into a stylish, comfortable, and safe haven on wheels.
Gather The Necessary Tools And Materials
Before you can install car LED strip lights, you need to gather all the necessary tools and materials. Having everything ready before you begin will make the installation process much smoother and ensure you have everything you need. Here are the essential tools and materials you will need:
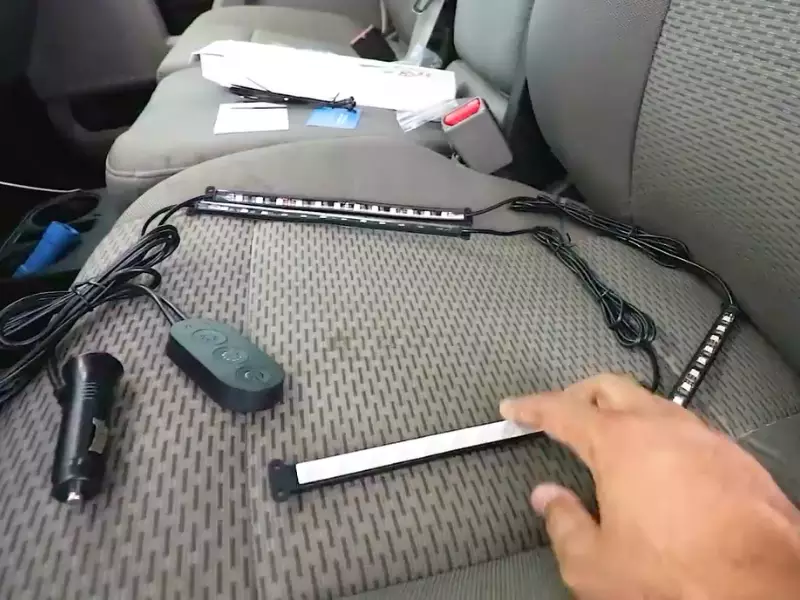
LED strip lights
The first thing you will need is the LED strip lights themselves. LED strip lights come in various lengths and colors, so make sure to choose the ones that best suit your preferences and needs. Consider the length required to cover the desired areas of your car.
Adhesive tape or adhesive pads
In order to securely fasten the LED strip lights to your car, you will need adhesive tape or adhesive pads. This will ensure that the lights stay in place and don’t come off while driving. Make sure to choose adhesive tape or pads that are strong enough to withstand the vibrations and movements of your car.
Wire cutter/stripper
When installing car LED strip lights, you may need to cut and strip wires to connect the lights to a power source. A wire cutter/stripper is an essential tool for this task, as it allows you to cut through wires cleanly and strip the insulation to expose the bare wire ends.
Power source (cigarette lighter adapter or direct wiring kit)
To power your LED strip lights, you will need a suitable power source. The two most common options are a cigarette lighter adapter or a direct wiring kit. A cigarette lighter adapter is a convenient choice if you want to easily plug and unplug the lights as needed. On the other hand, a direct wiring kit provides a more permanent and professional-looking installation.
Extension wire (if needed)
If the distance between your LED strip lights and the power source is too far, you may need an extension wire. This will allow you to bridge the gap between the lights and the power source, ensuring that they can be properly connected.
Mounting clips (optional)
Mounting clips are optional but can be useful for securing the LED strip lights to specific areas of your car. They provide an additional level of stability and can help prevent the lights from sagging or falling off. If you want to achieve a more precise and professional installation, mounting clips can be a great addition to your toolkit.
By gathering all these necessary tools and materials before you start installing your car LED strip lights, you will be well-prepared and ready to tackle the project with ease. Having everything at hand will make the process more efficient and ensure that your installation is successful.
Choose The Right Led Strip Lights
When it comes to installing car LED strip lights, there are a few key factors to consider in order to choose the right ones for your vehicle. You want to ensure that the LED strip lights you select are not only visually appealing, but also practical and suitable for automotive use. In this section, we will be discussing the color, brightness, length, and other important considerations to help you make an informed decision.
Consider the Color
One of the first things to think about when choosing LED strip lights for your car is the color. LED strips are available in a wide range of colors, including vibrant options like red, blue, green, and even multi-color options that can be customized through a remote control. Consider the overall aesthetics of your vehicle and choose a color that complements its style. Additionally, keep in mind any legal restrictions regarding the use of specific colors on vehicles in your area.
Brightness Matters
The brightness of the LED strip lights is another important factor to consider. You want your lights to be visible at night while driving, but not too overpowering. Look for LED strips with adjustable brightness settings so that you can customize the intensity of the lighting according to your preference. Brightness can greatly impact the overall look and feel of your car’s interior, so choose wisely.
Length and Fit
The length of the LED strip lights is crucial to ensure a proper fit inside your car. Take measurements of the areas where you plan to install the lights, such as the footwell or under the seats, and choose LED strips that match those dimensions. Some LED strips can be cut or extended to fit different lengths, offering flexibility for various installation locations. Remember to consider the power source and wiring requirements when determining the appropriate length for your LED strip lights.
Automotive Use and Waterproofing
Not all LED strip lights are suitable for automotive use, so it’s essential to choose ones specifically designed for cars. Automotive LED strip lights are built to withstand the vibrations and temperature changes associated with driving, ensuring their longevity. Furthermore, since LED strip lights are commonly installed in areas exposed to moisture, such as the exterior or interior of the car, it is vital to select lights that are waterproof. This will prevent any damage caused by water or other liquids, ensuring your LED strip lights last for a long time.
By considering the color, brightness, length, and suitability for automotive use and waterproofing, you can choose the right LED strip lights for your car installation. Remember, select LED strip lights that not only enhance the appearance of your vehicle but also provide functionality and durability on the road.
Planning The Layout
When it comes to installing LED strip lights in your car, planning the layout is an important step to ensure a professional and seamless installation. By deciding where you want to place the LED strip lights and determining the length needed for each section, you can create a customized lighting setup that suits your preferences. In this guide, we will walk you through the process of planning the layout for your car LED strip lights installation.
Decide where you want to place the LED strip lights in your car
Before you begin installing the LED strip lights, it is essential to decide where you want to place them in your car. The placement will depend on the desired effect and the areas you want to highlight or illuminate. Here are some popular options to consider:
- Under the dash: This is a common placement choice as it creates a stylish and futuristic glow that adds ambiance to the interior.
- Along the door panels: Placing the LED strip lights along the door panels can enhance the aesthetics and create a unique visual appeal.
- In the trunk: Installing LED strip lights in the trunk can make it easier to find items and add a cool touch to your car’s storage space.
- Along the floorboards: Placing the LED strip lights along the floorboards can create a vibrant and eye-catching effect that illuminates the entire interior.
Determine the length of the LED strip lights needed for each section
Once you have decided on the placement of the LED strip lights, the next step is to determine the length needed for each section. To do this, you will need to measure the areas where you intend to install the lights. Use a measuring tape to accurately measure the length of the sections.
When purchasing the LED strip lights, make sure to buy a length that matches or exceeds the measurement of each section. It’s better to have a slightly longer strip that you can trim down, rather than a strip that falls short.
Additionally, consider the power source and wiring when determining the length needed. Ensure that the LED strip lights can reach the power source without any strain on the wires.
With the layout planned and the length of LED strip lights determined for each section, you are now ready to proceed to the installation process. In the next section, we will guide you through the steps to install the LED strip lights in your car.
Preparing The Car Interior
Clean the areas where the LED strip lights will be installed
Before you begin the installation process of car LED strip lights, it is crucial to ensure that the areas where the strips will be placed are clean. This will ensure proper adhesion of the lights and prevent any dust or debris from obstructing the installation process. Start by wiping down the areas with a clean cloth to remove any surface dirt or grime. Be sure to use a mild cleaning solution that is suitable for the type of material in your car’s interior. Also, keep in mind that different surfaces may require different cleaning techniques, so it’s essential to refer to your car’s owner manual for specific instructions.
Make sure the surface is dry before proceeding to the next step
Once you have cleaned the areas, it is essential to ensure that the surface is completely dry before proceeding with the installation. Any moisture or dampness can hinder the adhesive properties of the mounting tape and may cause the LED strip lights to peel off. You can use a dry cloth or even a hairdryer on low heat to speed up the drying process. Ensure that there is no residual moisture sticking around, as this can affect the adherence of the LED lights.
To summarize, before you begin installing car LED strip lights, take the time to prepare the car interior by cleaning the areas where the lights will be placed. Ensure that the surface is completely dry before proceeding to the next step. By following these precautions, you can ensure a successful and long-lasting installation of your car LED strip lights.
Wiring The Led Strip Lights
Wiring the LED strip lights is a crucial step in the installation process. Properly connecting the wires ensures that the lights function correctly and safely. In this section, we will go through the necessary steps to wire your LED strip lights, from preparing the power source to connecting the wires properly. Let’s dive right in!
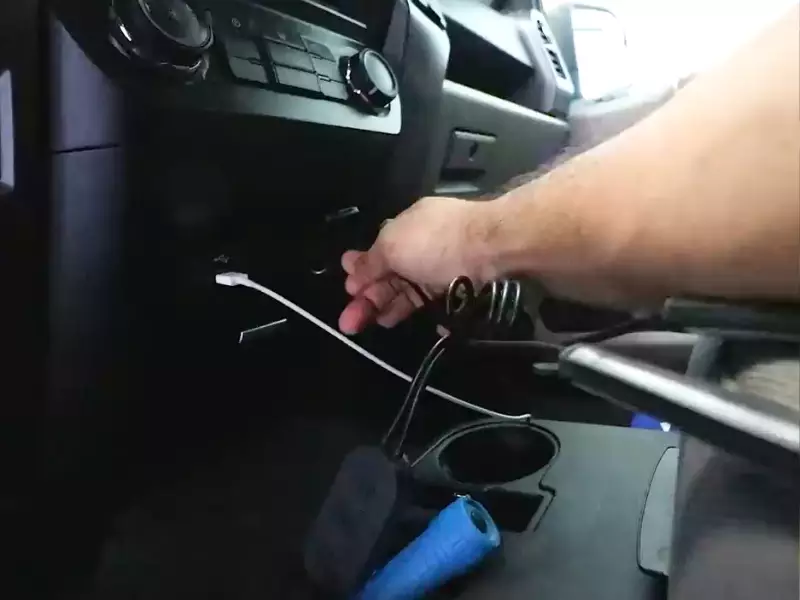
Prepare the power source by connecting it to the LED strip lights
To begin, you’ll need to prepare the power source for your LED strip lights. This involves connecting the power source to the lights to ensure a steady stream of electricity. Follow these steps to properly prepare the power source:
- Determine the power source: Before you begin, identify the power source that you’ll be using for your LED strip lights. This could be your car’s battery or an auxiliary power outlet. Ensure that the power source can handle the voltage requirements of the LED strip lights.
- Cut the LED strip lights: Measure the length of the area where you want to install the LED strip lights and cut the strip accordingly. Use sharp scissors or a cutting tool designed specifically for cutting LED strip lights.
- Strip the wire ends: Once you’ve cut the LED strip lights to the desired length, carefully strip the ends of the wires. Use a wire stripper to remove a small portion of the coating, exposing the bare wires underneath. Be cautious not to cut or damage the wires themselves.
- Connect the wires: With the wire ends stripped, you can now connect the wires to the power source. Identify the positive (+) and negative (-) wires on both the LED strip lights and the power source. Make sure to match the positive wire on the LED strip lights with the positive wire on the power source, and the same for the negative wires.
- Secure the connections: Once you’ve matched the wires, it’s important to secure the connections properly. You can use wire connectors or electrical tape to ensure a secure and reliable connection. This will prevent any loose connections that could cause issues with the LED strip lights’ functionality.
By following these steps, you’ll have successfully prepared the power source and connected it to your LED strip lights. Proceed to the next section to learn about the final steps in installing your car LED strip lights.
At this stage, you should have successfully wired your LED strip lights by preparing the power source and connecting the wires properly. Once secured, you can proceed with the final steps of installing your Car LED Strip Lights.
Mounting The Led Strip Lights
Once you have your car LED strip lights ready, it’s time to install them. Mounting the LED strip lights is a straightforward process that can enhance the ambiance of your vehicle while adding a touch of style. There are a few different methods you can use to securely attach the strip lights to your car. Let’s explore two popular options:
Attach the LED strip lights using adhesive tape or adhesive pads
One of the easiest ways to mount your LED strip lights is by using adhesive tape or adhesive pads. This method offers a quick and hassle-free installation process. Here’s what you need to do:
- Clean the surface where you will be attaching the strip lights. Ensure it is free from dust, dirt, and grime. This step is crucial to ensure optimal adhesion.
- Measure and cut the LED strip lights according to the desired length for your car.
- Remove the protective backing from the adhesive tape or adhesive pads, exposing the sticky surface.
- Align the strip lights with the desired location on your car, making sure they are straight and centered.
- Press firmly on the strip lights, applying even pressure along the entire length to secure them in place.
- Allow the adhesive to cure according to the manufacturer’s instructions to ensure long-lasting adherence.
Use mounting clips for added stability, if needed
If you’re looking for added stability for your LED strip lights, using mounting clips is an excellent option. Mounting clips can provide extra support and prevent the strip lights from shifting or coming loose in high-vibration environments. Follow these steps to use mounting clips:
- Measure and cut the LED strip lights to the desired length for your car.
- Attach the mounting clips to the surface of your car at regular intervals along the length of the LED strip lights.
- Slide the strip lights into the mounting clips, ensuring they fit snugly and securely.
- Test the stability of the strip lights by gently tugging them to ensure they are firmly held in place.
- Make any necessary adjustments to the position of the mounting clips if needed.
In conclusion, mounting your car LED strip lights using adhesive tape or adhesive pads offers a simple and convenient installation method. However, if you require additional stability, utilizing mounting clips can ensure your strip lights remain securely in place. Follow these steps for a successful installation and enjoy the vibrant lighting transformation in your vehicle.
Securing The Wires
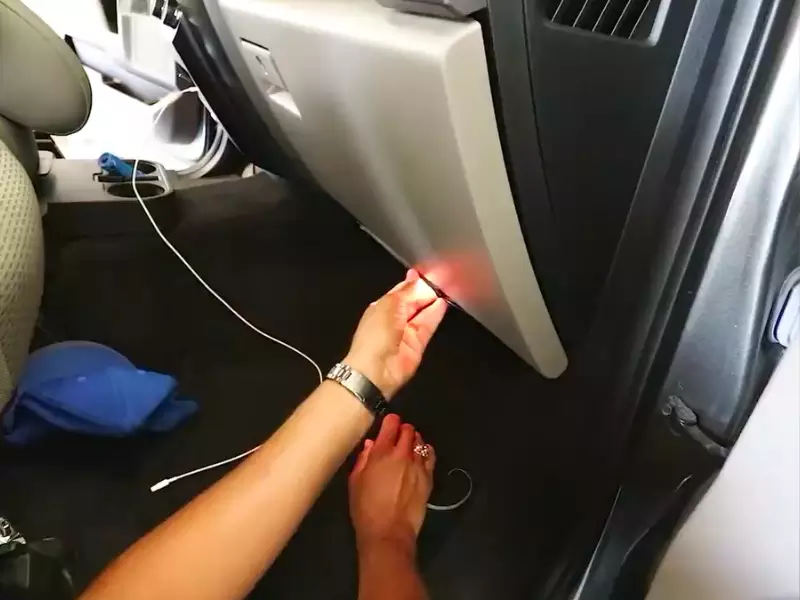
Hide the wires by tucking them under panels or molding
Securing the wires properly not only ensures a neat and professional-looking installation but also helps to prevent any potential damage or interference. One way to achieve this is by hiding the wires by tucking them under panels or molding.
When installing car LED strip lights, it is essential to carefully tuck the wires under the vehicle’s panels or molding to keep them out of sight. This not only creates a clean and seamless appearance but also protects the wires from any external elements or potential damage. The key here is to utilize the existing openings or gaps between panels or molding to discreetly route the wires.
If there are no natural openings available, you can create small incisions or openings using a sturdy tool such as a trim removal tool or a panel pry tool. However, it is vital to exercise caution and ensure that the wires are not strained or pinched while making these incisions.
Once the wires are tucked under panels or molding, make sure to secure them in place to avoid any movement or rattling during the vehicle’s operation.
Use zip ties or cable clips to secure the wires in place
Zip ties or cable clips are extremely useful in securing the wires in place and providing additional stability to the installation. These accessories are readily available at automotive supply stores and can be easily attached to various parts of the car’s interior without causing any damage.
When using zip ties, wrap them around the wires and the available brackets, hooks, or other anchor points. Ensure that they are tight enough to hold the wires securely but not too tight that they cause damage or strain. Trim off any excess length of the zip ties for a tidy finish.
Cable clips, on the other hand, can be affixed to the vehicle’s interior using adhesive backing or screws. These clips offer a clean and organized solution for securing the wires in place, especially along the edges or corners of the car. Place the wires in the clips and securely fasten them for a neat and professional appearance.
In some cases, a combination of both zip ties and cable clips may be necessary, depending on the specific requirements of your car and LED strip light installation.
By carefully following these steps to hide the wires and secure them using zip ties or cable clips, you can achieve a clean, professional, and safe installation of car LED strip lights. This not only enhances the aesthetic appeal of your vehicle’s interior but also ensures a long-lasting and trouble-free lighting experience.

Testing The Installation
Once you have successfully installed your car LED strip lights, it is crucial to test them to ensure they are functioning properly. Testing the installation not only confirms that the lights are working as intended but also allows you to make any necessary adjustments or fixes before hitting the road.
Connect the power source and test if the LED strip lights are working properly
To begin the testing process, you will need to connect the power source to the LED strip lights. Carefully locate the power source, which is typically a power adapter or a direct connection to your car’s electrical system. Ensure that the power source is compatible with the LED strip lights you have installed.
Once you have identified the power source, make sure to turn off any other electrical devices in your car. This will eliminate any potential interference and give you a more accurate reading of the LED strip lights’ performance.
Next, connect the power source to the LED strip lights according to the manufacturer’s instructions. This usually involves connecting the positive (+) and negative (-) terminals of the power source to the corresponding terminals on the LED strip lights.
After you have made the connections, switch on the power source and carefully observe the LED strip lights. They should light up and emit a consistent and vibrant glow. Pay close attention to any flickering, dimming, or irregular behavior, as these could indicate a problem with the installation.
If the LED strip lights are not working properly, double-check the connections to ensure they are secure and correctly wired. It is also recommended to check the power source itself to ensure it is functioning correctly.
Make any necessary adjustments or fixes to ensure proper functionality
If you encounter any issues during the testing phase, it is important to address them promptly and make the necessary adjustments or fixes. Troubleshooting potential problems can help ensure that your LED strip lights function properly and provide the desired lighting effect.
If you notice any flickering or dimming of the lights, it could indicate a loose or faulty connection. Check the wiring and ensure that all connections are secure and properly insulated. If necessary, tighten any loose connections or replace any damaged wiring.
In some cases, adjusting the positioning of the LED strip lights can improve their functionality. If certain areas of your car are not adequately lit or the lighting effect is not as desired, consider repositioning the strips to achieve a more even and appealing lighting display.
Additionally, if you find that the LED strip lights are too bright or too dim, you may need to adjust the power output from the source. Consult the manufacturer’s instructions or seek professional advice on adjusting the power settings to achieve the desired brightness level.
Once you have made any necessary adjustments or fixes, repeat the testing process to ensure the LED strip lights are now functioning properly. It is crucial to thoroughly test the lights before finalizing the installation to avoid any potential issues while driving.
In conclusion, testing the installation of your car LED strip lights is essential to confirm their proper functionality and make any necessary adjustments or fixes. By following the process of connecting the power source, testing the lights, and addressing any issues, you can ensure optimal performance and enjoy the desired lighting effect in your car.
Cleaning The Led Strip Lights
Cleaning the LED strip lights is an essential step in maintaining their functionality and appearance. Regular cleaning not only removes dirt and debris but also helps to prolong the lifespan of the lights. In this section, we will delve into the various methods and best practices for cleaning LED strip lights.
Use a mild detergent and water solution to clean the LED strip lights
One of the simplest and most effective ways to clean your LED strip lights is by using a mild detergent and water solution. This gentle solution helps to remove any accumulated dust, fingerprints, or other residue that may have built up over time. Here’s a step-by-step guide on how to clean your LED strip lights using this method:
- Firstly, prepare the cleaning solution by mixing a small amount of mild detergent with warm water. Avoid using harsh chemicals or abrasive materials, as they can damage the delicate LEDs.
- Dip a clean, soft cloth or sponge into the soapy solution and wring out any excess moisture. It’s important to avoid saturating the cloth, as excessive moisture can seep into the electrical components of the lights and cause damage.
- Gently wipe the LED strip lights with the damp cloth, ensuring that you cover the entire length of the strip. Pay special attention to any areas that appear to be particularly dirty or stained.
- Once you’ve wiped the entire strip, use a clean, dry cloth to remove any remaining moisture. This step is crucial to prevent water damage, as moisture can adversely affect the functionality of the lights.
- Finally, allow the LED strip lights to air dry completely before reconnecting them. This ensures that no moisture remains trapped within the lights, which could potentially lead to damage or malfunction.
Avoid using harsh chemicals or abrasive materials
When cleaning your LED strip lights, it’s crucial to avoid using harsh chemicals or abrasive materials. These substances can damage the delicate LEDs and their protective coatings, leading to reduced brightness or even complete failure.
Instead, opt for mild detergent solutions or gentle cleaning agents specifically designed for electronic components. These can effectively clean the lights without causing any harm.
In conclusion, cleaning LED strip lights is an important maintenance task that should not be overlooked. By using a mild detergent and water solution, you can effectively remove dirt and grime while ensuring the longevity and optimal performance of your lights. Remember to avoid harsh chemicals and abrasive materials that could potentially damage the LEDs. With regular cleaning, you can enjoy the vibrant illumination and ambiance that LED strip lights provide for years to come.
Troubleshooting Common Issues
Installing LED strip lights in your car can be an exciting and visually appealing way to enhance the interior. However, like any electronic device, you may encounter some common issues along the way. In this section, we will address the troubleshooting steps for LED strip lights not turning on, uneven brightness or color, and flickering or blinking lights.
LED strip lights not turning on
If your LED strip lights fail to turn on, follow these troubleshooting steps:
- Verify the connection: Check if all the connections between the LED strip lights and the power source are secure. Make sure the wires are properly connected to the power supply.
- Check the power source: Ensure that the power source is functional. Test it by plugging in another device to the same power outlet or using a different outlet.
- Inspect the fuse: LED strip lights often come with a fuse. Locate the fuse and check if it is intact. If it’s blown, replace it with a new one.
- Confirm polarity: LED strip lights have polarity, so it’s crucial to connect positive and negative wires correctly. Double-check the polarity to ensure correct installation.
- Consider a faulty switch: If everything else fails, the switch itself may be the problem. Test the switch or consider replacing it.
Uneven brightness or color
If you notice uneven brightness or color on your LED strip lights, try the following troubleshooting steps:
- Check voltage supply: Make sure that the LED strip lights are receiving the correct voltage supply. A voltage drop can cause uneven brightness. Consult the product specifications to ensure proper voltage input.
- Inspect individual LEDs: Look closely at the strip to examine each individual LED. It’s possible that some LEDs may be faulty or damaged, resulting in uneven lighting. Replace any defective LEDs.
- Investigate the controller: If you are using a controller to adjust brightness or color, ensure that it is functioning correctly. Test the controller and try different settings to see if the issue persists.
- Consider ambient lighting: Uneven brightness or color can also be influenced by the presence of ambient lighting. Adjust the surrounding lighting conditions to see if it improves the uniformity of the LED strip lights.
Flickering or blinking lights
Experiencing flickering or blinking lights? Try these troubleshooting steps:
- Check power supply stability: LED strip lights require a stable power supply to function properly. Ensure that the power source is delivering consistent power without fluctuations.
- Confirm wiring connections: Loose or poorly connected wires can cause flickering. Verify that all wiring connections are secure and properly soldered if necessary.
- Look for electromagnetic interference: Certain electronic devices or strong electromagnetic fields can interfere with LED strip lights, causing flickering. Keep the lights away from potential sources of interference.
- Replace the power supply: If the above steps do not resolve the issue, the power supply itself may be faulty. Consider replacing it with a compatible and reliable power supply.
By following these troubleshooting steps, you can overcome common issues that may arise when installing LED strip lights in your car. Enjoy a vibrant and captivating lighting experience that elevates your driving experience!
Tips For Maintenance And Longevity
Regularly check for loose connections or damaged wires
Regularly checking for loose connections and damaged wires is crucial for the proper functioning and longevity of your car LED strip lights. To do this, perform a visual inspection of the connections and wires, ensuring they are secure and not frayed or damaged. Loose connections can result in flickering or intermittent lighting, while damaged wires can lead to complete failure of the LED strip lights.
If you come across any loose connections or damaged wires, it is important to address them immediately. Tighten any loose connections and replace any damaged wires with new ones. This will not only enhance the overall performance of the LED strip lights but also prevent further damage or malfunctions.
Avoid exposing the LED strip lights to extreme temperatures or moisture
It is vital to protect your car LED strip lights from both extreme temperatures and moisture. Extreme heat or cold can potentially damage the LED chips and cause premature failure. Therefore, avoid installing the strip lights in areas where they will be directly exposed to sunlight or near heat sources.
In addition, moisture can lead to corrosion and short circuits, compromising the performance of the LED strip lights. Make sure to avoid any contact with water or excessive humidity. When washing your car, be cautious not to directly spray water on the LED strip lights.
To safeguard the LED strip lights from extreme temperatures and moisture, consider investing in waterproof or weatherproof varieties that are specifically designed for outdoor use.
Follow the manufacturer’s instructions for proper use and maintenance
The manufacturer’s instructions should always be your go-to resource for proper use and maintenance of your car’s LED strip lights. These instructions are specifically tailored to the product you have purchased and will provide specific guidelines on installation, operation, and maintenance.
By following the manufacturer’s instructions, you can ensure that you are utilizing the LED strip lights correctly, preventing any unnecessary damage or issues. This includes adhering to any recommended power supply, voltage, or current limitations and proper mounting techniques.
Moreover, understanding the manufacturer’s recommended maintenance routine is vital for maximizing the lifespan of your LED strip lights. Some manufacturers may suggest periodic cleaning or applying protective coatings to maintain optimal performance and longevity.
In conclusion, by regularly checking for loose connections or damaged wires, avoiding exposure to extreme temperatures or moisture, and diligently following the manufacturer’s instructions, you can ensure the maintenance and longevity of your car’s LED strip lights.
Frequently Asked Questions Of How To Install Car Led Strip Lights
Can You Install Led Strips In A Car?
Yes, you can easily install LED strips in your car. They add a stylish and vibrant lighting effect to the interior or exterior. Simply choose the desired LED strip, clean the surface where it will be placed, and apply the strip using adhesive backing or clips.
Finally, connect the strip to a power source, and you’re good to go!
Where Do You Wire Led Lights In A Car?
Wire LED lights in a car by connecting the positive wire to the positive terminal of the car’s battery and the negative wire to a metal part of the car’s frame. Make sure to follow the specific instructions for your LED light kit.
How Do You Install Led Strip Lights Step By Step?
Installing LED strip lights is easy and straightforward. First, measure the desired length and cut the strip accordingly. Next, remove the backing tape and stick the strip in place. Connect the power supply and plug it in. Finally, test the lights to ensure they’re working properly.
Enjoy the beautiful ambiance!
Are LED strip Lights Easy To Install?
Yes, LED strip lights are easy to install. They come with adhesive backing for simple installation on any clean surface. Plus, they typically only require a power source and can be cut to fit specific lengths, making it easy for anyone to set up and customize.
Conclusion
To sum up, installing car LED strip lights is a simple and hassle-free process that can greatly enhance the ambiance and visual appeal of your vehicle. By following the step-by-step guide outlined in this blog post, you can easily achieve the desired lighting effect in no time.
So, why wait? Get your hands on some high-quality LED strip lights and transform your car into a captivating visual spectacle on the road. Let your imagination run wild and showcase your unique style with these amazing lighting accessories. Happy installation!