To install a camera in your car, first, find a suitable location on your dashboard or windshield. Then, attach the camera using the provided suction cup or adhesive mount.
Choosing The Right Camera For Your Car
Installing a camera in your car can be a great investment, providing you with peace of mind and added security. With so many options available in the market, it’s important to choose the right camera for your car that meets your specific needs. Consideration of various factors and understanding the important features of a car camera will not only ensure optimal performance but also enhance your driving experience. In this guide, we will discuss the factors to consider before purchasing a car camera, the important features to look for in a car camera, and some of the best car camera options available in the market.
Factors to consider before purchasing a car camera
Before you start searching for a car camera, it’s crucial to consider a few factors to make an informed decision. These factors include:
- Budget: Determine your budget range for the car camera. Remember, cameras with advanced features tend to be more expensive.
- Camera Type: Decide whether you want a single-lens camera or a dual-lens camera. Single-lens cameras capture footage only from the front, while dual-lens cameras provide front and rear coverage.
- Video Quality: Check for the resolution and frame rate of the camera. High-resolution cameras with at least 1080p and 30fps will provide clear and crisp video recordings.
- Storage Capacity: Evaluate the storage capacity of the camera. Consider whether it has a built-in memory or requires a separate memory card for storing recordings.
- Installation Process: Determine the complexity of the installation process. Some cameras are plug-and-play, while others may require professional installation.
Important features to look for in a car camera
Now that you have a clear understanding of the factors to consider before purchasing a car camera, let’s explore the important features that your camera should possess:
- Night Vision: Look for a car camera with night vision capabilities. This feature ensures clear recordings even in low-light conditions.
- Wide-Angle Lens: Opt for a camera with a wide-angle lens, usually between 120 to 170 degrees. This wider field of view will capture more details and reduce blind spots.
- Loop Recording: Ensure that the camera has loop recording functionality. This feature automatically overwrites old footage when the storage is full, saving you the hassle of manually deleting files.
- G-Sensor: A camera with a G-sensor will automatically detect sudden movements or impacts and lock those recordings to prevent them from being overwritten.
- GPS: Consider a car camera with GPS capabilities to record your location and speed. This information can be beneficial during insurance claims or legal disputes.
Best car camera options available in the market
Now that you are familiar with the factors to consider and the important features to look for, let’s explore some of the best car camera options currently available in the market:
| Camera Model | Resolution | Field of View | Price Range |
|---|---|---|---|
| X Company Dash Cam 1 | 1080p | 150 degrees | $50 – $100 |
| Y Company Dash Cam 2 | 4K | 170 degrees | $100 – $200 |
| Z Company Dash Cam 3 | 1440p | 120 degrees | $200 – $300 |
These are just a few examples of car cameras available in the market. Remember to read customer reviews, compare prices, and choose the camera that best fits your requirements and budget.
By considering the factors mentioned above and choosing a car camera with the necessary features, you can enhance your car’s security and ensure peace of mind while on the road.
Preparing For The Installation
Before diving into the installation process of a car camera, it’s important to adequately prepare. This involves gathering the necessary tools and equipment, understanding the car camera placement options, and finding the optimal location for installing the camera.
Gathering the necessary tools and equipment
Prior to starting the camera installation, ensure you have all the essential tools and equipment at your disposal. This will not only make the installation process smoother but also prevent any unnecessary delays or interruptions. Here is a checklist of the tools and equipment you will need:
- Car camera kit (including the camera and necessary cables)
- Mounting bracket or adhesive
- Screwdriver set
- Trim removal tools
- Electrical tape
- Wire connectors
- Power drill (if necessary)
- Microfiber cloth
Having these items ready will ensure a hassle-free installation process, allowing you to focus on positioning and securing the camera in your car.
Understanding the car camera placement options
Car cameras can be installed in various locations within the vehicle, and it’s crucial to understand the placement options available. Depending on your preference and requirements, you can choose from the following common camera placements:
- Dashboard Mounting: This placement involves securing the camera on the dashboard using a mounting bracket or adhesive. It offers a clear view of the road ahead and is easily accessible for adjustments.
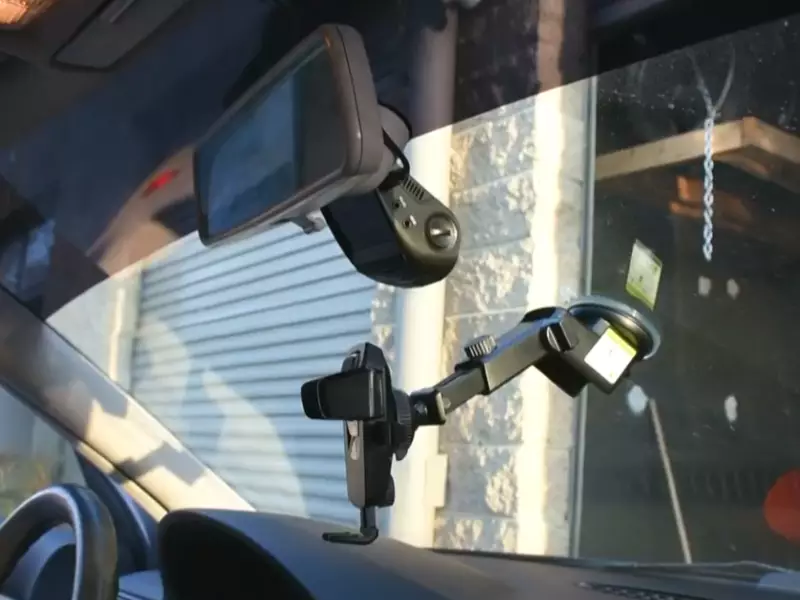
- Windshield Mounting: Mounting the camera on the windshield provides an unobstructed and wide-angle view, ensuring maximum visibility. It is important to position it correctly to avoid any hindrance to your driving experience.
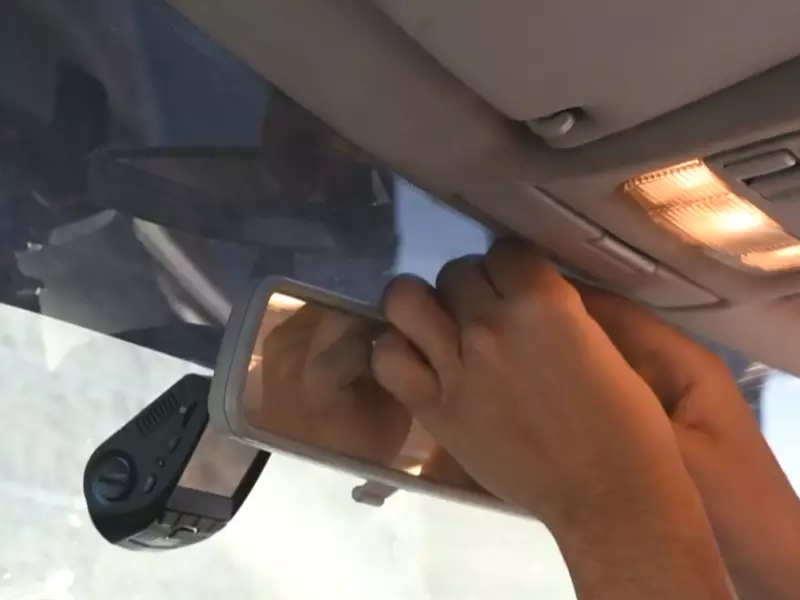
- Rearview Mirror Mounting: If you prefer a discreet installation, attaching the camera to the rearview mirror is an excellent option. This placement seamlessly integrates the camera into your car’s interior.
By knowing these placement options, you can determine which one suits your needs best and plan the installation accordingly.
Finding the optimal location for installing the camera
When finding the optimal location for installing your car camera, it’s essential to consider a few factors to ensure effective coverage and functionality. Here are some guidelines to help you determine the best spot for your camera:
- Ensure the camera has an unobstructed view of the road ahead or the desired area you want to monitor.
- Consider the wiring required for the camera’s power supply and connectivity. Make sure it’s not exposed or causing any inconvenience.
- Position the camera in a spot that minimizes glare, reflections, or distortion caused by the windshield or other objects.
- Take into account any laws or regulations in your jurisdiction regarding the placement of car cameras.
By carefully assessing these factors, you can identify the optimal location for your camera installation, ensuring it provides clear footage without interfering with your driving experience or violating any regulations.
Now that you know the importance of preparing for the installation and the steps involved, it’s time to put your plans into action and successfully install the camera in your car.
Step-By-Step Installation Process
Installing a camera in your car can provide an added layer of safety and peace of mind while on the road. The process might seem daunting at first, but with the right preparation and careful execution, it can be a straightforward task. In this step-by-step guide, we will walk you through the installation process, ensuring that you achieve a clean and efficient installation.
Step 1: Preparation and Safety Measures
Prior to starting the installation, it is important to gather all the necessary tools and ensure that you have a clear understanding of the process. Here are the steps to follow in this stage:
- Identify the camera’s ideal placement for optimal visibility and coverage.
- Check the manufacturer’s instructions and guidelines for any specific requirements.
- Gather the required tools, such as a screwdriver, adhesive tape, and cable management clips.
- Ensure that the car’s engine is turned off and the key is removed from the ignition to avoid any electrical mishaps.
- Wear protective gloves to prevent injury during the installation process.
Step 2: Mounting the Camera on the Windshield or Dashboard
Now that you are prepared, it’s time to mount the camera in your car. Follow these steps carefully:
- Clean the chosen mounting area on the windshield or dashboard with a non-abrasive cloth.
- If using adhesive tape, remove the protective film from one side and firmly press the camera mount onto the cleaned area.
- For a more secure installation, use screws and the provided bracket to attach the camera mount to the windshield or dashboard. Be sure to follow the manufacturer’s instructions for proper alignment.
- Double-check the stability of the camera mount before moving on to the next step.
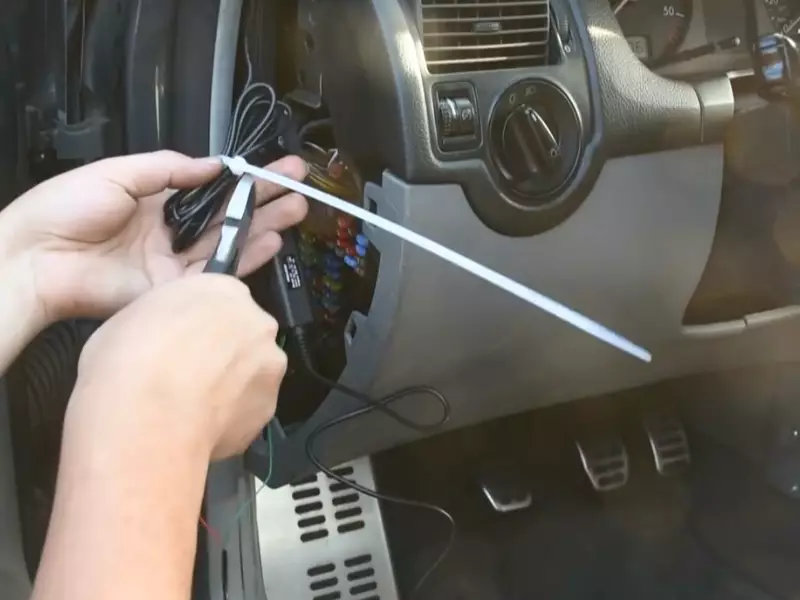
Step 3: Routing and Hiding the Cables for a Clean Installation
To maintain a clean and organized installation, it is essential to properly route and hide the cables. Here’s what you need to do:
- Identify the shortest and least obtrusive route for the cables to reach the camera from the power source.
- Use cable management clips and adhesive tape to secure the cables along the interior panels, ensuring that they are out of the driver’s line of sight.
- Consider using cable concealers to further hide the cables and maintain a neat appearance.
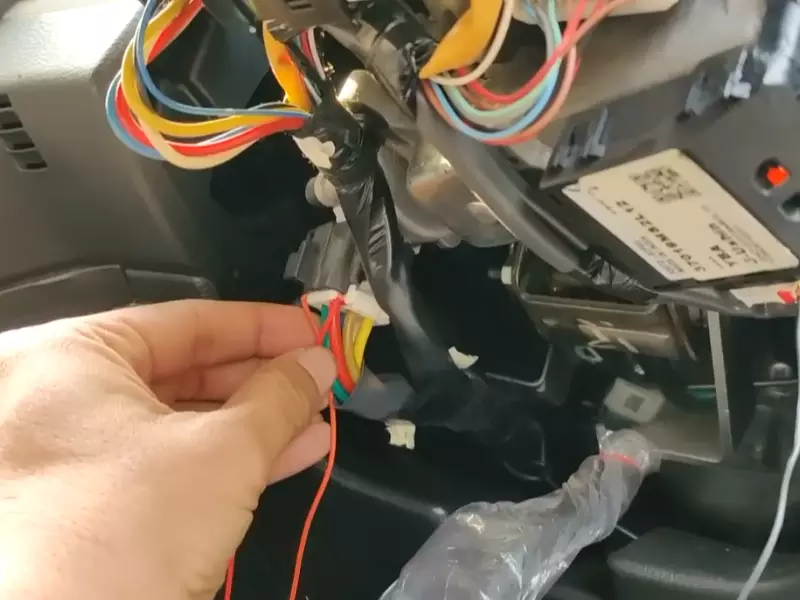
Step 4: Connecting the Camera to the Car’s Power Source
With the camera mounted and cables neatly routed, it’s time to connect the camera to the car’s power source. Follow these steps carefully:
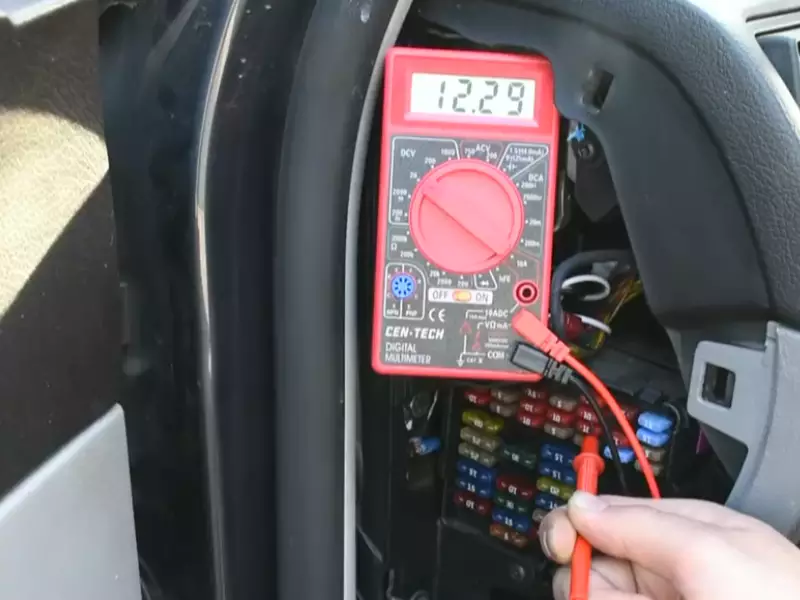
- Locate the nearest power source in your vehicle, such as the fuse box or cigarette lighter.
- Refer to the camera’s instructions to identify the appropriate connector for connecting the camera to the power source.
- If necessary, use an installation kit or additional wiring to ensure a secure and stable connection.
- Test the camera’s power connection to ensure it is working properly.
Step 5: Adjusting the Camera Settings for Optimal Performance
Now that the camera is installed and powered, it’s crucial to adjust the settings for optimal performance. Follow these steps:
- Access the camera’s settings menu through the provided controls or smartphone app.
- Adjust the camera angle and field of view to ensure maximum coverage.
- Tweak other settings, such as resolution, frame rate, and exposure, according to your preference and the camera’s capabilities.
- Test the camera and make any necessary adjustments to achieve clear and high-quality recordings.
By following this step-by-step installation process, you can have a camera installed in your car in no time. Remember to exercise caution and refer to the manufacturer’s instructions throughout the installation process. With a properly installed camera, you can enhance your safety on the road and capture any memorable moments during your journeys.
Extra Tips And Troubleshooting
Installing a camera in your car can provide you with valuable evidence in case of accidents or thefts. However, the installation process may come with its own set of challenges. In this section, we will discuss troubleshooting common installation issues, tips for hiding cables effectively, and securing the camera to prevent theft or damage.
Troubleshooting common installation issues
If you encounter any issues during the installation process, don’t worry. Here are some common problems and their solutions:
- No power: If your camera is not receiving power, double-check the connection to the car’s power source. Ensure that the fuse is intact, and the wiring is properly connected. If all else fails, consult a professional.
- Poor video quality: If you notice blurry or distorted footage, the camera lens may be dirty or misaligned. Clean the lens gently with a microfiber cloth and adjust the angle for better clarity.
- Excessive glare: Glare from the sun or other light sources can obstruct the view captured by your camera. Consider purchasing a lens hood or installing an anti-glare filter to reduce this problem.
Tips for hiding cables effectively
Cameras typically come with cables that need to be connected to power sources and displays, which can clutter up your car’s interior. Follow these tips to hide the cables effectively:
- Use cable clips: Attach cable clips along the edges of your car’s interior to keep the cables neatly in place. This not only prevents tangling but also makes it easier to hide them behind panels.
- Utilize cable sleeves: Cable sleeves are a great way to bundle cables together and give them a clean appearance. Choose a color that matches your interior to make them less noticeable.
- Route cables along the trim: Discreetly run the cables along the trims and edges of your car, tucking them behind panels wherever possible. This helps in keeping them out of sight and avoids interference with the driver’s line of sight.
Securing the camera to prevent theft or damage
Protecting your camera from theft or damage is crucial. Here are some steps you can take to secure it:
- Choose a discreet mounting location: Finding a hidden spot for your camera reduces the chances of it being noticed by potential thieves. Consider mounting it behind the rearview mirror or on the inside of the windshield.
- Use tamper-proof mounts: Invest in a tamper-proof mount that requires special tools to remove. This adds an extra layer of security and discourages theft attempts.
- Consider a removable camera: If security is a major concern, opt for a camera that can be easily detached when not in use. This allows you to remove it from the car and store it safely.
By following these extra tips and troubleshooting techniques, you can ensure a successful installation of your car camera while maximizing its effectiveness and security. Enjoy the peace of mind that comes with having a reliable and well-protected camera system in your vehicle.
Maintaining And Using Your Car Camera
Proper maintenance and regular cleaning of your car camera are essential for its optimal performance and longevity. By taking care of your camera, you can ensure clear and reliable footage in various driving conditions. Additionally, understanding how to use the camera’s features effectively and being aware of the legal implications and privacy concerns are equally important. Let’s dive into each of these aspects in detail:
1. Proper maintenance and cleaning techniques
To keep your car camera in top-notch condition, it’s crucial to follow proper maintenance and cleaning techniques. Here are some guidelines to help you:
- Regularly inspect your camera to ensure it’s securely attached and aligned correctly.
- Check your camera’s lens for any dirt, dust, or smudges that may affect the clarity of the footage.
- Use a microfiber cloth or lens cleaning solution to gently wipe the lens clean. Avoid using harsh chemicals or abrasive materials that could potentially damage the lens.
- Keep the camera’s housing clean by wiping it with a damp cloth, especially if it’s exposed to dirt, rain, or other external elements.
- Periodically check the cables and connections to make sure they’re intact and functioning properly. Tighten any loose connections if necessary.
By following these maintenance practices, you can ensure that your car camera remains in optimal condition, providing you with clear and reliable footage whenever you need it.
2. Utilizing the camera’s features for maximum benefit
Your car camera comes equipped with various features that can enhance your driving experience and ensure your safety on the road. Here are some ways to maximize the benefits of these features:
- Loop recording: Enable loop recording to automatically overwrite old footage when your memory card is full, allowing continuous recording without interruption.
- Impact and motion detection: Activate the impact and motion detection feature to automatically start recording when an impact or motion is detected, providing valuable evidence in the event of an accident or break-in.
- Night vision: If your camera has night vision capabilities, make sure to enable it for clear recording even in low-light or dark conditions.
- GPS integration: If your camera has GPS integration, take advantage of this feature to capture accurate location and speed data along with your video recordings.
By familiarizing yourself with the different features of your car camera and utilizing them effectively, you can maximize its benefits and ensure a safer driving experience.
3. Understanding the legal implications and privacy concerns
While having a car camera can be beneficial, it’s essential to be aware of the legal implications and privacy concerns associated with its use. Here are some key points to consider:
| Legal Implications | Privacy Concerns |
|---|---|
| Ensure compliance with local laws and regulations regarding recording devices in vehicles. | Respect the privacy of individuals when sharing or uploading recorded footage. |
| Understand any restrictions on using camera footage as evidence in legal proceedings. | Avoid recording private property or sensitive areas where privacy is expected. |
| Be mindful of the proper usage of the camera to avoid distractions while driving. | Consider using privacy filters or adjusting camera angles to minimize intrusion. |
By understanding and adhering to the legal requirements and privacy considerations, you can navigate the usage of your car camera responsibly and ethically.
By properly maintaining and cleaning your car camera, utilizing its features effectively, and being mindful of the legal and privacy aspects, you can make the most of your camera installation. Ensure a safer and more reliable driving experience while capturing valuable footage when you need it.
Frequently Asked Questions On How To Install Camera In Car
Can I Install the Car Camera Myself?
Yes, you can install a car camera yourself. It is a do-it-yourself task that requires basic tools and some technical knowledge. Just follow the instructions provided with the camera and ensure proper placement for optimal functionality and coverage.
How Much Does It Cost To Install A Camera In A Car?
The cost of installing a car camera varies, but it typically ranges from $100 to $500, depending on factors like camera quality and additional features. Professional installation may cost extra.
Where Is The Best Place To Put A Camera In Your Car?
The best place to put a camera in your car is on the dashboard or windshield. This location ensures a clear view of the road ahead and captures any incidents or accidents.
How Hard Is It To Install A Backup Camera In A Car?
Installing a backup camera in a car is relatively easy. It requires a few simple steps such as mounting the camera, running the wires, connecting the power source, and attaching it to the display. With basic technical skills, anyone can do it without much difficulty or professional help.
Conclusion
Installing a camera in your car not only ensures your safety but also provides peace of mind. By following the step-by-step guide discussed in this blog post, you can easily set up the camera without any hassle. Remember to choose a suitable location, connect the cables properly, and adjust the settings according to your preferences.
With a camera installed, you can confidently hit the road, knowing that you have an extra layer of security. Stay safe!