To install a blend door actuator, remove the dashboard panel and locate the actuator. Disconnect the electrical connector and remove the screws to replace it with a new one.
The blend door actuator is an essential component of the heating and cooling system in a vehicle. It controls the flow of air through the vents for heating or cooling purposes. Over time, the actuator may wear out or malfunction, resulting in issues with temperature control.
To resolve this, you will need to install a new blend door actuator. In this guide, we will provide step-by-step instructions on how to install a blend door actuator. We will cover the process of removing the dashboard panel, locating the actuator, disconnecting the electrical connector, and replacing it with a new one. By following these steps, you can ensure a smooth and effective installation, restoring proper temperature control in your vehicle.

Understanding Blend Door Actuators
What is a blend door actuator?
A blend door actuator is an essential component in the HVAC (Heating, Ventilation, and Air Conditioning) system of a vehicle. It is responsible for controlling the flow and temperature of the air that comes out of the vents. The blend door actuator regulates the position of the blend door, which directs either warm or cold air into the cabin based on the driver’s temperature settings.
How does a blend door actuator work?
The blend door actuator works through a combination of mechanical and electrical components. It is usually located behind the dashboard, near the air conditioning system. When you change the temperature settings on the HVAC control panel, a signal is sent to the blend door actuator, telling it to either open or close the blend door.
The blend door actuator then uses a combination of gears, motors, and sensors to physically move the blend door to the desired position. If you want warm air, the blend door actuator will open the door to allow air to flow through the heater core. Conversely, if you want cold air, the actuator will close the door, forcing the air to bypass the heater core and go through the air conditioning evaporator.
Common signs of a faulty blend door actuator
A faulty blend door actuator can cause various issues with your vehicle’s HVAC system. If you notice any of the following signs, there’s a good chance that your blend door actuator might be in need of replacement:
- Uneven temperature distribution: If you experience inconsistent temperatures coming from the vents, such as hot air on one side and cold air on the other, it could be a sign that the blend door actuator is malfunctioning.
- Noisy operation: A blend door actuator that is about to fail may produce clicking or tapping sounds when you change the temperature settings.
- Inability to change temperature: When the blend door actuator is faulty, you may find that you are unable to adjust the temperature settings on your HVAC control panel.
- Stuck in one temperature mode: Another common sign of a faulty blend door actuator is being stuck in either the hot or cold air mode, regardless of the temperature settings.
If you notice any of these signs, it is recommended to inspect and replace the blend door actuator as soon as possible. Ignoring the issue could lead to further damage to your HVAC system and discomfort while driving.
In conclusion, understanding blend door actuators is crucial to diagnosing and fixing HVAC issues in your vehicle. Being aware of what a blend door actuator is, how it works, and the common signs of a faulty one can help you take appropriate action to ensure the optimal performance of your vehicle’s HVAC system.
Preparing For Installation
Before installing a blend door actuator, it is important to properly prepare for the task at hand. This involves gathering the necessary tools and equipment, identifying the location of the blend door actuator, and removing the necessary components for access. Taking these steps will ensure a smooth and efficient installation process. Let’s look at each of these steps in detail.
Gathering the necessary tools and equipment
To begin with, it is crucial to gather all the tools and equipment you will need for the installation. Having the right tools on hand will save you time and frustration. Here is a list of essential tools that you should gather:
| Screwdriver set | Torque wrench |
| Socket set | Trim panel removal tool |
| Wire cutter/stripper | Electrical tape |
| Felt-tip marker | Flashlight |
- Make sure each tool is in good working condition and easily accessible during the installation process.
- Consider using a magnetic tray to keep track of small screws and bolts.
Identifying the location of the blend door actuator
Locating the blend door actuator is essential before beginning the installation process. The blend door actuator is typically located behind the vehicle’s dashboard, near the HVAC system. To identify its exact location:
- Refer to your vehicle’s manual or online resources for specific instructions on locating the blend door actuator for your make and model.
- Use a flashlight to inspect the area behind the dashboard for any visible signs of the actuator.
- Identify any nearby components, such as air ducts or electrical connectors, that may need to be removed for access.

Removing the necessary components for access
Before installing the blend door actuator, it may be necessary to remove certain components to gain access to the actuator. The exact components that need to be removed will vary depending on the vehicle make and model. Here are some general steps to follow:
- Start by disconnecting the vehicle’s battery to ensure safety during the installation process.
- Remove any panels or trim pieces that obstruct access to the blend door actuator. Using a trim panel removal tool can help prevent any damage to the surrounding components.
- Disconnect any electrical connectors or wiring harnesses that are connected to the actuator.
- Carefully remove any screws or bolts securing the actuator in place, using the appropriate tools.
- Once all necessary components have been removed, the blend door actuator should be easily accessible for installation.
By following the steps outlined above, you will be well-prepared to install a blend door actuator efficiently and effectively. As always, make sure to refer to your vehicle’s manual or seek professional assistance if you have any doubts or concerns.
Removing The Old Blend Door Actuator
Removing the old blend door actuator is an essential step when it comes to replacing it with a new one. In this section, we will guide you through the process of removing the old blend door actuator, ensuring that you do it safely and efficiently.
h3. Disconnecting the battery
Before you begin working on removing the old blend door actuator, it’s crucial to disconnect the battery. This step is essential to avoid any potential electrical shocks or damages that may occur during the process. Follow these steps to disconnect the battery:
1. Turn off the vehicle and locate the battery under the hood.
2. Identify the negative terminal marked with a minus (“-“) sign.
3. Use a wrench or a socket set to loosen the nut or bolt holding the negative terminal in place.
4. Once loosened, carefully remove the negative terminal from the battery.
5. To ensure your safety, wrap the negative terminal with electrical tape to avoid accidental contact while working.
h3. Removing electrical connections and screws
After disconnecting the battery, you can proceed with removing the electrical connections and screws that hold the old blend door actuator in place. Follow these steps:
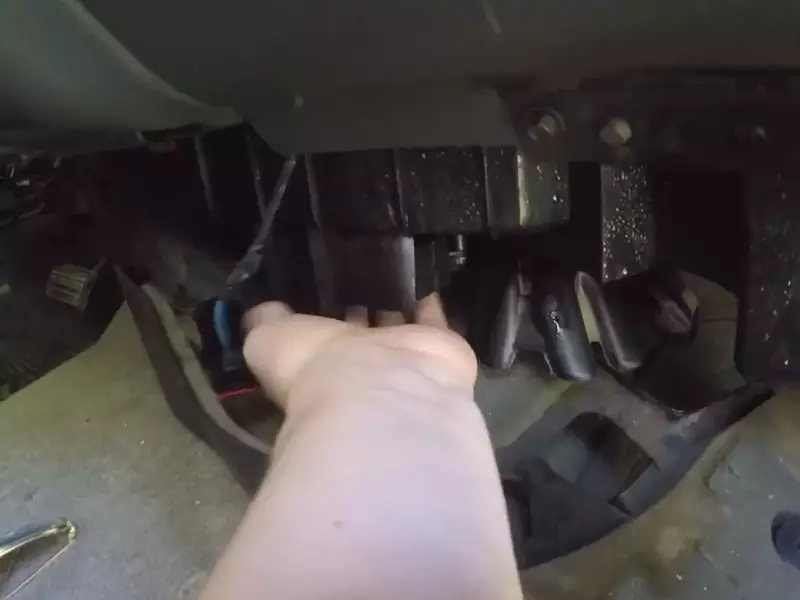
1. Locate the blend door actuator, typically found behind the dashboard or under the glove box.
2. Identify the electrical harness connected to the blend door actuator. Gently unplug the connector by pressing the release tab and pulling it apart.
3. Once the electrical connection is detached, examine the actuator for any screws or bolts securing it.
4. Using the appropriate screwdriver or socket, carefully remove the screws or bolts.
5. Keep track of the screws or bolts and store them in a secure place, ensuring you don’t lose any.
h3. Extracting the old blend door actuator
With the electrical connections and screws removed, you can now focus on extracting the old blend door actuator. It’s crucial to take your time and do this in a controlled manner to prevent any unnecessary damage. Follow these steps:
1. Gently wiggle the old blend door actuator from its position, ensuring that it is free from any obstructions.
2. If the actuator seems stuck, try using a flat-head screwdriver or a trim removal tool to carefully pry it away. Be cautious not to use excessive force, as it may cause damage.
3. Once the actuator is free, carefully disconnect any remaining linkages or rods that may still be attached.
4. Inspect the old actuator for any signs of damage or defects, as this will help you determine the cause of the blend door problem.
By following these steps, you will be able to remove the old blend door actuator smoothly and effectively. Remember to take your time and exercise caution throughout the process. In the next section, we will guide you on installing the new blend door actuator, so stay tuned.
Installing The New Blend Door Actuator
Once you have removed the faulty blend door actuator, it’s time to install the new one. Follow these steps to ensure a smooth and hassle-free installation process.
Positioning the new blend door actuator
Before attaching the new blend door actuator, make sure it is correctly positioned. Align the actuator with the blend door shaft, ensuring it fits snugly into place. Take your time to ensure proper alignment, as this will prevent any issues with functionality down the line.
Reconnecting electrical connections
After positioning the blend door actuator, it’s essential to reconnect the electrical connections. Locate the electrical connector that was disconnected during the removal process and plug it back into the new actuator. Ensure that it is firmly secured in place, as a loose connection can lead to malfunctions.
Securing the new blend door actuator with screws
To ensure the blend door actuator stays in place, it needs to be secured with screws. Using the appropriate screwdriver, carefully insert each screw into the designated holes on the actuator. Tighten each screw until it is snug, but be cautious not to over-tighten, as this can cause damage.
To summarize, installing the new blend door actuator involves positioning it correctly, reconnecting the electrical connections, and securing it with screws. By following these steps, you can ensure a successful installation and restore proper functionality to your HVAC system.
| 1 | Position the new blend door actuator by aligning it with the blend door shaft.
| 2 | Reconnect the electrical connections by plugging in the electrical connector.
| 3 | Secure the blend door actuator with screws, ensuring they are tightened adequately.
Remember, proper installation of the blend door actuator is crucial for efficient HVAC system operation. By following these steps carefully, you can enjoy a comfortable and functional interior climate in your vehicle.
Testing And Fine-Tuning
Reconnecting the battery
Once you have successfully installed the blend door actuator, it’s time to reconnect the battery. This step is crucial as it allows the actuator to communicate with the vehicle’s electrical system and ensures proper functioning. Follow the steps below to safely reconnect the battery:
- Locate the battery within the engine compartment.
- Using the appropriate sized wrench or socket, loosen the bolt on the negative (-) terminal of the battery.
- Once the bolt is sufficiently loosened, remove the negative cable from the battery terminal.
- Repeat the same process for the positive (+) terminal.
- Allow a few minutes for any residual energy to dissipate.
- Reattach the positive cable to the positive terminal and tighten the bolt securely.
- Follow the same procedure for the negative cable, ensuring a tight connection.
Activating the HVAC system
After reconnecting the battery, you can now activate the HVAC system to test the new blend door actuator and fine-tune its performance. Follow the steps outlined below:
- Enter the vehicle and ensure all doors are closed.
- Insert the key into the ignition and turn it to the “on” position without starting the engine.
- Locate the HVAC controls on the dashboard.
- Set the temperature control to a moderate setting, such as 68°F or 20°C.
- Adjust the fan speed to the highest setting.
- Switch the airflow mode to the desired setting, such as “vent,” “floor,” or “defrost.”
- Wait a few moments for the HVAC system to engage and start blowing air.
Testing the functionality of the new blend door actuator
Now it’s time to test the functionality of the newly installed blend door actuator. By following these steps, you can ensure that the actuator is working properly:
- Observe the airflow coming from the vents. It should correspond to the selected airflow mode, such as vents for “vent” mode or defrost for “defrost” mode.
- Change the temperature control setting and verify that the airflow adjusts accordingly.
- Switch between different airflow modes and confirm that the actuator smoothly transitions between them.
- Listen for any unusual noises or grinding sounds, which could indicate a faulty installation or malfunctioning actuator.
- Repeat the testing process multiple times to ensure consistent performance.
By carefully following these testing and fine-tuning steps, you can have confidence in the functionality of your new blend door actuator. Remember to consult your vehicle’s manual or seek professional assistance if you encounter any difficulties during the installation or testing process.

Troubleshooting Common Issues
Installation of a blend door actuator can sometimes present its fair share of challenges. However, with the right approach and troubleshooting tactics, you can overcome these common issues with ease. In this section, we will explore the problems that may arise during installation, provide effective solutions for these issues, and offer additional tips to ensure a successful installation.
Problems that may arise during installation
While installing a blend door actuator can be a straightforward process, there are a few common problems that you may encounter. It is important to be aware of these issues beforehand to avoid any frustrations during the installation. Some of the potential problems include:
- Difficulty accessing the actuator: In certain vehicle models, the blend door actuator may be located in a hard-to-reach area. This can make it challenging to remove and replace the actuator, requiring the use of specialized tools or disassembling certain components of the vehicle.
- Incorrect fitment: Sometimes, the blend door actuator you have purchased may not perfectly match the specifications of your vehicle model. This can cause compatibility issues and hinder proper installation.
- Limited wiring knowledge: Installing a blend door actuator involves dealing with electrical connections and wiring. Lack of familiarity with these components can make the installation process confusing and may result in faulty connections.
- Broken or stripped actuators: Occasionally, during the removal or installation process, the blend door actuator or its components may become damaged or break. This can be frustrating, as it can require you to obtain a replacement or repair the existing actuator.
Solutions for common installation issues
Fortunately, there are effective solutions available for the common issues encountered during the installation of a blend door actuator. To overcome these problems, consider the following steps:
- If accessing the actuator is challenging, refer to the vehicle’s service manual or online resources for guidance on gaining proper access. Utilize specialized tools that can assist in reaching the actuator in tight spaces.
- If the actuator does not fit properly, double-check the compatibility with your vehicle’s make, model, and year. Consider contacting the manufacturer or supplier to obtain the correct blend door actuator.
- If you lack sufficient wiring knowledge, research and study the electrical connections required for the blend door actuator installation. Consult wiring diagrams specific to your vehicle and don’t hesitate to seek advice from professionals or online forums.
- In the event of a broken or stripped actuator, ensure that you have a replacement part readily available before starting the installation. Take care when removing or installing the actuator to prevent any further damage.
Additional tips for a successful installation
Aside from troubleshooting common issues, there are a few additional tips that can contribute to a successful installation of a blend door actuator:
- Thoroughly inspect and clean the blend door area before installing the new actuator. Remove any debris or obstructions that can interfere with its function.
- Use caution when handling the actuator to avoid damaging any delicate components or wires. Gentle and precise handling can prolong the lifespan of the actuator and prevent unnecessary complications.
- Refer to the vehicle’s service manual or online resources for detailed step-by-step instructions tailored to your specific vehicle. Following a comprehensive guide can help ensure a smooth installation process.
- Test the functionality of the newly installed blend door actuator after completing the installation. Check if the air distribution is working correctly and make any necessary adjustments if needed.
By familiarizing yourself with potential problems, implementing effective solutions, and following additional tips, you can confidently tackle the installation of a blend door actuator. Enjoy improved climate control in your vehicle and breathe a sigh of relief knowing that you can troubleshoot any common issues that may arise along the way.
Frequently Asked Questions On How To Install Blend Door Actuator
Where Are The Positions Of The Blend Door Actuator?
The blend door actuator can be found inside the vehicle’s HVAC system. It is located near the heater core or air conditioning evaporator.
How Do You Know If Your Blend Door Actuator Is Bad?
If your blend door actuator is bad, you may notice issues with the temperature control in your vehicle. This can include hot or cold air coming out when you want the opposite, or the air not changing temperature at all.
It’s best to have a professional diagnose the problem.
What Happens If You Don’T Replace Blend Door Actuator?
If you don’t replace the blend door actuator, your HVAC system may not function properly, leading to issues with temperature regulation and air distribution in your vehicle. It’s important to address this problem to ensure optimal performance and comfort while driving.
How Much Does It Cost To Install A Blend Door Actuator?
The cost of installing a blend door actuator varies depending on factors like the make and model of the vehicle. Generally, it can range from $100 to $300 for parts and labor.
Conclusion
To conclude, installing a blend door actuator may seem daunting at first, but with the right steps and tools, it can be a manageable task. By following the instructions provided in this blog post, you can replace the blend door actuator efficiently and restore the proper functioning of your HVAC system.
Remember to always prioritize safety and consult a professional if needed. Happy repairing!