To install a battery terminal, first disconnect the negative cable, followed by the positive cable. Then, remove the old terminal and connect the new one, starting with the positive cable and then the negative cable.
Introducing a new battery terminal to your vehicle can be a straightforward process with the right steps and tools. It is essential to keep your battery terminals in good condition to ensure proper electrical flow and prevent any potential issues.
We will guide you on how to install a battery terminal correctly. By following these steps, you can easily replace your old or damaged terminal and ensure a secure connection for your vehicle’s electrical system. Let’s dive in and get started!
Tools Required
When it comes to installing battery terminals, having the right tools is essential to ensure a proper and secure connection. Below is a list of tools required for the installation process:
Wrench
A wrench is a versatile tool that will come in handy when installing battery terminals. It is used to loosen and tighten the bolts or nuts that secure the terminals in place. Make sure to choose a wrench that fits the size of the bolts on your battery terminals to ensure a snug fit.
Battery terminal cleaner
Keeping your battery terminals clean is crucial for maintaining a good electrical connection. A battery terminal cleaner is a specialized tool designed to remove corrosion and dirt from the surface of the terminals. Look for a cleaner that is safe to use on battery terminals and can effectively remove build-up without damaging the metal.
Battery terminal brush
In addition to a cleaner, a battery terminal brush is another useful tool for maintaining clean terminals. The brush is designed with stiff bristles that can reach into tight areas and remove any stubborn corrosion or debris. It is important to choose a brush that is made specifically for battery terminals to avoid any scratching or damage.
Battery terminal protectant spray
After cleaning and brushing the battery terminals, it is important to protect them from future corrosion. A battery terminal protectant spray forms a protective coating on the terminals, preventing the accumulation of dirt and moisture. Look for a spray that is designed to resist corrosion and is compatible with your battery type.
By having these tools on hand, you will be well-prepared to install battery terminals with ease. Remember to always follow safety precautions and consult your vehicle’s manual for specific instructions.
Precautions To Take
When installing battery terminals, it is crucial to follow certain precautions to ensure safety and prevent damage. By taking these precautions, you can easily carry out the installation without any mishaps.
Disconnect the negative terminal first
Before starting the battery terminal installation process, it is essential to disconnect the negative terminal first. This is a critical step to prevent any electrical short circuits or accidental shocks. To disconnect the negative terminal, locate the black cable attached to the battery and use a wrench to loosen the nut. Once loosened, carefully remove the cable from the terminal.
Remove any metal jewelry
Another important precaution to take before installing battery terminals is to remove any metal jewelry such as rings, bracelets, or watches. This is necessary to prevent the risk of electrical shock or potential damage to the jewelry. It is always better to be safe than sorry. So, remember to take off any metal jewelry before getting started with the installation process.
Ensure the engine is turned off
Before installing battery terminals, it is crucial to ensure that the engine of your vehicle is turned off. This step is essential to prevent any electrical accidents or injuries while working with the battery. Make sure the ignition key is in the off position and all electrical accessories are turned off. This will help create a safe environment for the installation process.
By following these precautions, you can install battery terminals safely and effectively. Remember to disconnect the negative terminal first, remove any metal jewelry, and ensure the engine is turned off. Taking these precautions will not only protect you from potential risks but also ensure a smooth and hassle-free installation process.
Step-By-Step Guide
Installing or replacing your battery terminal is a relatively simple process that can be done at home with just a few tools. In this step-by-step guide, we’ll walk you through the process of installing battery terminals so you can keep your vehicle running smoothly. Let’s get started!
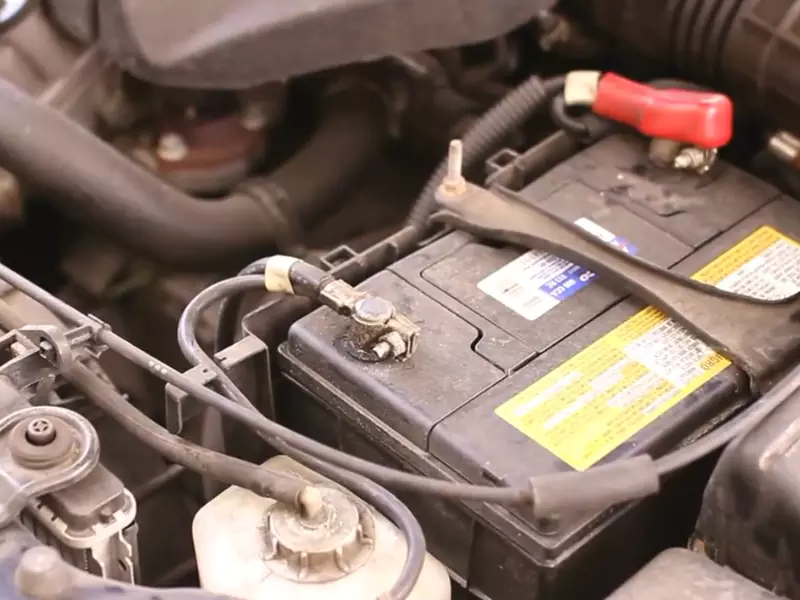
Inspect the battery and terminals for any damage or corrosion
The first step in installing battery terminals is to inspect the battery and terminals for any damage or corrosion. Check for any cracks or leaks in the battery casing, as well as any signs of corrosion on the terminals. If you notice any damage or corrosion, it’s important to address these issues before proceeding.
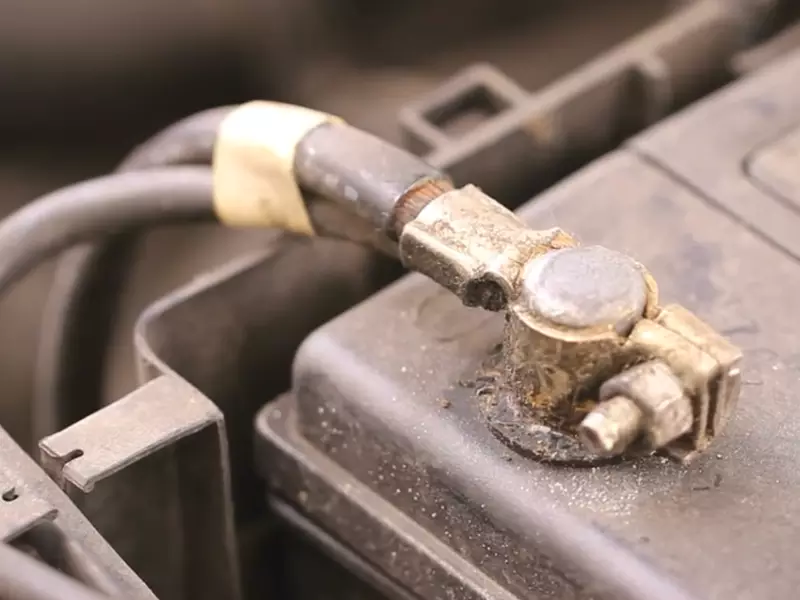
Use the battery terminal cleaner to remove any corrosion on the terminals
Corrosion on the battery terminals can prevent a secure connection and hinder the performance of your vehicle. To remove any corrosion, use a battery terminal cleaner. Apply the cleaner to the terminals and use a wire brush to scrub away any buildup. Wipe off any excess cleaner with a rag.
Loosen the nut on the negative terminal using a wrench
Next, use a wrench to loosen the nut on the negative terminal. Turn the wrench counterclockwise to loosen the nut, but be careful not to completely remove it yet. Loosening the nut will allow you to disconnect the terminal from the battery.
Remove the negative terminal from the battery
Once the nut is loosened, carefully remove the negative terminal from the battery. You may need to wiggle it back and forth slightly to free it from the post. Take care to avoid touching any metal objects with the terminal to prevent accidental sparking.
Repeat the previous two steps for the positive terminal
With the negative terminal disconnected, repeat the previous two steps for the positive terminal. Loosen the nut using a wrench, then remove the positive terminal from the battery.
Clean the battery terminals using a battery terminal brush
With both terminals disconnected, it’s a good idea to clean the battery terminals to ensure a strong connection. Use a battery terminal brush to scrub away any remaining corrosion or debris on the terminals. This will help improve the conductivity between the terminals and the battery.
Apply battery terminal protectant spray to prevent future corrosion
To prevent future corrosion, it’s a good idea to apply a battery terminal protectant spray. This spray creates a barrier between the terminals and the surrounding air, reducing the likelihood of corrosion. Follow the instructions on the spray can to apply the protectant evenly to both terminals.
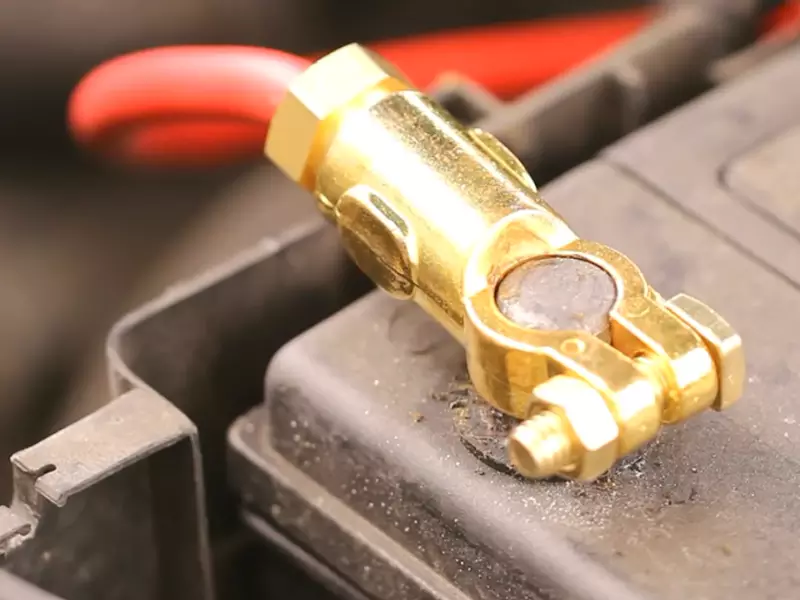
Attach the positive terminal to the battery
Now it’s time to reattach the battery terminals. Begin with the positive terminal. Align the terminal with the battery post and slide it onto the post until it’s snug. Make sure the terminal is securely seated on the post before moving on to the next step.
Tighten the nut on the positive terminal using a wrench
Once the positive terminal is in place, use a wrench to tighten the nut. Turn the wrench clockwise to secure the terminal to the battery. Avoid overtightening, as this can damage the terminal or strip the threads.
Attach the negative terminal to the battery
Finally, attach the negative terminal to the battery post. Align the terminal with the post and slide it onto the post until it’s snug. Again, ensure that the terminal is securely seated before proceeding.
Tighten the nut on the negative terminal using a wrench
The last step is to tighten the nut on the negative terminal using a wrench. Turn the wrench clockwise to secure the terminal to the battery. Like before, be careful not to overtighten.
And that’s it! You’ve successfully installed your battery terminals. Now you can start your vehicle with confidence, knowing that you have a secure and reliable connection. Remember to regularly inspect and clean your battery terminals to prevent corrosion and maintain optimal performance.
Testing The Connection
The final step in installing battery terminals is to test the connection to ensure that everything is working as it should. Testing the connection is vital because even if the terminals are properly installed, there might be underlying issues that need to be addressed. In this section, we will go over how to test the connection and ensure that the battery is functioning correctly.
Turn on the engine and check if the battery is working
After installing the battery terminal, the first thing you should do is turn on the engine to check whether the battery is working properly. Start by turning the ignition key and listening for the engine to start. If the engine starts smoothly without any hiccups, then it’s a good sign that the battery is functioning correctly. However, if you hear a clicking sound or the engine struggles to start, it might indicate that the battery is not providing enough power.
If you suspect that the battery is not working, it’s essential to check the voltage with a multimeter. Attach the positive lead of the multimeter to the positive terminal of the battery and the negative lead to the negative terminal. Ideally, a fully charged battery should have a voltage reading of around 12.6 volts. If the voltage reading is significantly lower than this, it might indicate that the battery needs to be charged or replaced.
Ensure all electrical components are functioning properly
Another important aspect of testing the connection is to ensure that all electrical components in your vehicle are functioning properly. This includes lights, radio, air conditioning, and other accessories. Start by turning on each electrical component one by one and checking if they work as expected. If any of the electrical components are not working or are functioning erratically, it might indicate a problem with the battery connection.
If you notice any issues with the electrical components, start by inspecting the battery terminals. Ensure that they are securely tightened and that there is no corrosion or dirt present. Corrosion and dirt can hinder the flow of electricity and cause connection problems. If you notice any corrosion or dirt, clean the terminals using a mixture of baking soda and water. Use an old toothbrush or a battery terminal cleaner to scrub off any residue, and then rinse with water.
In conclusion, testing the connection is a crucial step in the battery terminal installation process. By turning on the engine and checking if the battery is working, and by ensuring all electrical components are functioning properly, you can ensure that your battery terminals are installed correctly and that your vehicle’s electrical system is in good working order.
Maintenance Tips
Regularly inspecting and maintaining the battery terminals of your vehicle is important for optimal performance and longevity. Corroded or dirty terminals can hinder the flow of electricity, leading to starting issues and other electrical problems. By following these maintenance tips, you can ensure that your battery terminals remain clean and corrosion-free.
Regularly inspect the terminals for corrosion
Corrosion is one of the common issues that can affect battery terminals. It appears as a white, greenish-blue, or brownish coating on the terminals. Regularly inspect the terminals to identify any signs of corrosion. This can be done by visually examining the terminals and looking for any abnormal discoloration or buildup.
Clean the terminals if required
If you notice any corrosion on the battery terminals, it is crucial to clean them promptly. Corrosion can impede the transfer of electricity between the battery and the vehicle, leading to poor performance. To clean the terminals:
- Disconnect the negative terminal first, followed by the positive terminal.
- Mix a solution of baking soda and water in a small container. Apply this solution to the terminals using a brush, ensuring to scrub away any corrosion.
- Rinse the terminals with water and dry them thoroughly using a clean cloth.
- Apply a thin layer of petroleum jelly or dielectric grease to the terminals. This helps prevent future corrosion.
- Reconnect the positive terminal first, followed by the negative terminal.
Apply battery terminal protectant spray as needed
In addition to cleaning the terminals, it is advisable to use a battery terminal protectant spray. This spray is specifically designed to prevent corrosion and prolong the lifespan of the terminals.
To apply the protectant spray:
- Disconnect the negative terminal first, followed by the positive terminal.
- Spray a small amount of the protectant onto a clean cloth and apply it to the terminals, ensuring full coverage.
- Allow the protectant to dry for the recommended time specified by the manufacturer.
- Reconnect the positive terminal first, followed by the negative terminal.
By regularly inspecting, cleaning, and applying a battery terminal protectant spray, you can ensure that your battery terminals stay in optimal condition. This simple maintenance routine can help prevent starting issues and prolong the life of your vehicle’s battery.
Frequently Asked Questions Of How To Install Battery Terminal
Which Battery Terminal Do I Install First?
Install the positive battery terminal first, followed by the negative terminal.
How Do You Attach A Battery Terminal?
To attach a battery terminal, follow these steps:
- Ensure the car engine is off and the negative terminal is disconnected first.
- Position the positive terminal on the battery post and tighten it securely.
- Connect the negative terminal to its post and tighten it as well.
- Double-check the connections to make sure they are secure.
- Reconnect any accessories or devices that were disconnected.
What Order Do You Install Car Battery Terminals?
To install car battery terminals, follow these steps:
- Disconnect the negative terminal (marked with a “-” symbol) first to prevent electrical shocks.
- Remove the positive terminal (marked with a “+” symbol) next.
- Attach the positive terminal first when installing a new battery.
- Securely tighten the positive terminal.
- Finally, connect the negative terminal and ensure it is tightly secured.
Do You Connect Red Or Black First?
Connect the red wire first, followed by the black wire.
Conclusion
To sum it up, installing a battery terminal is a crucial task that requires precision and attention to detail. By following the steps outlined in this guide, you can ensure a seamless installation process and prolong the lifespan of your battery.
Remember to always prioritize safety and consult the manufacturer’s instructions for any specific requirements. Take the time to regularly inspect and maintain your battery terminals to avoid any potential issues down the road. With proper installation, you can enjoy a reliable and efficient electrical system in your vehicle.