To install battery cables, first, make sure your vehicle is turned off. Then, disconnect the negative cable followed by the positive cable, and remove any old cables from the battery terminals.
Install the new positive cable, ensuring it is securely connected to the positive terminal, and then repeat the process for the negative cable. Finally, tighten the cable connections and make sure they are secure. Installing battery cables is a task that every vehicle owner may need to perform at some point.
Whether you are replacing old cables or simply want to ensure a hassle-free driving experience, knowing how to install battery cables is essential. This guide will walk you through the step-by-step process of installing battery cables correctly. By following these instructions, you will be able to accomplish the task efficiently and with peace of mind, knowing that your vehicle’s electrical system is in good working order. So, let’s dive in and learn how to install battery cables in a few simple steps.

Tools And Materials Needed For Battery Cable Installation
When it comes to installing battery cables, having the right tools and materials is crucial for a successful installation. Not only does it ensure a safe and secure connection, but it also helps to prolong the life of your battery and prevent any potential damage. In this section, we will discuss the essential tools and materials you will need for battery cable installation.
Safety gloves
To protect your hands from any potential injury, it is important to wear safety gloves during the battery cable installation process. These gloves provide a barrier between your skin and any sharp edges or corrosive materials that may be present. They also provide a better grip when handling the battery cables and other tools.
Safety goggles
Protecting your eyes is vital when working on any automotive project, including battery cable installation. Safety goggles shield your eyes from any flying debris, sparks, or chemical splashes that may occur during the installation process. It is essential to wear safety goggles to prevent any eye injuries.
Adjustable wrench
An adjustable wrench is a versatile tool that allows you to tighten or loosen nuts and bolts of various sizes. During battery cable installation, you will need an adjustable wrench to secure the battery cables to the battery terminals. Make sure to choose the appropriate size wrench to ensure a proper fit.
Wire cutters
Wire cutters are necessary to cut the battery cables to the desired length. These cutters have sharp blades designed specifically for cutting through cables easily and cleanly. It is important to use wire cutters instead of other cutting tools to prevent any damage to the cables.
Wire strippers
Wire strippers are used to remove the insulation from the ends of the battery cables. This step is necessary to ensure a solid electrical connection between the cables and the battery terminals. Wire strippers have different-sized notches to accommodate different wire gauges, ensuring precise and accurate stripping.
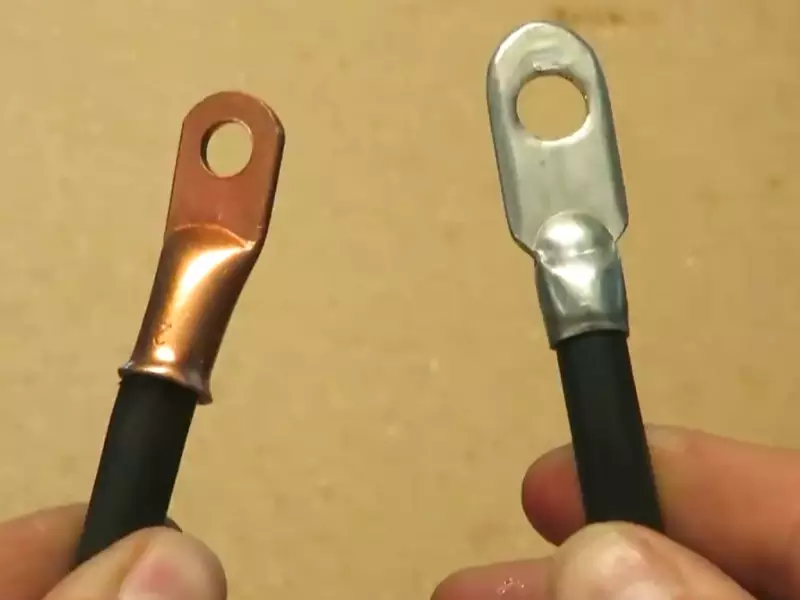
Battery cables (positive and negative)
Of course, you will need battery cables for the installation. It is important to have both positive and negative cables. The positive cable connects to the positive terminal of the battery, while the negative cable connects to the negative terminal. These cables are responsible for transferring electrical current between the battery and the vehicle’s electrical system.
Battery terminal cleaner
Before installing the battery cables, it is essential to clean the battery terminals to remove any corrosion or dirt. A battery terminal cleaner helps to remove these deposits and ensures a clean and solid connection. Look for a cleaner specifically designed for battery terminals to achieve the best results.
Terminal brush
A terminal brush is a handy tool for cleaning the battery terminals. It has a small brush on one end that can reach into tight spaces to remove any remaining corrosion or dirt. This tool helps to ensure a thorough cleaning of the battery terminals, allowing for a better connection with the battery cables.
Preparing For Battery Cable Installation
Before installing new battery cables, it’s crucial to prepare properly to ensure a smooth and successful installation. This involves understanding battery cable polarity, choosing the right cables, checking the battery condition and voltage, as well as disconnecting the negative battery terminal. Let’s dive into each step in more detail.
Understanding battery cable polarity
One of the first things you need to grasp before installing battery cables is understanding their polarity. Battery cables consist of two terminals – positive and negative. The positive terminal is usually marked with a plus sign (+), while the negative terminal is marked with a minus sign (-). It’s important to identify and differentiate these terminals correctly to avoid any confusion or potential damage during the installation process.
Choosing the right battery cables
When selecting battery cables for your vehicle, it’s essential to consider various factors to ensure compatibility and optimal performance. Firstly, you need to determine the correct cable gauge, which is determined by the maximum current required by your vehicle’s electrical system. The cable length should also be considered, as longer cables may require a thicker gauge to avoid voltage drops. Additionally, it’s crucial to choose cables with the right terminal sizes and types that match your battery and vehicle specifications to ensure a secure and reliable connection.
Checking battery condition and voltage
Before proceeding with the cable installation, it’s crucial to assess the condition and voltage of your battery. Start by inspecting the battery for any signs of corrosion, damage, or leakage. If any issues are detected, it’s recommended to address them before installing the new cables. Additionally, using a voltmeter, measure the battery’s voltage to ensure it’s within the acceptable range. This step is crucial as improper voltage levels can affect the performance and lifespan of your battery.
Disconnecting the negative battery terminal
Prior to installing new battery cables, it’s essential to disconnect the negative battery terminal to prevent any accidental electrical discharge or short circuits. Start by locating the negative terminal, which is often labeled with a minus sign (-) or the letters “NEG.” Using a wrench or socket, loosen the clamp that secures the terminal, then carefully remove the cable from the terminal. Be cautious not to touch any metal surfaces or other terminals during this process to avoid any potential shock or damage.
Inspecting existing battery cables
Finally, before installing new battery cables, take a moment to inspect the existing cables for any signs of damage, wear, or corrosion. Check for any frayed or loose ends, corrosion on the terminals, or signs of overheating. If you notice any significant issues, it’s advisable to replace the cables entirely rather than attempting to fix them. Remember, ensuring the integrity of your battery cables is crucial for maintaining a safe and efficient electrical system in your vehicle.
By following these steps and properly preparing for battery cable installation, you’ll be well on your way to enjoying a reliable and efficient electrical system in your vehicle. Next, we’ll move on to the actual installation process, where we’ll discuss the step-by-step instructions for connecting the cables securely and effectively.
Removing Old Battery Cables
Before installing new battery cables, it’s important to remove the old ones properly. This step is crucial to ensure a smooth and successful installation. In this section, we will guide you through each step of the process, from loosening and removing the battery cable clamps to safely disposing of the old cables.
Loosening and removing the battery cable clamps
Start by identifying the negative (-) and positive (+) terminals on your car battery. It’s crucial to disconnect the negative cable first to avoid short-circuiting or damage. Once you’ve located the negative terminal, use a wrench or socket to loosen the clamp securing the cable to the terminal. Make sure not to touch the positive terminal or any other metal components while doing this.
Next, remove the negative cable by pulling it gently away from the terminal. If it’s stuck, you can use a battery terminal puller tool to help separate the cable from the terminal. Once the negative cable is detached, proceed to the positive cable using the same method.
Cleaning battery terminals and clamps
After removing the old cables, it’s crucial to clean the battery terminals and clamps. Over time, corrosion and dirt can accumulate, hindering the flow of electricity. To clean the terminals and clamps, follow these steps:
- Mix a solution of baking soda and water to create a mild cleaning paste.
- Using a wire brush or an old toothbrush, scrub the battery terminals and clamps with the paste to remove any corrosion or dirt buildup.
- Rinse the terminals and clamps with clean water and dry them thoroughly using a clean cloth or paper towel.
By cleaning the terminals and clamps, you can ensure good conductivity and minimize the risk of electrical issues in the future.
Inspecting battery cable condition
With the old cables removed, take a moment to inspect their condition. Look for any signs of damage, such as frayed wires or cracked insulation. Additionally, check the connectors at the end of the cables. If you notice any significant wear or corrosion, it’s best to replace the cables entirely rather than reusing them.
Safely disposing of old battery cables
Properly disposing of old battery cables is essential to protect the environment and ensure safety. Avoid throwing them in regular trash bins, as the chemicals can be harmful to the environment. Instead, you can take them to a local recycling center or contact a battery retailer for guidance on how to dispose of them responsibly.
In conclusion, when removing old battery cables, make sure to follow the right steps. Loosen and remove the battery cable clamps, clean the battery terminals and clamps, inspect the condition of the cables, and safely dispose of them. By following these guidelines, you’ll be one step closer to successfully installing new battery cables for your vehicle.
Installing New Battery Cables
If your car’s battery cables are worn out or damaged, it’s crucial to install new ones to ensure proper electrical connections. In this guide, we’ll walk you through the step-by-step process of installing new battery cables to keep your vehicle running smoothly.
Measuring and cutting the new battery cables
The first step in installing new battery cables is to measure and cut the cables to the appropriate length. Start by determining the distance between the battery and the connection points on the engine or chassis. Use a wire cutter or cable cutter to cut the new cables to match the required length.
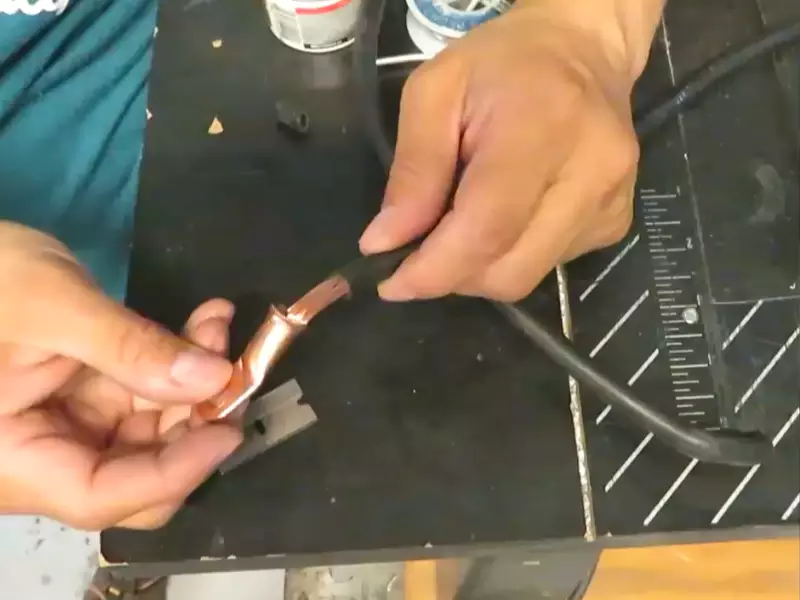
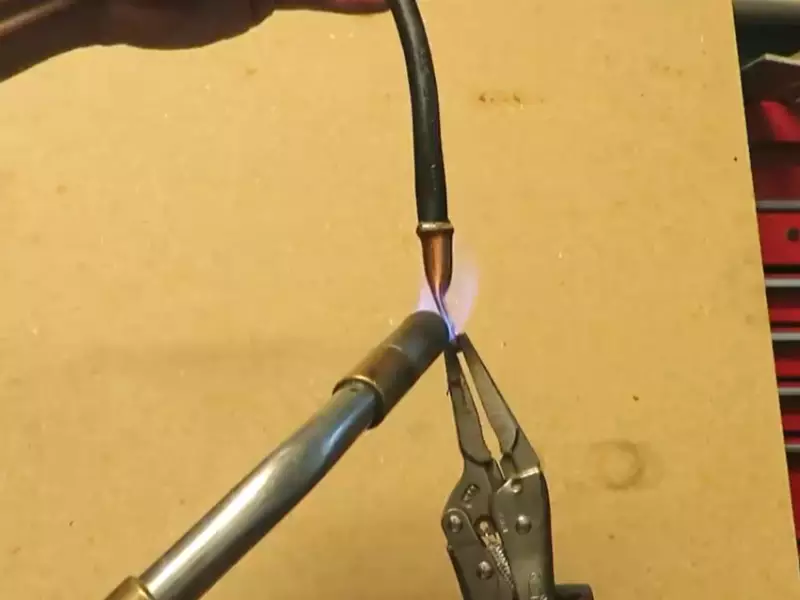
Stripping the insulation from the cable ends
After cutting the new battery cables to the desired length, strip about 1 inch of insulation from each end of the cables. You can use a wire stripper or a sharp utility knife to carefully remove the insulation. Make sure to expose clean, undamaged wire ends for optimal conductivity.
Applying terminal grease to the battery terminals
Before attaching the new battery cables, it is essential to apply a thin layer of terminal grease to the battery terminals. This grease helps prevent corrosion and ensures a secure connection. Apply a small amount of terminal grease to both the positive and negative battery terminals.
Attaching the positive cable to the battery
Now, it’s time to attach the positive battery cable. Identify the positive terminal, which is usually marked with a plus sign (+) or the letters “POS” or “P”. Place the cable’s exposed end over the positive terminal and tighten the retaining nut with a wrench until it is securely fastened.
Attaching the negative cable to the battery
Next, you’ll attach the negative battery cable. Locate the negative terminal, which is often marked with a minus sign (-) or the letters “NEG” or “N”. Position the cable’s exposed end over the negative terminal and tighten the retaining nut using a wrench until it is firmly in place.
Tightening the battery cable clamps securely
Once both the positive and negative cables are connected, it’s important to ensure that the battery cable clamps are tightened securely. Use a wrench to tighten the clamps, but be careful not to over-tighten, as this could damage the battery or cables. Double-check that the connections are snug and secure.
By following these simple steps, you can easily install new battery cables in your vehicle. Remember to exercise caution and follow safety procedures while working with electrical components. Installing new battery cables will help maintain proper electrical connections and ensure your vehicle performs at its best.
Checking Battery Cable Connections
One of the most crucial steps in installing battery cables is checking the connections to ensure a properly functioning electrical system. This involves verifying the proper cable connection to battery terminals, inspecting for any loose or corroded connections, testing battery voltage, and conducting a final visual inspection. By following these steps, you can ensure a reliable and efficient battery installation.
Verifying proper cable connection to battery terminals
Before installing the battery cables, it is important to ensure that they are connected to the correct terminals. The positive cable, typically red in color, should be connected to the positive terminal of the battery, while the negative cable, often black, should be connected to the negative terminal. Confirming the proper cable connection will prevent any potential damage to the electrical system and ensure the battery operates as intended.
Inspecting for any loose or corroded connections
Inspecting the battery cable connections is essential to identify any loose or corroded connections. Loose connections can lead to a poor electrical connection, resulting in starting issues or intermittent electrical problems. Similarly, corrosion on the battery terminals or cable ends can impede the flow of electricity. By checking for any loose or corroded connections, you can address the issue promptly before it affects the battery’s performance or causes electrical malfunctions.
Testing battery voltage and confirming proper installation
Once the cable connections have been verified and inspected, it is crucial to test the battery voltage to ensure a proper installation. This can be done using a multimeter, which measures the voltage output of the battery. Confirming that the battery is providing the correct voltage will help determine if the installation was successful and if the electrical system is functioning optimally.
Conducting a final visual inspection
Conducting a final visual inspection is the last step in checking battery cable connections. This involves visually inspecting the cables for any signs of damage, such as fraying or exposed wires, and ensuring all connections are secure. Additionally, inspecting the battery for any leaks, cracks, or signs of damage is essential. A thorough visual inspection will help ensure a safe and reliable electrical system.
Maintenance Tips For Battery Cables
Proper maintenance of battery cables is essential to ensure the efficient and reliable performance of your vehicle’s electrical system. Neglecting these cables can lead to various issues, including poor starting, weak electrical connections, and even damage to other components. To keep your battery cables in top condition, follow these essential maintenance tips:
Performing regular visual inspections
Regularly inspecting your battery cables can help you identify any signs of damage or wear. Look for any fraying or cracks in the cables, loose or corroded terminals, or any other visible signs of deterioration. If you notice any issues, it’s important to address them promptly to prevent further damage or electrical problems.
Keeping battery terminals clean and free of corrosion
Corrosion can quickly build upon the battery terminals, affecting the connection between the cable and the battery. To keep your terminals clean, a simple mixture of baking soda and water can work wonders. Create a paste-like consistency and use a wire brush or toothbrush to scrub away the corrosion. Rinse with water and dry thoroughly before reconnecting the cables.
Applying terminal grease to prevent corrosion
To provide additional protection against corrosion, it’s recommended to apply terminal grease to the battery terminals after cleaning them. Terminal grease, also known as dielectric grease, creates a protective barrier between the metal surfaces, preventing moisture and corrosion. Apply a small amount to each terminal, ensuring a thorough coating.
Tightening battery cable clamps if necessary
Over time, the cable clamps may become loose due to vibrations and regular use of the vehicle. Loose cable clamps can result in a weak electrical connection, affecting the performance of your vehicle’s electrical system. Inspect the clamps and tighten them if necessary, ensuring a secure and tight connection.
Monitoring battery voltage and performance
Regularly monitoring the battery voltage and performance is crucial to identify any potential issues before they become major problems. Use a digital multimeter to measure the voltage of the battery and compare it with the manufacturer’s specifications.
Additionally, pay attention to any signs of weak starting, dim lights, or other electrical problems that might indicate a battery or cable issue. If you notice any abnormalities, it’s advisable to have your battery and cables tested by a professional.
By following these maintenance tips for battery cables, you can ensure the long-lasting and efficient performance of your vehicle’s electrical system. Regular visual inspections, keeping battery terminals clean, applying terminal grease, tightening cable clamps, and monitoring battery voltage are all essential steps in maintaining your battery cables and preventing any potential electrical problems.
Frequently Asked Questions On How To Install Battery Cables
What Order Do You Put Battery Cables Back On?
To put the battery cables back on, start by connecting the positive cable (red) to the positive terminal (+) of the battery. Then, connect the negative cable (black) to the negative terminal (-) of the battery. Ensure both cables are securely tightened to avoid any potential electrical issues.
How Do You Put On Battery Cables?
To put on battery cables, follow these steps:
- Ensure the engine is off.
- Identify the positive and negative terminals on the battery.
- Connect the red cable to the positive terminal and the black cable to the negative terminal.
- Tighten the clamps securely.
- Start the engine to check if the cables are properly attached.
Which Cable Do You Hook Up First On A Battery?
Connect the positive cable (red) first, followed by the negative cable (black), when hooking up a battery.
Is It Easy To Replace Battery Cables?
Yes, replacing battery cables is relatively easy. It involves disconnecting the old cables, removing them from the battery and the vehicle’s terminals, and then connecting the new cables securely. However, it’s important to follow proper safety precautions and consult the vehicle’s manual for specific instructions.
Conclusion
Installing battery cables is a simple process that anyone can do with the right tools and knowledge. By following the step-by-step instructions outlined in this blog post, you can ensure a secure and efficient connection between your battery and vehicle.
Remember to exercise caution and consult your vehicle’s manual for specific instructions. Regularly checking and maintaining your battery cables will help prolong the life of your battery and prevent any unexpected issues on the road. Happy installing!