To install amps and subs, you will need to connect the power wire, ground wire and RCA cables to the car’s stereo system. Additionally, you will need to mount the amplifier and subwoofer in the appropriate locations within the vehicle, ensuring a secure installation.
If you’re looking to enhance your car’s audio system with more powerful bass, installing amps and subs is a great option. This process involves connecting the necessary wires and mounting the equipment properly. By following a few simple steps, you can enjoy a rich and immersive audio experience in your vehicle.
In this guide, we will walk you through the process of installing amps and subs, so you can take your car’s sound system to the next level.
Enhancing Your Car Audio System
When it comes to upgrading your car audio system, installing amps and subs can make a world of difference. Not only do they provide increased power and volume, but they also enhance the sound quality and bass of your favorite music. In this article, we will explore the benefits of installing amps and subs in your car and how it can completely transform your driving experience.
Better sound quality
One of the main advantages of installing amps and subs in your car is the significant improvement in sound quality. Whether you enjoy listening to music, podcasts, or audiobooks while on the road, having a clear and crisp audio output can completely transform your listening experience.
Installing amps amplifies the audio signal, which allows your speakers to reproduce the sound with greater accuracy and detail. This means you’ll be able to hear each instrument or vocalist with exceptional clarity, making your favorite songs sound even more immersive.
Increased power and volume
If you’re someone who loves to crank up the volume and feel the music in your bones, installing amps and subs is essential. Amps provide the necessary power boost to ensure that your speakers can handle the increased output without distortion.
When paired with a quality subwoofer, amps can deliver a powerful and punchy bass that adds depth and richness to your audio. Whether you’re into bass-heavy tunes or prefer a balanced sound, amps and subs will give you the amplification you need to enjoy your music at higher volumes without sacrificing quality.
Enhanced bass and audio clarity
Amps and subs work hand in hand to enhance the bass and audio clarity of your car audio system. The addition of a subwoofer allows for a richer and more defined bass response, adding a whole new dimension to your listening experience.
The low-frequency sounds produced by the subwoofer resonate throughout your car, creating a more immersive and enjoyable audio environment. With enhanced bass, every beat will be felt, bringing your music to life and making it feel like you’re sitting in the front row of a live concert.
In addition to the boosted bass, amps and subs also contribute to audio clarity. By offloading the lower frequencies to the subwoofer, the main speakers are relieved of the task, allowing them to reproduce mid-range and high-frequency sounds with greater precision and accuracy.
In conclusion, installing amps and subs in your car not only provides better sound quality and increased power and volume but also enhances the bass and audio clarity of your audio system. So, if you want to take your car audio experience to the next level, consider upgrading your system with amps and subs. Trust us, you won’t regret it!
Essential Tools And Materials
When it comes to installing amps and subs in your vehicle, having the right tools and materials is essential. With the proper equipment, you can ensure a successful installation and enjoy high-quality audio performance. In this section, we will discuss the essential tools and materials you need to have on hand for the installation process.
Amps and Subs
The first thing you need to have are the amps and subs themselves. These are the key components that will enhance your audio system and provide powerful bass. Make sure to choose amps and subs that are compatible with your vehicle’s electrical system and audio setup. It’s important to invest in high-quality amps and subs to achieve the best sound quality.

Wiring kit
A wiring kit is a crucial tool to connect your amps and subs to your vehicle’s power source. It typically includes power cables, ground cables, remote turn-on wires, and other necessary components. A wiring kit ensures efficient power transfer and helps eliminate any potential electrical issues.
RCA cables
RCA cables are used to transmit audio signals from your vehicle’s head unit to the amps. These cables are responsible for delivering the sound signals accurately and without interference. When choosing RCA cables, opt for high-quality ones that provide excellent signal transfer.
Speaker wires
Speaker wires are essential for connecting your amps to the subs and speakers in your vehicle. These wires transmit the audio signals from the amps to the speakers, ensuring clear sound reproduction. Use the appropriate gauge of speaker wires for your setup to maintain optimal performance.
Fuse and holder
A fuse and holder are crucial for protecting your amps and subs from power surges and short circuits. The fuse acts as a safety device, cutting off the power flow if necessary and preventing damage to your equipment. Make sure to choose the right fuse rating for your amps and install it in a dedicated fuse holder.
Power distribution block
A power distribution block simplifies the wiring process by providing multiple connection points for your amps and other accessories. It helps distribute power from the battery to your amps, ensuring a clean and organized installation. Look for a power distribution block that matches the power requirements of your amps.
Wire connectors and terminals
Wire connectors and terminals are essential for securely connecting and terminating your wiring. These connectors ensure proper electrical contact and prevent any loose connections that could affect the performance of your amps and subs. Use crimp connectors and terminals that are suitable for your wire gauge and type.
By gathering these essential tools and materials, you’ll be well-prepared for the installation of amps and subs in your vehicle. Make sure to carefully follow the installation instructions provided with your equipment and take your time to ensure a clean and professional installation.
Different Types Of Amplifiers
When it comes to upgrading your car’s audio system, installing amps and subs can make a world of difference. Amplifiers play a crucial role in enhancing the sound quality and power output of your speakers, while subs are responsible for delivering deep and thunderous bass. However, not all amplifiers are created equal. In this post, we will explore the different types of amplifiers available in the market, so you can choose the one that best suits your car audio needs.
Mono Amplifiers
A mono amplifier, also known as a subwoofer amplifier, is specifically designed to power subwoofers. It is a single-channel amplifier dedicated to producing deep and rich bass frequencies. Mono amplifiers are widely used in car audio setups where bass is a priority. These amplifiers are capable of providing the low-frequency power required to make your subwoofers truly shine. They are the perfect choice for those who want their music to make a huge impact and feel the bass in their bones.
2-channel Amplifiers
A 2-channel amplifier is a versatile option that can power two speakers or a pair of subwoofers. This type of amplifier is commonly used in car audio systems where a balance between music amplification and bass enhancement is desired. The two channels can be bridged to create a more powerful output for a single subwoofer. 2-channel amplifiers are a popular choice for those who want a balanced audio experience and have limited space in their car for multiple amplifiers.
4-channel Amplifiers
If you are looking to power a complete car audio system with both speakers and subwoofers, a 4-channel amplifier is the way to go. These amplifiers feature four channels that can power four speakers or two sets of speakers and a subwoofer. They provide a balance between amplifying the music and delivering impactful bass. With a 4-channel amplifier, you can achieve a well-rounded audio setup that brings out the best in both your speakers and subwoofers.
5-channel Amplifiers
For those who want it all, a 5-channel amplifier is the ultimate solution. These amplifiers combine the benefits of a 4-channel amplifier with the power of a mono amplifier. With four channels dedicated to powering your speakers and a fifth channel specifically designed for your subwoofer, a 5-channel amplifier offers the best of both worlds. This type of amplifier is ideal for car audio enthusiasts who crave a high-fidelity sound experience with powerful bass.
In conclusion, when selecting an amplifier for your car audio system, consider your specific needs and preferences. Mono amplifiers are perfect for those seeking powerful bass, while 2-channel amplifiers strike a balance between music amplification and bass enhancement. 4-channel amplifiers are a great choice for a complete audio setup, and 5-channel amplifiers cater to those who want the best of both worlds. Choose an amplifier that suits your car, budget, and desired audio experience, and get ready to enjoy a whole new level of sound quality on your rides.
Choosing The Right Amps And Subs
One of the most crucial steps in installing amps and subs for your car audio system is choosing the right equipment. The ideal combination of amps and subs can greatly enhance your listening experience, bringing deep bass and clear sound to your favorite tracks. In this section, we will discuss three key factors to consider when selecting your amps and subs: matching the wattage, impedance and ohms, and the subwoofer size and enclosure type.
Matching the wattage
Matching the wattage is a vital aspect of building a powerful yet balanced car audio system. Your amps and subs should have compatible power ratings to ensure optimal performance and prevent equipment damage. The wattage refers to the power output of the amplifier and the power handling capacity of the subwoofer. To achieve the best results, the wattage of the amplifier should roughly match or slightly exceed the power handling capacity of the subwoofer.
Impedance and ohms
Understanding impedance and ohms is essential when selecting amps and subs. Impedance refers to the resistance in the electrical circuit and is measured in ohms (Ω). It is crucial to match the impedance ratings between the amplifier and subwoofer to prevent distortion or damage to the equipment. Most amps and subs have impedance options, typically ranging from 2 to 8 ohms. Matching the impedance correctly helps ensure efficient power transfer and optimal sound quality.
Subwoofer size and enclosure type
The size of your subwoofer and the enclosure type also play a significant role in the audio performance. Subwoofers come in various sizes, such as 8, 10, 12, or even 15 inches. The larger the subwoofer, the deeper and more powerful the bass it can produce. Additionally, the type of enclosure, whether it’s sealed, ported, or bandpass, affects the overall sound reproduction. Each enclosure type has its advantages and produces different bass characteristics, so it’s essential to consider your listening preferences when choosing the size and enclosure type of the subwoofer.
By carefully considering these factors and taking into account your personal preferences and vehicle constraints, you can select the amps and subs that are perfect for your car audio system. Remember to always consult the product specifications and seek professional advice if needed to ensure you’re making the right choices.
Wiring Setup
Proper wiring setup is an essential step when installing amps and subs in your car audio system. It ensures a clean and efficient power delivery, allowing you to enjoy the best sound quality possible. In this section, we will guide you through the process of planning the installation, connecting power and ground wires, installing the inline fuse, wiring the RCA cables, and connecting the speaker wires.
Planning the installation
Before you start wiring the amps and subs, it’s important to plan out the installation to ensure a smooth process. Here are some key considerations:
- Choose the ideal location for your amplifiers and subwoofers, keeping in mind factors such as available space, accessibility, and airflow to prevent overheating.
- Map out the route for your power and RCA cables, avoiding any potential interference with other wires or components in your car.
- Determine the appropriate gauge of the power and ground wires based on the power requirements of your amps. Thicker gauges (lower numbers) are generally recommended for high-powered systems to minimize voltage drops.
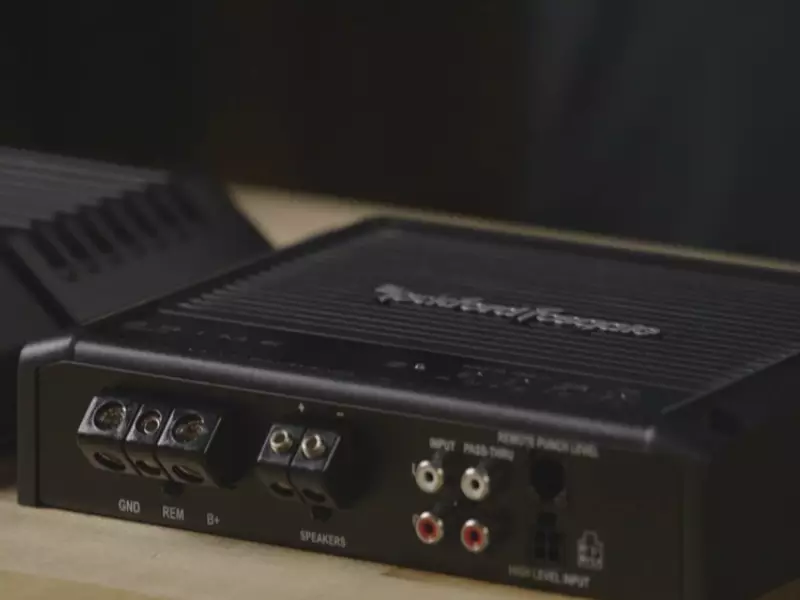
Connecting power and ground wires
The power and ground wires are the backbone of your car audio system, providing the necessary electrical current to your amps and subs. Follow these steps to connect them:
- Identify a suitable location to connect the power wire to the positive terminal of your car’s battery. Ensure to include a fuse holder within 18 inches of the battery connection.
- Route the power wire through the firewall and into the car’s interior. Use rubber grommets or existing wiring channels to protect the wire from any sharp edges.
- Connect the power wire to the positive terminal of each amplifier using appropriate connectors, such as ring terminals. Make sure all connections are secure and well insulated.
- Connect the ground wire from each amplifier to a clean, bare-metal surface on the vehicle’s chassis. It’s important to remove any paint or corrosion for a proper ground connection.
Installing the inline fuse
An inline fuse is crucial for protecting your amps and subs from electrical faults. Here’s how to install it:
- Locate a suitable position near the battery to install the inline fuse holder. This should be easily accessible for future maintenance.
- Cut the power wire to the appropriate length, leaving enough slack for any necessary adjustments or repairs.
- Insert one end of the power wire into the input terminal of the inline fuse holder and secure it tightly. Then, connect the other end of the power wire to the output terminal of the inline fuse holder.
- Finally, attach the fuse to the fuse holder, ensuring it matches the amperage rating recommended by your equipment’s manufacturer.
Wiring the RCA cables
The RCA cables are responsible for transmitting the audio signal from your head unit to the amplifiers. Follow these steps to wire them correctly:
- Locate the RCA outputs on your head unit and the RCA inputs on your amplifiers.
- Connect one end of each RCA cable to the corresponding output on your head unit, ensuring a secure connection.
- Route the RCA cables away from any power or speaker wires to prevent interference or noise.
- Connect the other end of each RCA cable to the corresponding input on your amplifiers, again ensuring a secure connection.
Connecting speaker wires
The final step is connecting the speaker wires, which deliver the audio signal from the amplifiers to the subwoofers and speakers. Here’s how:
- Strip a small portion of insulation from the end of each speaker wire.
- Connect the positive terminal of each amplifier to the corresponding positive terminal of the speaker or subwoofer.
- Similarly, connect the negative terminal of each amplifier to the corresponding negative terminal of the speaker or subwoofer.
- Ensure that all connections are tight and secure to prevent any signal loss or electrical issues.
By following the proper wiring setup, you can optimize the performance of your amps and subs, resulting in a remarkable car audio experience. Take the time to plan your installation, connect the power and ground wires securely, install an inline fuse, wire the RCA cables correctly, and connect the speaker wires with care. Now that you have completed the wiring setup, it’s time to fine-tune your audio system and enjoy the thumping bass and crisp sound.
Mounting And Placement
When it comes to installing amps and subs in your car, proper mounting and placement are crucial. Choosing the right location, securing the amp and sub, and protecting them from moisture and vibrations are all essential steps in creating a high-quality audio system. In this section, we will discuss each of these aspects in detail.
Choosing the Right Location
Before you start the installation process, it’s important to carefully select the location for your amp and sub. Consider the following factors:
- Accessibility: Choose a location that allows for easy access and adjustment of the amp and sub settings. This will make it easier for you to fine-tune your audio system later on.
- Adequate ventilation: Ensure that the chosen location provides sufficient ventilation for the amp and sub to prevent overheating. Avoid placing them in enclosed spaces without proper airflow.
- Space availability: Make sure that there is enough space in the chosen location to accommodate both the amp and sub comfortably.
Securing the Amp and Sub
Once you have selected the ideal location, it is crucial to secure the amp and sub properly. This will prevent them from shifting or moving while you’re driving, reducing the risk of damage. Follow these steps to secure them effectively:
- Mounting brackets: Use mounting brackets that are specifically designed for your amp and sub models. These brackets will provide a secure and stable base for the components.
- Secure wiring: Use zip ties or wire clips to secure the wiring to the vehicle’s frame or existing wiring harnesses. This will prevent the wires from getting tangled or interfering with other components.
- Double-check connections: Before finalizing the installation, ensure that all connections are properly tightened and secure. Loose connections can lead to poor audio quality or even damage to the components.
Protecting from Moisture and Vibrations
To ensure the longevity and optimal performance of your amp and sub, it’s essential to protect them from moisture and vibrations. Moisture can lead to corrosion, while vibrations can cause damage to sensitive components. Consider these tips:
| Moisture Protection | Vibration Protection |
|---|---|
|
|
By carefully choosing the location, securing the amp and sub, and protecting them from moisture and vibrations, you can ensure both a safe and optimal audio experience in your car. With these essential steps in mind, you’re now ready to move on to the next phase of your amp and sub installation journey.
Testing And Troubleshooting
Verifying power and ground connections
Before proceeding with the testing and troubleshooting of your amp and subwoofers installation, it is crucial to verify that the power and ground connections are properly established. Incorrect or loose connections can lead to various issues, including poor audio quality, system shutdowns, or even electrical hazards.
Begin by inspecting the power and ground wires for any damage or signs of wear. Ensure that they are securely connected to the respective terminals on the amplifier and properly grounded to a suitable location on the vehicle’s body. Tighten any loose connections using a wrench or screwdriver, if necessary.
Next, check the fuse that protects the power wire connected to the amplifier. Make sure it is the correct amperage and securely seated in its holder. A blown fuse can disrupt the power supply and cause the system to malfunction. Replace it if needed.
Once the power and ground connections are verified and secure, move on to the next step of testing and troubleshooting: adjusting gain and crossover settings.
Adjusting gain and crossover settings
The gain and crossover settings on your amplifier play a crucial role in ensuring optimal audio performance. These settings allow you to customize and fine-tune the sound output according to your preferences and the capabilities of your subwoofers.
Start by setting the gain control to the minimum or zero position. This prevents any potential distortion or clipping during the initial setup. Gradually increase the gain while playing music or test tones until you achieve the desired volume level without any audible distortion or clipping.
Next, adjust the crossover settings to ensure a seamless blend between the subwoofers and the other speakers in your audio system. The crossover frequency determines the range of frequencies that will be sent to the subwoofers. Experiment with different crossover points to find the sweet spot that delivers a balanced and well-integrated sound.
Remember to refer to the user manual of your amplifier for specific instructions on how to adjust the gain and crossover settings, as they may vary depending on the model and manufacturer.
Checking for distortion and noise
Once you’ve verified the power and ground connections and properly adjusted the gain and crossover settings, it’s time to test for distortion and noise. These can indicate underlying issues that may affect the overall audio quality.
Play some music or test tones through your audio system and carefully listen for any distortion, such as harsh or crackling sounds. If you detect distortion, try reducing the gain or adjusting the crossover settings to find a more suitable balance.
In addition to distortion, be attentive to any unwanted noise, such as hissing or buzzing. This noise can be indicative of poor grounding or interference from other electrical components. Check all connections and ground wires to ensure they are secure and properly installed.
It’s essential to troubleshoot and address any distortion or noise issues promptly to maintain the integrity of your audio system. Unresolved issues can not only impair the listening experience but may also cause damage to the amplifier or subwoofers over time.
By adhering to these testing and troubleshooting steps, you can confidently ensure that your amps and subs installation is optimized for exceptional audio performance.
Preparing For Installation
Before you start installing amps and subs in your car, it’s important to make sure you are fully prepared for the task at hand. This means gathering all the necessary tools and materials, as well as reviewing your car’s electrical system to ensure it can handle the extra power. Let’s break down each step to help you get started.
Gathering all the necessary tools and materials
To successfully install amps and subs in your car, you will need to gather a few essential tools and materials. Having everything ready beforehand will make the installation process much smoother. Here are the items you will need:
| Tools | Materials |
|---|---|
|
|
Reviewing the car’s electrical system
Before proceeding with the installation, it is crucial to assess your car’s electrical system to ensure it can handle the additional power required by the amps and subs. This step will help you avoid electrical issues and potentially damaging your vehicle. Here’s what you should do:
- Check the car’s battery to make sure it is in good condition and has enough capacity to handle the additional power load.
- Inspect the alternator to ensure it is capable of generating sufficient power to recharge the battery and power the amps.
- Review the car’s fuse box, making sure it has available slots to accommodate the new fuses required for the amps and subs.
- Examine the wiring in your car, looking for any signs of damage or wear. Replace any faulty wiring to avoid potential issues.
By thoroughly reviewing your car’s electrical system, you can identify any potential issues beforehand and address them accordingly. This will help ensure a safe and successful installation of your amps and subs.
Installing The Amplifier
Installing the amplifier is a crucial step in upgrading your car’s audio system. Proper installation ensures optimal performance and prevents any damage to the equipment. In this section, we will guide you through each step of installing the amplifier by covering topics such as mounting the amp, connecting the power and ground wires, installing the inline fuse, wiring the RCA cables and speaker wires, and adjusting the gain and crossover settings.
Mounting the amp
The first step in installing your amplifier is to mount it securely in your car. Choose a location that is well-ventilated and away from any heat sources. This will prevent overheating and ensure the amplifier operates efficiently. Use screws and brackets to fix the amp in place, ensuring it is stable and won’t vibrate while driving.
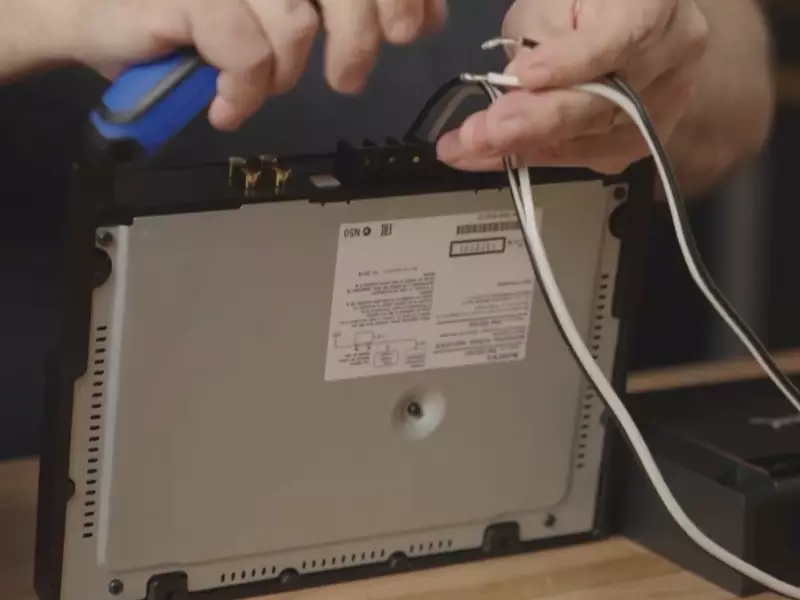
Connecting the power and ground wires
Next, you need to connect the power and ground wires to your amplifier. Before beginning, ensure the car’s power is turned off to prevent any electrical accidents. Connect the power wire to the positive terminal of the car battery and the ground wire to a sturdy metal surface in the vehicle’s chassis. Make sure the wires are properly secured and that there are no exposed connections.
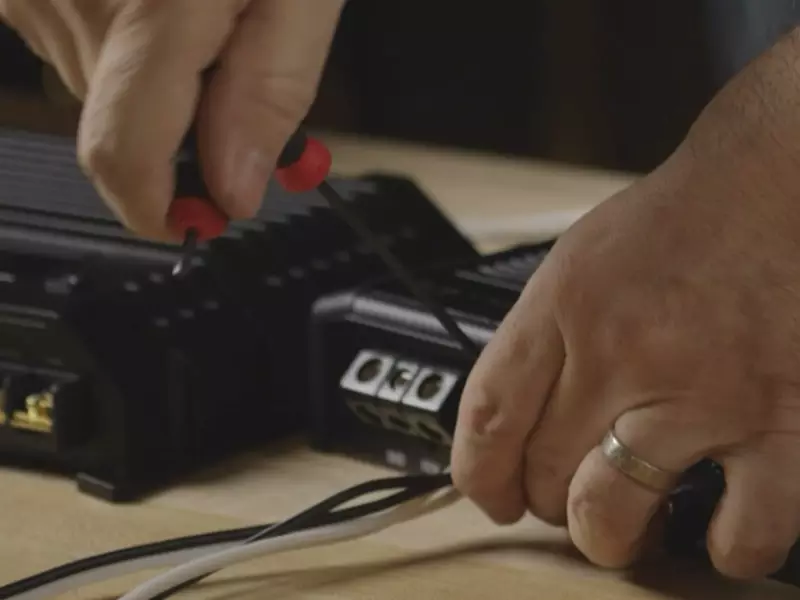
Installing the inline fuse
An inline fuse is an essential safety feature when installing an amplifier. It helps protect both the amplifier and your car’s electrical system from any potential damage caused by a power surge or short circuit. Install the inline fuse close to the battery, between the positive terminal and the amplifier’s power wire. This will ensure the fuse can quickly interrupt the flow of current in case of an electrical issue.
Wiring the RCA cables and speaker wires
Now it’s time to connect the audio signals between your head unit and amplifier. Use RCA cables to carry the audio signals from the head unit to the amplifier. Connect the RCA cables to the appropriate inputs on the amplifier, ensuring a tight connection. For the speaker wires, connect them to the amplifier’s speaker output terminals, making sure to connect the positive and negative terminals correctly for each speaker.
Adjusting the gain and crossover settings
Finally, after the connections are made, you will need to adjust the gain and crossover settings on the amplifier. The gain control determines the level of amplification for the audio signals, while the crossover settings allow you to tailor the sound frequencies that are sent to your speakers. Start with conservative settings and fine-tune them gradually until you achieve the desired audio quality.
By following these step-by-step instructions, you will be able to successfully install your amplifier and enjoy enhanced audio performance in your car. It’s essential to take your time and ensure each connection is secure and proper settings are applied. Let’s move on to the next section of the installation guide where we will focus on installing the subwoofer for a complete audio system upgrade.
Installing The Subwoofers
Choosing the right subwoofer size and enclosure type
When it comes to installing subwoofers in your car audio system, it’s essential to choose the right subwoofer size and enclosure type. The size of the subwoofer greatly affects the bass output and overall sound quality. Additionally, the enclosure type plays a crucial role in determining the subwoofer’s performance, efficiency, and the type of sound it produces.
When selecting the subwoofer size, consider factors such as available space in your vehicle, desired bass level, and the type of music you typically listen to. Larger subwoofers, such as 12-inch or 15-inch ones, are generally recommended for those who enjoy deep, booming bass. On the other hand, smaller subwoofers, like 8-inch or 10-inch ones, are ideal for those seeking a more balanced and controlled bass response.
Next, consider the enclosure type for your subwoofers. The two common types are sealed enclosures and ported enclosures. Sealed enclosures provide precise and accurate bass reproduction, making them suitable for various music genres. They require less space and are easier to install compared to ported enclosures. On the other hand, ported enclosures are known for their louder and more impactful bass output. They require additional tuning and maintenance but can enhance the overall listening experience.
Mounting the subs
Once you have selected the appropriate subwoofers and enclosures, the next step is mounting them in your vehicle. Start by finding a suitable location for the subwoofers, considering factors such as available space, visibility, and accessibility for wiring.
It is crucial to ensure that the subs are securely mounted to prevent any vibrations or damage while driving. Some popular mounting options include placing the subs in the trunk, under the seats, or custom-built enclosures in the rear cargo area. Remember to check for compatibility with your vehicle’s layout and dimensions before finalizing the mounting location.
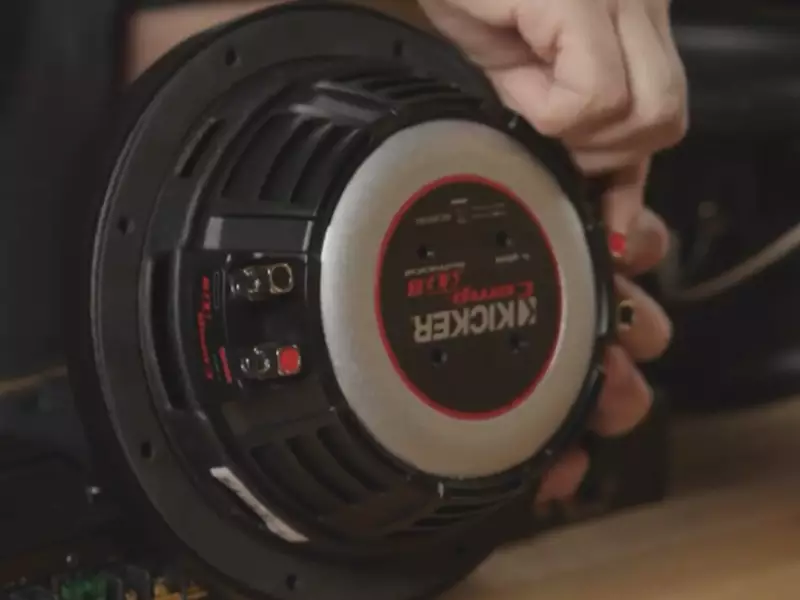
Wiring the subs to the amplifier
Proper wiring is essential for an optimal subwoofer performance. Start by connecting the subwoofers to the amplifier using appropriate speaker wires. Make sure to match the positive and negative terminals correctly to avoid any phase cancellation issues.
For multiple subwoofers, consider using parallel or series wiring configurations based on your amplifier’s capabilities and the desired impedance load. Parallel wiring allows for a lower overall impedance load, resulting in more power output from the amplifier. On the other hand, series wiring increases the impedance load, providing a more balanced and controlled bass response.
Testing for proper functioning
After completing the wiring process, it’s vital to test the subwoofers for proper functioning. Ensure that all connections are secure, and there are no loose wires or electrical shorts. Power up your audio system and play some bass-heavy music to evaluate the subwoofers’ performance.
Listen for any abnormal noises, rattling, or distortion. Adjust the amplifier gain and bass settings as necessary to achieve the desired sound quality. A well-installed and properly functioning subwoofer system should enhance the overall audio experience, providing a deep and immersive bass response.
In conclusion, installing subwoofers involves choosing the right subwoofer size and enclosure type, mounting the subs securely, wiring them to the amplifier correctly, and testing for proper functioning. By following these steps, you can enjoy a powerful and balanced bass output that complements your car audio system. So, get ready to feel the thump and take your music listening experience to the next level with a well-installed subwoofer system.
Positioning And Adjusting The Subwoofers
When it comes to achieving the best sound quality in your car audio system, one of the most crucial factors is the positioning and adjustment of the subwoofers. Subwoofers are designed to reproduce low-frequency sounds, adding depth and richness to your music. To optimize their performance, it’s essential to find the ideal placement for the subs and fine-tune their settings. In this section, we will discuss how to find the perfect spot for your subwoofers and adjust the crossover and phase settings to ensure an immersive audio experience.
Finding the ideal placement for the subs
Placement plays a significant role in the overall performance of your subwoofers. It’s important to consider the following factors when determining the ideal spot:
- Car interior: Before installing your subs, examine the interior of your car. Look for available space where the subs can fit without obstructing your comfort or safety features.
- Avoiding rattling: Subwoofers generate powerful vibrations that can potentially cause rattling in your vehicle. To minimize this, consider placing the subs on a solid surface or using sound-deadening materials in the surrounding areas.
- Enclosure type: The type of enclosure you choose will also impact the positioning of the subs. If you opt for a sealed enclosure, you have more flexibility in placement options compared to a ported or bandpass enclosure, which may require specific positioning guidelines.
- Listener position: Take into account the primary listening position in your car. While the bass is omnidirectional, placing the subs closer to the listener can enhance the overall bass experience.
Once you have considered these factors, experiment by placing the subs in different locations to find the sweet spot where they deliver the best bass response and blend seamlessly with the rest of your audio system.
Adjusting the crossover and phase settings
In addition to finding the right placement for your subs, adjusting the crossover and phase settings is vital for achieving a balanced and harmonious sound. These settings dictate how the subwoofers interact with your main speakers. Here’s how to fine-tune them:
- Crossover adjustment: The crossover is responsible for defining the frequency range that is sent to the subwoofers. It prevents unwanted frequencies from reaching the subs and distorting the sound. Begin by setting the crossover frequency to a point where the subs and main speakers work together seamlessly. Test and adjust the crossover frequency until you achieve a smooth transition between the subs and the rest of the audio system.
- Phase adjustment: Phase issues can occur when the sound waves produced by the subwoofers and the main speakers are out of sync. To avoid this, use the phase adjustment feature found on most subwoofer amplifiers. Start with the phase set to 0 degrees and gradually adjust it while listening to a bass-heavy track. Find the setting that provides the tightest and most impactful bass response.
By meticulously positioning your subwoofers and tweaking the crossover and phase settings, you can create a truly immersive and exhilarating audio experience in your car. Remember to take your time during the installation process and make gradual adjustments until you achieve the desired sound. With the right placement and adjustments, your subs will deliver deep, thunderous bass that will take your car audio system to the next level.
Fine-Tuning The Eq Settings
One of the most important steps in installing amps and subs is fine-tuning the EQ settings to achieve the best possible sound quality in your car audio system. The EQ settings give you control over the bass, midrange, and treble, allowing you to customize your listening experience and enhance the overall audio performance. In this section, we will explore how to balance these three components and effectively use sound enhancement features to optimize your car’s audio system.
Balancing the bass, midrange, and treble
When it comes to the EQ settings, achieving a balanced sound is crucial. Start by adjusting the bass, midrange, and treble levels to create a harmonious blend of frequencies. To do this, follow these simple steps:
- Begin by playing a song or audio track that covers a wide range of frequencies.
- Gradually increase the bass level until it’s at a point where you can feel the impact without overpowering the rest of the audio.
- Next, focus on the midrange frequencies, which are responsible for the vocals and instruments. Adjust the midrange level to bring out the clarity and presence without overshadowing the bass or treble.
- Finally, fine-tune the treble to add the sparkle and brilliance to the sound while ensuring it’s not overly harsh or piercing.
By carefully balancing the bass, midrange, and treble, you can achieve a rich and immersive listening experience that enhances the overall quality of your car audio system.
Using sound enhancement features
In addition to the basic EQ settings, most car audio systems come with built-in sound enhancement features that can further optimize your sound. These features allow you to fine-tune specific aspects of your audio, such as:
- Soundstage: Adjusting the soundstage allows you to create a sense of depth and space in your audio. Enhance the width and height of the soundstage to simulate a concert-like experience.
- Bass boost: If you crave more low-frequency impact, activate the bass boost feature. However, exercise caution to prevent distortion and overpowering the rest of the sound spectrum.
- Surround sound: Many car audio systems offer surround sound settings to create a more immersive listening environment. Experiment with different surround sound modes to find the one that suits your preferences.
Each car audio system may have different sound enhancement features, so refer to your user manual for specific instructions on how to access and adjust these settings.
By understanding and utilizing these sound enhancement features effectively, you can take your car audio experience to the next level, immersing yourself in a world of captivating sound.
Frequently Asked Questions Of How To Install Amps And Subs
How Do I Add An Amp To My Factory Stereo?
To add an amp to your factory stereo, first, identify the appropriate amp type for your stereo. Then, disconnect your car’s battery, find a suitable location for the amp, and connect it to the stereo using a wiring harness or RCA cables.
Finally, reconnect the battery and test the amp.
What Wiring Do You Need For Subs And Amp?
To connect subs and an amp, you’ll need power and ground wires, as well as RCA cables for audio signals. Use speaker wire to connect the subs to the amp. Make sure to match the wire gauge to the power requirements of your setup.
Can You Hook Up An Amp And Subs To A Stock Stereo?
Yes, you can hook up an amp and subs to a stock stereo. Simply connect the amp using RCA cables, and then connect the subs to the amp. Enjoy enhanced sound quality and bass!
How Do You Hook Up A Sub To An Amp?
To hook up a sub to an amp, connect the subwoofer’s audio input to the amp’s “Sub Out” or “LFE” output. Use an RCA cable for the connection, making sure it’s securely plugged in. Adjust the subwoofer’s settings and the amp’s bass level to complete the setup.
Conclusion
In a nutshell, installing amps and subs in your vehicle can be a game-changer for your audio system. With the right tools and steps outlined in this guide, you can easily enhance your music experience on the go. From connecting the wires to tuning the system, every detail matters to ensure optimal performance.
So, don’t wait any longer! Get ready to take your car audio to the next level with amps and subs. Happy installation!