To install an amp to a stock stereo, you will need to connect the amp’s power and ground wires, as well as the RCA cables, to the stock stereo unit. Additionally, you must ensure that the stock stereo unit has an output for connecting the RCA cables.
This process will allow you to enhance your audio system by adding an amplifier. To install an amp to a stock stereo, follow these simple steps.
Understanding The Stock Stereo Setup
When it comes to upgrading your car’s audio system, understanding the stock stereo setup is crucial. Whether you want to install an amp, new speakers, or a subwoofer, knowing how your car’s stock stereo system is set up will help you make the necessary modifications effectively. In this article, we will dive into the key components of a stock stereo system, and its limitations, and provide an overview of the setup.
Overview of a stock car stereo system
A stock car stereo system is an audio system that comes pre-installed by the manufacturer in your vehicle. It is designed to provide basic audio functionality and entertainment while you drive. Stock stereo systems vary in complexity and features depending on the make and model of your car. While some may come equipped with Bluetooth connectivity, touchscreen displays, and advanced equalizers, others may have a more simplistic design with standard radio and CD player functionality.
Understanding the overall setup of a stock car stereo system is essential before considering any modifications. Let’s take a closer look at the key components typically found in a stock stereo system.
Key components of a stock stereo system
A stock stereo system typically consists of the following key components:
- Head Unit: The head unit, also known as the head or deck, is the central control unit of the car audio system. It usually includes the radio tuner, CD player, and in some cases, auxiliary inputs for external devices.
- Amplifier: The amplifier, often integrated into the head unit, handles the task of amplifying the audio signals to power the speakers.
- Speakers: Stock car stereo systems come equipped with standard speakers that are strategically placed throughout the vehicle to provide audio output.
- Wiring: The wiring connects all the components of the stock stereo system, ensuring the flow of audio signals between them.
These components work together to deliver sound to your ears while you’re on the road. Understanding their roles will help you identify the areas you may need to upgrade or modify.
The limitations of a stock stereo system
Despite their convenience, stock stereo systems have their limitations. The most common limitations include:
- Limited power output: Stock stereo systems are designed to deliver audio at moderate volume levels, which may not be sufficient for those seeking a more immersive audio experience.
- Lack of customization: Stock systems often have limited equalizer settings and sound customization options, preventing users from fine-tuning the audio to their preferences.
- Poor sound quality: Due to cost constraints, stock speakers may not provide the best sound quality, resulting in distorted or underwhelming audio.
Fortunately, these limitations can be overcome by installing an amp to your stock stereo system. The addition of an amplifier not only boosts the power output but also allows for greater control over the sound quality and customization.
In conclusion, understanding the stock stereo setup is crucial when considering any modifications to your car’s audio system. It gives you insight into the components involved, their functions, and the limitations of the stock system. Armed with this knowledge, you can make informed decisions about whether to install an amp or upgrade other components to enhance your in-car audio experience.
Preparing For The Amp Installation
Before starting the amp installation process, it’s essential to take a few important steps to ensure a successful and hassle-free installation. This section will guide you through assessing your car’s compatibility with an aftermarket amp, choosing the right amp for your stock stereo, and gathering the necessary tools and materials.
Assessing your car’s compatibility with an aftermarket amp
In order to determine whether your car is compatible with an aftermarket amp, there are a few factors to consider. Firstly, you need to check if your car’s stock stereo has a preamp output. The preamp output is crucial for connecting the amp to your existing stereo system. Most modern stock stereos come with this feature, but it’s essential to verify before proceeding.
Similarly, you need to ensure that there is enough space in your car to install the amp without any interference or hindrance to other components. Taking these compatibility factors into account will help avoid any compatibility issues during the installation process.
Choosing the right amp for your stock stereo
Choosing the right amp for your stock stereo is an important step to ensure optimal sound quality and compatibility. There are a few considerations to keep in mind when selecting an amp. The power output of the amp should match the power handling capabilities of your car’s speakers. This ensures that the amp has enough power to drive the speakers without causing any distortions or damage.
Additionally, it’s important to choose an amp that is compatible with the voltage level of your car’s electrical system. This will prevent any electrical damage and ensure smooth operation. Properly researching and selecting the right amp will greatly enhance your overall audio experience.
Gathering the necessary tools and materials
Prior to starting the installation, make sure you have all the required tools and materials. This will help avoid any unnecessary interruptions during the installation process. Some essential tools and materials include:
- Wire cutters and strippers
- Screwdrivers
- Electrical tape
- Wire connectors or soldering equipment
- RCA cables
- Power and ground wires
- Fuse holder and fuses
Having these tools readily available will ensure a smoother and more efficient installation process.
Wiring The Amp To The Stock Stereo
Installing an amp to your stock stereo is an excellent way to enhance the audio quality in your car without having to replace the entire system. However, wiring the amp to the stock stereo can be a bit tricky if you are unfamiliar with car audio installations.
In this guide, we will walk you through the process of identifying the amp installation locations in your car, locating the necessary wires for the amp installation, and connecting the amp to the stock stereo using a line output converter (LOC).
Identifying the Amp Installation Locations in Your Car
The first step in wiring the amp to your stock stereo is to identify the amp installation locations in your car. Different vehicles have different locations where the factory amplifier is installed. In some cars, the amp might be located under the front seats, while in others, it could be in the trunk or behind the dashboard.
To locate the amp installation location in your car, consult the vehicle’s user manual or do an online search specific to your make and model. Once you have identified the location, make sure to remove any panels or components blocking access to the amp. This will allow you to easily connect the wiring harness and ensure a clean installation.
Locating the Necessary Wires for the Amp Installation
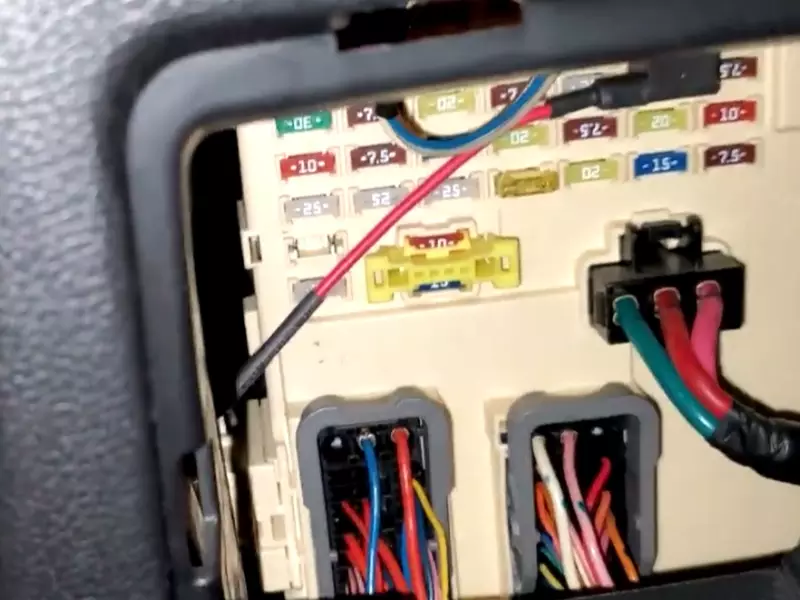
After identifying the amp installation location, the next step is to locate the necessary wires for the amp installation. Your vehicle’s wiring diagram will be your best friend in this process. It will help you identify the speaker wires that need to be tapped into for connecting the amp.
To access the wiring diagram for your specific car, you can either obtain a physical copy from the manufacturer or search for it online. Once you have the wiring diagram, locate the speaker wires for the front and rear speakers. These wires will serve as the input for your amp.
Connecting the Amp to the Stock Stereo Using a Line Output Converter (LOC)
Now that you have identified the amp installation location and located the necessary wires, it’s time to connect the amp to the stock stereo using a line output converter (LOC). A line output converter allows you to tap into the speaker wires and convert the high-level signal to a low-level signal that the amp can process.
Here’s a step-by-step guide on connecting the amp to the stock stereo using a line output converter:
- Remove the stock stereo from the dashboard and locate the speaker wires.
- Cut the speaker wires and connect them to the line output converter according to the converter’s instructions.
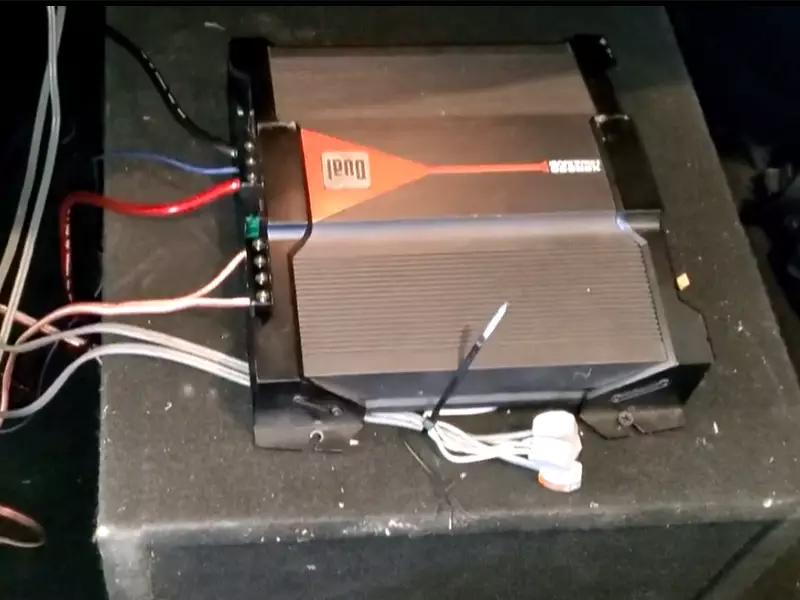
- Connect the RCA cables from the line output converter to the amp’s RCA inputs.
- Connect the power cable from the amp to the car’s battery or a suitable power source.
- Ground the amp by connecting the ground cable to a metal part of the car’s chassis.
- Turn on the car stereo and test the sound to ensure everything is working correctly.
By following these steps, you should be able to successfully wire the amp to your stock stereo and enjoy improved audio performance in your vehicle. Remember to double-check all connections and ensure proper insulation to prevent any electrical issues.
Powering The Amp And Adjusting Settings
When it comes to enhancing the sound quality of your car’s stock stereo, installing an amp is an excellent option. However, simply hooking up the amp to your stock stereo is not enough. You need to ensure that the amp is powered properly and its settings are adjusted correctly for optimal performance. In this section, we will explore how to set up a power wire connection, ground the amp, and adjust the gain settings to achieve a balanced audio output.
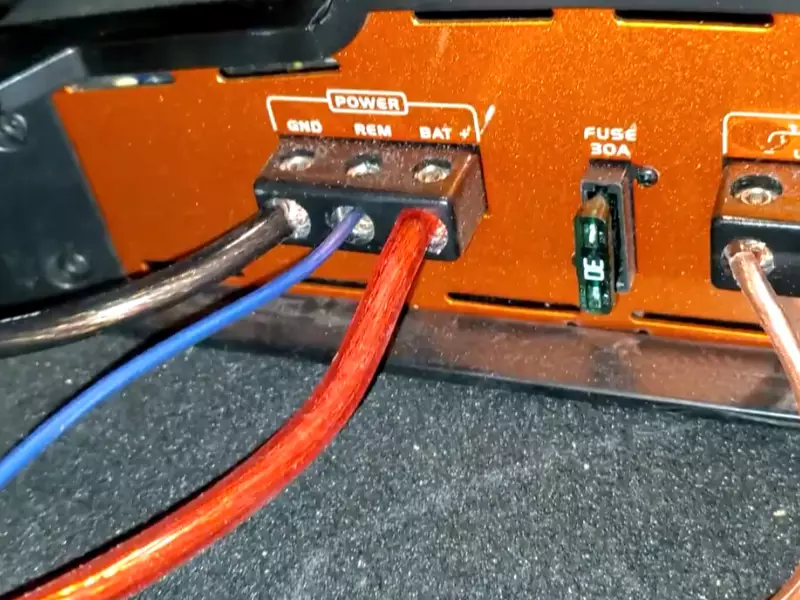
Setting up a power wire connection for the amp
In order to power up your amp, you need to establish a strong connection between the car’s battery and the amp. Here’s a step-by-step guide on how to set up a power wire connection:
- Start by disconnecting the negative battery terminal to avoid any electrical mishaps.
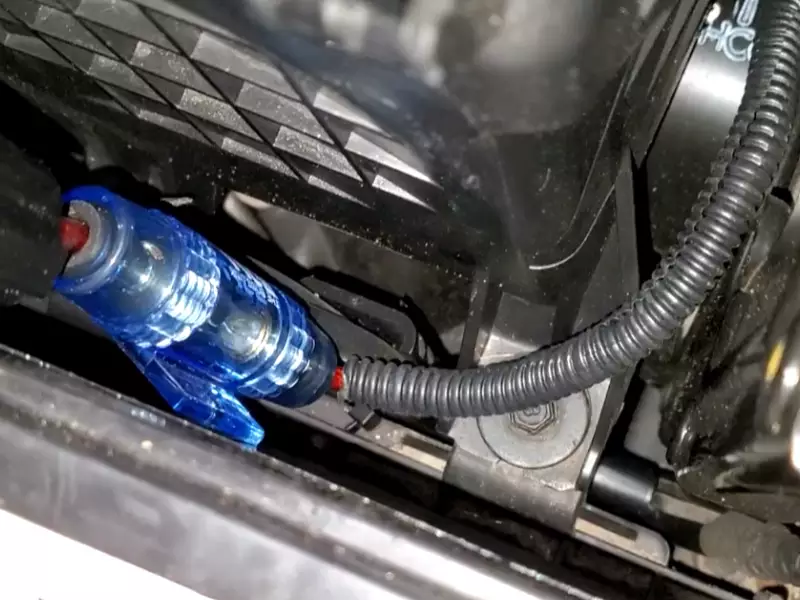
- Locate the amp installation kit, which usually includes a power wire, fuse holder, and connectors.
- Measure the distance between your battery and amp to determine the length of the power wire needed.
- Use a wire stripper to strip about half an inch of insulation from both ends of the power wire.
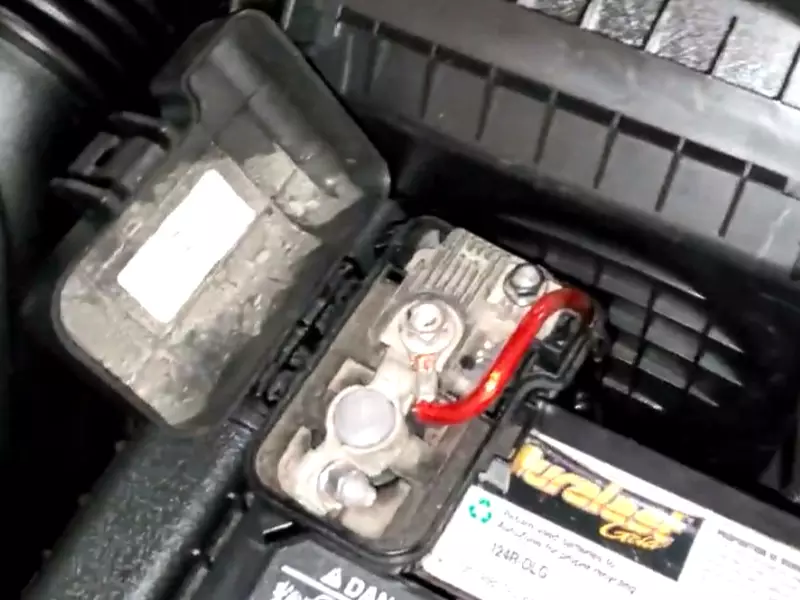
- Connect one end of the power wire to the positive terminal of the car battery.
- Thread the power wire through the car’s firewall to bring it inside the cabin.
- Secure the wire using wire clips or zip ties to prevent any potential damage.
- Connect the other end of the power wire to the positive terminal of the amp.
- Insert the fuse into the fuse holder and connect it to the positive terminal of the car battery.
- Finally, reconnect the negative battery terminal.
Grounding the amp for optimal performance
Grounding the amp properly is crucial for ensuring optimal performance and minimizing the risk of electrical interference. To ground the amp correctly, follow these steps:
- Select a suitable grounding point near the amp location. It should be a bare metal surface that is free of paint, dirt, or rust.
- Use sandpaper or a wire brush to clean the grounding point thoroughly.
- Strip half an inch of insulation from one end of the ground wire and connect it securely to the grounding point.
- Strip the other end of the ground wire and connect it securely to the ground terminal of the amp.
- Ensure that the ground wire is tightly secured and cannot be easily pulled out.
Adjusting the amp’s gain settings for balanced audio output
The gain settings on the amp control the input sensitivity and overall output level. It is essential to adjust these settings properly for a balanced audio output. Here’s how:
- Start by setting all EQ (Equalizer) settings on the amp and stereo to their flat, or neutral, positions.
- Play an audio track that represents the type of music you usually listen to.
- Gradually increase the gain setting on the amp until you hear distortion in the audio.
- Back off the gain slightly until the distortion disappears and the sound is clean and clear.
- If your amp has separate high-pass and low-pass filters, adjust them according to your speaker system’s specifications.
- Listen to different genres of music and make slight adjustments to the gain settings if necessary, until you achieve a well-balanced audio output.
By carefully following these steps, you can power up your amp correctly, ground it for optimal performance, and adjust the gain settings for a balanced audio output. With your amp properly installed and set up, you can now enjoy a whole new level of sound quality from your car’s stock stereo.
Testing And Troubleshooting
Once you have successfully installed the amp to your stock stereo, it’s important to verify the connectivity and functionality of the equipment. This step will ensure that everything is working as intended and will help you identify any issues that may arise during the installation process. In this section, we will cover how to verify the connectivity and functionality of the amp and stock stereo, troubleshoot common issues, and fine-tune the amp settings for optimal audio quality.
Verifying the Connectivity and Functionality of the Amp and Stock Stereo
To start, you need to check if the amp and stock stereo are properly connected and functioning correctly. Follow these steps to verify the connectivity:
- Ensure all the connections between the amp and the stock stereo are securely plugged in. Check both the input and output connections.
- Turn on the stock stereo and adjust the volume to a comfortable level.
- Play some music through the stock stereo and listen for sound coming from the speakers connected to the amp. It’s a good idea to test different audio sources (e.g., radio, CD player, etc.) to ensure that the amp is receiving the audio signal from the stock stereo.
- If you don’t hear any sound or if the sound is distorted, double-check the connections and make sure they are properly inserted. Additionally, check the amp’s power supply to ensure it is receiving enough power.
Troubleshooting Common Issues During the Installation Process
During the installation process, you may encounter some common issues. Here are a few troubleshooting tips to help you address them:
| Issue | Troubleshooting Steps |
|---|---|
| No sound coming from the speakers |
|
| Distorted sound |
|
| Interference or noise |
|
Fine-tuning the Amp Settings for Optimal Audio Quality
To achieve the best audio quality with your amp, it’s essential to fine-tune its settings. Here’s how you can optimize the amp’s performance:
- Adjust the gain control to balance the audio output. Start with a low gain setting and gradually increase it until you achieve the desired audio level without distortion.
- Experiment with the bass, midrange, and treble settings to find the optimal sound quality for your preferences. It’s best to make small adjustments and test the sound after each change.
- If your amp features additional settings such as crossover controls, explore them to tailor the sound to your specific audio setup.
Remember, the optimal amp settings may vary depending on your stock stereo, speakers, and personal preferences. Taking the time to fine-tune these settings will help you achieve the best audio experience in your vehicle.
Enhancing Your Sound System
Adding additional speakers to complement the amp installation
If you want to take your sound system to the next level, adding additional speakers is a great way to enhance the overall audio experience. By installing extra speakers, you can achieve a more immersive soundstage and enjoy crisp and clear audio throughout your vehicle. Whether you’re a fan of bass-heavy beats or prefer the subtle tones of classical music, adding new speakers can help you achieve the perfect sound.
Upgrading the stock stereo head unit for advanced features
An upgraded stock stereo head unit can significantly improve your sound system’s functionalities and performance. With advanced features such as Bluetooth connectivity, USB ports, and auxiliary inputs, you can connect your favorite devices and enjoy seamless integration with your sound system. Additionally, a higher-quality head unit often offers better sound processing capabilities, resulting in improved audio clarity and dynamic range.
Implementing sound deadening techniques for improved audio experience
One often overlooked aspect of sound system enhancement is implementing sound deadening techniques. By reducing unwanted vibrations and echoes within your vehicle, you can create a more controlled and balanced audio experience. Sound deadening materials, such as mass-loaded vinyl or foam insulation, can be installed on doors, floorboards, and other areas prone to vibration. This not only enhances the audio quality but also reduces outside noise, allowing you to enjoy your music without distractions.
Now that we’ve explored these three key ways to enhance your sound system, you can take your car audio experience to the next level. Whether you choose to add additional speakers, upgrade your stock stereo head unit, or implement sound deadening techniques, each step will contribute to a more immersive and enjoyable audio experience. So, what are you waiting for? Start enhancing your sound system today and let the music take you on a journey like never before.
Safety Precautions And Maintenance Tips
Proper safety precautions and regular maintenance are essential when installing an amp to your stock stereo system. Neglecting these important steps can result in costly damage to your car’s electrical system and even compromise your safety on the road. In this section, we will discuss the important safety considerations during the installation process, protecting your car’s electrical system from damage, and maintenance tips to ensure the longevity of your amp and stock stereo system.
Important safety considerations during the installation process
When installing an amp to your stock stereo system, it’s crucial to prioritize safety at every step. Here are some important safety precautions to keep in mind:
- Disconnect the negative battery terminal: Before starting any installation work, always disconnect the negative battery terminal to avoid electrical shocks and prevent accidental short circuits.
- Wear protective gear: When handling electrical components, it is advisable to wear safety gloves and glasses to protect yourself from any potential harm.
- Follow wiring instructions carefully: Each amp and stock stereo system may have specific wiring requirements. Be sure to carefully read and follow the manufacturer’s instructions to avoid any mishaps.
- Double-check connections: Prior to reattaching the battery, double-check all connections to ensure they are secure and properly insulated to prevent any potential hazards.
Protecting your car’s electrical system from damage
While installing an amp to your stock stereo system can enhance your audio experience, it is crucial to protect your car’s electrical system to avoid any unwanted issues. Take the following precautions to safeguard your vehicle:
- Use proper wiring materials: Choose high-quality wiring materials and connectors that are suitable for your amp and stock stereo system. This helps maintain proper electrical flow and reduces the risk of damage or malfunctions.
- Avoid overloading the electrical system: Calculate the power requirements of your amp and ensure it doesn’t exceed the capacity of your car’s electrical system. Overloading can lead to overheating or even damaging the system.
- Securely mount the amp: Install the amp in a secure location to prevent vibrations that may cause loose connections or damage to nearby components.
- Regularly inspect wiring and connections: Periodically check the condition of the wiring and connections to identify any signs of wear, corrosion, or loose connections. Promptly address any issues to avoid potential problems.
Maintenance tips to ensure the longevity of your amp and stock stereo system
To keep your amp and stock stereo system performing at their best, follow these maintenance tips:
- Keep the system clean: Regularly clean the surfaces of your amp and stock stereo system using a soft cloth to remove dust and debris. Avoid using harsh chemicals that may damage the equipment.
- Protect from extreme temperatures: Avoid exposing your car’s interior to extreme temperatures as it can affect the performance and lifespan of the amp and stock stereo system. Park in shaded areas whenever possible.
- Avoid high-volume levels: While it may be tempting to crank up the volume, excessively high sound levels can strain your amp and speakers. Maintain moderate volume levels to prevent premature wear and damage.
- Regularly check for updates: Stay informed about any firmware or software updates for your amp and stock stereo system. These updates often include bug fixes and new features that can enhance performance and reliability.
By adhering to these safety precautions and maintenance tips, you can ensure a smooth and long-lasting installation of your amp to your stock stereo system, improving your audio experience while protecting your car’s electrical system.
Frequently Asked Questions On How To Install Amp To Stock Stereo
Can I Hook Up An Amp To My Factory Stereo?
Yes, you can connect an amp to your factory stereo.
Can You Hook Up An Amp To A Home Stereo?
Yes, you can hook up an amp to a home stereo. It allows you to enhance the audio output and increase the power of your audio system at home. The amp connects to the stereo using audio cables and provides a stronger signal to your speakers, giving you better sound quality.
How Do I Connect My Amp To My Stereo?
To connect your amp to your stereo, first, locate the audio output on your stereo and audio input on your amp. Use an RCA cable to connect the audio output to the audio input. Ensure that the connections are secure.
Adjust the volume settings on both devices, and you’re good to go.
Can You Hook Up Subs And Amp To Stock Stereo?
Yes, you can connect subs and an amp to your stock stereo.
Conclusion
Installing an amp to your stock stereo can greatly enhance your audio experience without the need for a complete system overhaul. By following the step-by-step guide provided in this blog post, you can effortlessly upgrade your car’s sound system and enjoy a higher level of sound quality.
Whether you’re a music lover or simply want to improve your driving experience, adding an amp is a worthwhile investment. Get ready to elevate your car’s audio performance!