To install an amp to door speakers, connect the amp’s power and ground wires to the car’s battery and chassis, then run the amp’s RCA cables to the head unit. Finally, connect the speakers to the amp using speaker wires.
Adding an amplifier to your car’s door speakers can significantly improve the audio quality and overall listening experience. By providing more power to the speakers and enhancing the clarity and bass response, an amp can make your music sound more vibrant and immersive. However, installing an amp to door speakers requires some careful steps to ensure proper functionality and avoid any damage.
In this guide, we will outline the necessary procedure to install an amp to your car’s door speakers, allowing you to enjoy enhanced sound performance while driving. Whether you are a car audio enthusiast or simply looking to upgrade your audio system, this installation process is straightforward and can be done with basic tools and a little bit of patience.

Gathering The Necessary Tools And Equipment
Before you can start installing an amp to your door speakers, it is important to gather all the necessary tools and equipment. This will ensure that you have everything you need to complete the installation process smoothly and efficiently. Here are the essential items you will need:
Amplifier
The first item on your list is the amplifier. This is the main component that will boost the audio signals coming from your radio or head unit and deliver them to your door speakers. Make sure to choose an amplifier that is compatible with your car’s audio system and the power requirements of your speakers.
Wiring kit
A wiring kit is another crucial tool you will need for installing an amp to your door speakers. This kit typically includes power cables, ground cables, RCA cables, and speaker wires. These wires will be used to connect the amplifier to your car’s battery, ground, head unit, and speakers. It is important to choose a wiring kit that matches the power requirements of your amplifier and the length needed for your installation.
Screwdriver
Having a screwdriver with different sizes of tips is essential for removing panels and securing the amplifier and wiring connections. This tool will be used to remove any screws or bolts holding the car’s interior panels in place, allowing you to access the wires and mount the amplifier securely.
Wire stripper
A wire stripper is used to remove the insulation from the ends of the wires, allowing for easy and secure connections. Make sure to choose a wire stripper that is suitable for the gauge of wires you will be working with.
Electrical tape
Electrical tape is used to secure and insulate the connections you make during the installation process. This helps prevent short circuits and ensures a clean and professional look. Make sure to choose high-quality electrical tape to ensure a secure and long-lasting connection.
By gathering these necessary tools and equipment, you will be well-prepared to install an amp to your door speakers. Next, we will move on to the next step, which is preparing the vehicle for installation.
Assessing The Wiring And Power Requirements
Checking the car’s electrical system
Before installing an amplifier (amp) to your door speakers, it is crucial to assess your car’s electrical system. This step ensures that your car’s power supply can handle the additional load, preventing any potential damage. Please follow the steps below to check your car’s electrical system:
- Inspect the car battery: Begin by examining the condition of your car’s battery. Look out for any signs of corrosion or damage, as this can affect the overall electrical performance.
- Measure the battery voltage: Use a voltmeter to measure the voltage of your car’s battery. Make sure the engine is turned off and the car is not running. A healthy battery should read around 12.6 volts.
- Check the alternator output: Start your car’s engine and let it idle. Connect the voltmeter to the battery terminals while the engine is running. The voltmeter should display a voltage between 13.8 to 14.4 volts, indicating that the alternator is functioning properly.
- Inspect the fuses and wiring: Carefully examine the fuses and wiring in your car’s electrical system. Look out for any frayed wires, loose connections, or blown fuses. These issues can cause problems with the amplifier installation.

Determining the appropriate wiring configuration
Once you have assessed your car’s electrical system, the next step is to determine the appropriate wiring configuration for your amp and door speakers. This ensures that the power is distributed correctly and efficiently. Follow these guidelines to determine the appropriate wiring configuration:
- Choose the right gauge of wire: The gauge of wire you use will depend on the power requirements of your amp and the distance between your amp and speakers. Refer to the manufacturer’s recommendations or consult a professional to ensure you choose the right gauge of wire.
- Consider the speaker impedance: Different speakers have different impedance ratings, typically 2, 4, or 8 ohms. Ensure that your amp can handle the speaker impedance you plan to use. Also, make sure the wiring configuration matches the speaker impedance to avoid any potential audio issues.
- Plan the wiring route: Before installing the wiring, plan the route you will take from the amp to the door speakers. This ensures a clean and organized installation. Avoid placing the wiring near any heat sources or moving parts.
- Use appropriate connectors: Properly crimped connectors and terminals ensure a secure and reliable connection. Avoid using twist-on connectors as they may come loose or cause signal degradation over time.
By following the above steps to check your car’s electrical system and determine the appropriate wiring configuration, you can ensure the successful installation of an amp to your door speakers. Taking the time to assess the wiring and power requirements will help optimize the performance and longevity of your audio system.
Safely Accessing The Speaker
When it comes to installing a new amplifier to your door speakers, it’s crucial to follow the right steps to ensure a safe and successful installation. One of the first steps is safely accessing the speaker to begin the installation process. In this section, we’ll cover two essential steps: disabling the power supply and removing the negative battery terminal, as well as detaching the door panels.
Disabling the Power Supply and Removing the Negative Battery Terminal
The first step to safely accessing your door speaker is to disable the power supply. This ensures that you won’t accidentally trigger any electrical current while working on the installation. To do this, follow these steps:
- Locate your vehicle’s fuse box and identify the fuse for the audio system.
- Using the appropriate fuse puller tool, carefully remove the fuse for the audio system.
- Verify that the audio system is no longer functioning by turning on the ignition and checking for any sound output.
- Once you have confirmed that the power supply is disabled, the next step is to remove the negative battery terminal. This step is crucial to prevent any electrical shock or short circuits. Follow these steps:
Note: Make sure you have your vehicle’s manual handy, as the location of the fuse box and battery terminals may vary depending on the make and model of your vehicle.
- Open the hood of your vehicle and locate the negative battery terminal, usually indicated with a “-” symbol.
- Using the appropriate size wrench or socket, loosen the nut holding the negative battery cable in place.
- Once the nut is loosened, carefully remove the negative battery cable from the terminal.
- Secure the negative battery cable away from the terminal to prevent any accidental contact.
Detaching the Door Panels
With the power supply disabled and the negative battery terminal removed, you can now proceed to detach the door panels. This step allows you to gain access to the door speaker and begin the installation of the new amplifier. Follow these steps to detach the door panels:
- Using a trim removal tool or a flathead screwdriver wrapped in a soft cloth, carefully pry off any trim pieces or covers that may be hiding screws.
- Locate and remove the screws that secure the door panel to the door frame. These screws are typically located around the edges and handle area of the door panel.
- Once the screws are removed, gently pull on the door panel to release the clips holding it in place. Take care not to apply excessive force, as this may cause damage to the panel or clips.
- Continue to work your way around the door panel, gently releasing the remaining clips until the panel is free from the door frame.
- Once the door panel is detached, set it aside in a safe location, ensuring it is not resting on any wires or components.
Note: It’s important to exercise caution while detaching the door panels, as they can be fragile and easily damaged. Take your time and apply gentle but firm pressure to avoid any unnecessary mishaps.
Now that you have successfully disabled the power supply, removed the negative battery terminal, and detached the door panels, you are ready to proceed with the installation of your new amplifier to the door speakers. Stay tuned for our next section, where we will guide you through the process of connecting the amp to the speakers.
Connecting The Amp To The Head Unit
Connecting an amplifier to your door speakers is a great way to enhance your car audio system’s sound quality. However, if you want to achieve this, you need to know how to properly connect the amp to the head unit. In this guide, we’ll walk you through the steps of connecting the amp to the head unit seamlessly.
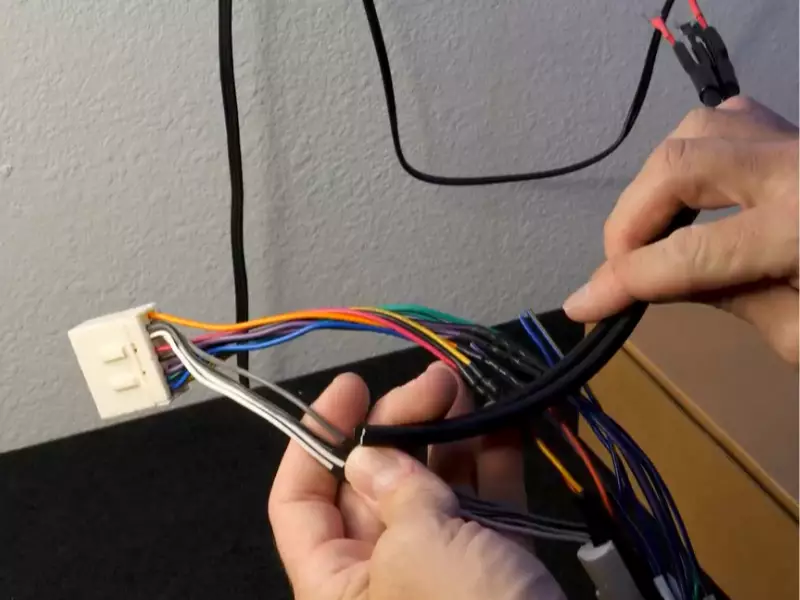
Locating the head unit’s wiring harness
To connect the amp to the head unit, you first need to locate the head unit’s wiring harness. The wiring harness is usually located behind the head unit in your car’s dashboard. It connects the head unit to the car’s electrical system, including the speakers.
To locate the wiring harness:
- Remove the head unit from the dashboard. Refer to your car’s manual or online resources for instructions specific to your vehicle model.
- Once you’ve removed the head unit, carefully examine the backside of it for a group of wires connected to a harness.
- Identify the wiring harness that corresponds to the speaker outputs. These wires are usually color-coded and labeled. Consult your head unit’s manual for the specific wire colors and labels.
- Make a note of which wires correspond to the front left, front right, rear left, and rear right speaker outputs. You’ll need this information when connecting the amp.
Using a line output converter (LOC) if necessary
In some cases, your head unit may not have RCA outputs that are required to connect the amp. If this is the case, you’ll need to use a line output converter (LOC) to convert the speaker-level outputs from the head unit to low-level RCA outputs.
Follow these steps to use a line output converter:
- Locate the speaker-level outputs from the head unit’s wiring harness that you identified earlier.
- Connect the speaker-level outputs to the input side of the line output converter using the appropriate wire connections. Ensure that the polarity is correct to avoid any phase cancellation issues.
- Connect the output side of the line output converter to the RCA inputs on the amplifier using RCA cables.
- Adjust any gain controls on the line output converter to match the amplifier’s input sensitivity.
Using a line output converter allows you to connect an amplifier to a head unit without RCA outputs, ensuring you can still achieve great sound quality.
Now that you’ve located the head unit’s wiring harness and, if needed, used a line output converter, you’re ready to connect the amp to the head unit. By following these steps carefully, you’ll be able to enjoy a more powerful and immersive sound experience in your car.
Running The Speaker Wire
Identifying the Speaker Wires in the Car
Before you can begin running the speaker wire for your car’s amp installation, it’s vital to identify which wires are responsible for carrying the audio signal to the door speakers. To do this, you may need to consult your vehicle’s wiring diagram or use a multimeter to test each wire individually.
To identify the speaker wires, start by locating the wiring harness in the car door. This is usually found near the speaker itself or behind the door panel. Once you’ve located the harness, look for pairs of wires. These pairs will typically consist of one colored wire and one wire with a stripe of the same color. These are the speaker wires.
For example, if you’re working with a Ford vehicle, the color-coding for the speaker wires may be as follows:
| Wire Color | Function |
|---|---|
| White | Left Front Speaker (+) |
| White with Black Stripe | Left Front Speaker (-) |
| Gray | Right Front Speaker (+) |
| Gray with Black Stripe | Right Front Speaker (-) |
Properly Routing the Wires through the Car’s Interior
Once you’ve identified the speaker wires, it’s time to route them through your car’s interior. Proper routing is crucial to avoid any damage to the wires or interference with other components. Here’s how you can do it efficiently:
- Begin by removing the door panel to reveal the speaker wires and access points. This is usually done by removing a few screws or clips.
- Next, find an existing wiring pathway or create a new one for the speaker wires. It’s essential to choose a pathway that ensures minimal exposure to potential hazards, such as sharp edges or excessive heat.
- Once you’ve chosen the pathway, use plastic wire loom or electrical tape to protect the wires from any potential abrasion or damage. This step is crucial to maintain the integrity of the speaker wire and prevent any short circuits.
- Carefully route the wires through the chosen pathway, ensuring they are neatly organized and away from any moving parts or components that generate heat. Consider using cable ties or clips to secure the wires in place and minimize any potential damage from shifting or vibrations.
- Finally, reassemble the door panel, making sure to reconnect any electrical connectors you might have disconnected during the process. Test the speakers to ensure they are functioning correctly before moving on to the next steps of your amp installation.
By following these steps, you can safely and effectively run the speaker wire for your amp installation, ensuring optimal audio performance without any unnecessary complications or damage to your car’s interior. Take your time, be meticulous, and enjoy the enhanced audio experience that awaits you.

Connecting The Speaker Wire To The Amplifier
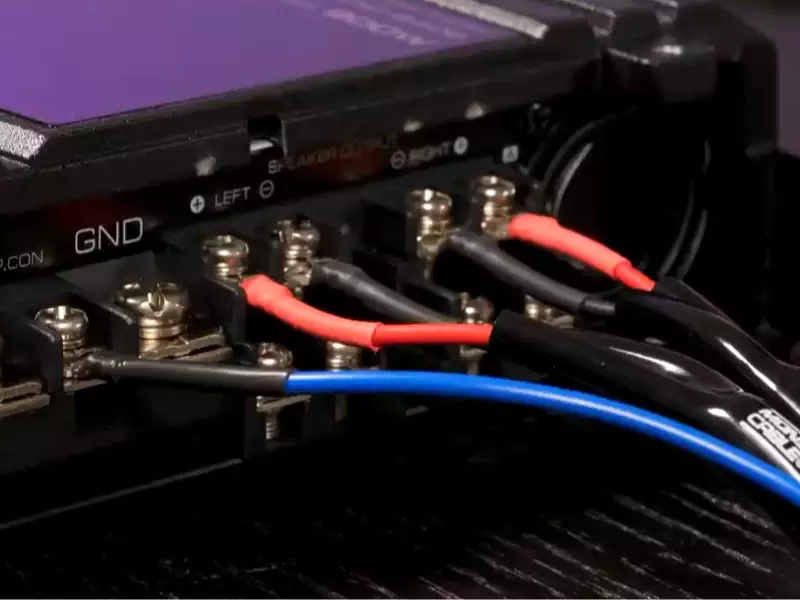
Connecting the speaker wire to the amplifier is a crucial step in the installation process of your car’s audio system. It ensures that the power and sound signals are properly transmitted, providing you with clear and high-quality audio. The process involves stripping the wire ends and connecting them to the corresponding terminals on the amplifier.
Stripping the wire ends
To begin, strip the ends of the speaker wire to expose the bare metal. There are several methods to accomplish this task, including using wire strippers or a utility knife. Wire strippers are the most efficient option but make sure to select the appropriate size for the gauge of wire you are using. If you don’t have wire strippers on hand, a utility knife can also do the job.
Start by cutting a small slit on the insulation at the end of the wire. Be careful not to cut too deep as you don’t want to damage the internal copper strands. Once you have made the initial cut, gently twist the knife around the wire to separate the insulation from the metal strands. Take your time to ensure a clean cut and avoid any frayed strands.
Connecting the wires to the amplifier
Once you have stripped the wire ends, it’s time to connect them to the amplifier. Most amplifiers have screw terminals or binding posts to secure the wires. Double-check the amplifier’s manual or specifications to determine the appropriate terminals for connecting the speaker wire.
Here’s a step-by-step guide to connecting the wires to the amplifier:
- Identify the positive and negative terminals on both the amplifier and the speaker wire. The positive terminal is typically marked with a “+,” while the negative terminal may have a “-” or no marking at all.
- Loosen the screws or binding posts on the amplifier’s terminals.
- Insert the stripped end of the speaker wire into the corresponding terminal on the amplifier. Ensure that the positive wire is connected to the positive terminal and the negative wire to the negative terminal.
- Tighten the screws or binding posts to securely fasten the wire in place. Be careful not to overtighten, as this may damage the wire or terminal.
- Repeat the process for the other speaker wire, making sure to connect it to the correct terminals on the amplifier.
Once you have connected the speaker wire to the amplifier, give it a gentle tug to ensure it is securely attached. Misconnections or loose wires can result in poor sound quality or even damage to the audio system. Take your time and double-check your connections before moving on to the next steps of the installation process.
Remember, a secure and proper connection is essential for optimal audio performance. By following these steps to connect the speaker wire to the amplifier, you can enjoy crystal-clear sound and make the most out of your car’s audio system.
Selecting An Ideal Location
Considering space constraints and ventilation requirements
One of the first things you need to do when installing an amp to your door speakers is select an ideal location. This is crucial as it will impact the performance and lifespan of your amp. When choosing a location, there are two key factors to consider: space constraints and ventilation requirements.
- Space constraints: The size of your vehicle and the availability of space will determine where you can mount your amp. You need to find a location that not only fits the dimensions of your amp but also allows for easy access for installation and maintenance. It’s important to ensure that the amp does not obstruct any other components or interfere with the operation of other systems within the vehicle.
- Ventilation requirements: Amplifiers can generate a significant amount of heat during operation, so it’s crucial to provide adequate ventilation to prevent overheating. When selecting a location, look for areas that allow for proper airflow. This can include mounting the amp in areas with built-in ventilation grilles or ensuring that there is sufficient space around the amp for air to circulate. Avoid placing the amp in enclosed spaces or areas where heat can get trapped, as this can lead to overheating and potential damage to the amp.
Securing the amp to prevent vibrations
Once you have found an ideal location for your amp, it’s important to secure it properly to prevent vibrations. Vibrations can not only affect the sound quality but also lead to damage over time. Here are a few tips to ensure a secure installation:
- Use mounting brackets: Mounting brackets are designed to hold the amp securely in place and reduce vibrations. They provide a stable foundation and help minimize the movement of the amp during vehicle operation.
- Use rubber grommets: Rubber grommets act as shock absorbers, reducing vibrations and protecting the amp from potential damage. Place them between the amp and the mounting surface to provide an extra layer of insulation.
- Tighten all connections: Ensure that all connections, including screws and bolts, are securely tightened. Loose connections can contribute to vibrations, so it’s important to check and re-tighten them periodically.
By considering space constraints and ventilation requirements when selecting a location and securing your amp to prevent vibrations, you can ensure a successful installation that enhances the performance and longevity of your door speakers.
Attaching The Power And Ground Cables
Once you have carefully selected and positioned your new amp and speakers, it’s time to connect the power and ground cables for a solid and reliable audio system. Attaching these cables correctly will ensure optimal performance and prevent any potential damage to your equipment. Let’s go through the step-by-step instructions on how to connect the power cable to the battery and establish a solid ground connection.
Connecting the power cable to the battery
The power cable is a crucial component in the installation process as it provides the necessary electrical current from the battery to your amp. Follow these steps to connect it properly:
- Start by determining the appropriate gauge for your power cable based on the power requirements of your amp. Consult the manufacturer’s instructions or a reliable car audio specialist for guidance.
- Locate your vehicle’s battery and identify the positive and negative terminals. The positive terminal is typically marked with a “+” symbol, while the negative terminal is marked with a “-” symbol.
- Using a suitable wrench or socket, loosen the bolt that secures the positive terminal’s clamp.
- Slide the ring terminal from the power cable onto the positive terminal, ensuring a secure fit.
- Tighten the bolt on the positive terminal clamp to securely fasten the power cable in place.
- Route the power cable away from any moving parts, sharp edges, or areas that could cause damage. Secure it using cable ties or clamps at regular intervals to maintain a clean and organized installation.
Establishing a solid ground connection
Creating a strong ground connection is vital for the proper functioning of your amp and speakers. Follow these steps to ensure a reliable ground connection:
- Identify a suitable grounding point near your amp installation location. It should be a clean and unpainted metal surface, preferably connected directly to the vehicle’s chassis.
- Use a wire brush or sandpaper to remove any paint or corrosion from the selected grounding point, ensuring a clean metal-to-metal contact.
- Strip the end of the ground cable to expose enough bare wire for a secure connection.
- Connect the bare wire of the ground cable to the chosen grounding point by securely fastening it with a bolt or self-tapping screw.
- Tighten the bolt or screw to ensure a solid and reliable ground connection.
- Double-check that the ground connection is secure and that there is no excess wiring in the vicinity of any moving parts or potential sources of damage.
By following these steps and ensuring the proper connection of the power cable to the battery and the establishment of a solid ground connection, you can enjoy enhanced audio quality and a seamless installation of your door speakers. Take your time, double-check your connections, and enjoy the rewarding experience of a professionally installed amp system!
Verifying The Connections
Verifying the connections is a crucial step in the process of installing AMP to door speakers. By ensuring that all the wiring connections are properly established, you can prevent any issues or malfunctions in the audio system. In this section, we will guide you through the steps of double-checking all the wiring connections to guarantee a successful installation.
Double-checking all the wiring connections
Before proceeding, it is essential to verify that each wire is connected to the correct terminal. An incorrect wiring connection can result in poor audio quality or even damage to your speakers and AMP. To avoid any such problems, carefully examine each wire and follow these steps:
- Inspect the connection between the AMP and the speaker terminals. Ensure that the wires are securely connected and there is no loose connection.
- Check the polarity of the connections. Positive terminals should be connected to positive terminals, and negative terminals should be connected to negative terminals.
- Confirm that the wires are properly insulated to prevent any short circuits. Frayed or exposed wires can cause electrical problems and disrupt the audio signal.
- Examine the speaker wire connections for any signs of corrosion or damage. Clean or replace any corroded wires to maintain optimal performance.
- Test the connections by gently tugging on each wire to ensure they are securely fastened. Loose connections can lead to intermittent sound or complete loss of audio.
- Verify the connection between the AMP and the power source. Ensure that the power wires are properly connected to the AMP and the battery, following the manufacturer’s instructions.
By carefully double-checking all the wiring connections, you can have peace of mind knowing that your AMP is correctly installed, and your door speakers will deliver exceptional audio performance. Spending a few extra minutes to verify the connections will save you from future headaches and potential costly repairs. Now that you have ensured the connections, it’s time to move on to the next step: setting the gain control on your AMP!
Adjusting The Amplifier Settings
When it comes to upgrading your car’s sound system, installing an amplifier to your door speakers can make a significant difference in audio quality. However, the process doesn’t end with simply connecting the wires. Adjusting the amplifier settings is equally important to ensure optimal sound output and prevent distortion.
Setting the Gain
One of the essential amplifier settings to adjust is the gain. The gain control determines the input sensitivity of the amplifier and controls the power being sent to the door speakers. It is crucial to set the gain correctly to avoid overpowering or underpowering the speakers, which can result in distorted or weak sound.
To set the gain, follow these steps:
- Start by playing a midrange music track of your choice.
- Gradually increase the gain knob until you notice distortion or clipping in the audio output.
- Once distortion is heard, back off the gain slightly until the sound is clean and distortion-free.
Crossover
The next amplifier setting to focus on is the crossover. The crossover determines which frequencies are sent to the speakers, ensuring that each driver receives the appropriate range of sounds. This helps in achieving a balanced and clear audio output.
Follow these steps to set the crossover:
- Refer to the specifications provided by the speaker manufacturer for the recommended crossover frequency range.
- Set the high-pass filter to the specified frequency value for the door speakers.
- Adjust the low-pass filter to send the lower frequencies to the subwoofer or dedicated bass speakers, if present.
Bass Boost
In addition to gain and crossover settings, many amplifiers offer a bass boost feature. This allows you to enhance the low-frequency response for a more pronounced bass effect. It can add depth and impact to your music, especially if you enjoy genres that heavily rely on deep bass.
Here’s how to adjust the bass boost:
- Start by setting the bass boost dial to its minimum or zero position.
- Gradually increase the bass boost until you achieve the desired level of low-end emphasis.
- Be cautious not to overdo it, as excessive bass boost can lead to distortion and muddiness in the sound.
Once you have set the gain, crossover, and bass boost to your preference, it is essential to fine-tune the sound output to ensure it suits your listening preference. Experiment with the settings while playing different types of music to find the right balance and enjoy a rich and immersive audio experience in your car.
Placing The Speakers Back Into Position
Aligning the Speakers
Once you have successfully installed the amplifier to your door speakers, the next step is to align the speakers in their proper position. Proper alignment is essential for optimal sound quality and clarity. Here’s how you can align the speakers:
- Remove the door panel: Begin by carefully removing the door panel to gain access to the speakers. Refer to your vehicle’s manual for specific instructions on removing the door panel. Ensure to keep any screws or clips in a safe place for reassembly.
- Inspect the speaker openings: Before placing the speakers back into position, inspect the openings in the door to ensure they are clean and free from any debris or obstructions. If necessary, gently clean the openings using a soft brush or cloth.
- Check the speaker connections: Take a moment to double-check the connections between the amplifier and the speakers. Ensure that each wire is securely attached and that there are no loose connections. A loose connection can lead to poor sound quality or no sound at all.
- Position the speakers: Carefully place the speakers back into their original position in the door, aligning them with the speaker openings. Make sure the speaker wires are properly routed, so they do not get pinched or obstructed.
Securing the Speakers
Once the speakers are aligned correctly, you’ll need to secure them in place to prevent any movement or vibration that can negatively impact sound quality. Follow these steps to secure the speakers:
- Reattach the door panel: Begin by carefully reattaching the door panel, ensuring that it is aligned properly. Connect any screws or clips that were removed during the panel removal process. Use gentle pressure to secure the panel back into place.
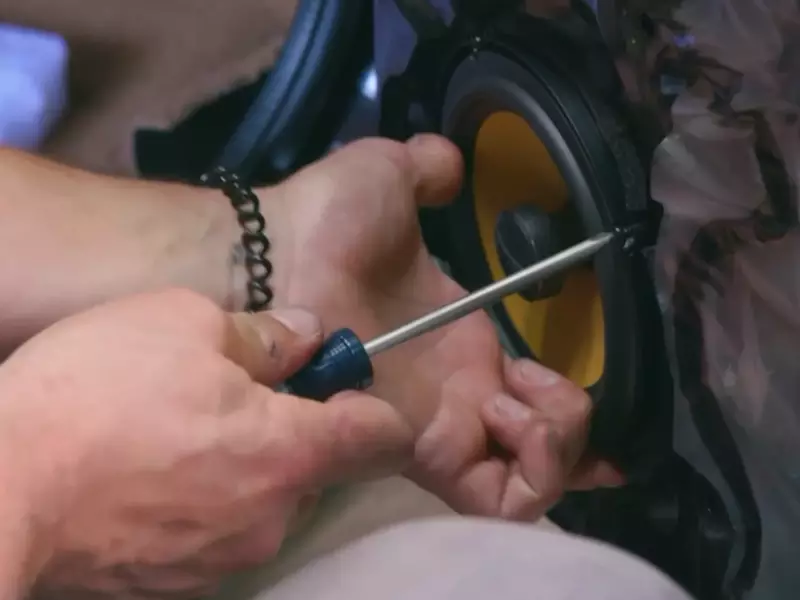
- Tighten speaker screws: Locate the mounting screws provided with your speakers and use a screwdriver or appropriate tool to tighten them securely. Be careful not to overtighten, as this can damage the speakers or the door panel.
- Test the speaker: After securing the speakers, test the sound system to ensure that everything is working correctly. Play a variety of music genres and adjust the volume to verify the quality and balance of the sound.
By following these steps, you can confidently align and secure your door speakers after installing an amplifier. Taking the time to position the speakers correctly and securely will result in an enhanced audio experience whenever you’re on the road.
Reattaching The Door Panels
Ensuring all the clips and screws are properly fastened
Before reattaching the door panels, it is crucial to make sure that all the clips and screws are properly fastened. This step ensures that the door panels are securely attached and will not come loose while driving.
To do this, follow these simple steps:
- Inspect all the clips: Carefully examine each clip and make sure they are in good condition. Replace any damaged or broken clips with new ones to ensure a secure fit.
- Check the screws: Tighten any loose screws that you may find. A loose screw can cause the door panel to rattle or come off, so it’s important to ensure that they are firmly in place.
- Align the clips: Before reattaching the door panel, align the clips with the corresponding holes on the door frame. This will ensure that the panel fits properly and does not bulge or sag.
- Apply firm pressure: Once the clips are aligned, apply firm pressure on the door panel to secure it in place. You may hear a series of clicks as the clips snap into position.
Taking the time to ensure all the clips and screws are properly fastened will result in a neat and secure installation. It also helps maintain the structural integrity of the door panels, preventing any potential issues down the line.
Frequently Asked Questions For How To Install Amp To Door Speakers
How Do I Connect Amp To Speakers?
To connect an amp to speakers, follow these steps: 1. Identify the amp’s speaker output connectors. 2. Connect the speaker wire to the amp’s positive (+) and negative (-) terminals. 3. Identify the speaker’s input connectors. 4. Connect the speaker wire to the corresponding positive (+) and negative (-) terminals on the speaker.
5. Ensure a secure connection and test the audio output.
What Kind Of Amplifier Do I Need For Door Speakers?
You need a compatible amplifier specifically designed for door speakers for optimal performance and sound quality.
How Do I Connect My Car Amp To Speakers?
To connect your car amp to speakers, follow these steps: 1. Identify the output terminals on your amp and input terminals on the speakers. 2. Use appropriate gauge speaker wire to connect the positive (+) terminal of the amp to the corresponding positive (+) terminal on the speaker.
3. Connect the negative (-) terminal of the amp to the corresponding negative (-) terminal on the speaker. 4. Ensure tight connections and insulate them with electrical tape. 5. Test the setup to verify sound output.
Do Door Speakers Sound Better With Amp?
Amp can improve the sound quality of door speakers. It amplifies the signal and provides more power, resulting in clearer and louder sound.
Conclusion
To recap, installing an amp to your door speakers can greatly enhance your audio experience in your vehicle. By following the step-by-step process outlined in this guide, you can ensure a seamless installation that will allow you to enjoy clear and powerful sound on the go.
Don’t be intimidated by the technical aspects – with a little patience and the right tools, you’ll be able to successfully upgrade your car’s audio system. So go ahead, give it a try and elevate your driving experience to a whole new level.