To install an aftermarket radio, locate the mounting bracket in your vehicle and remove the factory radio. Disconnect the wiring and antenna connections, then connect the wiring and antenna to the new radio and secure it in the mounting bracket.
Are you tired of your factory radio and want to upgrade to an aftermarket one? Maybe you want better sound quality, more features, or compatibility with modern devices. Whatever the reason, installing an aftermarket radio is a relatively simple process that can be done with a few basic tools.
In this guide, we will walk you through the steps involved in installing an aftermarket radio in your vehicle. From removing the factory radio to connecting the wiring and securing the new radio, you’ll have your upgraded audio system up and running in no time. So let’s get started!
Gathering The Necessary Tools And Materials
Before you delve into installing an aftermarket radio in your vehicle, it’s essential to gather all the necessary tools and materials. This will ensure a smooth and hassle-free installation process. Here are the steps you need to follow to gather everything you need:
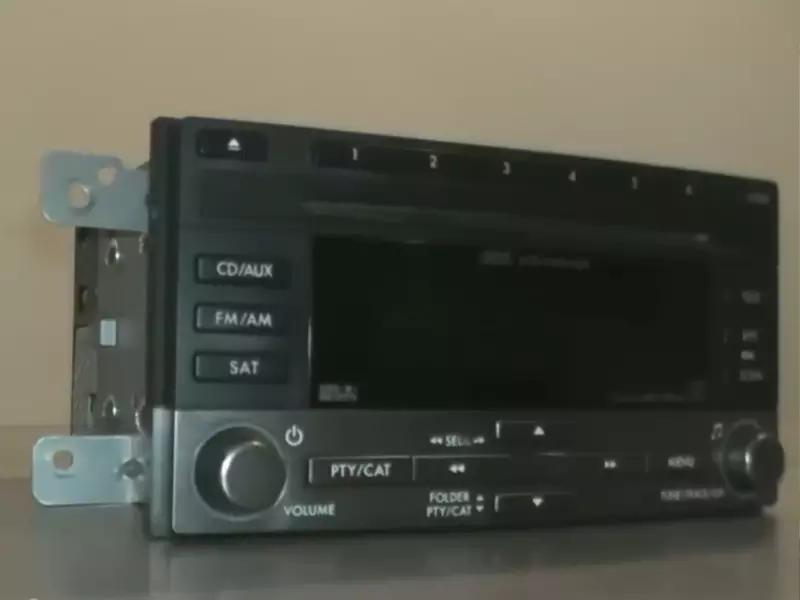
Research and find the right aftermarket radio for your vehicle
The first step is to identify and research the right aftermarket radio that suits your vehicle. There are various options available in the market, so it is essential to find one that not only matches your preferences but is also compatible with your vehicle’s make and model. Consider factors such as features, size, and compatibility when making your selection.
Check the compatibility of the radio with your vehicle’s make and model
Compatibility is crucial when it comes to installing an aftermarket radio. To ensure a seamless installation process, double-check the compatibility of the chosen radio with your vehicle’s make and model. This information can usually be found in the product specifications or by contacting the manufacturer directly. Take note of any additional adapters or harnesses that may be required for compatibility.
Purchase the necessary installation accessories
Once you have identified the right aftermarket radio and confirmed its compatibility, it’s time to purchase the necessary installation accessories. These accessories may include a wiring harness, antenna adapter, and dash kit. These components are vital for connecting the new radio to your vehicle’s existing wiring system and ensuring a secure and professional installation.
Gather the tools needed for the installation
Having the right tools is essential to ensure a successful installation. Make sure you have the following tools readily available:
| 1. Wire cutters | To neatly cut and strip wires for a precise connection. |
| 2. Crimping tool | For securely crimping connectors onto wires. |
| 3. Screwdrivers | Both Phillips and flathead screwdrivers may be needed to remove panels and screws. |
| 4. Panel removal tools | To safely remove panels without causing any damage. |
Make sure to have all these tools readily available before starting the installation process. Having everything at hand will streamline the process and save you from any unnecessary interruptions.
By gathering the necessary tools and materials, you will be well-prepared to tackle the installation of your aftermarket radio with confidence. This will ensure a successful and professional outcome that enhances the functionality and enjoyment of your vehicle’s audio system.
Removing The Factory Radio
Familiarize yourself with the vehicle’s dashboard and locate the factory radio
Before you begin the process of installing an aftermarket radio, it’s important to get acquainted with your vehicle’s dashboard. Take a few moments to familiarize yourself with the layout and features of the dashboard, so you know exactly where the factory radio is located. This will make the removal process much easier and more efficient.
Disconnect the negative battery terminal to prevent any electrical mishaps
Prior to removing the factory radio, it’s crucial to disconnect the negative battery terminal. This step ensures your safety and prevents any electrical mishaps during the installation process. Locate the negative terminal on your vehicle’s battery and use a wrench to loosen the nut and remove the cable.
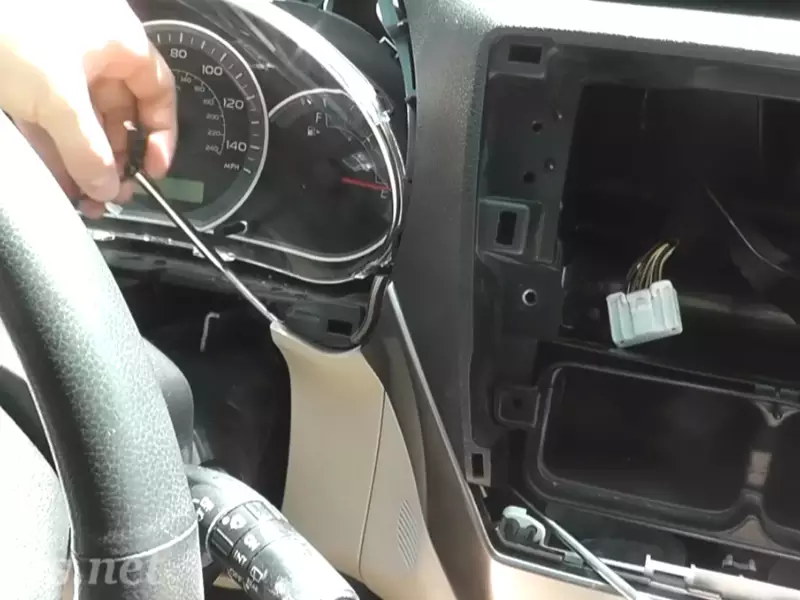
Remove any trim panels or covers surrounding the factory radio
Once the battery is disconnected, it’s time to remove any trim panels or covers that are surrounding the factory radio. Carefully examine the area around the radio and look for any screws, bolts, or clips holding the trim panels or covers in place. Remove these fasteners using the appropriate tools, such as a screwdriver or a trim removal tool.
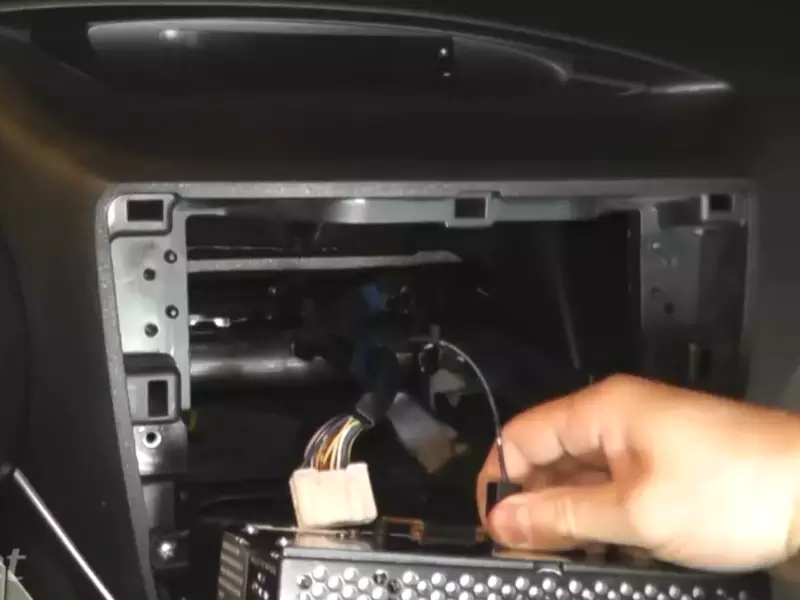
Unplug the wiring harness and antenna cable connected to the factory radio
With the trim panels or covers removed, you’ll now have access to the wiring harness and antenna cable connected to the factory radio. Carefully unplug these connections by pressing on the release tabs and gently pulling the connectors apart. Take your time and double-check that all connections are unplugged properly to avoid any damage.
Remove any screws or bolts securing the radio in place
Underneath the factory radio, you might find screws or bolts that are securing it in place. Locate these fasteners and use the appropriate tools to unscrew or unbolt them. Keep these screws or bolts in a safe place, as you’ll need them later when installing the aftermarket radio.
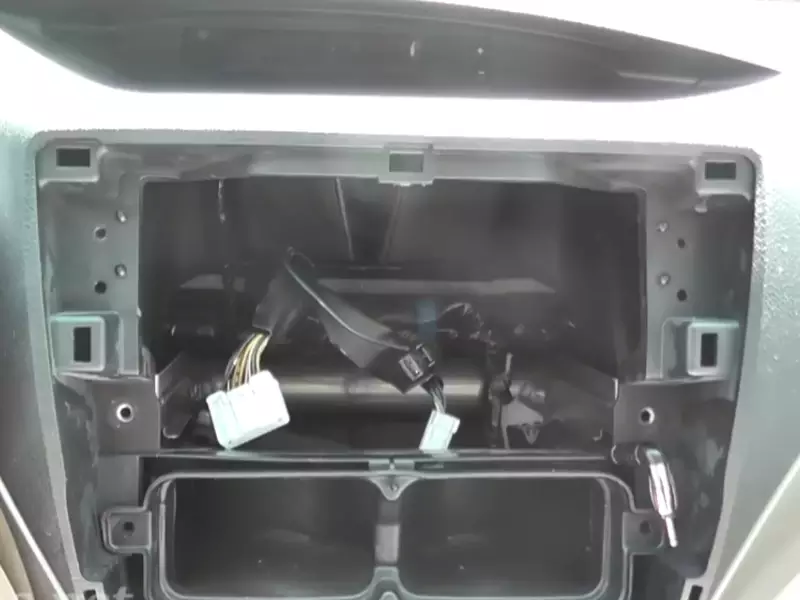
Carefully slide out the factory radio from the dashboard
With all the fasteners removed, it’s time to carefully slide out the factory radio from the dashboard. Slowly pull the radio towards you, making sure not to force or damage any surrounding components. Take your time and be gentle during this step to avoid any unnecessary damages to the dashboard or the radio itself.
Wiring And Connecting The Aftermarket Radio
Installing an aftermarket radio in your vehicle can greatly enhance your driving experience. However, it is crucial to properly wire and connect the new radio to ensure it functions correctly. In this section, we will guide you through the process of wiring and connecting the aftermarket radio to the vehicle’s wiring harness.
Examine the wiring harness of the aftermarket radio and compare it to the vehicle’s wiring harness
The first step is to carefully examine the wiring harness of the aftermarket radio and compare it to the vehicle’s wiring harness.
Make sure to identify the corresponding wires between the two harnesses, such as power, ground, speaker wires, and any other necessary connections.
Connect the wiring harness adapter to the vehicle’s wiring harness
Once you have identified the matching wires, it’s time to connect the wiring harness adapter to the vehicle’s wiring harness.
Take the wiring harness adapter and plug it into the vehicle’s wiring harness. Ensure that the connections are secure and aligned correctly.
Connect the other end of the wiring harness adapter to the wiring harness of the aftermarket radio
Next, take the other end of the wiring harness adapter and connect it to the wiring harness of the aftermarket radio.
Match each wire of the adapter with the corresponding wire of the radio’s harness and make solid connections.
Ensure all the connections are secure and properly insulated
After making all the necessary connections, it is vital to ensure that they are secure and properly insulated.
Double-check each connection to make sure they are tight and won’t come loose while driving. Additionally, use electrical tape or heat shrink tubing to insulate the connections properly.
Connect the antenna adapter to the aftermarket radio’s antenna input
Finally, connect the antenna adapter to the aftermarket radio’s antenna input.
Ensure that the adapter is securely plugged in, as a loose connection can cause signal loss or poor radio reception.
By following these steps and ensuring all the connections are secure and properly insulated, you can successfully wire and connect an aftermarket radio to your vehicle’s wiring harness. This will allow you to enjoy all the benefits of your new radio while maintaining a clean and professional installation.
Installing The Aftermarket Radio
Installing the Aftermarket Radio
When it comes to upgrading your car’s audio system, installing an aftermarket radio can make a significant difference in sound quality and functionality. Whether you’re looking to enjoy your favorite tunes with enhanced clarity or take advantage of additional features like Bluetooth connectivity, installing an aftermarket radio is a relatively simple and rewarding DIY project. In this guide, we’ll walk you through the step-by-step process of installing the aftermarket radio in your car, ensuring a seamless integration and optimal performance.
Insert the aftermarket radio into the dash kit or mounting bracket
To begin the installation process, you’ll first need to insert the aftermarket radio into the dash kit or mounting bracket. The dash kit serves as an adapter that allows the new radio to fit seamlessly into the existing space in your car’s dashboard. Start by carefully removing the existing radio from the dashboard using a suitable removal tool. Next, carefully align the aftermarket radio with the appropriate mounting holes in the dash kit. Gently push the radio into place, ensuring a snug fit.
Secure the radio in place using screws or bolts provided with the dash kit
With the aftermarket radio properly inserted into the dash kit, it’s time to secure it in place. Most dash kits come with screws or bolts that are specifically designed to hold the radio securely in place. Refer to the instructions provided with the dash kit to determine the appropriate hardware for securing the radio. Using a screwdriver or wrench, tighten the screws or bolts until the radio is firmly fixed in the dash kit.
Reconnect the negative battery terminal
Before proceeding further, it’s important to ensure your safety by disconnecting the negative battery terminal. This step will prevent any electrical issues from occurring during the installation process. Use a wrench or socket to loosen the negative battery terminal, then carefully detach it from the battery. Wait for a few minutes before proceeding to the next step, allowing any residual power to drain from the car’s electrical system.
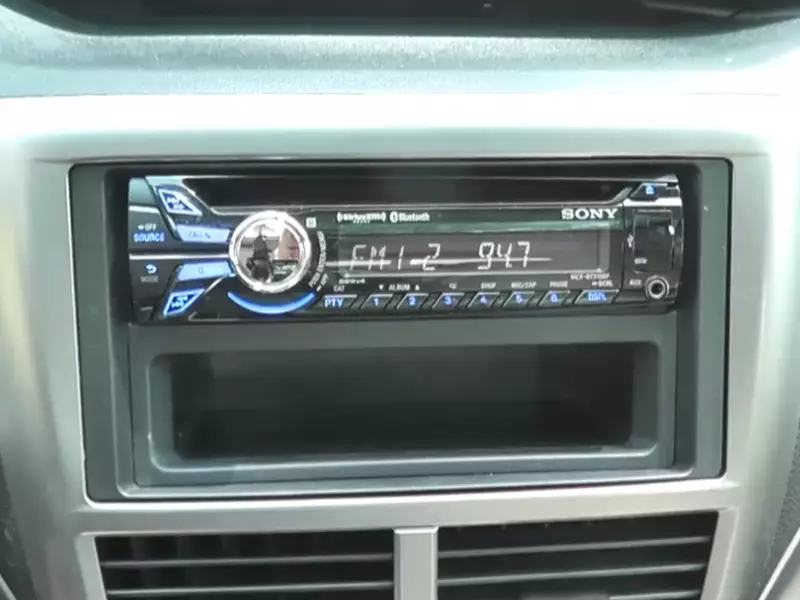
Test the functionality of the radio by turning it on and checking the sound
Now that the aftermarket radio is securely installed, it’s time to test its functionality. Reconnect the negative battery terminal by carefully attaching it back to the battery and tightening it with a wrench or socket. Turn on the car’s ignition and power on the radio. Ensure that all the buttons and controls are working as intended. Test the sound quality by playing a song or tuning in to a radio station. If the sound is clear and the features are working, you can proceed to the final step.
Adjust any settings or configurations as needed
Lastly, take a moment to adjust any settings or configurations to suit your preferences. Every car and aftermarket radio may have different settings, such as equalizer options, audio output levels, or display preferences. Spend some time exploring the radio’s settings menu and make adjustments as desired. This will help you achieve the best audio experience tailored to your liking.
In conclusion, installing an aftermarket radio in your car can greatly enhance your audio experience. By following these steps – inserting the radio into the dash kit or mounting bracket, securing it in place, reconnecting the negative battery terminal, testing its functionality, and adjusting settings – you can seamlessly integrate the new radio into your car’s audio system. Enjoy your favorite music with improved sound quality and added features by taking advantage of an aftermarket radio installation.
Reassembling The Dashboard
Reinstall any trim panels or covers that were removed earlier
Now that you have successfully installed the aftermarket radio, it’s time to reassemble the dashboard. Start by carefully reinstalling any trim panels or covers that were removed earlier. These panels not only enhance the aesthetic appeal of your vehicle’s interior but also provide protection to the underlying components.
Make sure to align the panels properly before securing them back in place. This will ensure a seamless fit and minimize any potential rattling or movement while driving. Take your time and double-check that each panel is properly aligned with the surrounding parts.
Double-check that all the panels are properly aligned and secured
It’s important to double-check that all the panels are properly aligned and securely fastened. This will not only give your dashboard a clean and professional look but also prevent any potential issues down the road.
Inspect each panel closely and ensure that there are no gaps or misalignments. If you notice any discrepancies, gently adjust the panels until they fit snugly. This will provide a seamless transition between the aftermarket radio and the rest of your dashboard.
Test the fit and functionality of the trim panels by pressing on them gently
After reinstalling the trim panels, it’s crucial to test their fit and functionality. Gently press on each panel to check for any movement or looseness. If a panel feels unstable, you may need to reposition it or tighten the fasteners further.
Additionally, make sure that the buttons, knobs, and controls on the panels operate smoothly. Press each button and turn every knob to ensure that they function as intended. This step will help identify any issues that may need to be addressed before completing the installation.
Ensure all buttons, knobs, and controls are working correctly
The final step in reassembling the dashboard is to ensure that all buttons, knobs, and controls are working correctly. This is essential for the optimal functionality of your aftermarket radio and the overall user experience.
Test each button individually to verify that it responds accurately and without any delays. Similarly, check that all knobs and controls adjust the desired settings smoothly without any resistance or erratic behavior.
By following these steps, you can rest assured that your dashboard has been reassembled properly, and all components are aligned, secured, and functioning correctly.
Troubleshooting Common Issues
No power to the aftermarket radio
If you’ve installed an aftermarket radio and there’s no power, it can be quite frustrating. But don’t worry, we’ve got you covered. Here are a few troubleshooting tips to help you get to the root of the problem:
Check the wiring connections and ensure they are secure
Sometimes, the issue lies in loose or poorly connected wiring. Make sure that all the wires are properly connected and securely attached to their respective terminals. Double-check the connections to ensure there are no loose ends or frayed wires.
Verify that the wiring harness adapters are compatible and properly connected
Using the correct wiring harness adapters is crucial for a successful installation. Ensure that the wiring harness adapters you have chosen are compatible with your aftermarket radio and your vehicle’s wiring system. Check if there are any loose or disconnected wires, and make sure everything is properly connected.
Check the vehicle’s fuse box for any blown fuses related to the radio
Blown fuses can also be a common reason for lack of power to the aftermarket radio. Locate the fuse box in your vehicle and check if any of the fuses related to the radio are blown. If you find any blown fuses, replace them with new ones of the same amperage.
Poor sound quality or no sound
If you have installed an aftermarket radio but are experiencing poor sound quality or no sound at all, try these troubleshooting steps to identify and resolve the issue:
Check the speaker connections and ensure they are properly connected
Sometimes, poor sound quality or no sound can be a result of loose or poorly connected speaker wires. Make sure that all the speaker wires are securely connected to their respective terminals on both the radio and the speakers. Ensure there are no loose ends or frayed wires.
Adjust the volume and audio settings on the aftermarket radio
It’s also worth checking the volume and audio settings on your aftermarket radio. Increase the volume to see if that resolves the issue. Additionally, make sure that the audio settings are properly configured and adjusted according to your preferences.
Verify that the speaker wires are correctly connected to the radio’s output
Incorrectly connected speaker wires can significantly affect the sound quality. Make sure that the speaker wires are properly connected to the correct output terminals on the aftermarket radio. Consult the wiring diagram provided with your radio or the manufacturer’s manual for guidance.
Display or control issues
If you’re experiencing problems with the display or control functions of your aftermarket radio, follow these troubleshooting tips to identify and fix the issues:
Check the wiring connections for the display and control functions
Loose or poorly connected wiring can cause display or control issues with your aftermarket radio. Ensure that all the necessary wires for the display and control functions are properly connected and securely attached. Check for any loose ends or frayed wires and fix them accordingly.
Ensure the aftermarket radio is securely mounted in the dash kit
A loose or improperly mounted aftermarket radio can result in display or control issues. Make sure that the radio is securely and properly mounted in the dash kit. Tighten any screws or brackets that are meant to hold the radio in place.
Consult the manufacturer’s manual for troubleshooting specific issues
If you’re still facing display or control issues with your aftermarket radio, it’s always a good idea to consult the manufacturer’s manual. The manual may have specific troubleshooting steps for common issues, allowing you to resolve the problem effectively.
Now that you have some troubleshooting tips to address common issues with aftermarket radios, you can confidently install your new radio and enjoy an improved audio experience in your vehicle.
Frequently Asked Questions On How To Install Aftermarket Radio
Is It Hard To Install An Aftermarket Radio?
Installing an aftermarket radio is not difficult. It can be done easily without professional help. Just follow the instructions provided with the radio and ensure you have the necessary tools. The process involves removing the old radio, connecting the new one, and securing it in place.
What Do You Need To Install An Aftermarket Stereo?
To install an aftermarket stereo, you need a compatible stereo unit, a wiring harness adapter, and a dash kit. Additionally, tools like wire strippers, crimpers, and screwdrivers may be required. Follow the manufacturer’s instructions and ensure proper connections for a successful installation.
Can You Install A New Car Radio Yourself?
Yes, you can install a new car radio yourself. It’s a straightforward process that doesn’t require advanced technical skills. With the right tools and instructions, you can save money by doing it yourself. Just make sure to follow the installation guide for your specific car model.
Do You Need A Wiring Harness For An Aftermarket Radio?
Yes, you need a wiring harness for an aftermarket radio. It allows you to connect the radio to the electrical system of your vehicle. A wiring harness ensures proper functioning and compatibility. It simplifies the installation process and avoids cutting or splicing into the existing wiring.
Conclusion
Installing an aftermarket radio doesn’t have to be a daunting task. By following the step-by-step instructions provided in this guide, you can confidently upgrade your car audio system. Remember to gather all the necessary tools and equipment, and take your time during the installation process.
With a little patience and effort, you’ll be enjoying your new radio in no time. Happy driving!