To install a wire harness car stereo, first, identify the wires needed to connect the stereo to the vehicle’s electrical system. Then, match the color-coded wires on the harness to the corresponding wires on the stereo and vehicle, and use crimp connectors or soldering to secure the connections.
Understanding Wire Harnesses For Car Stereos
Installing a wire harness for your car stereo can seem like a daunting task, but it doesn’t have to be. In this section, we will discuss what a wire harness is and how it simplifies the car stereo installation process. Understanding these concepts will help you feel more confident and knowledgeable when it comes to installing your new car stereo.
What is a wire harness for a car stereo?
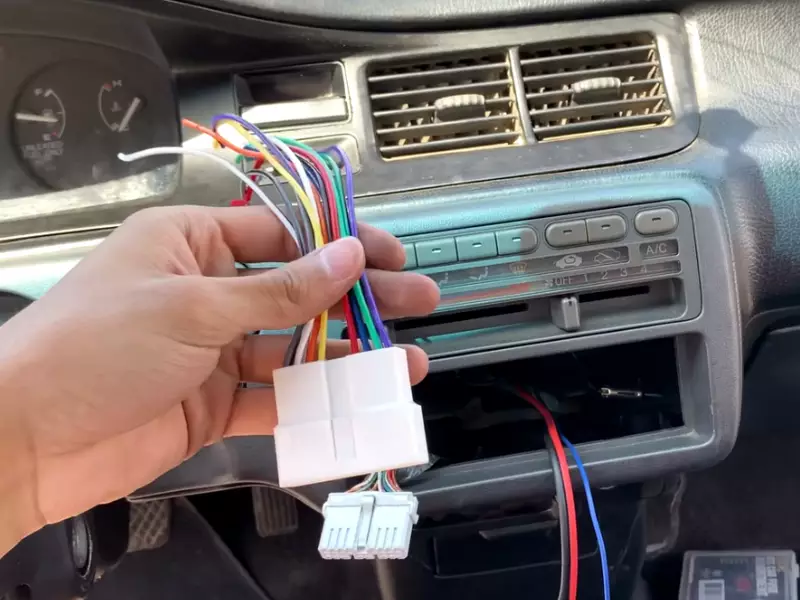
A wire harness, also known as a wiring harness or wiring loom, is a vehicle-specific electrical component that connects the car stereo to the vehicle’s electrical system. It consists of individual wires that are bundled together and terminated with connectors at each end. These connectors are designed to plug directly into the factory wiring harness, making it easier to install an aftermarket car stereo without the need for cutting or splicing wires.
Wire harnesses are typically color-coded to match the wires of the car stereo, making it easier to identify which wire should be connected to which. This eliminates the guesswork and reduces the risk of accidentally connecting the wrong wires, which can lead to electrical issues or damage to the car stereo and vehicle.
Moreover, wire harnesses often come with additional features, such as antenna adapters and steering wheel control interfaces, that allow for seamless integration of the new car stereo into the existing vehicle system. This makes it easier to retain essential functions like radio reception or steering wheel controls.
How does a wire harness simplify the car stereo installation process?
Wire harnesses simplify the car stereo installation process in several ways:
- Eliminates the need for cutting or splicing factory wires: With a wire harness, you can simply connect the new car stereo to the existing wiring without modifying the original wiring harness. This ensures a clean and professional installation.
- Reduces the risk of electrical issues: By using a wire harness, you minimize the chance of accidentally connecting the wrong wires, which can result in short circuits or electrical damage.
- Saves time and effort: With clearly labeled connectors and color-coded wires, installing a car stereo with a wire harness is much quicker and easier compared to manually connecting each wire individually.
Wire harness for a car stereo is an invaluable component that simplifies the installation process. It provides a plug-and-play solution for connecting the car stereo to the vehicle’s electrical system, eliminating the need for cutting or splicing wires. Using a wire harness saves time, minimizes the risk of electrical issues, and ensures a professional installation. With this understanding, you can confidently tackle the installation of your new car stereo.
Gathering The Necessary Tools And Materials
Installing a wire harness car stereo can seem like a daunting task, but with the right tools and materials on hand, it can be a straightforward and successful project. By gathering the essential tools and required materials before you begin the installation process, you can save time and ensure everything goes smoothly. In this section, we will go over the necessary tools and materials you will need to install a wire harness car stereo.
Essential tools for installing a wire harness car stereo
Before you start the installation process, make sure you have the following tools handy:
| Tools | Description |
|---|---|
| Screwdriver set | A set of screwdrivers of different sizes will be required to remove the old stereo and install the new one. |
| Wire crimpers | Wire crimpers are essential for attaching the wires from the wire harness to the car stereo. |
| Wire strippers | Wire strippers will help you remove the insulation from the wires, making it easier to connect them. |
| Tape measure | A tape measure will come in handy when you need to measure the space in your car for the new stereo. |
| Electrical tape | Electrical tape will be used to secure the connections and prevent any short circuits. |
Required materials for a successful wire harness installation
In addition to the tools mentioned above, you will also need the following materials:
- Wire harness adapter: A wire harness adapter is a crucial component that allows you to connect your car’s factory wiring to the new stereo without the need for cutting or splicing.
- New car stereo: Make sure you have a compatible car stereo that fits your vehicle’s make and model.
- Mounting kit: A mounting kit is necessary if your car’s stereo slot is a different size than the new stereo.
- Antenna adapter: An antenna adapter is required if your car’s antenna plug does not match the one on the new stereo.
- Crimping connectors: Crimping connectors are used to secure the wires from the wire harness adapter to the car stereo.
By gathering these essential tools and materials, you will be prepared to tackle the wire harness car stereo installation with ease. Having everything you need at hand will help streamline the process and ensure a successful installation.
Removing The Existing Car Stereo
Before installing a wire harness car stereo, it is necessary to first remove the old car stereo. This step-by-step guide will walk you through the process of safely removing your existing car stereo.
Step-by-step guide to removing the old car stereo
- Gather the necessary tools: Before getting started, make sure you have the following tools on hand: a flathead screwdriver, a panel removal tool, and possibly a socket wrench set.
- Disconnect the negative battery terminal: To ensure your safety and prevent any electrical mishaps, begin by disconnecting the negative (black) battery terminal. This will cut off power to the car’s electrical system.
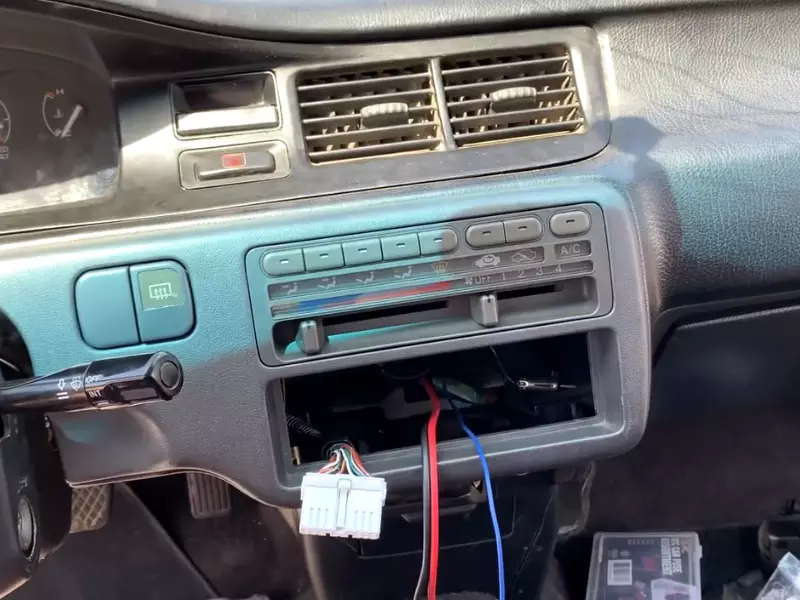
- Use the panel removal tool to pry off the trim pieces: Carefully insert the panel removal tool between the trim pieces and the dashboard to pry them off. Start with the trim pieces around the stereo, such as the air vents or control knobs.
- Unscrew or unclip the mounting brackets: Once the trim pieces are removed, you may need to unscrew or unclip the mounting brackets that secure the car stereo in place. Refer to your car’s manual to determine the specific method for your vehicle.
- Gently pull the stereo out: Slowly and carefully pull the car stereo out of the dashboard. Be mindful of any cables or wires attached to the back of the stereo.
- Disconnect the wiring harness and antenna: Locate the wiring harness and antenna connections at the back of the car stereo. Carefully disconnect each connector by gently pulling them apart.
- Remove the old stereo: With all connections detached, you can now completely remove the old car stereo from the dashboard.
Precautions to take during the removal process
- Be cautious with delicate trim pieces: When using the panel removal tool, take extra care when prying off trim pieces to avoid any damage. Apply gentle pressure and use the tool strategically to prevent any scratches or cracks.
- Tread carefully with cables and wires: As you pull the stereo out, watch out for any cables or wires that may still be connected. Mishandling these delicate components can result in damage to the car’s electrical system.
- Refer to the car’s manual if unsure: If you encounter any difficulties or are unsure about the steps involved in removing the old car stereo, consult your car’s manual. It will provide detailed instructions tailored to your specific make and model.
Following these steps and taking necessary precautions will help you safely remove your old car stereo, preparing the way for the installation of your new wire harness car stereo.
Connecting The Wire Harness To The Car Stereo
Installing a wire harness car stereo is a crucial step in upgrading your vehicle’s audio system. A wire harness connects the car stereo to the electrical system of the car, ensuring seamless integration and proper functionality. In this guide, we will focus on the process of connecting the wire harness to the car stereo, covering the identification of wire harness connections and the proper steps to ensure a secure and reliable connection.
Identifying the Wire Harness Connections for the Car Stereo
Before you can connect the wire harness to the car stereo, it’s important to identify the various connections on the wire harness. These connections may vary depending on the brand and model of your car stereo, so referring to the user manual and the wire harness instructions is essential. However, there are some common connections you can expect to find:
- Power connection: This connection supplies power to the car stereo, typically using a red wire for positive and a black wire for ground or negative.
- Speaker connections: These connections are used to connect the car stereo to the speakers, usually grouped into sets of two for each speaker channel.
- Accessory connection: This connection is used to power additional accessories, such as an amplifier or a subwoofer.
- Antenna connection: This connection allows the car stereo to receive radio signals.
- Control connections: These connections enable additional features of the car stereo, such as steering wheel controls or a remote control system.
Properly Connecting the Wire Harness to the Car Stereo
Once you have identified the wire harness connections for your specific car stereo, the next step is to properly connect the wire harness to the car stereo. Follow these steps to ensure each connection is secure:
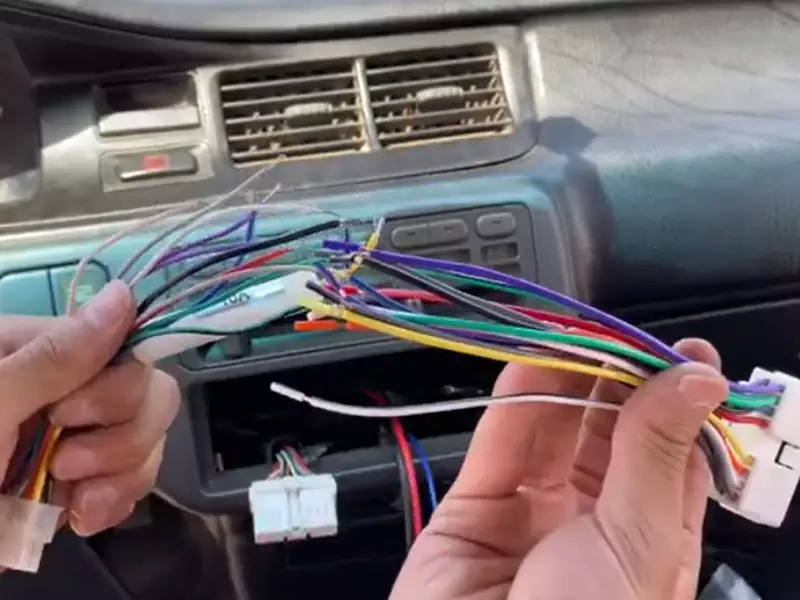
- Match the wire colors: Start by matching the wire colors of the wire harness to the corresponding colors on the car stereo. This will ensure that the connections are made correctly.
- Strip the wires: Use a wire stripper to remove a small portion of insulation from the wire ends. This will expose the bare metal wire for a better connection.
- Twist the wires together: Twist the exposed metal wires from the wire harness to the corresponding wires on the car stereo.
- Solder or crimp the connections: For a more secure connection, you can choose to solder the wires or use crimp connectors. Soldering provides a strong and reliable connection, while crimp connectors offer ease of installation and flexibility.
- Insulate the connections: After making the connections, it’s important to insulate them to prevent any short circuits or electrical issues. Use electrical tape or heat shrink tubing to cover the exposed connections.
By following these steps and ensuring each connection is secure and properly insulated, you can successfully connect the wire harness to your car stereo. This will allow you to enjoy the enhanced audio experience and functionality that a new car stereo brings.
Matching The Wire Harness Connections With The Vehicle
Identifying the wire connections in the vehicle
Before you can begin matching and connecting the wire harness with the vehicle’s wires, it’s crucial to properly identify the wire connections in your car. Every vehicle comes with its unique wire setup, so it’s important to understand which wires perform which functions.
Start by locating the wire diagram for your specific car model. This can usually be found in the vehicle’s owner’s manual or through an online search. The wire diagram will provide you with a visual map of how the wires are connected and what each wire represents.
Once you have the wire diagram, begin by identifying the key wires in your car’s harness. Some of the common wire connections you may come across include:
- Power wire: This wire provides power to the car stereo unit.
- Ground wire: The ground wire ensures proper electrical grounding and prevents any potential electrical issues.
- Speaker wires: These wires connect the car stereo to the speakers throughout the vehicle.
- Antenna wire: The antenna wire allows for radio reception.
- Accessory wire: This wire is responsible for supplying power to additional accessories such as amplifiers or subwoofers.
Matching and connecting the wire harness with the vehicle’s wires
Now that you have successfully identified the wire connections in your car, it’s time to match and connect the wire harness with the vehicle’s wires. This process ensures that the car stereo unit functions seamlessly with your vehicle’s electrical system.
To start, match the color-coded wires on the wire harness with the corresponding wires in your vehicle. Many wire harnesses and car stereo units come with standardized color codes to make this process easier. For example, the red wire typically represents the power wire, while the black wire signifies the ground wire.
Once you’ve matched the wires, connect them securely using butt connectors or soldering. Butt connectors provide a reliable and insulated connection by crimping the wire ends together, while soldering creates a permanent bond between the wires.
After connecting the wire harness to the vehicle’s wires, take a moment to double-check all the connections. Ensure that each wire is securely fastened and that there are no loose or exposed wires. A tidy and secure connection minimizes the risk of electrical problems and ensures optimal performance of your car stereo unit.
Remember, it’s always essential to refer to your car’s specific wire diagram and the instructions provided with your wire harness and car stereo unit for accurate information and guidance during the installation process. With proper matching and connecting, you’ll be enjoying your favorite tunes in no time!
Securing And Testing The Wire Harness Connection
Securing the wire harness connection for stability
Once you have properly connected the wire harness to your car stereo, it’s important to secure the connection to ensure stability. A secure wire harness connection will prevent any intermittent audio issues and ensure that your car stereo functions optimally. Here are some steps you can follow to secure the wire harness connection:
- Inspect the wire harness connection: Take a moment to visually inspect the connection to ensure that all the wires are properly connected and there are no loose or exposed wires. This will help you identify any potential problems before moving forward.
- Use electrical tape: To provide added stability and protection to the wire harness connection, use electrical tape to wrap around the connected wires. Start by wrapping a few inches of tape around the wire bundle, making sure to cover the exposed ends of the wires. Continue wrapping the tape tightly along the length of the connection, ensuring that all the wires are securely held together.
- Secure the wire harness: Once you have wrapped the wire harness connection with electrical tape, it’s important to secure it in place. You can use zip ties or adhesive clips to hold the wire harness in place and prevent it from becoming loose or moving around. Position the wire harness securely away from any moving parts or hot surfaces to avoid any potential damage.
Testing the wire harness connection for functionality
Now that you have secured the wire harness connection, it’s time to test its functionality. Testing the wire harness connection will ensure that all the wires are properly connected and the car stereo is functioning as expected. Here’s how you can test the wire harness connection:
- Power on the car stereo: Start by powering on your car stereo and checking if it turns on without any issues. If the car stereo doesn’t power on or if you notice any unusual behavior, double-check the wire harness connection and make sure all the wires are securely connected.
- Test each speaker: To test the functionality of each speaker, play audio through the car stereo and make sure that sound is coming from all the speakers. If you notice any speakers not producing sound or producing distorted sound, it could be a sign of a faulty wire harness connection. In such cases, recheck the wire connections and ensure they are properly secured.
- Check other features: Besides testing the speakers, it’s also important to check other features of the car stereo, such as radio reception, CD player, Bluetooth connectivity, and any other functionalities specific to your car stereo model. Make sure all these features are working as intended, as any issues can indicate a problem with the wire harness connection.
By securing and testing the wire harness connection, you can ensure a stable and functional car stereo installation. Follow these steps and enjoy a seamless audio experience on your journeys!
Mounting The New Car Stereo
Proper placement and mounting of the new car stereo are crucial steps to ensure a secure and stable installation. When it comes to installing a wire harness car stereo, you want to make sure that the head unit is securely positioned in your vehicle’s dashboard.
Proper Placement
The first step in mounting your new car stereo is to find the perfect location within your vehicle’s dashboard. This location should be easily accessible and provide optimal visibility and reach. Take into consideration any existing wiring or components that may interfere with the installation process. Additionally, make sure that there is enough clearance behind the dashboard to accommodate the depth of the stereo and any required wiring connections.
While each vehicle may have different mounting options and requirements, it is generally recommended to position the car stereo at eye level for easy access. This allows you to operate the stereo without taking your eyes off the road for an extended period. Aim for a position that provides a comfortable viewing angle and doesn’t obstruct any of the vehicle’s controls or air vents.
Ensuring a Secure and Stable Installation
Once you have determined the proper placement, it’s time to secure your new car stereo in place. This is crucial to prevent any movement or potential damage while driving.
Here are a few steps to ensure a secure and stable installation:
- Attach the mounting brackets: Most car stereos come with mounting brackets that need to be attached to the sides of the stereo unit. These brackets will then be used to secure the stereo within the dashboard.
- Slide the stereo into place: Carefully slide the stereo unit into the dashboard until it sits snugly in the desired position. Make sure it aligns properly with the mounting brackets.
- Secure the stereo with screws: Once the stereo is properly aligned, use the screws provided with the mounting brackets to secure the stereo in place. Ensure each screw is tightened firmly but not overly tightened, as it may damage the stereo or the dashboard.
- Test for stability: After securing the stereo, give it a gentle shake to check for any loose connections or movement. If the stereo feels stable and does not jiggle or move, you have successfully mounted your new car stereo.
By following these steps and ensuring a secure and stable installation, you can enjoy your wire harness car stereo with peace of mind, knowing that it is properly mounted and ready to provide a superior audio experience during your drives.

Troubleshooting And Finishing Touches
Once you’ve successfully connected the wire harness for your car stereo, there are a few remaining steps that you’ll need to complete. Troubleshooting any potential issues that arise during the installation process is essential for ensuring a smooth and functional operation. Additionally, taking care of the finishing touches will give your car stereo installation a polished and professional look. In this section, we’ll explore common issues that may occur during wire harness car stereo installation and provide the final steps to complete the installation process.
Common issues during wire harness car stereo installation
During the process of installing a wire harness car stereo, you may encounter a few common issues. These issues can be easily resolved with some troubleshooting. By addressing these problems, you’ll be able to ensure that your car stereo functions properly without any complications. Here are some common issues you may face and how to troubleshoot them:
- Incorrect wiring connections: If you find that your car stereo is not turning on or there is no sound coming from the speakers, the problem is likely due to incorrect wiring connections. Double-check all your connections and make sure they match the wiring diagram for your specific car and car stereo model.
- Poor audio quality: If you notice a decrease in audio quality, such as distorted sound or low volume, it could be due to a loose or faulty connection. Make sure all the connections are secure and properly seated. Additionally, check the settings on your car stereo to ensure they are optimized for the best audio performance.
- Interference or static: If you experience interference or static noise while using your car stereo, it could be caused by improper grounding or poor shielding. Check that all the ground wires are securely connected and consider using a noise filter or shielded cables to minimize interference.
- Incompatibility: In some cases, the wire harness and car stereo may not be compatible with each other. This can result in unexpected behavior or no functionality at all. Before purchasing a wire harness, make sure it is specifically designed for your car make and model, as well as the car stereo you plan to install.
- Malfunctioning controls or buttons: If certain controls or buttons on your car stereo are not working properly, it could indicate a wiring issue or a faulty component. Carefully inspect the wiring connections and test the controls to identify the cause of the malfunction. If necessary, consult the user manual of your car stereo for further troubleshooting steps.
Final steps to complete the installation process
To wrap up the wire harness car stereo installation, there are a few final steps that you should follow to ensure everything is in order. These steps will guarantee a neat and professional-looking installation. Here are the final steps you should take:
- Secure the wire harness: Use zip ties or electrical tape to secure the wire harness and prevent it from interfering with other car components or becoming tangled. This will help maintain a clean and organized installation.
- Test the functionality: Double-check that all the functions of your car stereo are working properly. Test features such as radio reception, CD playback, Bluetooth connectivity, and any other functions specific to your car stereo model. Make sure the sound is clear and the controls are responsive.
- Reassemble any removed parts: If you had to remove any panels or trim pieces during the installation process, carefully reattach them to their original positions. Ensure that they fit securely and do not obstruct the operation of your car stereo.
- Clean up: Take a moment to clean up any dust or debris that may have accumulated during the installation. This will give your car a polished finish and make the entire installation process look professional.
- Enjoy your new car stereo: Now that you have successfully installed the wire harness and completed all the necessary steps, it’s time to enjoy your upgraded car stereo system. Sit back, relax, and enjoy your favorite music or radio stations on the go!
By troubleshooting common issues and following these final steps, you’ll be able to complete the wire harness car stereo installation process with confidence and achieve a fully functional and professional-looking setup.
Tips And Tricks For A Successful Wire Harness Car Stereo Installation
Installing a wire harness car stereo can be a challenging task, especially for beginners. However, with the right tips and tricks up your sleeve, you can ensure a smooth installation process and enjoy a high-quality car audio experience. In this article, we will share expert tips and common mistakes to avoid during the wire harness car stereo installation.
Expert tips to ensure a smooth installation process
- Read the manual: Before diving into the installation process, it is crucial to thoroughly read the manual provided with your wire harness car stereo. This will familiarize you with the specific instructions, wiring diagrams, and installation guidelines that are unique to your car stereo model.
- Prepare the necessary tools: To streamline the installation process, make sure you have all the necessary tools beforehand. These may include wire strippers, electrical tape, a soldering iron, crimping pliers, and a wiring harness adapter.
- Label your wires: To avoid confusion and minimize the chances of making mistakes, label the wires as you remove them from the old stereo. This will make it easier to match them correctly to the new wire harness.
- Double-check the connections: Once you have connected the wires from the car to the wire harness, it’s vital to double-check all the connections before mounting the stereo into the dash. Ensure that each wire is securely connected and that there are no loose connections.
- Test the stereo before finalizing: Before finalizing the installation process, it is crucial to test the car stereo to ensure everything is working correctly. Check the audio output, controls, and functionality to avoid any headaches later on.
Common mistakes to avoid during the installation
- Skipping the wire harness adapter: One of the most common mistakes is neglecting to use a wire harness adapter. This adapter ensures a seamless connection between the car’s wiring and the wire harness of the new stereo. Skipping this step can lead to wiring issues and potential damage to your car’s electrical system.
- Not properly securing the wires: Improperly securing the wires can result in interference, rattling, or even short circuits. Take the time to tuck and secure the wires neatly using electrical tape or zip ties to prevent any potential problems in the future.
- Failure to match wire colors: Matching wire colors correctly is vital for a successful installation. Even if two wires seem similar, always refer to the manual or wiring diagram to ensure accurate matching. Mismatched connections can cause functionality issues and may even damage your car stereo.
- Overlooking ground connections: A good ground connection is essential for optimal performance and preventing electrical issues. Make sure to connect the ground wire from the wire harness to an appropriate grounding point in your vehicle.
- Ignoring the antenna connection: Connecting the antenna wire is often overlooked during installation. This can result in poor radio signal reception. Ensure that you connect the antenna wire properly to maintain optimal radio performance.
By following these expert tips and avoiding common mistakes, you can ensure a successful wire harness car stereo installation. Take your time, be patient, and refer to the manual whenever needed. With a little effort, you’ll be enjoying your favorite tunes on the road in no time!
Frequently Asked Questions For How To Install A Wire Harness Car Stereo
How Do You Connect A Wire Harness To A Radio?
To connect a wire harness to a radio, identify the matching colors on both the harness and the radio’s wiring. Strip the wires, twist them together, and secure with electrical tape or crimp connectors. Finally, plug the harness into the radio’s corresponding port.
Do I Need A Wiring Harness To Install A Car Stereo?
Yes, you need a wiring harness to install a car stereo. Wiring harnesses are necessary for connecting the stereo to your vehicle’s wiring system, ensuring proper functioning and compatibility. It simplifies the installation process and eliminates the need for splicing or cutting wires.
What Color Wires Go Together In A Car Stereo?
The color wires that go together in a car stereo vary depending on the manufacturer. Generally, red is for power, black is for ground, and other colors like white or blue are for specific functions. Check the stereo’s manual or consult a professional for precise wire color codes.
Where Do You Connect The Ground Wire On A Car Stereo?
Connect the ground wire of a car stereo to a metal part of the car’s chassis.
Conclusion
Installing a wire harness car stereo can be a daunting task, but with the right steps and tools, it becomes a breeze. By following the instructions and diagrams provided, you can ensure a seamless installation process. Remember to double-check all connections and take your time to avoid any potential issues.
With the added convenience and improved audio quality, installing a wire harness car stereo is definitely worth the effort. So go ahead, give it a try and enjoy a better driving experience with your new car stereo.