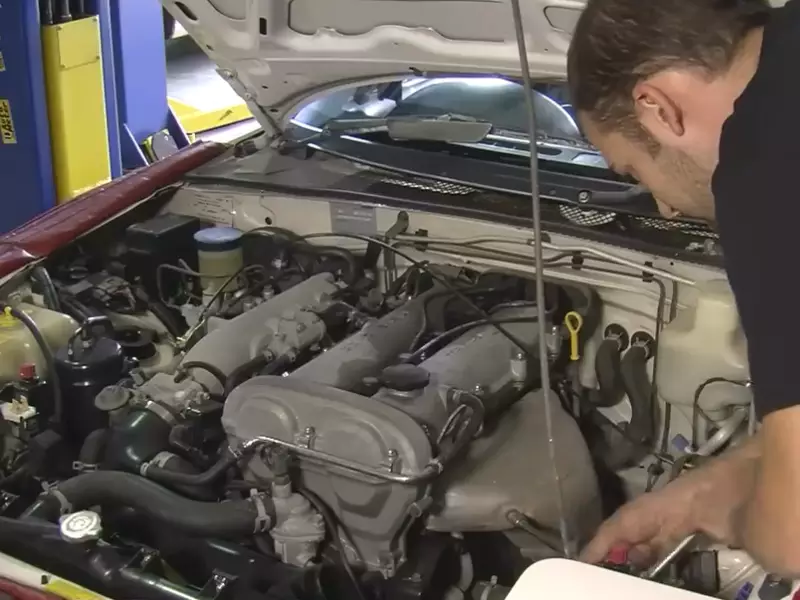
Installing a turbo involves several steps, including mounting the unit, connecting the oil and coolant lines, and installing the intake and exhaust components. When installing a turbo, it is important to carefully follow the manufacturer’s instructions and use the correct tools for the job.
Factors To Consider When Selecting A Turbo
Power requirements of your engine
When selecting a turbo for your engine, the first factor you need to consider is the power requirements of your engine. Every engine has a specific power output and torque capacity, and it’s important to choose a turbo that can handle the demands of your engine.
Firstly, you need to determine the horsepower and torque goals you have for your engine. This will give you an idea of the power output you are aiming for. It’s important to ensure that the turbo you choose can provide adequate boost pressure to achieve these goals.
Next, you need to consider the size of your engine. Smaller engines typically require smaller turbos, while larger engines may require bigger turbos to meet the power requirements. It’s crucial to find the right balance between turbo size and engine size to ensure optimal performance.

Size and fitment compatibility
The size and fitment compatibility of the turbo is another important factor to consider. It’s essential to choose a turbo that will fit properly in your engine bay and be compatible with other components in the system.
Firstly, you need to measure the available space in your engine bay to ensure that the turbo can physically fit. Consider factors such as clearance with the hood, firewall, and other surrounding components. Also, check if any modifications or custom fabrication will be required to install the turbo.
Additionally, you need to consider the compatibility of the turbo with other components such as the exhaust manifold, intercooler, and intake system. Make sure that the turbo flange matches the exhaust manifold flange, and that the intercooler pipes and intake system can be routed properly for a seamless installation.
Furthermore, it’s advisable to consult with experienced professionals or seek advice from the turbo manufacturer to ensure that you choose a turbo that is the right size and fitment for your specific engine and vehicle.
Turbo options based on budget
Lastly, your budget plays a significant role in selecting a turbo for your engine. Turbochargers come in a variety of options, ranging from budget-friendly options to high-performance variants.
If you have a limited budget, you may opt for a stock turbo or a smaller aftermarket turbo, which can still provide a noticeable power increase. These turbos are often more affordable and readily available.
On the other hand, if you have a larger budget and are seeking maximum performance, you can consider high-end turbos with advanced features such as ball bearing technology, adjustable wastegates, and larger compressor wheels. These turbos are designed for enthusiasts who are looking for exceptional power gains and improved throttle response.
Ultimately, it’s essential to strike a balance between your budget and performance goals, ensuring that you choose a turbocharger that meets your requirements without breaking the bank.
Preparing For The Turbo Installation
Before installing a turbocharger on your engine, there are a few important steps you need to take to ensure a smooth and successful installation. This section will cover the necessary tools and equipment you’ll need, important safety precautions, and how to inspect and prepare your engine for the installation.
Gathering the necessary tools and equipment
To get started, gather all the tools and equipment you’ll need for the turbo installation. Here’s a list of the essentials:
| Tools | Equipment |
|---|---|
| Socket set | Turbocharger kit (including the turbocharger, wastegate, intercooler, and associated piping) |
| Torque wrench | Blow-off valve |
| Screwdrivers | Boost controller |
| Pliers | Oil feed and drain lines |
| Wrenches | Turbo gaskets and mounting hardware |
| Electrical connectors |
Safety precautions and workspace setup
When it comes to turbo installations, safety should be your top priority. Follow these safety precautions and set up your workspace accordingly:
- Wear protective gloves and goggles to avoid injury.
- Disconnect the battery to prevent any electrical mishaps.
- Work in a well-ventilated area to avoid inhaling any fumes or gases.
- Ensure that the engine is cool before you begin the installation.
- Use jack stands or ramps to elevate the vehicle securely.
- Place a fire extinguisher nearby for added safety.
Inspecting and preparing the engine
Before installing the turbo, it’s crucial to inspect and prepare your engine properly. Follow these steps:
- Clean the engine bay and components to remove any dirt, debris, or oil buildup.
- Inspect the engine for any signs of damage or wear, such as cracked hoses or worn gaskets. Replace any faulty components.
- Ensure that the engine is in good working condition, with no mechanical issues.
- Check the oil and coolant levels and make sure they are at the recommended levels.
- Inspect the exhaust system to ensure it is in good condition and free from any leaks.
- Prepare the necessary installation areas for the turbocharger, wastegate, intercooler, and associated piping.
By following these steps to gather the necessary tools and equipment, taking appropriate safety precautions, and inspecting and preparing your engine, you’ll be well on your way to successfully installing a turbocharger. In the next section, we’ll dive into the actual installation process.
Removing The Old Turbo
Before installing a new turbocharger in your vehicle, it is crucial to properly remove the old one. This process involves several steps, including draining and removing the engine coolant, disconnecting and removing the exhaust system, as well as removing the intake manifold and intercooler. Let’s take a closer look at each of these steps.
Draining and removing the engine coolant
Firstly, ensure the engine is cool before proceeding with this step. Start by placing a container under the radiator drain valve to catch the coolant. Then, locate the drain valve, usually near the bottom of the radiator, and turn it counterclockwise to release the coolant. Allow all the coolant to drain out completely.
Disconnecting and removing the exhaust system
Next, it is necessary to disconnect and remove the exhaust system to gain access to the turbocharger. Begin by removing bolts and clamps attaching the exhaust system components together. Be mindful of any sensors or connectors that may need to be disconnected as well. Once all the necessary connections are detached, carefully remove the exhaust system from the vehicle.
Removing the intake manifold and intercooler
The intake manifold and intercooler sitting on top of the engine must be removed to access the old turbocharger. Start by disconnecting any hoses or pipes connected to the intercooler. Loosen and remove any bolts or clamps securing the intake manifold as well.
Unbolting and removing the old turbocharger
Now comes the final step—unbolting and removing the old turbocharger. To do this, locate the bolts securing the turbocharger to the engine and use an appropriate wrench to loosen and remove them. Work your way around the turbocharger, ensuring all bolts are removed. Once all the bolts are detached, carefully lift the old turbocharger out of its position.
With the old turbocharger successfully removed, you can now move on to the exciting process of installing a new turbocharger in your vehicle. Stay tuned for our next blog post on how to properly install a turbocharger!
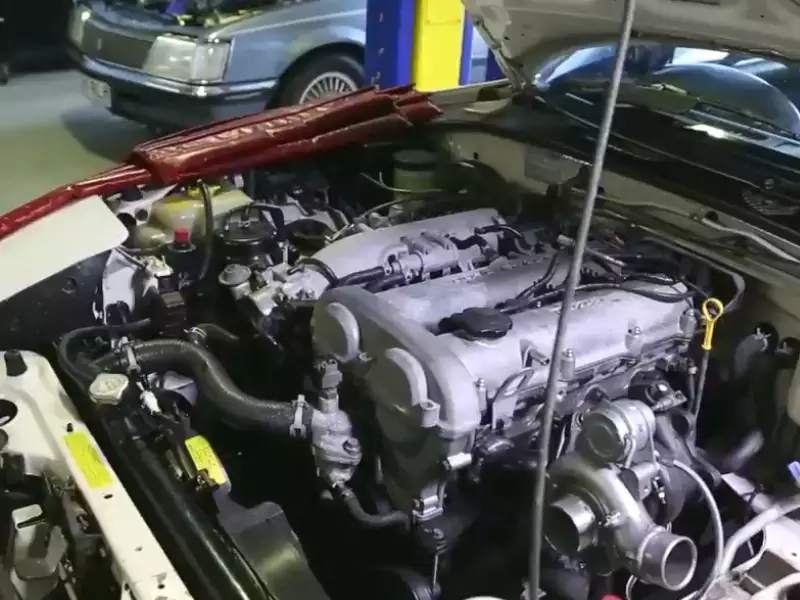
Installing The New Turbo
Now that you have properly removed the old turbocharger, it’s time to install the new one. This crucial step requires precise knowledge and attention to detail to ensure a successful installation. In this section, we will guide you through the process of preparing the new turbocharger for installation, mounting and securing it, reassembling the intake manifold and intercooler, and connecting the exhaust system and engine coolant.
Preparing the new turbocharger for installation
Before installing the new turbocharger, it’s crucial to prepare it properly. Here are the steps you need to follow:
- Inspect the new turbocharger for any signs of damage or defects. It’s crucial to ensure that you are installing a turbocharger in pristine condition.
- Apply a thin layer of high-temperature anti-seize compound to the mounting flanges of the turbocharger. This will help prevent corrosion and make future removal easier.
- Check the manufacturer’s instructions for any specific preparation steps or requirements.
Mounting and securing the new turbocharger
Once you have prepared the new turbocharger, it’s time to mount and secure it in place. Follow these steps:
- Carefully position the new turbocharger in its designated location. Ensure that the mounting flanges align with the corresponding flanges on the engine.
- Secure the turbocharger in place using the manufacturer-specified mounting bolts or studs. Tighten them to the recommended torque specification using a torque wrench.
- Verify that the turbocharger is securely mounted and there is no excessive play or movement.
Reassembling the intake manifold and intercooler
With the new turbocharger properly mounted, it’s time to reassemble the intake manifold and intercooler. Here’s what you should do:
- Clean the mating surfaces of the intake manifold and intercooler to ensure a proper seal.
- Reinstall the intake manifold gasket or seal, ensuring proper alignment.
- Align the intercooler and secure it in place using the provided brackets or fasteners.
- Tighten all the bolts and clamps to the manufacturer’s specifications to achieve a proper seal.
Connecting the exhaust system and engine coolant
The final steps involve connecting the exhaust system and engine coolant. Follow these steps:
- Reconnect the exhaust pipes or manifold to the turbocharger’s outlet flange. Ensure that the connections are properly sealed to prevent any leaks.
- Connect the engine coolant lines to the appropriate fittings on the turbocharger. Verify that the connections are secure and free from any leaks or blockages.
Congratulations! You have successfully installed the new turbocharger. Now it’s time to test the turbocharger and ensure that everything is functioning properly. In the next section, we will guide you through the process of testing and troubleshooting your newly installed turbocharger.
Adjusting And Tuning
Once you have installed a turbocharger in your vehicle, the next step is to adjust and fine-tune it to maximize its performance and ensure optimal engine efficiency. This crucial process involves calibrating the engine control unit (ECU), fine-tuning the boost pressure, testing and adjusting the wastegate, and finalizing the tuning process.
Calibrating the engine control unit (ECU)
The engine control unit (ECU) is responsible for managing the air and fuel mixture in the engine. To optimize the turbocharger’s performance, you need to recalibrate the ECU. Here’s how:
- Connect a diagnostic tool to the OBD-II port of your vehicle.
- Access the ECU programming software.
- Adjust the ECU parameters to allow for increased boost pressure.
- Upload the new ECU calibration to the vehicle’s ECU.
Fine-tuning the boost pressure
Fine-tuning the boost pressure ensures that the turbocharger delivers the right amount of compressed air to the engine. Follow these steps to fine-tune the boost pressure:
- Install a boost pressure gauge to monitor the boost levels.
- Start the engine and let it idle.
- Increase the throttle gradually, while monitoring the boost pressure.
- Adjust the boost controller to achieve the desired boost pressure.
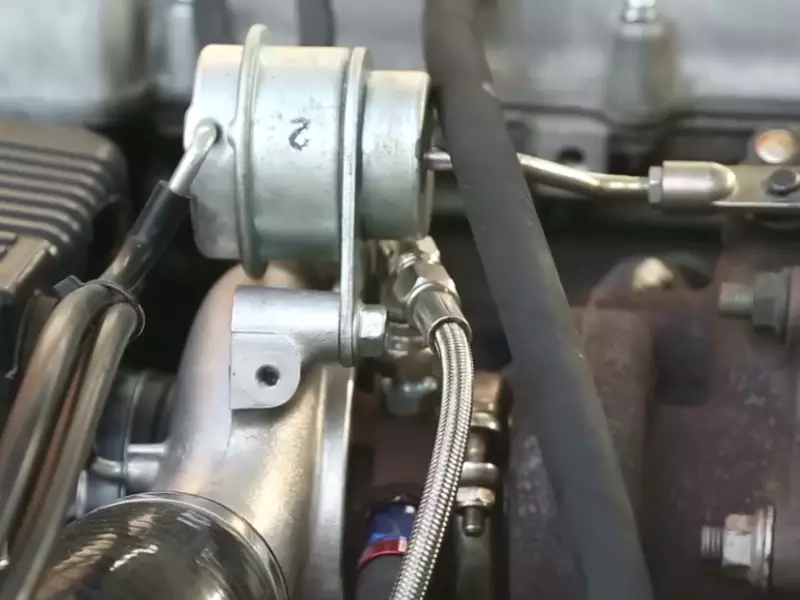
Testing and adjusting the wastegate
The wastegate plays a vital role in regulating the turbocharger’s boost pressure. To ensure it functions optimally, follow these steps:
- Inspect the wastegate for any signs of damage or wear.
- Test the wastegate by applying pressure and observing if it opens and closes properly.
- If necessary, adjust the wastegate actuator rod to achieve the desired boost pressure.
Finalizing the tuning process
After calibrating the ECU, fine-tuning the boost pressure, and adjusting the wastegate, it’s crucial to finalize the tuning process. This step involves:
- Verifying that all connections, hoses, and clamps are securely in place.
- Checking for any boost leaks using a smoke tester.
- Conducting a thorough test drive and monitoring the engine’s performance.
- Analyzing the data from the ECU to ensure proper fueling and optimal performance.
Troubleshooting Common Turbocharger Issues
Installing a turbocharger can greatly enhance the performance of your vehicle, providing a significant boost in power and acceleration. However, like any mechanical component, turbochargers can experience issues that may affect their performance. In this section, we will discuss some common problems that turbochargers may encounter and provide troubleshooting tips to address them effectively. By understanding these issues and their solutions, you can keep your turbocharged vehicle running smoothly and efficiently.
Boost leaks
Boost leaks refer to any unintended gaps or holes in the turbocharger system that allow pressurized air to escape before reaching the engine. The presence of boost leaks can result in reduced power, decreased fuel efficiency, and even potential engine damage. To identify boost leaks:
- Inspect all the intercooler connections and hoses for cracks or loose fittings. Tighten or replace any damaged parts.
- Check the turbocharger housing and intake manifold for signs of leakage, such as oil stains or loose bolts. Re-sealing or tightening may be required.
- Perform a smoke test, where smoke is introduced into the intake system to reveal any leaks. Address any identified leaks promptly.
- Ensure that all clamps and couplers connecting the intake components are secure.
Compressor surge
Compressor surge occurs when the pressure build-up in the turbocharger’s compressor outlet is disrupted and results in a sudden reversal of airflow. This can lead to decreased performance, increased wear on the turbocharger, and potential damage to the engine. To prevent or resolve compressor surge:
- Avoid sudden throttle changes or aggressive acceleration, as these can cause excessive pressure fluctuations.
- Install a blow-off valve or bypass valve to redirect excess pressure and prevent surge.
- Check the compressor housing for damage and ensure that the wastegate is functioning correctly.
- Consider upgrading to a larger or more efficient turbocharger if surge is a persistent issue.
Oil leaks and smoking issues
Oil leaks and smoking issues are common turbocharger problems that can indicate internal damage or worn seals. If you notice excessive smoke from the exhaust or oil leaking from the turbocharger, take the following steps:
- Inspect the oil feed line and ensure that it has the correct pressure and flow.
- Check the turbocharger’s oil drain line for blockages or restrictions.
- Inspect the seals and gaskets for wear or damage. Replace them if necessary.
- If the smoking issue persists, it may be necessary to disassemble the turbocharger for further inspection or seek professional assistance.
Maintenance Tips For Longevity
When it comes to maintaining your turbocharger, proper care and regular maintenance can significantly increase its longevity. Ignoring routine maintenance can lead to costly repairs and even complete failure of the turbo. To ensure your turbo performs optimally and lasts for a long time, here are some essential maintenance tips to follow:
Regular oil changes
One of the most critical maintenance tasks for your turbocharger is regular oil changes. The turbo relies on the engine oil for lubrication and cooling. Over time, engine oil can become contaminated with dirt, debris, and pollutants, which can clog or damage the turbo’s components. Regular oil changes at the recommended intervals will ensure fresh, clean oil circulates through the turbo, reducing the risk of excessive wear or damage. Don’t forget to use high-quality oil that meets the manufacturer’s specifications.
Inspection of oil and coolant lines
In addition to regular oil changes, it’s crucial to inspect the oil and coolant lines connected to the turbocharger. These lines carry important fluids that are essential for the turbo’s performance. Check for any signs of leaks, cracks, or loose connections. Ensure that the lines are properly secured and free from any obstructions. Any issues with the oil and coolant lines should be addressed promptly to prevent damage to the turbo and ensure efficient operation.
Monitoring boost levels and exhaust temperature
Boost levels and exhaust temperature play a significant role in the performance and longevity of your turbocharger. Monitoring these parameters regularly is essential to prevent overheating, excessive boost pressure, or any other abnormal conditions that may cause stress on the turbo. Use a boost gauge and an exhaust temperature gauge to keep an eye on these readings. If you notice any fluctuations or deviations from the normal range, it’s crucial to investigate the underlying cause and address it promptly to prevent potential damage to the turbo.
Cleaning the turbocharger components
Another critical maintenance task for ensuring the longevity of your turbo is cleaning the turbocharger components regularly. Over time, carbon deposits, oil residue, and other contaminants can accumulate on the compressor wheel, exhaust housing, and other turbo components. These deposits can restrict airflow and cause imbalance, leading to reduced performance and potential damage. Cleaning the turbocharger components with a suitable solvent or cleaner will help remove these deposits and ensure the turbo operates at its best.
Frequently Asked Questions For How To Install A Turbo
Can You Install A Turbo Yourself?
Yes, you can install a turbo yourself. Follow instructions carefully, gather necessary tools, and be familiar with your vehicle’s engine. Always exercise caution and ensure you have the required expertise. A professional installation, however, might be recommended for best results.
Can You Install A Turbo On Any Car?
Yes, a turbo can be installed on most cars. However, it requires careful consideration of engine size, compatibility, and modifications to accommodate the increased power. It’s best to consult with a professional to ensure proper installation and optimal performance.
Can I Put A Turbo On A Stock Engine?
Yes, you can add a turbo to a stock engine. However, it’s important to consider the engine’s capacity and ensure proper tuning to avoid damaging the engine.
Can I Install A Turbo To My Exhaust?
No, you cannot install a turbo to your exhaust.
Conclusion
To summarize, installing a turbo can significantly enhance your vehicle’s performance. By following the step-by-step instructions outlined in this guide, you can successfully install a turbo yourself. Remember to gather the necessary tools, take safety precautions, and seek professional assistance if needed.
With a turbo in place, you’ll experience increased horsepower and acceleration, making your driving experience even more thrilling. Happy turbocharging!