To install a tire pressure sensor, remove the old sensor from the wheel and replace it with the new sensor, ensuring it is securely fastened. Installing a tire pressure sensor is a straightforward process that requires removing the old sensor and replacing it with a new one.
What Are Tire Pressure Sensors?
Overview of tire pressure sensors
In this section, we will provide you with an overview of tire pressure sensors, explaining their purpose and how they work. Tire pressure sensors are small devices installed in the wheels of your vehicle to monitor the air pressure inside your tires. They measure the pressure and transmit the data to your vehicle’s computer system, which then alerts you if the pressure is too low or too high. This information is important because proper tire pressure not only improves your vehicle’s performance but also ensures your safety on the road.

Different types of tire pressure sensors
There are various types of tire pressure sensors available in the market, each with its own set of features and advantages. Let’s take a closer look at some of the most common types:
- Direct tire pressure sensors: These sensors are installed inside the tire and directly measure the air pressure. They provide real-time data and offer accurate readings. Direct sensors are more reliable but can be more expensive than indirect sensors.
- Indirect tire pressure sensors: Unlike direct sensors, indirect sensors do not directly measure the air pressure. Instead, they rely on other vehicle systems to estimate the tire pressure. Indirect sensors use the Anti-lock Braking System (ABS) or the wheel speed sensors to detect changes in tire pressure. While they are generally less expensive, they may not provide as accurate readings as direct sensors.
- Internal tire pressure sensors: These sensors are installed inside the tire, typically attached to the valve stem. They are completely concealed inside the tire and are not visible from the outside. Internal sensors are more discreet and protected from damage, but they may require professional installation and are not easily replaceable.
- External tire pressure sensors: As the name suggests, these sensors are attached to the external surface of the tire. They are typically mounted on the valve stem, making them easy to install and replace. External sensors are more visible and vulnerable to theft or damage but are usually more affordable and suitable for DIY installation.
Regardless of the type of tire pressure sensor you choose, it’s crucial to ensure proper installation and maintenance. Now that you have an overview of tire pressure sensors and their different types, you can make an informed decision based on your needs and budget.
Why Install A Tire Pressure Sensor?
When it comes to maintaining your vehicle, one crucial aspect that often gets overlooked is tire pressure. Proper tire pressure is essential for optimum performance, safety, and longevity of your tires. This is where installing a tire pressure sensor can prove to be immensely beneficial. In this article, we will delve into the importance of accurate tire pressure and the advantages of installing a tire pressure sensor.
Importance of Accurate Tire Pressure
Accurate tire pressure is paramount for several reasons. Having the right tire pressure ensures optimal handling, stability, and traction while driving. It promotes even tread wear, thus prolonging the lifespan of your tires. Properly inflated tires also enhance fuel efficiency, saving you money in the long run. Additionally, maintaining accurate tire pressure reduces the risk of blowouts or accidents that can occur due to underinflated or overinflated tires.
Benefits of Installing a Tire Pressure Sensor
Installing a tire pressure sensor offers numerous benefits that make it a worthwhile investment. Here are some key advantages:
- Enhanced Safety: A tire pressure sensor constantly monitors the air pressure in your tires, alerting you if it deviates from the recommended levels. This allows you to take prompt action, preventing potential tire failures.
- Extended Tire Life: By maintaining proper tire pressure, you minimize unnecessary wear and tear. This helps prolong the lifespan of your tires and saves you from the hassle and expense of premature replacements.
- Improved Fuel Efficiency: Underinflated tires create more rolling resistance, leading to decreased fuel efficiency. A tire pressure sensor helps you maintain the right tire pressure, optimizing your vehicle’s fuel consumption.
- Time and Effort Savings: Regularly checking the tire pressure manually can be a tedious task. With a tire pressure sensor, you can easily monitor the tire pressure from the comfort of your car. This saves time and effort, ensuring you never overlook this important aspect of vehicle maintenance.
Gather The Necessary Tools And Materials
Before you can install a tire pressure sensor, it’s important to gather all the necessary tools and materials. Having everything prepared in advance will make the installation process smoother and more efficient. In this section, we will discuss the list of tools and materials needed for the installation and provide some tips on acquiring the right sensor for your vehicle.
List of tools and materials needed for installation
Here is a comprehensive list of the tools and materials you will need to install a tire pressure sensor:
| Tools | Materials |
|---|---|
|
|
Make sure you have all these tools and materials readily available before you start the installation process. Having them on hand will save you time and effort.
Tips for acquiring the right sensor for your vehicle
When it comes to acquiring the right tire pressure sensor for your vehicle, it’s important to consider a few factors. Here are some tips to help you:
- Check your vehicle’s manual or consult with a professional to determine the appropriate sensor for your specific make and model.
- Ensure compatibility by double-checking the sensor’s compatibility with your vehicle’s tire pressure monitoring system (TPMS).
- Consider the sensor’s durability and quality to ensure long-lasting performance.
- Research customer reviews and ratings to get an idea of the sensor’s reliability and functionality.
- Compare prices from different suppliers to find the best deal without compromising on quality.
By following these tips, you can acquire the right tire pressure sensor for your vehicle, ensuring optimal performance and safety.
Preparing The Vehicle
Before installing a tire pressure sensor, it is essential to properly prepare the vehicle to ensure a safe and successful installation. This involves ensuring that the vehicle is on a level surface, turning off the engine, and engaging the parking brake.
Ensuring the vehicle is on a level surface
The first step in preparing the vehicle is ensuring that it is parked on a level surface. This is important as it helps maintain the stability of the vehicle during the installation process. Parking on an uneven surface can lead to issues with tire pressure readings and may affect the overall performance of the tire pressure sensor.
Turning off the engine and engaging the parking brake
Once the vehicle is parked on a level surface, the next step is to turn off the engine and engage the parking brake. This is done to ensure the safety of both the installer and the vehicle. Turning off the engine prevents any accidental starts or interference during the installation process. Engaging the parking brake provides an additional layer of security, preventing the vehicle from moving while the tire pressure sensor is being installed.
By following these crucial steps, you can ensure that the vehicle is properly prepared for the installation of a tire pressure sensor. Taking the time to prepare the vehicle correctly can help prevent any potential mishaps and ensure a successful installation process.
Removing The Wheel
Loosening the lug nuts
Before removing the tire from your vehicle to access the tire pressure sensor, it’s important to correctly loosen the lug nuts. The lug nuts secure the wheel to the wheel hub, so it’s crucial to follow the proper steps to ensure a safe and easy removal.
To begin, position a lug wrench or a socket wrench with the correct size socket onto the lug nuts. Make sure the wrench is securely attached before applying force to avoid any slippage that could result in injury. Once you’re ready, turn the lug wrench or socket wrench counterclockwise to loosen the lug nuts. Remember to work in a star pattern, loosening the nuts sequentially, as this will help prevent damage to the wheel or studs.
Lifting the vehicle and removing the wheel
After loosening the lug nuts, it’s time to lift your vehicle off the ground and remove the wheel. This step is essential for gaining access to the tire pressure sensor. Follow these simple guidelines to ensure a safe and effective procedure.
1. Find a secure lifting point: Before jacking up your vehicle, identify the recommended lifting points as specified in your owner’s manual. These points are designed to handle the weight of your vehicle and ensure stability.
2. Position the jack: Place the hydraulic jack or a suitable lifting device under the chosen lifting point, ensuring it is securely positioned and stable.
3. Lift the vehicle: Slowly and steadily pump the hydraulic jack’s handle or operate the lifting device until the vehicle is lifted off the ground. Be cautious to maintain a steady hand and keep an eye on the vehicle’s stability throughout the process.
4. Remove the lug nuts and wheel: Using your previously loosened lug nuts, completely remove them from the wheel. Carefully pull the wheel straight towards your body to avoid damage or injury. If the wheel seems stuck, apply gentle pressure or use a rubber mallet to release any friction between the wheel and the hub.
5. Place the wheel in a safe location: Once removed, set the wheel aside in a safe area away from the work zone to avoid any accidental damage.
Now that you have successfully removed the wheel, you’re one step closer to installing your new tire pressure sensor. Remember to follow the manufacturer’s instructions for your specific vehicle and sensor model to ensure a seamless installation process.
Locating The Sensor
Installing a tire pressure sensor is an essential part of maintaining optimal tire performance and safety. However, finding the sensor’s location on your vehicle’s wheel may seem like a daunting task at first. In this guide, we’ll walk you through the process of identifying the sensor’s location and provide some useful tips for finding it on different vehicle models.
Identifying the sensor’s location on the wheel
Before we jump into finding the sensor, let’s quickly understand where it is typically located on the wheel. The tire pressure sensor is usually attached to the valve stem, which is responsible for inflating and deflating the tire. In some vehicles, it may be integrated into the valve stem itself, while in others, it may be a separate component attached near the valve stem.
Now, let’s move on to some tips that can help you easily locate the sensor on different vehicle models:
Tips for finding the sensor on different vehicle models
1. Consult the vehicle’s owner’s manual: The owner’s manual is a valuable resource that can provide specific information about the sensor’s location for your vehicle model. It’s a good place to start your search.
2. Inspect the valve stems: As mentioned earlier, the tire pressure sensor is often located near the valve stem. Take a close look at the valve stems on all the wheels to identify any sensor attached to them.
3. Look for sensor symbols or markings: Some vehicles have symbols or markings on the wheel or tire indicating the presence of a tire pressure sensor. Keep an eye out for these symbols as they can serve as valuable clues.
4. Check the driver’s side door jamb: In certain vehicle models, the sensor’s location may be mentioned on a sticker located inside the driver’s side door jamb. This sticker provides important information about the vehicle, including tire pressure sensor details.
5. Ask an expert: If you’re still having trouble locating the sensor, it’s always a good idea to seek assistance from a professional mechanic or tire technician. They have experience dealing with various vehicle models and can quickly locate the sensor for you.
Remember, proper installation of the tire pressure sensor is crucial for accurate tire pressure monitoring. By following these tips and using the resources available, you’ll be able to locate the sensor on your vehicle’s wheel without much difficulty.
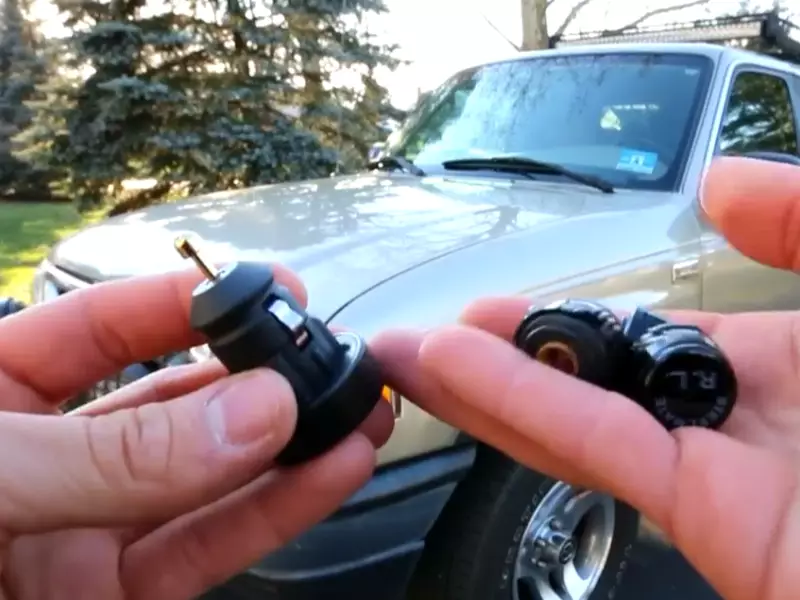
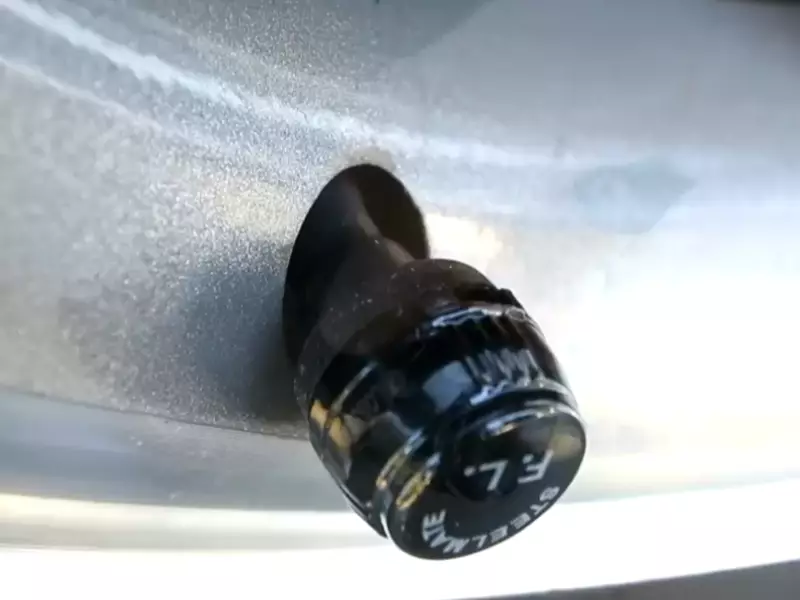
Installing The Sensor
Installing a tire pressure sensor is an essential step in maintaining the safety and performance of your vehicle. With a properly installed sensor, you can quickly and accurately monitor the air pressure in your tires, allowing you to address any issues before they lead to more significant problems. In this guide, we will walk you through the process of installing a tire pressure sensor, starting with removing the old sensor (if applicable) and ending with mounting the new sensor onto the wheel.
Removing the Old Sensor (if applicable)
If you are replacing an existing tire pressure sensor, the first step is to remove the old sensor. This is typically done by unscrewing the sensor from the valve stem using a valve stem tool. Make sure to keep track of any washers or seals that may be attached to the old sensor. Once the old sensor is removed, you can proceed to the next step of mounting the new sensor.
Mounting the New Sensor onto the Wheel
Now that the old sensor has been removed, it’s time to mount the new sensor onto the wheel. To do this, follow these steps:
- Retrieve the new sensor and ensure it is compatible with your vehicle’s make and model.
- Identify the valve stem on the wheel where you will be installing the new sensor.
- Thread the new sensor onto the valve stem clockwise, making sure it is securely tightened.
- If the new sensor comes with a washer or seal, place it onto the valve stem before threading the sensor.
- Use a valve stem tool to tighten the sensor, ensuring it is snug but not overtightened.
Once the new sensor is securely mounted onto the wheel, repeat the process for the remaining tires, if necessary. It is important to ensure that each new sensor is properly installed to provide accurate tire pressure readings.
By following these steps, you can successfully install a tire pressure sensor and enjoy the benefits of monitoring your tire pressure with ease. Remember to regularly check the readings from your sensor and address any issues promptly to maintain optimal safety on the road.
Reinstalling The Wheel
Aligning the wheel with the mounting studs
After removing and inspecting the tire pressure sensor, it’s time to reinstall the wheel onto your vehicle. One important step in this process is to align the wheel with the mounting studs. This ensures that the wheel is properly positioned and fitted onto your vehicle, allowing for a secure and safe installation.
Here’s how to align the wheel with the mounting studs:
- Bring the wheel close to the mounting studs, making sure it is centered.
- Slowly rotate the wheel while gently pushing it towards the mounting studs.
- As you rotate the wheel, align the holes on the wheel with the mounting studs.
- Continue rotating and pushing until the wheel is properly aligned with the studs.
Aligning the wheel with the mounting studs may require some patience and precision. Take your time to ensure that the alignment is accurate, as this will affect the stability and performance of your vehicle.
Tightening the lug nuts securely
Once the wheel is properly aligned with the mounting studs, the next crucial step is to tighten the lug nuts securely. This is essential for the wheel to be securely fastened to your vehicle’s hub, preventing any issues such as wobbling or loose tires.
Below are the steps to properly tighten the lug nuts:
- Using a lug wrench or a socket wrench, start by tightening the lug nuts by hand until they are snug.
- Following a star or crisscross pattern, tighten each lug nut a quarter turn at a time.
- Repeat the tightening process, going through the lug nuts in the same pattern, until they are properly tightened.
- Make sure to use the appropriate torque specifications recommended by the vehicle manufacturer for your specific wheel and lug nut type.
- Double-check the lug nuts to ensure they are all tightened securely.
It is important not to overtighten the lug nuts, as this can lead to damage or breakage. On the other hand, loose lug nuts can result in wheel detachment, which poses serious safety risks. Striking the right balance when tightening the lug nuts ensures a safe and secure installation.
Testing The Sensor
Testing the sensor is a crucial step after installing a tire pressure sensor. This ensures that the sensor is functioning properly and accurately providing the required data about your tire pressure. In this section, we will discuss two important aspects of testing the sensor: ensuring the sensor is properly installed and checking for any errors or malfunctions.
Ensuring the sensor is properly installed
After installing the tire pressure sensor, it’s important to double-check its installation to ensure it is securely in place. Here are a few steps you can follow to ensure the sensor is properly installed:
- Inspect the sensor: Start by visually inspecting the sensor to ensure it is properly seated on the valve stem. Make sure there is no debris or obstructions that could interfere with its functionality.
- Tighten the sensor: Use a torque wrench or a suitable tool to tighten the sensor onto the valve stem. Refer to the manufacturer’s instructions or recommended torque specifications to ensure you don’t over-tighten the sensor, which could lead to damage.
- Check for leaks: Apply a solution of soapy water to the valve stem and sensor area. If you notice any bubbles forming, it indicates a leak. In such cases, recheck the sensor’s installation or consult a professional for assistance.
Checking for any errors or malfunctions
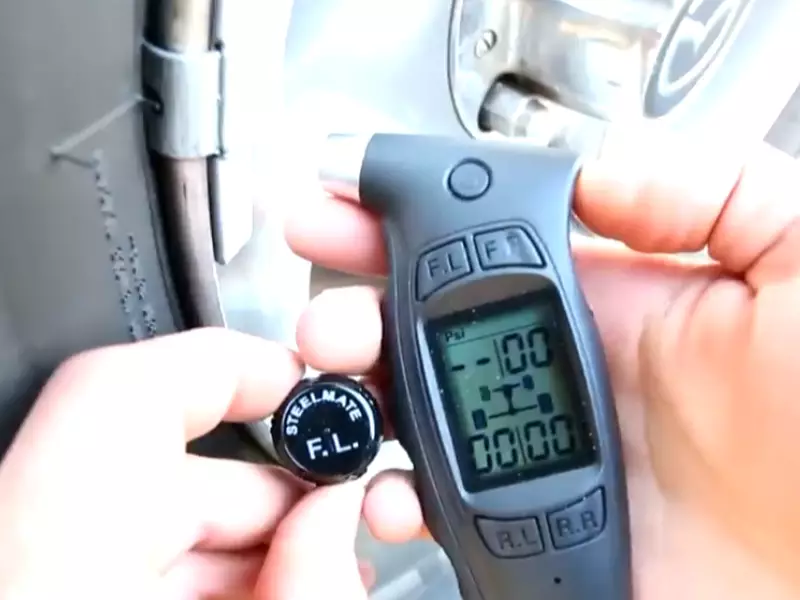
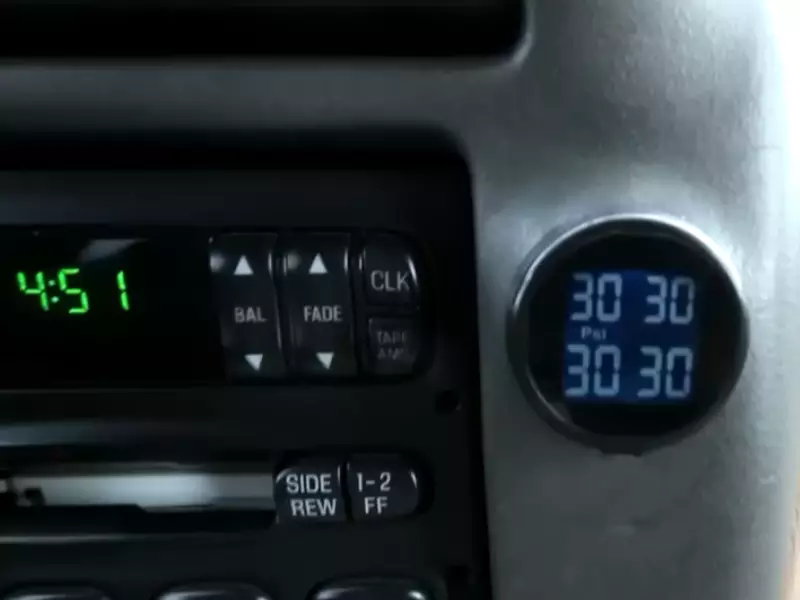
Once you have ensured that the sensor is properly installed, the next step is to check for any errors or malfunctions. Here are a few things you can do to ensure the sensor is functioning correctly:
- Monitor the readings: Use the tire pressure monitoring system (TPMS) or the display provided by the sensor to monitor the tire pressure readings. Ensure that the readings are accurate and consistent with what you expect.
- Compare with a gauge: Use a manual tire pressure gauge to cross-check the readings provided by the sensor. If there is a significant discrepancy in the readings, it could indicate a problem with the sensor that needs to be addressed.
- Test sensor responsiveness: Inflate or deflate the tires to different pressures and monitor how quickly the sensor updates the readings. A responsive sensor should provide instant updates when there are changes in tire pressure.
By following these steps, you can ensure that the tire pressure sensor is properly installed and functioning correctly. Remember, if you encounter any issues or have concerns about the sensor’s performance, it’s always best to consult a professional for assistance.
Calibrating The Sensor
When it comes to installing a tire pressure sensor, one important step is calibrating the sensor. Calibration ensures that the sensor accurately monitors the tire pressure and alerts you in case of any issues. Following the manufacturer’s instructions for calibration is crucial to ensure that the sensor works effectively. Additionally, resetting the tire pressure monitoring system is also necessary to ensure accurate readings. In this article, we will guide you through the steps of calibrating the tire pressure sensor and resetting the monitoring system.
Following the manufacturer’s instructions for calibration
Calibration is a vital step in the process of installing a tire pressure sensor. Different sensors might have unique calibration procedures as specified by the manufacturer. To ensure optimal performance, it is imperative to closely adhere to the manufacturer’s instructions.
The calibration process generally involves a series of steps, which may include:
- Ensuring the vehicle is parked in a safe and level location
- Activating the sensor’s calibration mode. This can usually be done through the vehicle’s onboard system or a separate calibration tool provided by the manufacturer.
- Following the prompts or instructions on the dashboard display or calibration tool to initiate the calibration process.
- Driving the vehicle at a specified speed or distance, as instructed by the manufacturer, to allow the sensor to gather the necessary data and calibrate itself.
- Verifying the calibration by checking for any error messages or confirmations on the dashboard display or calibration tool. If there are any issues detected, it may be necessary to repeat the calibration process.
Remember, each tire pressure sensor’s calibration process may vary, so always consult the manufacturer’s instructions for precise steps specific to your sensor.
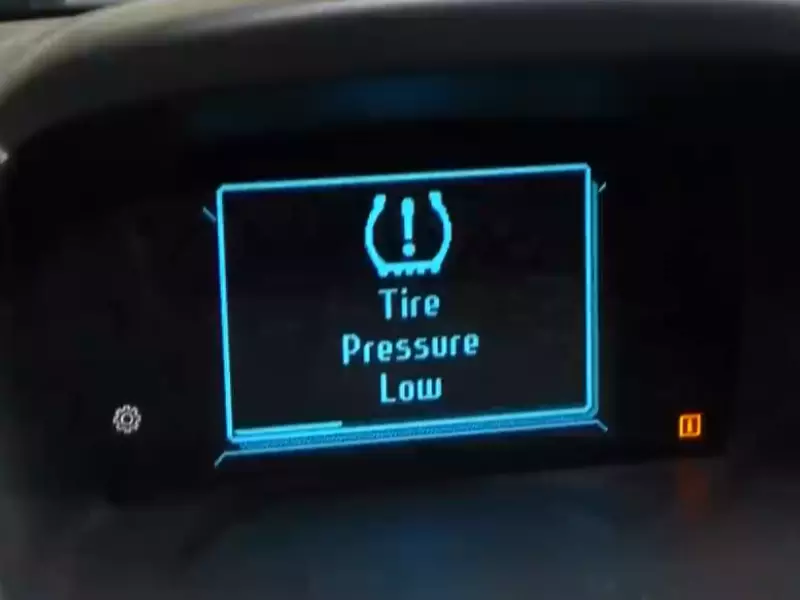
Resetting the tire pressure monitoring system
In addition to calibrating the sensor, resetting the tire pressure monitoring system is crucial to ensure accurate readings. Resetting the system is often required when a new sensor is installed or when the sensor detects a tire pressure issue that has been properly addressed.
The process of resetting the tire pressure monitoring system can typically be done through the vehicle’s onboard system. Here are the general steps to reset the system:
- Ensure all tires are properly inflated to the recommended pressure.
- Locate the tire pressure monitoring system reset button, which is usually located either under the steering wheel or in the glove compartment.
- With the ignition turned on, press and hold the reset button until the TPMS indicator light on the dashboard flashes. This may take a few seconds.
- Release the reset button and wait for the TPMS indicator light to illuminate steadily, indicating that the reset process is complete.
- Drive the vehicle for a short distance to allow the system to recalibrate itself and ensure accurate tire pressure readings.
By following these steps, you can successfully calibrate the tire pressure sensor and reset the monitoring system, ensuring accurate monitoring of your tire pressure and promoting safer driving.
Regular Inspection And Maintenance
Regular inspection and maintenance of your tire pressure sensors are crucial for ensuring their optimal functionality and extending their lifespan. By following a few simple tips and performing regular checks, you can prevent potential issues and ensure that your tire pressure sensors are working perfectly.
Tips for maintaining the sensors’ functionality
- Check the sensor batteries regularly to ensure they are in good condition. A low battery can affect the accuracy of the sensor readings. Replace the batteries as recommended by the manufacturer to avoid any discrepancies in tire pressure readings.
- Inspect the sensor for any visible damage or wear and tear. Look out for any cracks, corrosion, or loose parts. If you notice any damage, it’s important to have the sensor repaired or replaced as soon as possible.
- Keep your sensors clean to prevent dirt or corrosion. Dirt and debris can affect the sensor’s ability to transmit accurate readings. Regularly clean the sensors using a mild detergent and a soft cloth. Be sure to dry them thoroughly before reinstalling.
- Ensure proper installation of the sensors. Improper installation can lead to loose sensors or incorrect readings. Consult the manufacturer’s instructions or seek professional help for the correct installation process.
- Regularly check the tire pressures to ensure they are within the recommended range. This will help you identify any discrepancies in readings and address them promptly.
- Consider investing in a tire pressure monitoring system (TPMS) tool. This tool allows you to check the functionality of the sensors and diagnose any issues easily. Regularly using a TPMS tool can help you catch and address problems early on.
Cleaning the sensors to prevent dirt or corrosion
Cleaning your tire pressure sensors is an important part of maintenance. Dirt, grime, and corrosion can obstruct the sensors and prevent them from accurately transmitting tire pressure information. Follow these steps to clean your sensors:
- Step 1: Park your vehicle on a flat surface and engage the parking brake.
- Step 2: Locate the tire pressure sensors on each wheel. They are usually attached to the inside of the tire valve stem.
- Step 3: Carefully remove the sensors using a wrench or a valve stem removal tool. Be cautious not to damage the sensors during removal.
- Step 4: Prepare a mixture of mild detergent and water in a bucket or container.
- Step 5: Dip a soft cloth into the soapy water solution and gently clean the sensors, removing any dirt or grime. Pay extra attention to the areas around the sensor where dirt tends to accumulate.
- Step 6: Rinse the sensors with clean water to remove any residue from the cleaning solution.
- Step 7: Dry the sensors thoroughly using a clean, lint-free cloth.
- Step 8: Reinstall the sensors onto the valve stems, ensuring they are tightened properly but not over-tightened.
- Step 9: Repeat the same process for all the tire pressure sensors on your vehicle.
Maintaining the cleanliness of your tire pressure sensors is essential for accurate readings and optimal performance. By regularly inspecting and cleaning your sensors, you can ensure that they function properly and contribute to a safer driving experience.
Troubleshooting Common Issues
Addressing Common Problems with Tire Pressure Sensors
If you’ve recently installed a tire pressure sensor and are encountering some issues, fret not! Many common problems with tire pressure sensors can be easily addressed with a few troubleshooting techniques. In this section, we’ll explore some common issues that you might encounter and provide helpful tips on how to resolve them.
Troubleshooting Tips for Sensor Malfunction
If your tire pressure sensor is not functioning correctly, it could result in inaccurate readings or no readings at all. Here are a few troubleshooting tips to help you identify and resolve sensor malfunctions:
- First, check the battery of the sensor. If the battery is drained or weak, it may need to be replaced. Consult the manufacturer’s instructions on how to change the battery, as the process may vary depending on the sensor model.
- Ensure that the sensor is securely installed onto the tire valve stem. A loose or improperly installed sensor can lead to inconsistent readings or no readings at all. Use a wrench or specialized tool, if necessary, to tighten the sensor onto the valve stem, following the manufacturer’s guidelines.
- Verify that the sensor is compatible with your vehicle’s make and model. Some sensors may not be compatible with certain vehicles, resulting in compatibility issues. Consult the sensor’s documentation or contact the manufacturer for guidance on compatibility.
- Check for any physical damage to the sensor. Harsh road conditions or accidental impacts can damage the sensor, causing it to malfunction. Look for cracks, dents, or signs of moisture inside the sensor. If any damage is detected, it may be necessary to replace the sensor.
- Reset the sensor and recalibrate it if necessary. In some cases, a sensor may need to be reset or recalibrated to rectify issues. Refer to the manufacturer’s instructions on how to perform a reset or recalibration, as the process may vary between sensor models.
By following these troubleshooting tips, you can effectively address common tire pressure sensor problems and ensure that your sensor operates accurately and reliably.
Frequently Asked Questions For How To Install A Tire Pressure Sensor
Can I Install Tpms Sensors Yourself?
Yes, you can install TPMS sensors yourself. It’s a simple process that you can do at home. Just make sure to follow the instructions carefully for accurate installation.
How Much Does It Cost To Install A Tire Pressure Sensor?
The cost to install a tire pressure sensor can vary depending on the vehicle and location but typically ranges from $50 to $100.
How Do You Replace A Tire Pressure Sensor?
To replace a tire pressure sensor, follow these steps:
- Locate the faulty sensor on the tire.
- Remove the sensor by unscrewing it.
- Install the new sensor in the same position, ensuring it is tightly secured.
- Repeat the process for all other sensors if necessary.
- Finally, reset the tire pressure monitoring system for accurate readings.
How Are Tire Pressure Sensors Mounted?
Tire pressure sensors are typically mounted on the inside of the tire valve stem.
Conclusion
Installing a tire pressure sensor is a simple yet crucial task for maintaining vehicle safety and performance. By following the step-by-step guide provided in this blog post, you’ll be able to complete the installation process smoothly. Remember to gather the necessary tools and materials, read the manufacturer’s instructions carefully, and double-check the sensor’s compatibility with your vehicle.
By installing a tire pressure sensor, you’ll ensure proper tire inflation and enjoy a safer and smoother driving experience.