To install a subwoofer and amplifier, follow these steps: connect the amplifier’s power cable to the car battery, run the RCA cables from the car stereo unit to the amplifier, and connect the subwoofer to the amplifier using speaker wire. The installation process requires some knowledge of car audio systems and electrical connections.
Ensure to read the user manuals for the subwoofer, amplifier, and car stereo unit for specific instructions. Taking precautions like disconnecting the car battery before installation and securing all connections properly will help ensure a successful installation and optimal sound performance.
Remember to test the system after installation to make sure everything is functioning correctly.

Necessary Tools And Equipment
Installing a subwoofer and amplifier in your car can greatly enhance the audio quality and overall listening experience. To ensure a smooth and successful installation process, it is important to have the necessary tools and equipment on hand. In this section, we will discuss the various tools and equipment required for installing a subwoofer and amplifier.
Tools required for installation
- Wire cutters/strippers
- Socket wrench set
- Screwdrivers (Phillips and flathead)
- Drill and drill bits
- Crimping tool
- Tape measure
- Wire caps/connectors
- Electrical tape
- Fuse holder
These tools will help you in various aspects of the installation process, from cutting and stripping wires to securing components in place. A socket wrench set will be especially handy when mounting the amplifier and subwoofer to your car’s chassis. Additionally, a drill with suitable drill bits will be useful for creating holes for wiring and screws.
Equipment needed for installation
| Item | Description |
|---|---|
| Subwoofer | A subwoofer is a specialized loudspeaker that is designed to produce low-frequency sounds. It is an essential component in any car audio system. |
| Amplifier | An amplifier is responsible for increasing the power of the audio signals coming from the head unit of your car stereo. It provides the necessary power for the subwoofer to produce bass. |
| Wiring kit | A wiring kit includes all the necessary wires, cables, and connectors to connect the amplifier and subwoofer to your car’s electrical system. It typically includes power cables, ground cables, RCA cables, and speaker wires. |
| Speaker box/enclosure | A speaker box or enclosure is a specially designed housing that holds the subwoofer and allows it to deliver optimal sound performance. It helps in controlling the sound waves produced by the subwoofer. |
| Remote turn-on wire | A remote turn-on wire is used to connect the amplifier to your car’s stereo system. It allows the amplifier to turn on and off automatically with the car’s ignition. |
| Fuses | Fuses are necessary to protect your car’s electrical system from any potential damage caused by excessive power or electrical faults. It is important to choose the correct size of fuses for your specific setup. |
These are the essential equipment required for installing a subwoofer and amplifier in your car. Make sure to choose high-quality components that are compatible with your car’s audio system to achieve the best results.
Now that you have a clear understanding of the necessary tools and equipment, you are ready to proceed with the installation process. In the next section, we will guide you through the step-by-step process of installing a subwoofer and amplifier in your car.
Choosing The Right Subwoofer And Amplifier
When it comes to enhancing the audio quality in your car, installing a subwoofer and amplifier can make a significant difference. However, with so many options available in the market, it’s important to choose the right subwoofer and amplifier that suit your specific needs and preferences. In this article, we will explore the factors you should consider when selecting a subwoofer and amplifier, as well as understanding power requirements and compatibility.
Factors to consider when selecting a subwoofer and amplifier
Before diving into the process of installation, it’s crucial to think about the following factors to help you make an informed decision:
- Power handling: Ensure the subwoofer and amplifier have compatible power handling capabilities. Power handling refers to the amount of power the subwoofer or amplifier can manage without distortion. It’s important to match the power handling of the subwoofer and amplifier to avoid damaging either component.
- Subwoofer size: Consider the available space in your vehicle and the desired bass output. Subwoofers come in various sizes, including 8, 10, 12, and 15 inches. A larger subwoofer typically produces deeper and more powerful bass, but it may require more space in your vehicle. Consider your preferences and available space when selecting the size of the subwoofer.
- Enclosure type: Decide between a sealed or ported enclosure. Sealed enclosures provide tighter and more accurate bass, while ported enclosures enable enhanced low-frequency output. The enclosure type depends on your desired sound quality and the resonant characteristics of your vehicle’s interior.
- Amplifier class: Choose between different amplifier classes, such as Class A, Class AB, Class D, or Class H. Each class has its advantages and disadvantages in terms of power efficiency, heat generation, and sound quality. Consider your budget, power requirements, and desired sound quality when selecting the amplifier class.
- Budget: Set a budget and look for options within that range. Subwoofers and amplifiers come in a wide price range, so it’s important to set a budget and explore options that fit within that budget. Keep in mind that higher-priced components often offer better quality and performance.
- Brand and reviews: Research different brands and read customer reviews. Look for reputable brands that have a track record of producing high-quality subwoofers and amplifiers. Reading customer reviews can give you valuable insights into the experiences and satisfaction levels of existing users.
Understanding power requirements and compatibility
After considering the aforementioned factors, it’s essential to understand the power requirements and compatibility of your chosen subwoofer and amplifier:
Power requirements: Check the RMS power rating of both the subwoofer and amplifier. RMS (Root Mean Square) power rating indicates the continuous power handling capacity of the components. It’s crucial to match the RMS power ratings of the subwoofer and amplifier to ensure optimal performance and prevent damage.
Impedance matching: Ensure the impedance of both the subwoofer and amplifier is compatible. Impedance is measured in ohms and represents the opposition to the flow of electrical current. Incorrect impedance matching can lead to subpar performance or even damage to the equipment. Make sure the impedance of both components matches or falls within the acceptable range specified by the manufacturer.
Wiring and connections: Use appropriate gauge wiring and make solid connections. The gauge of the wiring depends on the power requirements of the amplifier and the length of the wire run. Incorrect or insufficient wiring can lead to voltage drops and ultimately affect the performance of the subwoofer and amplifier. Additionally, ensure all connections are secure and free from corrosion to maintain optimal signal transfer.
By considering these factors and understanding power requirements and compatibility, you can choose the right subwoofer and amplifier to enhance your car audio experience. Remember to always follow the manufacturer’s guidelines and recommendations for optimal performance and safety.
Now that you have a clearer understanding of how to choose the right subwoofer and amplifier, we can move on to the installation process. Stay tuned for our next article on installing a subwoofer and amplifier in your car!
Locating An Ideal Position For The Subwoofer
Choosing the right placement for your subwoofer is crucial to achieving optimal sound quality and enhancing your overall audio experience. The positioning of the subwoofer can significantly impact its performance, delivering deep bass that resonates throughout your space. In this section, we’ll explore the factors to consider when choosing the placement of the subwoofer, as well as some helpful tips to ensure you achieve the best sound quality possible.
Factors to consider when choosing the placement of the subwoofer
When deciding where to position your subwoofer, several factors come into play to ensure it delivers the desired audio performance:
- Room size: Take into account the size of the room to determine the appropriate placement. Larger rooms may require multiple subwoofers to distribute bass evenly.
- Listening area: Consider the location of your primary listening area. Placing the subwoofer near this area will provide a more immersive listening experience.
- Furniture and obstacles: Be aware of any furniture, walls, or other obstacles that may obstruct the sound waves. These can absorb or reflect the bass frequencies, affecting the overall sound quality.
- Room shape and layout: The shape of the room and its layout can impact bass response. Experiment with different positions to find the optimal placement.
- Acoustic treatment: If you have acoustic treatment in your room, take that into account when positioning the subwoofer. It can help improve sound absorption and prevent excessive bass buildup.
Tips for achieving optimal sound quality
To maximize the sound quality of your subwoofer, consider the following tips:
- Experiment with placement: Try different locations within the room to find the spot that provides the best bass response. Small adjustments can make a significant difference.
- Corner placement: Placing the subwoofer in a corner can enhance bass response due to the reinforcement effect created by the adjacent walls. However, be cautious of excessive bass buildup and adjust accordingly.
- Subwoofer isolation: Use isolation pads or stands to decouple the subwoofer from the floor or other surfaces. This can help reduce vibrations and improve overall sound quality.
- Positioning relative to speakers: Consider the relationship between your subwoofer and main speakers. Experiment with placement to achieve a seamless integration between the bass and other frequency ranges.
- Phase adjustment: Fine-tune the phase control on your subwoofer to ensure proper synchronization with the main speakers, eliminating any potential audio cancellations or imbalances.
By taking these factors into consideration and implementing these tips, you can optimize the placement of your subwoofer and amplifier, allowing them to deliver the deep, powerful bass that adds a new dimension to your audio setup.

Connecting The Subwoofer To The Amplifier
Connecting the Subwoofer to the Amplifier is a crucial step in installing a subwoofer and amplifier system in your car audio setup. This step ensures that the subwoofer receives the necessary power and audio signal from the amplifier to deliver those thumping bass notes. In this section, we will explore how to wire the subwoofer to the amplifier and properly ground the subwoofer for optimal performance.
Wiring the subwoofer to the amplifier
To wire the subwoofer to the amplifier, you will need a subwoofer cable or RCA cable. These cables carry the audio signal from the amplifier to the subwoofer.
Here’s a step-by-step guide on how to wire the subwoofer to the amplifier:
- Begin by locating the audio output jacks on the amplifier. These jacks are usually color-coded for easy identification. The subwoofer jack is commonly marked as “Sub Out” or “LFE Out.”
- Take one end of the subwoofer cable and connect it to the “Sub Out” or “LFE Out” jack on the amplifier.
- On the other end of the subwoofer cable, you will find two connectors or plugs. These plugs are typically color-coded, with one being red and the other being white.
- Insert the red plug into the red “Subwoofer” input jack on the subwoofer.
- Plug the white plug into the white “Subwoofer” input jack on the subwoofer.
- Ensure that the connections between the subwoofer cable and the amplifier and subwoofer are secure and snug.
Properly grounding the subwoofer
Proper grounding of the subwoofer is essential for avoiding potential noise and interference issues in your car audio system. Grounding provides a stable electrical connection for the subwoofer, preventing any unwanted buzzing or humming sounds.
Here are the steps to properly ground the subwoofer:
- Locate a suitable grounding point within your vehicle. This grounding point should be a metal surface that is connected directly to the chassis of the car.
- Clean the grounding point using a wire brush or sandpaper to ensure a good electrical connection.
- Take the negative terminal wire from the subwoofer and connect it securely to the grounding point.
- Use a bolt or screw to secure the wire to the grounding point tightly.
- Inspect the grounding connection to ensure there is no loose or exposed wiring.
By following these steps, you can successfully connect your subwoofer to the amplifier and ensure proper grounding. Remember to double-check all the connections and consult the user manuals for your specific subwoofer and amplifier for any additional instructions.
Installing A Subwoofer Enclosure
When it comes to enhancing your car’s audio system, installing a subwoofer enclosure is a crucial step. A subwoofer enclosure not only helps to protect your subwoofer but also enhances its performance by ensuring that the sound waves are properly channeled for maximum bass output. In this guide, we will walk you through the different types of subwoofer enclosures and provide step-by-step instructions on how to install one in your vehicle.
Different types of subwoofer enclosures
Before diving into the installation process, it’s important to understand the different types of subwoofer enclosures available. Each type has its own advantages and is suitable for different preferences and vehicle setups. Here are the most common types:
| Type | Description |
|---|---|
| Sealed Enclosure | A sealed enclosure is airtight and provides accurate and tight bass response. It is ideal for music genres that demand precise bass reproduction. |
| Ported Enclosure | A ported enclosure uses a tuned port to enhance low-frequency output. It provides louder and deeper bass but may sacrifice some accuracy. |
| Bandpass Enclosure | A bandpass enclosure is a combination of sealed and ported designs. It offers a narrow frequency range and maximum efficiency in that range. |
| Free-Air Enclosure | A free-air enclosure mounts the subwoofer directly to a board or panel in the vehicle. It utilizes the trunk or the rear deck as the enclosure itself. |
Steps for installing a subwoofer enclosure
Now that you are familiar with the different types of subwoofer enclosures, let’s move on to the installation process. Follow these steps to ensure a successful and professional installation:
- Choose the location: Determine the ideal location for your subwoofer enclosure in your vehicle. Consider factors such as available space, ease of access, and aesthetic appeal.
- Prepare the area: Clean the mounting surface to ensure proper adhesion. Remove any obstructions or obstacles that may interfere with the installation process.
- Measure and mark: Use measuring tape to accurately mark the placement of the enclosure. This will help ensure proper alignment and symmetry.
- Drill pilot holes: With the help of a drill, create pilot holes at the marked locations. This will make it easier to screw in the mounting brackets or screws.
- Mount the enclosure: Attach the mounting brackets or screws to secure the subwoofer enclosure in place. Ensure a tight and secure fit to prevent any vibrations or movement.
- Connect the speaker wires: Carefully route the speaker wires from the subwoofer to the amplifier. Use appropriate connectors and connections to ensure a reliable and clean signal transmission.
- Test and fine-tune: Prior to finalizing the installation, test the subwoofer and amplifier setup. Adjust the levels and settings as necessary to achieve the desired sound quality.
- Secure and hide wires: Once you are satisfied with the performance, secure and hide the speaker wires to maintain a clean and organized installation.
- Enjoy the bass: Sit back, relax, and enjoy the deep and powerful bass produced by your newly installed subwoofer enclosure.
By following these steps, you can confidently install a subwoofer enclosure in your vehicle and experience an enhanced audio experience on the go. Remember to refer to the manufacturer’s instructions and seek professional assistance if needed. Now, buckle up and get ready to be immersed in the world of thumping bass!
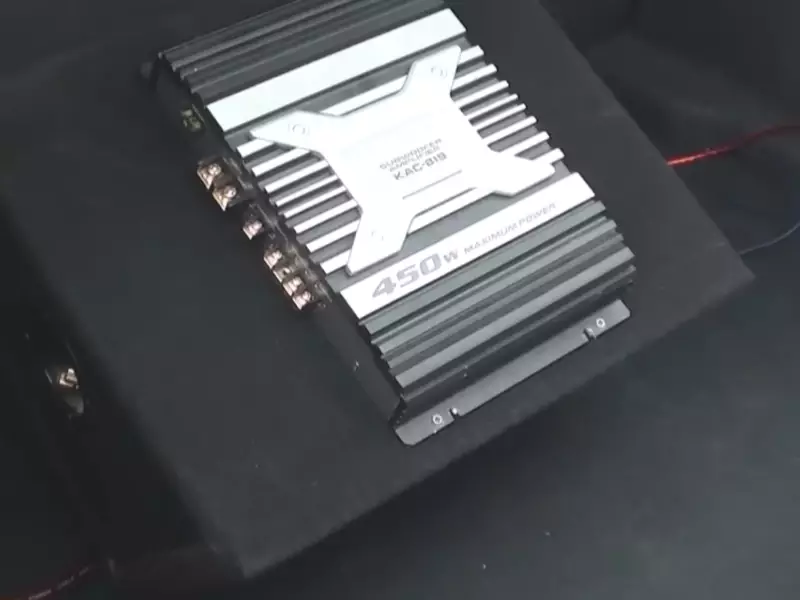
Mounting The Amplifier
Choosing a suitable location for the amplifier
When installing a subwoofer and amplifier in your car, one of the most crucial steps is choosing the right location to mount the amplifier. This decision can affect the overall performance and safety of your audio system. Keep in mind that the amplifier should be placed away from sources of heat and moisture, as these can cause damage and potentially lead to a short circuit. Here are a few factors to consider when selecting a suitable location:
- Accessibility: Ensure that the amplifier is easily accessible for future adjustments or repairs. You don’t want it to be hidden or obstructed in a way that makes it difficult to reach when needed.
- Ventilation: Amplifiers tend to generate heat, so it’s important to choose a location that allows for proper ventilation. Mounting the amplifier in cramped spaces or enclosed compartments can result in overheating and reduced performance.
- Stability: The location you choose should provide a stable and secure base for the amplifier. Vibrations caused by the car’s movement can affect the sound quality and potentially damage the amplifier if it is not securely mounted.
Installing the amplifier securely
Once you’ve picked the right location for your amplifier, the next step is to install it securely to prevent any movement or vibrations. Here’s a step-by-step guide to ensure a secure installation:
- Gather the necessary tools: Before you begin the installation process, make sure you have all the required tools handy. This may include a drill, screws, screwdriver, wire cutters, and a wire stripper.
- Prepare the mounting surface: Clean the surface where you plan to mount the amplifier. Ensure it is free from any dirt, debris, or loose materials that may affect the grip.
- Place the amplifier: Position the amplifier on the mounting surface and mark the spots where you will drill the holes for securing it.
- Drill pilot holes: Use a drill with an appropriate drill bit size to create pilot holes in the marked spots. These holes will serve as guides for screwing in the mounting screws.
- Attach the amplifier: With the pilot holes in place, use screws to secure the amplifier to the mounting surface. Make sure the screws are tightened adequately, but be careful not to overtighten and risk damaging the amplifier or the surface.
- Secure the wiring: Lastly, secure the amplifier’s wiring using zip ties or clamps to prevent any movement or interference with the car’s components.
Your amplifier is now securely mounted and ready to deliver an enhanced audio experience in your car. Remember to double-check all connections before testing your subwoofer and amplifier setup. Enjoy the crisp and powerful bass that your new audio system promises!
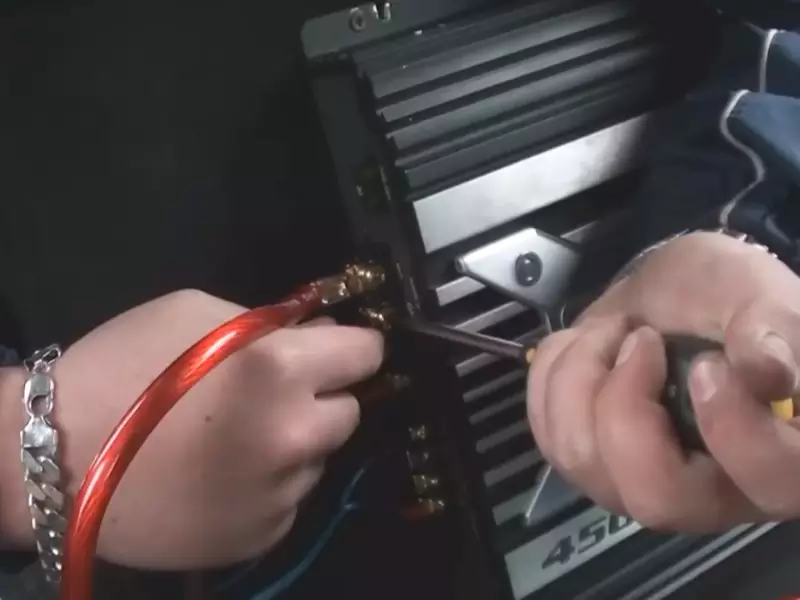
Connecting The Amplifier To The Car Battery
Connecting the amplifier to the car battery is a crucial step in installing a subwoofer and amplifier in your car. This connection ensures that the amplifier receives the necessary power to deliver the deep and powerful bass you desire. However, it is important to take precautions and follow proper wiring techniques to ensure a safe and reliable connection.
Precautions to take when connecting the amplifier to the car battery
- Before initiating the connection, always disconnect the negative (-) terminal of the car battery to prevent any electrical mishaps.
- Ensure that the amplifier’s power cable is of the appropriate gauge, ensuring sufficient power delivery. Refer to your amplifier’s manual for the recommended gauge size.
- Use appropriate protective measures for any exposed wires or connections to prevent electrical short circuits or accidental contact.
- Consider using a fuse near the battery connection to protect the amplifier and your vehicle’s electrical system.
- Double-check the polarity of the connections to avoid accidental reverse polarity, which can damage the amplifier or other electrical components.
Properly wiring the amplifier to the battery
To ensure a reliable and efficient connection, follow these steps when wiring your amplifier to the car battery:
Step 1: Select a suitable location for the amplifier
Choose a secure and well-ventilated location to mount the amplifier in your vehicle. Consider factors like accessibility, airflow, and protection from moisture and excessive heat. Mounting the amplifier away from the engine or exhaust components is recommended to minimize the risk of damage.
Step 2: Route the power cable
Begin by routing the power cable from the amplifier to the car battery. Ensure that the cable is not near any moving parts and is protected from sharp edges that can potentially damage the insulation. Use cable ties or clips to secure the cable along the way, maintaining a clean and organized installation.
Step 3: Connect the power cable to the battery
Attach the positive (+) terminal of the power cable to the positive terminal of the car battery. Use a suitable connector, such as a ring terminal, to ensure a solid and secure connection. Remember to tighten the connection properly to avoid any power loss or intermittent signal.

Step 4: Ground the amplifier
Find a suitable grounding point near the amplifier. This can be a metal bolt or screw on the vehicle’s chassis. Use an appropriate gauge wire to create a reliable ground connection between the amplifier’s grounding terminal and the grounding point. Ensure the grounding point is free from paint or corrosion to guarantee a low-resistance ground connection.
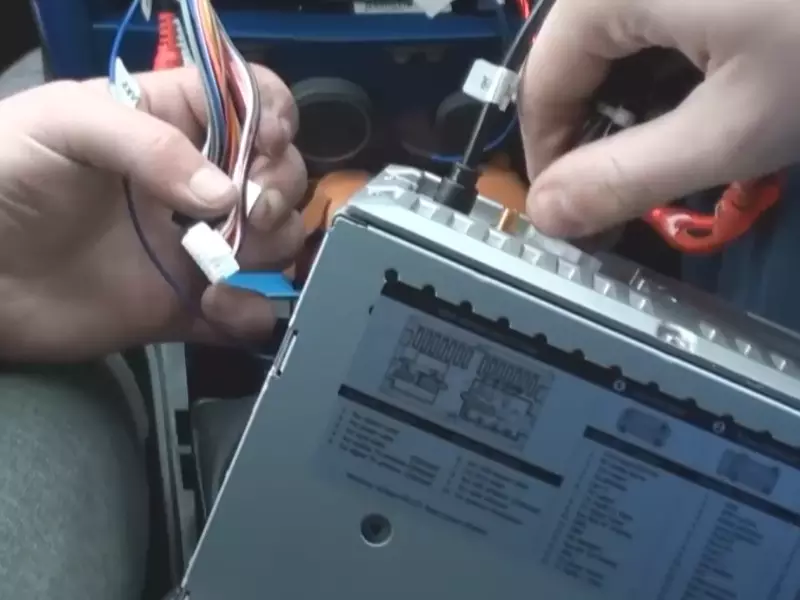
Step 5: Connect the remote turn-on wire
The remote turn-on wire controls the amplifier’s power, allowing it to turn on and off with the car’s ignition. Locate the remote turn-on wire in your vehicle’s wiring harness, usually found with the stereo wiring. Connect one end of the wire to the amplifier’s remote terminal and the other end to the appropriate wire in the wiring harness.
Step 6: Test the connection
Once all the connections are made, double-check all the wiring to ensure everything is secure and properly connected. Reconnect the negative (-) terminal of the car battery and test the amplifier by turning on your car’s audio system. Make sure the amplifier powers on and produces sound without any issues.
By following these precautions and proper wiring techniques, you can safely and effectively connect your amplifier to the car battery, allowing your subwoofer to deliver the bone-shaking bass you crave. Take your time, be diligent, and enjoy a thrilling audio experience on the go!
Wiring The Amplifier To The Subwoofer
Connecting the amplifier to the subwoofer is a crucial step in setting up your car audio system. This step determines the quality and power output of your subwoofer, ensuring a powerful bass experience for your favorite music.
Connecting the amplifier to the subwoofer
When it comes to connecting the amplifier to the subwoofer, precise wiring is essential. Here’s a step-by-step guide to help you get it right:
- Locate the amplifier’s speaker output terminals. These terminals are usually labeled as “Speaker Out” or “AMP Out”.
- Identify the speaker-level input or high-level input on your subwoofer. This input is typically labeled as “Speaker In” or “High-Level Input”.
- Strip the insulation off the end of the positive and negative speaker wires. This ensures a clean connection with the subwoofer and amplifier.
- Insert the positive wire into the positive terminal of the subwoofer’s speaker-level input, and the negative wire into the negative terminal.
- Connect the other end of the positive wire to the positive terminal of the amplifier’s speaker output, and the negative wire to the negative terminal.
- Ensure that all connections are secure and tightly fastened to prevent any signal loss or distortion.
By following these steps, you will successfully establish a solid connection between the amplifier and subwoofer, allowing for the transmission of the audio signal and power supply.
Adjusting the amplifier settings for optimal sound output
Once the amplifier and subwoofer are properly wired, it’s time to optimize the sound output for a fantastic audio experience. Here are the key settings to adjust on your amplifier:
- Gain control: Adjust the gain control on the amplifier to match the input signal level. Start with a low setting and gradually increase until you achieve the desired volume without distortion.
- Low-pass filter: Set the low-pass filter to allow frequencies below a certain point to reach the subwoofer. This helps prevent higher frequencies from distorting the bass sound.
- Bass boost: Use the bass boost feature, if available, to enhance the low-frequency response of your subwoofer. Be cautious not to overdo it, as excessive bass boost can lead to distortion.
- Phase control: Adjust the phase control to synchronize the subwoofer’s output with the other speakers in your car audio system. This ensures a smooth and seamless transition between frequencies.
- Crossover frequency: Set the crossover frequency to define the point at which the subwoofer starts blending with the other speakers in your system. This helps create a balanced and cohesive soundstage.
Take your time to fine-tune these settings, finding the perfect balance that suits your preferences and musical taste. Experimentation is key to achieving an optimal sound output.
With the amplifier properly connected to the subwoofer and the settings dialed in for the best sound performance, you can now sit back, relax, and enjoy the deep, rich bass that will take your car audio system to the next level.
Testing The Subwoofer And Amplifier Setup
Once you have successfully installed your subwoofer and amplifier, it’s time to put them to the test! Testing the setup is essential to ensure that everything is working properly and that you are getting the best sound quality possible from your new audio system. In this section, we will cover how to test the subwoofer and amplifier for proper functionality and how to adjust the settings for your desired sound quality.
How to test the subwoofer and amplifier for proper functionality
Testing your subwoofer and amplifier for proper functionality is an important step in the installation process. Here’s how you can do it:
- Start by playing a piece of audio, such as a song or a movie clip, that has a good amount of bass.
- Gradually increase the volume on your amplifier to a comfortable level.
- Pay close attention to the bass response coming from your subwoofer. If the bass sounds clear and powerful, then your subwoofer and amplifier are working properly.
- If you notice any distortion, rattling, or weak bass, there may be an issue with your setup. Check all the connections and ensure that the subwoofer is properly positioned and not obstructed.
Adjusting the settings for desired sound quality
Now that your subwoofer and amplifier are working correctly, you may want to fine-tune the settings to achieve your desired sound quality. Here are some tips:
- Refer to the user manual for your amplifier to understand its different settings and features.
- Experiment with the controls and settings, such as gain, crossover frequency, and phase, to find the optimal sound balance.
- Listen to various types of music or audio content to gauge the performance of your subwoofer and amplifier across different genres.
- Make small adjustments at a time and take note of any changes in the sound quality. This will help you find the sweet spot that suits your personal preferences.
By testing your subwoofer and amplifier setup and adjusting the settings accordingly, you can ensure that you are getting the best possible sound quality from your audio system. Enjoy the deep, rich bass and immerse yourself in a truly superior audio experience!
Troubleshooting Common Issues
Installing a subwoofer and amplifier in your car can greatly enhance your audio experience, but sometimes issues can arise that need troubleshooting to ensure everything is working properly. In this section, we will identify common problems that can occur during subwoofer and amplifier installations and provide step-by-step troubleshooting methods to resolve these issues.
Identifying common problems with subwoofer and amplifier installations
Even with the most careful installation, problems can occur that prevent your subwoofer and amplifier from functioning correctly. Here are some common issues you may encounter:
- No sound from the subwoofer: One of the most frustrating issues is when your subwoofer produces no sound at all. This could be due to a loose or disconnected wire, a blown fuse, or an issue with the amplifier itself.
- Distorted or muddy sound: If the sound coming from your subwoofer is distorted or muffled, it could be a sign of incorrect settings or a faulty connection. It’s important to check your audio source, amplifier settings, and speaker wires for any potential issues.
- Ground loop noise: Ground loop noise is characterized by a constant humming or buzzing sound present in the audio system. This typically occurs due to multiple grounding points or improper grounding. It’s important to identify and eliminate any ground loop noise to ensure clean audio playback.
Troubleshooting steps to resolve issues
Resolving these common issues with subwoofer and amplifier installations can be achieved by following these troubleshooting steps:
- Check connections: Ensure that all cables and wires are securely connected to their respective terminals. If any connections are loose or disconnected, reattach them firmly.
- Test power supply: Verify that your amplifier is receiving power by checking the power supply connections and ensuring the power switch is turned on.
- Inspect fuses: If there is no sound coming from the subwoofer, check the amplifier’s fuses. Replace any blown fuses with the appropriate replacements.
- Adjust amplifier settings: If the sound is distorted or muffled, review your amplifier settings and adjust them accordingly. Pay attention to the gain, crossover, and equalizer settings to optimize audio performance.
- Eliminate ground loop noise: To eliminate ground loop noise, try using a ground loop isolator. This device interrupts the ground loop path and can effectively reduce or eliminate the noise.
By following these troubleshooting steps, you can address common issues with subwoofer and amplifier installations and ensure optimal audio performance in your car.
Frequently Asked Questions Of How To Install A Subwoofer And Amplifier
How Do You Connect A Subwoofer To An Amplifier?
To connect a subwoofer to an amplifier, first, identify the subwoofer and amplifier’s output and input connections. Use high-quality RCA cables to connect the amplifier’s subwoofer output to the subwoofer’s input. Make sure the connections are secure. Adjust the subwoofer’s settings to optimize the sound output.
Can You Hook Up A Subwoofer And Amp To A Stock Radio?
Yes, you can connect a subwoofer and amp to a stock radio. Just make sure to use a line output converter to connect the speaker-level outputs from the radio to the amp’s inputs. This will allow you to add more bass to your stock sound system.
Do I Need An Amp If I Install A Subwoofer?
Yes, you need an amp to power your subwoofer. The amp provides the necessary power for the subwoofer to produce deep and low-frequency sound. Without an amp, the subwoofer won’t have enough power and may not function properly.
Do I Plug My Subwoofer Into My Speakers?
No, you do not plug your subwoofer into your speakers. Speakers and subwoofers are separate components that require their own connections. The subwoofer is usually connected to an audio receiver or amplifier using a specific subwoofer output or dedicated subwoofer cable.
Conclusion
Installing a subwoofer and amplifier can greatly enhance your audio experience. By following the step-by-step guide provided in this blog post, you can successfully install these components in your car. Remember to gather all necessary tools, carefully wire the system, and test the setup for optimal performance.
With a little patience and attention to detail, you can enjoy music with added depth and power. Happy listening!