To install a stereo in a car, remove the old stereo, connect the new stereo’s wiring harness, and secure it in place. Installing a stereo in your car can enhance your driving experience by providing high-quality audio and access to various entertainment options.
Whether you want to upgrade your existing stereo system or replace a faulty one, the installation process can be done with a few simple steps. In this guide, we will walk you through the process of installing a stereo in your car, from removing the old unit to connecting the wiring and securing the new stereo in place.
By following these steps, you can enjoy your favorite music and radio stations while on the go.

Gathering The Necessary Tools And Materials
Before you dive into the exciting process of installing a stereo in your car, it’s important to make sure you have all the necessary tools and materials on hand. Having everything you need at the outset will save you time and potential frustration along the way. You wouldn’t want to be halfway through the installation only to discover you’re missing a crucial tool or component.
Essential tools and equipment:
Here is a list of must-have tools and equipment that you’ll need to successfully complete the installation:
- Screwdrivers (both Phillips and flathead) – You’ll need these to remove any screws or panels in your car’s interior.
- Wire cutters and strippers – These tools are essential for working with the wiring of your car’s stereo system.
- Pliers – Pliers are useful for grasping and bending wires as needed.
- Socket set – A socket set will come in handy for removing any bolts or nuts that hold your car’s stereo in place.
- Trim removal tools – These specialized tools will help you pry off any trim pieces without damaging them.
- Tape measure – To ensure a precise fit for your new stereo, a tape measure will come in handy for measuring the dimensions of the dashboard opening.
Required materials for the installation:
In addition to the tools and equipment mentioned above, you’ll also need specific materials to successfully install your new stereo:
- New stereo unit – Make sure you have the compatible stereo unit for your car model. Be sure to check the dimensions and specifications before purchasing.
- Wiring harness adapter – This adapter will allow you to connect the new stereo to your car’s existing wiring system.
- Mounting kit – A mounting kit includes brackets and screws that secure the stereo unit in the dashboard opening.
- Electrical tape – Electrical tape is crucial for insulating any exposed wires and ensuring a secure connection.
- Wire connectors – These connectors help join different wires together cleanly and securely.
- Amp integration harness (if applicable) – If you’re adding an amplifier to your car’s stereo system, you’ll need an integration harness to connect it.
- Antenna adapter – To ensure proper reception, you may need an antenna adapter that matches your car’s antenna connection.
- Crimping tool – A crimping tool is necessary for securely crimping wire connectors.
Preparing Your Car For Stereo Installation
Installing a new stereo in your car can greatly enhance your driving experience, allowing you to enjoy your favorite music and podcasts on the go. However, before you jump into the installation process, it’s crucial to prepare your car properly.
In this section, we will guide you through the essential steps to ensure a successful stereo installation. By following these instructions, you will be on your way to enjoying your new audio system in no time.
Disconnecting the Car Battery
Before you begin working on your car’s stereo system, it’s imperative to disconnect the car battery. This is a safety measure that will protect you from any electrical mishaps during the installation process. To do this, follow these steps:
- Locate the car battery in your vehicle. It is typically housed under the hood, but its exact location may vary depending on the make and model of your car.
- Once you have located the car battery, use a wrench to loosen and remove the negative (-) terminal clamp. The negative terminal is usually indicated by a minus sign (-) or the letters “NEG”.
- Set the negative terminal clamp aside, ensuring it doesn’t come into contact with any metal surfaces to avoid accidental reconnection.
- Repeat the same process for the positive (+) terminal clamp, which is usually indicated by a plus sign (+) or the letters “POS”. By removing both terminal clamps, you eliminate any potential electric current flowing through the car’s electrical system.
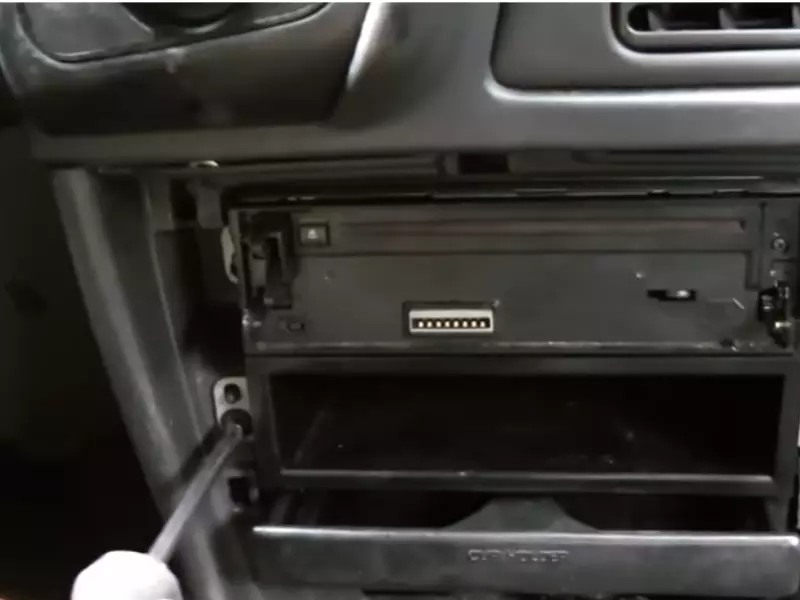
Removing the Existing Stereo Unit
Once the car battery is disconnected, it’s time to remove the existing stereo unit from your car. Follow these steps to get started:
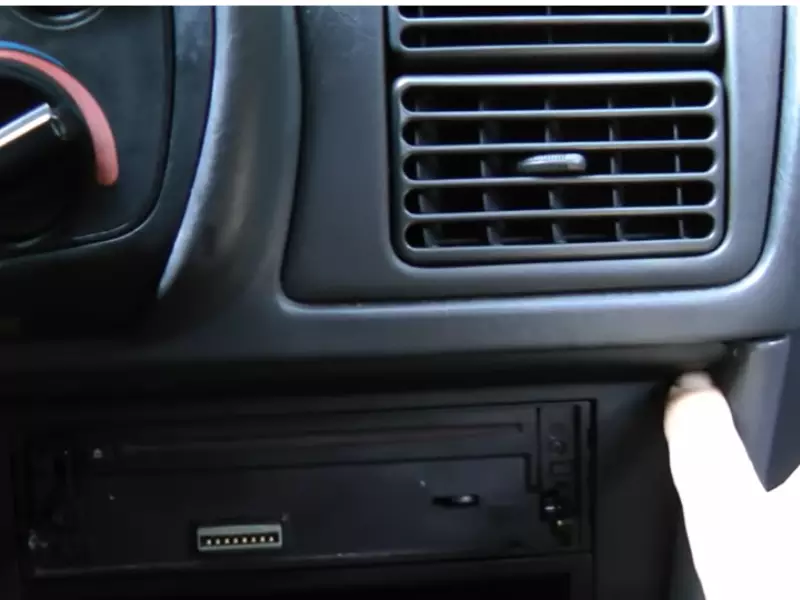
- Start by locating and removing any trim panels or covers that may be concealing the stereo unit. These can usually be gently pried off with a trim removal tool or a flathead screwdriver wrapped in a cloth to prevent scratches.
- Once the trim panels have been removed, you should see the stereo unit secured by screws or bolts. Use the appropriate tools to unscrew and remove these fasteners.
- After the screws or bolts have been removed, carefully pull the stereo unit out from the dashboard. Take note of any wire connections that are still attached to the unit.
- Disconnect these wire connections by gently pressing the release tab or button on each connector and pulling them apart. Keep in mind that some connectors may require a bit of force to detach.
- Once all the wire connections have been disconnected, you can now fully remove the old stereo unit from your car.
Preparing the Mounting Space for the New Stereo
With the old stereo unit out of the way, it’s time to prepare the mounting space for the new unit. Follow these steps to ensure a proper fit:
- Inspect the mounting area to ensure it is free from any debris or obstructions that could hinder the installation process.
- If necessary, clean the mounting area using a soft cloth or brush to remove dust, dirt, or residue.
- Refer to the installation manual or guidelines provided with your new stereo unit to determine if any additional mounting brackets or accessories are required.
- If mounting brackets are needed, securely attach them to the mounting space using the appropriate screws or bolts.
- Ensure the mounting brackets are aligned and level to provide a stable base for the new stereo unit.
By following these steps to prepare your car for stereo installation, you are setting a solid foundation for a successful upgrade. Once you have completed these tasks, you can move on to the exciting part – installing the new stereo unit in your car!
Wiring And Connecting The Stereo
Installing a stereo in your car can significantly enhance your driving experience, allowing you to enjoy your favorite tunes while on the road. However, the process of wiring and connecting the stereo may seem daunting at first. In this section, we will guide you through the necessary steps to successfully wire and connect the stereo in your car. By following these instructions, you’ll be jamming to your favorite music in no time.
Identifying the stereo wiring harness
Before you begin connecting the stereo, it’s essential to identify the stereo wiring harness. This harness controls the electrical connections to the stereo, allowing it to function properly. To locate the stereo wiring harness, you’ll need to consult the manual provided with your stereo or refer to the car’s wiring diagram.
In most cases, the stereo wiring harness consists of a bundle of wires color-coded to match the different functions. The color codes will vary depending on the make and model of your car, so it’s crucial to refer to the appropriate manual or wiring diagram. Make sure to double-check the color codes to avoid any potential confusion during the installation process.
Matching the stereo wiring harness with the car’s wiring
Once you have identified the stereo wiring harness, it’s time to match it with the car’s wiring. This step requires careful attention to detail to ensure the correct connections. Refer to the car’s wiring diagram or manual to identify the corresponding wires in your car’s wiring. Some stereo wiring harnesses may come with labels that indicate their functions, which can be helpful during this process.
When matching the stereo wiring harness with the car’s wiring, ensure that each wire is correctly aligned and connected. It’s crucial to follow the color codes provided in the manual or wiring diagram to avoid any potential issues. Take your time during this step to ensure a secure and accurate connection between the stereo wiring harness and the car’s wiring.
Connecting the wiring harnesses together
Once you have successfully identified and matched the stereo wiring harness with the car’s wiring, it’s time to connect them together. This step involves carefully joining the corresponding wires from both harnesses using appropriate connectors, such as crimp connectors or wire nuts.
To connect the wiring harnesses together, follow these steps:
- Strip about half an inch of insulation from the end of each wire in the stereo wiring harness and the car’s wiring.
- Twist together the exposed wires of the same color from both harnesses.
- Slide a crimp connector or apply a wire nut over the twisted wires.
- Using a crimping tool, crimp the connector securely to ensure a tight connection. If using wire nuts, twist them tightly to secure the wires.
- Repeat this process for each pair of corresponding wires until all connections are made.
Once you have connected all the wires, gently tug on each connection to ensure they are secure. It’s important to check that no wires are loose or disconnected, as this can affect the functionality of the stereo.
With the wiring harnesses successfully connected, you’re one step closer to enjoying your new stereo system. In the next section, we will guide you through the final steps of installing the stereo, ensuring a seamless integration with your car’s audio system.
Mounting And Securing The New Stereo
Installing a new stereo in your car can greatly enhance your driving experience. Not only does it allow you to enjoy your favorite music with better sound quality, but it also gives you access to additional features like Bluetooth connectivity and navigation systems. However, before you can start jamming to your tunes, you need to properly mount and secure the new stereo. In this guide, we’ll walk you through the necessary steps so you can do it yourself.
Choosing the appropriate mounting kit
The first step in mounting your new car stereo is to choose the right mounting kit. A mounting kit is designed to provide a secure and stable platform for your stereo unit, ensuring it fits perfectly into the dashboard of your car. It’s important to choose a kit that is compatible with both your car’s make and the stereo unit you have purchased.
When selecting a mounting kit, it’s essential to consider factors such as the size and shape of the stereo unit, the type of vehicle you have, and any special features or requirements. Remember to consult the instruction manual or reach out to the manufacturer for guidance if you are unsure about which kit to choose.
Installing the mounting kit into the car
Once you have chosen the appropriate mounting kit, it’s time to install it into your car. Start by carefully removing the factory stereo unit from the dashboard using the appropriate tools. Ensure that you disconnect all the necessary wiring and set the factory unit aside.
Next, refer to the instructions provided with the mounting kit for guidance on how to properly install it into your car. In most cases, this involves attaching the mounting brackets and trim panels to the dashboard. Make sure to secure them tightly to ensure a stable foundation for your new stereo unit.
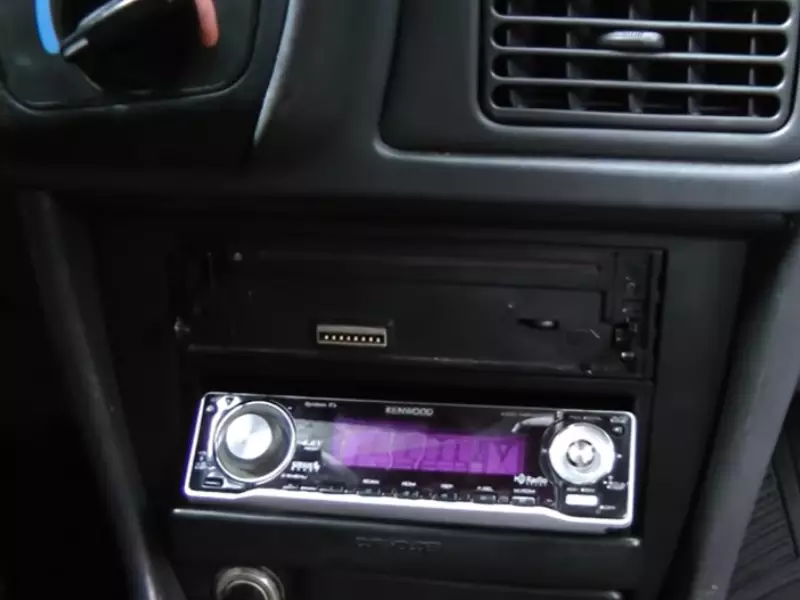
Securing the new stereo unit into the mounting kit
Now that the mounting kit is securely installed, it’s time to secure the new stereo unit into it. Start by carefully sliding the stereo unit into the mounting kit, aligning the mounting holes on the unit with the holes on the kit. Once aligned, use the provided screws or brackets to secure the stereo unit in place.
Ensure that all the necessary connections, such as wiring harnesses and antenna cables, are properly connected before finalizing the installation. Take the time to double-check each connection to avoid any potential issues down the line.
Finally, test the new stereo unit to ensure that it is working properly and that all the features are operational. Adjust the settings and customize the sound to your liking.
By following these steps and taking the time to mount and secure your new stereo properly, you can enjoy a seamless and enjoyable audio experience whenever you hit the road.
Testing The New Stereo
Reconnecting the car battery
Before testing the new stereo, it’s essential to reconnect the car battery. This step ensures that the stereo receives the necessary power supply for proper functionality. Follow these simple steps to reconnect the car battery:
- Locate the negative and positive terminals on the car battery.
- Using a wrench or a socket set, loosen the bolt or screw on the negative terminal to remove the cable.
- Slide the cable off the terminal and set it aside.
- Repeat the same process for the positive terminal, removing the cable and setting it aside.
- After completing any other necessary installation steps, reattach the car battery by connecting the positive cable to the positive terminal and the negative cable to the negative terminal.
- Tighten the bolts or screws on both terminals to secure the connection.
Turning on the stereo and checking for functionality
Now that the car battery is reconnected, it’s time to turn on the stereo and ensure it’s functioning correctly. Follow these steps to check for proper functionality:
- Locate the power button on the stereo unit, usually marked with an icon resembling a circle or “power.”
- Press the power button firmly to turn on the stereo.
- Look for indicator lights or a display on the stereo unit to confirm that it is receiving power.
- If the stereo doesn’t turn on, double-check the battery connection and ensure it is secure.
- If the stereo still doesn’t turn on, consult the user manual or seek professional assistance.
Adjusting the sound settings and testing different features
Once the stereo is powered on and functioning correctly, it’s time to fine-tune the sound settings and explore the different features. Follow these steps to adjust the sound settings and test various functions:
- Refer to the user manual or the on-screen display to locate the sound settings menu.
- Use the volume control knob or buttons to increase or decrease the sound level to your preference.
- Explore other sound settings such as bass, treble, balance, and fade to customize the audio output.
- Test different features such as radio reception, CD player, Bluetooth connectivity, auxiliary input, and any other available options.
- Make sure each feature is functional and produces the desired sound quality.
- If any issues arise, consult the user manual or seek professional assistance.
By following these steps, you can confidently test your newly installed car stereo and ensure it’s delivering the best audio experience in your vehicle.
Troubleshooting And Finishing Touches
The installation of a stereo in your car is almost complete, but before you start enjoying your new audio system, there are a few important troubleshooting steps and finishing touches to consider. By following these tips, you can ensure your stereo installation is successful and the sound quality in your car is top-notch.
Common troubleshooting tips and solutions
Even with careful planning and installation, you may encounter some issues during the process. Here are a few common problems you might face and the solutions to overcome them:
- No power to the stereo: If your stereo isn’t turning on, it could be due to a loose or faulty connection. Double-check that all wiring connections are secure and properly attached to their respective terminals. If necessary, use a multimeter to test the power supply.
- Poor sound quality: If the audio from your stereo sounds distorted or weak, there may be a problem with the speaker connections. Make sure all the speaker wires are correctly connected and that the polarity (+/-) is aligned. Additionally, check the equalizer settings and adjust them for optimal sound output.
- Noise or interference: If you are experiencing unwanted noise or interference, such as static or whining sounds, it may be caused by improper grounding or a poorly shielded cable. Ensure that the grounding wire is securely connected to a clean metal surface and use shielded cables to minimize interference.
Finalizing the installation with proper cable management
Once you have resolved any troubleshooting issues, it’s important to finish the installation by tidying up the cables and ensuring they are securely managed. Proper cable management not only improves the overall aesthetic but also prevents potential damage to the wires.
Here are a few tips for achieving clean and efficient cable management:
- Organize and bundle cables: Use cable ties or Velcro straps to bundle and secure the cables together. This will prevent them from tangling or getting in the way of other components.
- Route cables away from moving parts: Ensure that cables are routed away from any moving parts, such as hinges or levers, to avoid potential damage or interference.
- Conceal cables: If possible, hide the cables behind panels or use cable conduit to create a neat and professional-looking installation.
- Avoid sharp edges: When routing cables, be mindful of sharp edges or metal surfaces that may damage the insulation. Use grommets or protective sleeves to shield the cables.
By following these cable management techniques, you can not only improve the overall appearance of your installation but also ensure the longevity and reliability of your stereo system.
Now that you have completed the troubleshooting steps and perfected the cable management, it’s time to enjoy your newly installed car stereo. Sit back, relax, and immerse yourself in the premium audio experience that you have tailored to your preferences.
Tips For Maintaining And Upgrading Your Car Stereo
Cleaning and maintaining the stereo system
Keeping your car stereo clean and well-maintained not only ensures optimal performance but also extends its lifespan. Here are some tips to help you clean and maintain your car stereo system:
- Regular dusting: Dust and dirt can accumulate on the surface of your car stereo over time, affecting the audio quality. To prevent this, use a soft cloth or microfiber cloth to gently wipe away any dust or debris from the stereo panel.
- Safe cleaning: Use a mild, non-abrasive cleaner and a soft cloth to clean the buttons and controls of your car stereo. Avoid using harsh chemicals or excessive moisture, as they can damage the sensitive electronic components.
- Protective cover: Consider using a protective cover for your car stereo panel to shield it from dust, dirt, and potential scratches. This can help maintain its appearance and keep it in good condition.
- Prevent overheating: Ensure that the car stereo is installed in a well-ventilated area of your car to prevent overheating. Avoid placing any objects that can block the ventilation holes, as this can lead to performance issues.
- Regular maintenance: Schedule regular maintenance checks for your car stereo system. Consult a professional or refer to the user manual for specific instructions on maintenance tasks such as cleaning the connectors and checking the wiring.
Upgrades and enhancements for better audio experience
While a standard car stereo can provide decent sound quality, there are various upgrades and enhancements available to enhance your audio experience on the road. Here are some options to consider:
- Upgraded speakers: Investing in high-quality speakers can significantly improve the audio quality in your car. Look for speakers that are compatible with your car’s audio system and consider factors such as power handling, sensitivity, and frequency response for optimal performance.
- Amplifier installation: Adding an amplifier to your car stereo system can provide more power to the speakers, resulting in clearer and louder sound. Choose an amplifier that matches the power requirements of your speakers and ensure proper installation for optimal performance.
- Subwoofer enhancement: If you enjoy deep bass and low-frequency audio, consider adding a subwoofer to your car stereo system. A subwoofer can enhance the overall audio experience by delivering powerful and well-defined bass notes.
- Sound deadening materials: Reduce unwanted vibrations and improve sound quality by using sound deadening materials in your car. These materials can help minimize outside noise and enhance the clarity and balance of the audio.
- Digital media receivers: Upgrade to a digital media receiver that offers features such as Bluetooth connectivity, USB ports, and smartphone integration. This allows you to stream music wirelessly, play audio from USB devices, and control your stereo system more conveniently.
By following these maintenance tips and considering the various upgrades available, you can ensure that your car stereo system delivers the best audio experience possible. Whether you are a music enthusiast or simply enjoy crystal-clear sound on your daily commute, these tips will help you maintain and enhance your car stereo system.
Frequently Asked Questions Of How To Install A Stereo In A Car
Can I Install A Car Stereo Myself?
Yes, you can install a car stereo yourself. It is a straightforward process that requires basic tools and knowledge. Follow the instructions provided with the stereo and ensure you disconnect the car battery before starting.
Can You Install A Stereo Into Any Car?
Yes, you can install a stereo in any car. It is not limited to specific car models or makes.
What Color Wires Go Together In A Car Stereo?
The color wires that go together in a car stereo are specific to each vehicle’s wiring harness. It’s important to consult the user manual or seek professional assistance for accurate connections.
Can You Put A New Stereo In An Old Car?
Yes, you can install a new stereo in an old car. It’s a straightforward process that can enhance your car’s audio system.
Conclusion
To sum up, installing a stereo in your car is a rewarding project that allows you to enjoy your favorite music on the road. By following the step-by-step guide provided, you can successfully complete the installation process. Remember to gather the necessary tools, identify the wiring connections, and test the system before finishing up.
With a little patience and practice, you can achieve a professional-quality stereo installation that enhances your driving experience. So, go ahead and give it a try!