To install a seat cover, first, remove the headrest and lift the seat cover over the backrest. Then, tuck the cover securely into the creases of the seat and reattach the headrest.
Now let’s dive into the details. Car seat covers not only protect your vehicle’s seats but can also enhance their appearance. Installing a seat cover is a relatively simple process that can be done in a few easy steps. By following these instructions, you can quickly and efficiently install a seat cover without any hassle.
In this guide, we will explain the step-by-step process of installing a seat cover, including removing the headrest, fitting the cover onto the backrest, and ensuring a snug and secure fit. So, let’s get started and transform the look and protection of your car seats in no time.
Factors To Consider When Choosing A Seat Cover
When it comes to protecting your car seats and enhancing their appearance, seat covers play a crucial role. But with so many options available in the market, choosing the right seat cover can be a daunting task. However, by considering a few key factors, you can ensure that you make an informed decision and find the perfect seat cover for your needs. Here are the factors that you should keep in mind:
Material
The material of a seat cover plays a significant role in determining its durability, comfort, and ease of maintenance. Here are some popular materials used in seat covers:
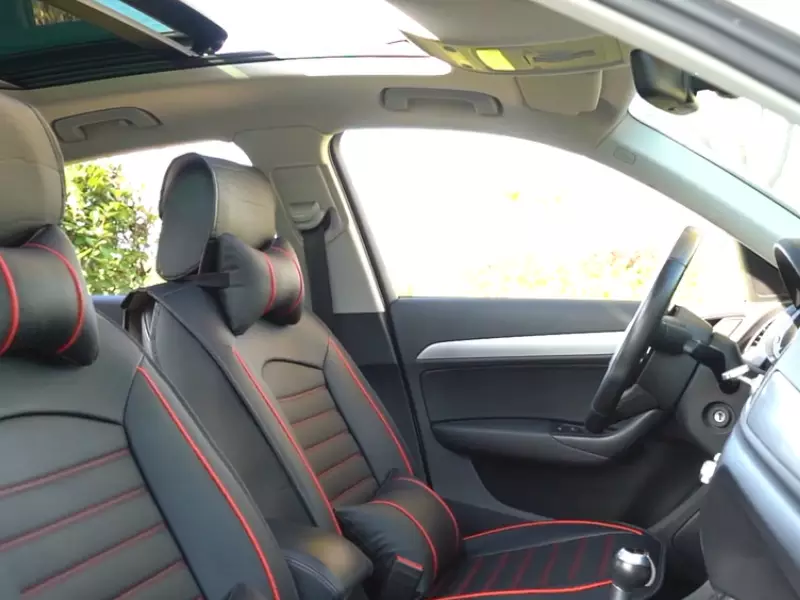
- Leather: Leather seat covers not only offer a luxurious look but also provide excellent durability and are easy to clean. They are perfect for those seeking a sophisticated appearance.
- Neoprene: Neoprene seat covers are known for their extreme durability and resistance to water and UV rays. They provide excellent protection and are perfect for those who want to maintain an active lifestyle.
- Canvas: Canvas seat covers are rugged and offer exceptional protection against spills, stains, and daily wear and tear. They are ideal for those who require heavy-duty protection.
- Mesh: Mesh seat covers are breathable, making them great for hot climates. They allow air circulation, preventing sweat and odor buildup.
Design
The design of a seat cover is crucial to ensure it complements your car’s interior and reflects your personal style. Here are some design options to consider:
- Sports-style: Sports-style seat covers often feature bold colors, racing stripe patterns, and contoured designs. They are perfect for those with a sporty taste.
- Classic: Classic seat covers have a timeless appeal with elegant patterns, neutral colors, and sophisticated textures. They are suitable for those who prefer a refined and luxurious look.
- Customized: Customized seat covers allow you to add a personal touch by choosing specific patterns, colors, and even embroideries. They offer a unique and personalized look.
Size
Ensuring the seat cover fits your car seats perfectly is essential for a neat and professional look. It is crucial to consider the different seat styles, such as bucket seats or bench seats, and the specific measurements of your car seats. Most seat covers come in universal or semi-custom sizes, which can be adjusted to fit a wide range of car seat dimensions.
Compatibility
Before purchasing a seat cover, it is crucial to ensure its compatibility with your car’s make and model. Some seat covers are designed specifically for certain car brands or models, while others offer a more universal fit. Check the product description and specifications to ensure the seat cover is compatible with your car’s seats and airbags.
By considering these important factors, you can find a seat cover that not only protects your car seats but also enhances their appearance, matches your personal style, and fits your specific needs. Remember to research different options, read customer reviews, and choose a reputable brand for the best results.
Measuring Your Car’S Seats
Installing a seat cover is a great way to protect your car’s seats and give your interior a fresh new look. However, before you can start the installation, it’s important to measure your car’s seats correctly. Proper measurements ensure that you choose the right size seat cover and achieve a snug fit. In this section, we will guide you through the process of measuring your car’s seats step by step, so you can get the perfect fit for your seat covers.
Preparing the necessary tools
Before you begin measuring your car’s seats, make sure you have the following tools ready:
- Measuring tape
- Paper and pen for jotting down measurements
- Scissors or a utility knife
Having these tools handy will help you measure accurately and streamline the installation process.
Identifying the correct measurement points
Next, you need to identify the correct points to measure on your car’s seats. Depending on the type of seat cover you choose, the measurements required may vary. It’s essential to know where to measure to ensure a precise fit. Here are the key measurement points to consider:
- Headrest width and height – Measure the width and height of the headrest separately if your seat cover has a separate headrest cover.
- Seat back width and height – Measure the width and height of the seat back from one edge to the other.
- Seat cushion width and depth – Measure the width and depth of the seat cushion, starting from the outer edges.
- Armrest width and length – If your car has armrests, measure their width and length separately.
By identifying these measurement points, you’ll have a clear understanding of where to take your measurements and ensure a precise fit for your new seat cover.
Taking accurate measurements
Now that you have your tools ready and you know the correct measurement points, it’s time to take accurate measurements. Follow these steps to ensure precision:
- Start by measuring the width of each seat component separately, such as the headrest, seat back, and seat cushion. Measure from one edge to the other, following the contours of the seats.
- Next, measure the height of each component. Measure from the base of the seat to the highest point of the component, whether it’s the headrest or seat back.
- If your car has armrests, measure their width and length separately. Measure from one edge to the other, following the contours of the armrests.
- Make sure to record your measurements accurately on paper, noting the width and height of each component separately.
Taking precise measurements is crucial for selecting the right size seat cover and ensuring a snug and secure fit. Double-check your measurements before moving forward with your seat cover installation.
Now that you have successfully measured your car’s seats, you are ready to move on to the next step in the installation process. Stay tuned for our upcoming blog post, where we will guide you through the step-by-step process of installing your new seat cover.
Researching And Comparing Seat Cover Options
When it comes to installing a seat cover, it’s important to take the time to research and compare your options. Choosing the right seat cover can not only enhance the aesthetics of your car’s interior but also provide protection and comfort. In this section, we will discuss some key steps to help you in this research and comparison process.
Online resources and reviews
One of the first steps you should take is to utilize online resources and read reviews. The internet offers a wealth of information and customer feedback on various seat cover options. Websites like Amazon, AutoZone, and CarID provide a wide range of seat cover products, along with customer reviews and ratings.
While browsing through these online platforms, filter your search results based on your vehicle make and model. This will help you find seat covers specifically designed for your car, ensuring a perfect fit. When reading reviews, pay attention to customer experiences regarding the material quality, durability, ease of installation, and overall satisfaction.
Comparing prices and quality
When comparing seat cover options, it’s essential to consider both price and quality. While affordability is important, you don’t want to compromise on durability and functionality. Look for seat covers that offer the best balance between cost and quality.
To make an informed decision, create a comparison table using the following criteria:
| Seat Cover | Price | Material | Installation | Customer Rating |
|---|---|---|---|---|
| Seat Cover A | $XX | Quality Material A | Easy | 4.5/5 |
| Seat Cover B | $XX | Quality Material B | Difficult | 4/5 |
| Seat Cover C | $XX | Quality Material C | Medium | 4.2/5 |
This comparison table will help you assess the different seat cover options side by side, allowing you to make a more informed decision based on your priorities.
Seeking recommendations
In addition to conducting online research, seeking recommendations from car enthusiasts, friends, or family members who have installed seat covers can provide valuable insights. They can share their firsthand experiences, giving you a better understanding of which brands or models to consider and which ones to avoid.
Furthermore, don’t forget to ask for advice from local car accessory shops or professional installers. They have hands-on experience with seat covers and can suggest reliable brands or offer suggestions based on specific requirements.
By researching and comparing seat cover options through online resources, reviews, price and quality comparisons, and seeking recommendations, you can make an informed decision and find the perfect seat cover for your vehicle.
Gathering The Required Tools
Before you start installing a seat cover, it’s essential to gather all the necessary tools to make the process smooth and hassle-free. Having the right tools at hand can save you time and ensure a successful installation. In this section, we will discuss the essential tools you need, as well as some optional ones that can make the task even easier.
Essential Tools
When it comes to installing a seat cover, there are a few essential tools that you must have. These tools will help you remove the old seat cover and install the new one efficiently. Here are the must-have tools:
- Trim Removal Tool: This tool will assist you in removing any clips or trim pieces securely without damaging them or the seat.
- Socket Set: A socket set with various sizes will be handy in removing the bolts that hold the seat in place.
- Screwdriver: Choose a screwdriver with a comfortable grip, as you will be using it to remove screws from the seat.
- Needle-nose Pliers: These will help you remove any stubborn clips or pins that may be holding the seat cover in place.
- Utility Knife: A sharp utility knife will come in handy when you need to cut the old seat cover or make adjustments to the new one.
Optional Tools
In addition to the essential tools mentioned above, there are a few optional tools that can make the installation process even easier. While not necessary, having these tools can save you time and effort:
- Heat Gun: If your seat cover is made of fabric or leather, a heat gun can help you stretch the material for a snug fit.
- Hog Ring Pliers: These pliers are specifically designed for attaching hog rings, which are often used to secure seat covers. They come in handy if your seat cover requires hog rings.
- Upholstery Adhesive: Upholstery adhesive can be used to reinforce the attachment of the seat cover to the seat, providing extra security.
- Steam Cleaner: If you want to give your seats a thorough cleaning before installing the seat cover, a steam cleaner can help remove dirt and stains effectively.
By having the essential tools and considering the optional ones, you can ensure a smooth and successful installation of your new seat cover. Make sure to gather all the required tools beforehand to avoid any interruptions during the process.
Removing The Old Seat Cover
Removing the old seat cover is the first step in installing a new seat cover. Whether you’re doing it for aesthetic reasons or to protect your seats from wear and tear, this process is relatively straightforward. In this section, we will guide you through the process of removing the old seat cover, step by step.
Cleaning the seat
Before starting the process of removing the old seat cover, it is essential to clean the seat thoroughly. Over time, dirt, dust, and grime can accumulate on the seat, making it difficult to get a smooth installation with the new seat cover. Here’s a simple method to clean your seat:
- Vacuum the seat to remove loose particles and debris.
- Prepare a cleaning solution by mixing mild dish soap with warm water.
- Dip a clean cloth or sponge into the cleaning solution and gently scrub the seat in a circular motion.
- Pay extra attention to areas with stains or dirt, applying a bit more pressure if needed.
- Rinse the seat with clean water to remove any soap residue.
- Allow the seat to dry completely before proceeding to the next step.
Detaching the old seat cover
Once the seat is clean and dry, it’s time to detach the old seat cover. Follow these steps to ensure a smooth removal:
- Locate the attachment points of the seat cover.
- Using a flat-head screwdriver or a panel removal tool, gently pry off any clips or plastic fasteners holding the seat cover in place.
- Take your time and be careful not to damage the seat or the clips.
- Once the clips are detached, start from one corner of the seat and slowly peel back the seat cover.
- If the old seat cover is secured with elastic straps or hooks, release them to completely remove the cover.
- Inspect the seat for any remaining clips or fasteners and remove them if necessary.
By following these steps in a methodical manner, you will be able to remove the old seat cover without any issues. Cleaning the seat beforehand ensures a clean surface for the new seat cover installation. Detaching the old seat cover requires patience and attention to detail to prevent any damage to the seat or the clips.
Preparing The New Seat Cover
Reading the Manufacturer’s Instructions
Unpacking and Inspecting the Seat Cover
Checking for Any Additional Preparation Steps
Installing A Universal Seat Cover
Installing a universal seat cover is a great way to protect your car seats and add a stylish touch to your vehicle’s interior. Whether you’re looking to cover up worn-out seats or simply want to give your car a new look, a universal seat cover is a versatile option that can fit most car models and seat types. In this guide, we will walk you through the step-by-step process of installing a universal seat cover to ensure a snug fit that will stay in place.
Positioning the seat cover
The first step in installing a universal seat cover is to properly position it on the seat. Start by holding the seat cover over the seat and visually aligning it to fit properly. Make sure the front of the seat cover is facing the front of the seat and that any openings for headrests or seat belts are correctly aligned. Once you have positioned the seat cover, move on to the next step of adjusting the straps and clips.
Adjusting the straps and clips
Universal seat covers come with adjustable straps and clips to help secure them in place. Begin by locating the straps and clips on the seat cover. These are usually found at the edges and corners of the cover. Take each strap and clip and attach them to their corresponding locations on the seat. Adjust the straps to ensure a tight fit, but be careful not to over-tighten as it may cause the seat cover to rip or tear. Once the straps and clips are properly adjusted, move on to the final step of securing the seat cover into place.
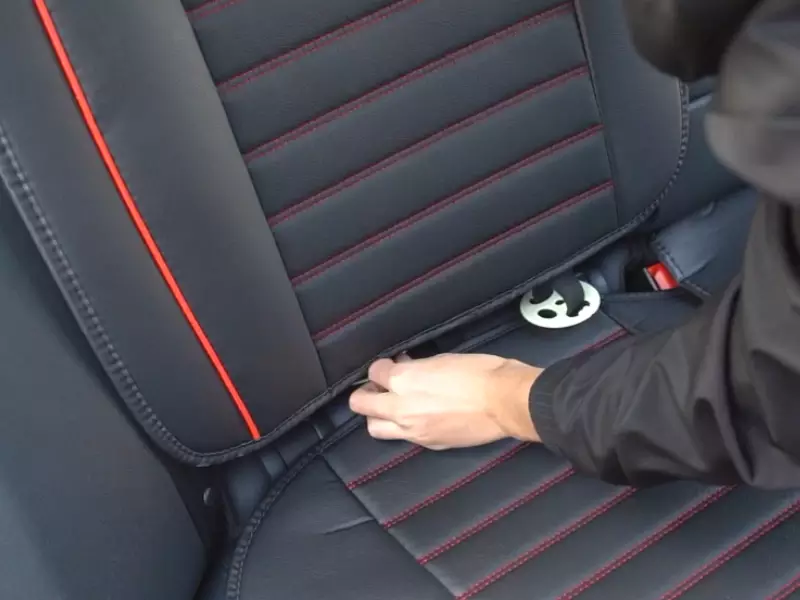
Securing the seat cover into place
Now that you have positioned the seat cover and adjusted the straps and clips, it’s time to secure the seat cover into place. Start by gently smoothing the seat cover over the seat, ensuring that it is evenly distributed and free from any wrinkles or creases. Use your hands to press down on any excess fabric and tuck it into the gaps between the seat and backrest. This will give the seat cover a neat and tailored appearance. Once the seat cover is properly aligned and smoothed out, press down on the edges to ensure a secure fit. Take a step back and admire your newly installed universal seat cover!
Installing A Custom-Fit Seat Cover
Installing a custom-fit seat cover is a great way to protect your car seats and add a stylish touch to your vehicle’s interior. By ensuring a proper fit, you can achieve a seamless look and ensure that the seat cover stays securely in place. In this article, we will guide you through the process of installing a custom-fit seat cover step-by-step, ensuring a hassle-free experience.
Identifying the correct seat cover pieces
Before you begin the installation process, it’s crucial to identify the correct seat cover pieces for your specific car make and model. Custom-fit seat covers are designed to fit snugly on each seat, so it’s essential to have the right pieces to ensure a proper fit. Unpack your seat cover and carefully review the instructions or labeling that came with it to determine which piece goes where.
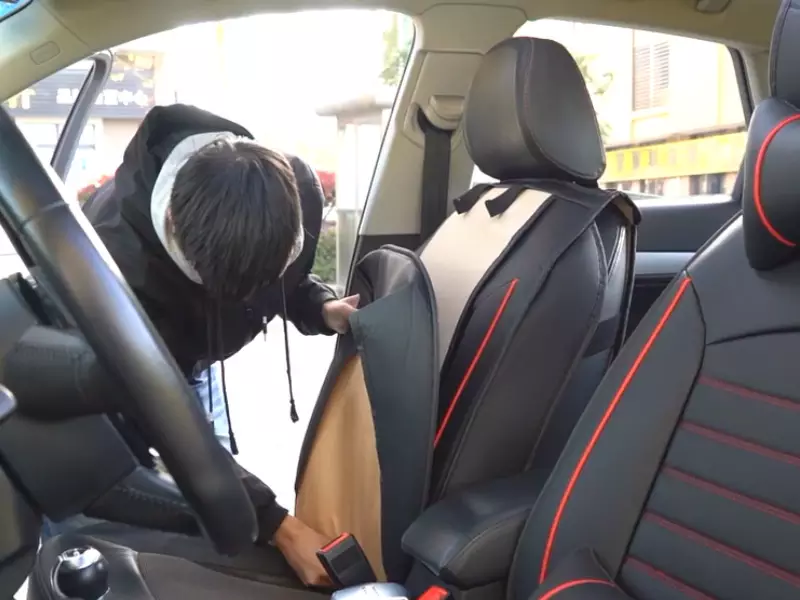
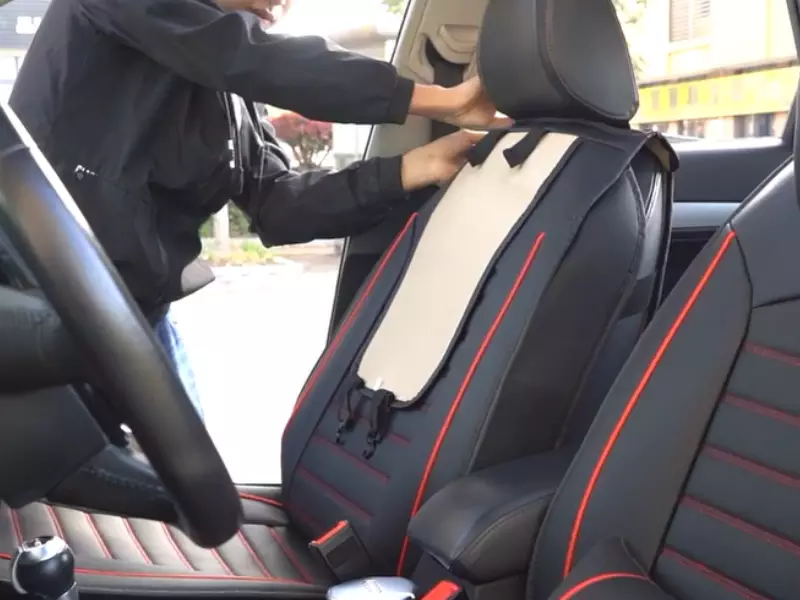
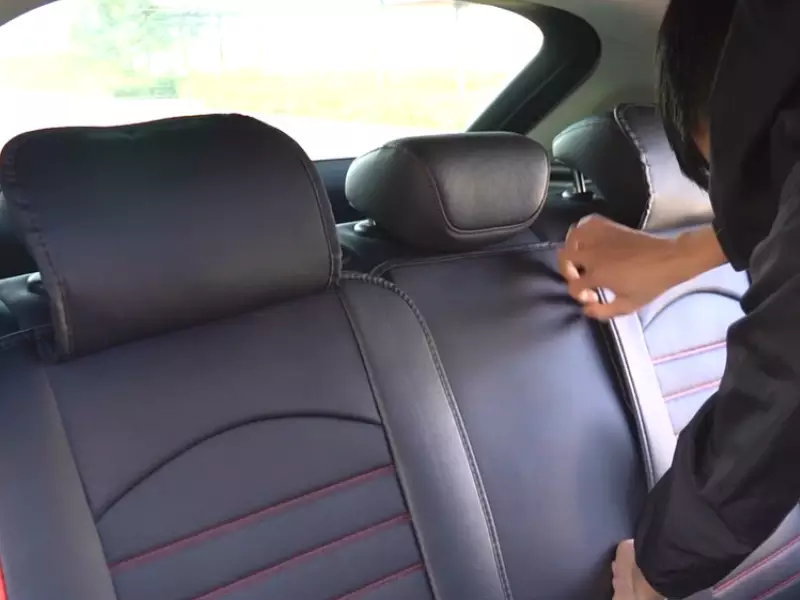
Aligning the seat cover with the seat
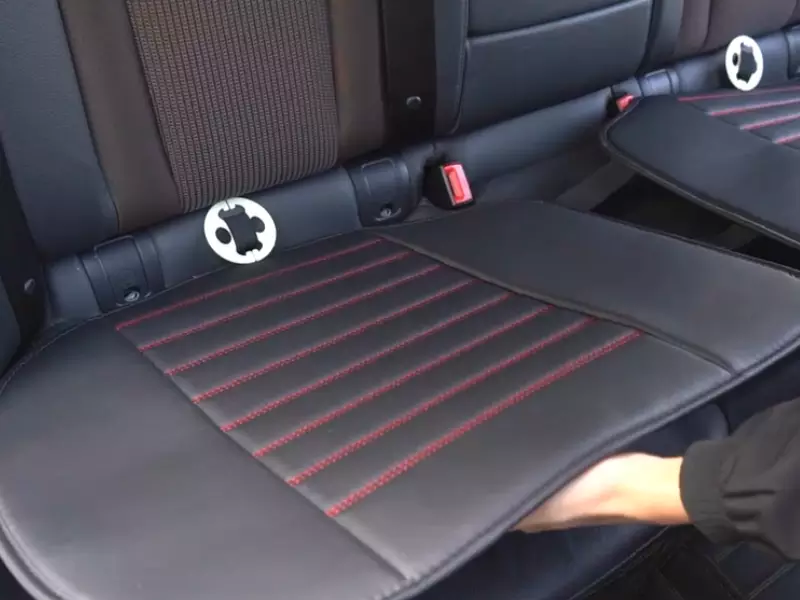
Once you have identified the correct seat cover pieces, it’s time to align them with the seat. Start by removing the headrest and slide the seat cover over the top part of the seat. Be sure to align any openings or straps with the corresponding parts on the seat. Pull the seat cover down, making sure it reaches the bottom and covers the entire seat surface. Smooth out any wrinkles or creases as you go along to achieve a neat and snug fit.
Fastening the seat cover securely
Now that the seat cover is aligned with the seat, it’s time to fasten it securely to ensure it stays in place. Most custom-fit seat covers come with straps, hooks, or elastic attachments that help secure the cover. Use these attachments to fasten the seat cover tightly to the seat, making sure there are no loose areas. If there are any adjustable straps or buckles, adjust them accordingly to achieve a snug fit without restricting seat movement.
After fastening the seat cover, take a step back and assess the overall fit. Check for any areas that might need further adjustment or tightening. Smooth out any remaining wrinkles or creases, making sure the seat cover looks seamless and fits flush with the seat. A properly installed custom-fit seat cover not only enhances the appearance of your vehicle but also provides protection against spills, stains, and wear and tear.
By following these simple steps, you can successfully install a custom-fit seat cover and enjoy the benefits it provides. So go ahead and give your car seats a fresh new look while ensuring their longevity!
Ensuring A Proper Fit
Smooth out any wrinkles or creases
Once you have successfully installed the seat cover on your vehicle, it’s important to ensure a proper fit by smoothing out any wrinkles or creases. This step not only improves the overall appearance of the seat cover but also ensures a comfortable experience for both the driver and passengers.
To smooth out wrinkles or creases, start by adjusting the seat cover fabric. Gently pull and stretch the fabric in the areas where it appears wrinkled or creased. This will help to distribute the tension evenly and create a smooth surface.
If you encounter stubborn wrinkles or creases that are difficult to remove by stretching alone, consider using a steamer or a hairdryer in a low-heat setting. Hold the steamer or hairdryer a few inches away from the seat cover and direct the steam or warm air toward the affected area. Be cautious not to overheat the fabric or cause any damage.
Continue to smooth out the wrinkles or creases until you are satisfied with the appearance of the seat cover. Remember, patience is key during this process, as taking your time will result in a more professional and polished outcome.
Double-checking the installation
After smoothing out any wrinkles or creases, it’s important to double-check the installation of the seat cover to ensure a proper fit. This step will give you peace of mind and help you identify any areas that may require further adjustment.
Start by visually inspecting the seat cover. Look for any loose fabric, misalignments, or bulging areas. If you notice any issues, gently readjust the seat cover to correct them. Pay close attention to the corners and edges, as these areas are prone to shifting during use.
Next, sit in the seat and test its functionality. Ensure that the seat cover does not impede the movement of any adjustable components, such as the headrest, armrests, or seat controls. Adjust the seat in various positions to confirm that the seat cover remains secure and does not slip or bunch up.
If you are installing seat covers on multiple seats, repeat the above steps for each seat to ensure a consistent and proper fit throughout your vehicle.
By taking the time to smooth out any wrinkles or creases and double-check the installation, you can guarantee a properly fitted seat cover that not only enhances the aesthetics of your vehicle but also provides comfort and durability for the long haul.
Cleaning The Seat Cover
Keeping your seat cover clean is essential to maintaining the overall appearance and durability of your car’s interior. A clean seat cover not only enhances the aesthetic appeal of your vehicle but also extends its lifespan. In this section, we will discuss the appropriate cleaning methods, effective stain and dirt removal techniques, and the importance of regular maintenance routines for your seat cover.
Choosing the appropriate cleaning method
When it comes to cleaning your seat cover, selecting the right method is crucial. Different types of seat covers require specific cleaning approaches to avoid damage. Below, we have compiled a list of common seat cover materials and the most suitable cleaning methods for each:
| Seat Cover Material | Appropriate Cleaning Method |
|---|---|
| Leather | Use a gentle leather cleaner and conditioner specifically designed for automotive leather. Avoid using harsh chemicals or abrasive materials that can strip away the natural oils and cause cracking. |
| Fabric | Check the manufacturer’s instructions for any specific cleaning recommendations. In general, a mixture of mild detergent and warm water can be used to remove stains. Test the solution on a small, inconspicuous area first to ensure it does not cause discoloration. |
| Neoprene | Neoprene seat covers are relatively easy to clean. Wipe them down with a damp cloth or sponge using mild soap. Avoid using abrasive brushes or detergents that can damage the material. |
Removing stains and dirt
Stains and dirt are inevitable, especially if you frequently use your car. Here are some effective methods to remove stains and dirt from your seat cover:
- Blot the stain immediately with a clean cloth or paper towel to absorb as much liquid as possible.
- For fabric seat covers, create a solution of mild detergent and warm water. Dab a clean cloth into the solution and gently rub the stain in a circular motion until it fades.
- For stubborn stains, you can try using a specialized fabric stain remover. Follow the instructions on the product carefully and test it on an inconspicuous area first.
- For leather seat covers, use a leather cleaner and apply it to the stained area using a soft cloth. Gently rub in circular motions, being careful not to scrub too harshly.
- Once the stain is removed, blot the area with a clean, damp cloth to remove any residue. Allow the seat cover to air dry.
Regular maintenance routine
In addition to tackling stains and dirt, establishing a regular maintenance routine is essential to keep your seat cover looking fresh and clean. Here are some key steps you can follow:
- Vacuum your seat cover regularly to remove loose dirt and debris.
- Use a soft brush or cloth to gently remove any surface dust.
- Wipe down your seat cover with a damp cloth to remove any smudges or spills.
- Apply a suitable conditioner to leather seat covers periodically to keep them supple and prevent cracking.
- Avoid exposing your seat covers to direct sunlight for extended periods, as it can accelerate color fading.
By incorporating these simple yet effective cleaning and maintenance techniques into your routine, you can ensure that your seat cover remains in top condition, providing you with comfort and style for years to come.
Extending The Lifespan Of The Seat Cover
Installing a seat cover is a great way to protect your car seats and add a touch of style to your vehicle’s interior. However, just like any other car accessory, seat covers require proper care and maintenance to ensure they last for a long time. By taking a few simple steps, you can extend the lifespan of your seat cover and keep it looking fresh and new. In this article, we will discuss three important factors that can help you protect and maintain your seat cover: protecting from harsh sunlight, avoiding abrasive cleaners and materials, and regular inspection for wear and tear.
Protecting from harsh sunlight
Harsh sunlight can be damaging to your seat cover, causing it to fade and lose its vibrant color over time. To protect your seat cover from the damaging effects of the sun, consider parking your car in shaded areas or using a windshield sunshade to block out the UV rays. Additionally, you can apply a UV protection spray specifically designed for car seat covers. This spray creates an invisible barrier that prevents the sun’s rays from penetrating the fabric and causing damage. By taking these precautionary measures, you can significantly prolong the lifespan of your seat cover and keep it looking as good as new.
Avoiding abrasive cleaners and materials
Using abrasive cleaners or materials on your seat cover can cause irreparable damage, such as tears or discoloration. It is important to avoid using harsh chemicals, bleach, or abrasive brushes when cleaning your seat cover. Instead, opt for mild soap or detergent mixed with water and a soft cloth or sponge. Gently scrub the surface of the seat cover in a circular motion to remove any dirt or stains. After cleaning, make sure to thoroughly rinse off any soap residue and allow the seat cover to air dry. By using gentle cleaning methods and avoiding abrasive materials, you can ensure the longevity of your seat cover and keep it in excellent condition.
Regular inspection for wear and tear
Regularly inspecting your seat cover for any signs of wear and tear is crucial in maintaining its lifespan. Check for any loose threads, tears, or fraying edges. If you notice any damage, address it immediately to prevent further deterioration. Small repairs can often be made using a needle and thread or fabric adhesive. However, if the damage is extensive, it may be necessary to replace the seat cover altogether. By regularly inspecting your seat cover and addressing any issues promptly, you can prevent minor damages from becoming major problems and ensure its durability for years to come.
In conclusion, proper care and maintenance are essential for extending the lifespan of your seat cover. Protecting it from harsh sunlight, avoiding abrasive cleaners and materials, and regular inspection for wear and tear are key factors in ensuring its longevity. By following these simple guidelines, you can keep your seat cover looking new and protect your car seats from damage. Remember, a well-maintained seat cover not only adds style to your vehicle’s interior but also helps preserve the value of your car.
Troubleshooting Common Installation Issues
Installing a seat cover can drastically enhance the interior of your vehicle, protecting your seats from wear and tear while giving them a stylish new appearance. However, sometimes installation issues can arise, leaving you with a less-than-perfect result. To help you overcome these challenges, we’ve outlined some common problems that may occur during the installation process and provided troubleshooting tips to ensure a seamless installation.
Loose or Sagging Seat Cover
One of the most frustrating issues you may encounter when installing a seat cover is a loose or sagging fit. Not only does it compromise the aesthetics of your seats, but it can also be uncomfortable to sit on. Here are a few steps you can take to address this problem:
- Start by double-checking that you have chosen the correct seat cover size for your vehicle’s make and model. You can refer to the manufacturer’s instructions or contact their customer support for guidance.
- Ensure that all straps, hooks, and elastic bands provided with the seat cover are securely attached and tightened. This will help to hold the cover in place and prevent any slippage.
- If the sagging persists, consider using additional accessories such as foam padding or non-slip mats to provide extra support and grip between the seat and the cover.
- Regularly adjust and tighten the seat cover as needed to maintain a snug fit.
Fitment Issues
Fitment issues can occur when the seat cover does not align properly with the contours of your seats. This can result in bulges or gaps that diminish the overall appearance and functionality of the cover. Follow these steps to troubleshoot fitment problems:
- Ensure that you have chosen a seat cover specifically designed for your vehicle’s make and model. Universal seat covers may not provide the precise fit required for optimal performance.
- Carefully inspect the seat cover for any loose or excess fabric that may be causing the fitment issue. Trim or tuck away any excess material to achieve a neater appearance.
- Consider using seat cover installation tools, such as hooks or clips, to secure the cover tightly and ensure it remains in place.
- If the fitment problem persists, reach out to the manufacturer or consult a professional for further assistance.
Wrinkles or Creases
Wrinkles and creases are another common issue that can arise during seat cover installation. They not only detract from the aesthetic appeal but can also affect the comfort of your seats. Here’s what you can do to tackle this problem:
- Before installing the seat cover, attempt to smooth out any wrinkles or creases by gently stretching the fabric with your hands. This can often help to minimize the appearance of imperfections.
- If wrinkles persist, use a handheld steamer or a hairdryer on low heat to gently heat the fabric. While applying heat, use your hands or a soft cloth to smooth out the wrinkles and flatten the surface.
- Consider leaving the seat cover on for a few days to allow the fabric to settle and conform to the shape of your seats. Over time, many minor wrinkles may naturally disappear.
- Regularly adjust and smooth out any remaining wrinkles as needed.
By following these troubleshooting tips, you can overcome common installation issues and achieve a perfectly fitted and visually appealing seat cover for your vehicle. Remember to always refer to the manufacturer’s instructions for any specific guidance or additional methods for addressing any problems that may arise.
Frequently Asked Questions For How To Install A Seat Cover
Are Seat Covers Easy To Install?
Yes, seat covers are easy to install.
How Do You Stick A Car Seat Cover?
To stick a car seat cover, follow these steps:
1. Ensure the seat is clean and dry.
2. Position the cover over the seat, aligning the openings with the seat’s features.
3. Secure the cover tightly using hooks, straps, or elastic bands.
4. Smooth out any wrinkles or creases.
5. Test the cover’s fit and adjust if necessary.
How Do You Install Front Car Seat Covers With Hooks?
To install front car seat covers with hooks:
1. Remove the headrests from the seats.
2. Slide the cover over the seat, ensuring the hooks align with the seat frame.
3. Reattach the headrests.
4. Fasten the hooks securely to the seat frame.
5. Adjust the cover to ensure a snug fit and smooth appearance.
How Do You Install Car Seat Inserts?
To install car seat inserts, first, choose the right insert for your car seat model. Then, remove the seat cover and straps. Slide the insert into the seat and secure it tightly. Reattach the seat cover and straps according to the manufacturer’s instructions.
Conclusion
Installing a seat cover doesn’t have to be a daunting task. By following the simple steps outlined in this guide, you can easily transform the look and feel of your car’s interior. With attention to detail and a little patience, anyone can achieve professional-looking results.
Remember, taking care of your seat covers will also help to prolong their lifespan. Enjoy a refreshed and comfortable driving experience with your newly installed seat cover!