To install a seat belt, follow these steps carefully. Attach the belt anchor to the mounting point, pull the belt through the seat, and fasten the buckle securely.
Introduce the seat belt by explaining its importance in ensuring safety and compliance with traffic laws. A seat belt plays a crucial role in protecting drivers and passengers in the event of sudden stops or collisions. It reduces the risk of severe injuries and saves lives.
Installing a seat belt properly is vital to its effectiveness. This guide will provide you with clear instructions on how to install a seat belt correctly and ensure maximum safety for everyone in your vehicle.
Prepare Your Tools And Materials
List of Tools and Materials Needed
Preparing your tools and materials is an essential step when it comes to installing a seat belt. By having everything you need ready and within reach, you can ensure a smooth and efficient installation process. Here is a list of the tools and materials you will need:
1. Socket set with various size attachments
2. Wrench set
3. Screwdriver set (both flathead and Phillips)
4. Utility knife
5. Pliers
6. Wire cutters
7. Safety glasses
8. Ratchet straps or bungee cords
9. Seat belt kit (including the seat belt itself, mounting hardware, and any necessary brackets)
It is important to gather all of these tools and materials before you begin the installation process. Having the right equipment will not only make the installation easier but also ensure the safety and functionality of the seat belt.

Importance of Having the Right Equipment
Having the right equipment is crucial when it comes to installing a seat belt. Choosing the wrong tools or using subpar materials can lead to a faulty installation, compromising the effectiveness of the seat belt and putting your safety at risk. Here are a few reasons why having the right equipment is of utmost importance:
- Safety: The seat belt is a vital safety feature in any vehicle, providing protection in the event of a collision or sudden stop. Using improper tools or materials can weaken the seat belt’s integrity, reducing its ability to protect you and your passengers.
- Durability: The right equipment ensures that the seat belt is installed securely and will withstand the rigors of regular use. Low-quality tools or materials may result in a loose or unstable installation, causing the seat belt to malfunction or come loose over time.
- Compliance: Proper equipment ensures that your seat belt installation meets the required regulations and standards. This is especially important if you plan to use the vehicle for commercial purposes or if you live in an area with strict safety regulations.
- Efficiency: Having the right tools and materials on hand will make the installation process smoother and more efficient. You won’t waste time searching for missing tools or improvising with inadequate equipment, allowing you to complete the installation correctly and in a timely manner.
Remember, when installing a seat belt, it is crucial to prioritize safety and ensure that you have the necessary tools and materials. By doing so, you can guarantee a secure and reliable installation that will effectively protect you and your passengers on the road.
Inspect And Remove The Old Seat Belt
Check for any damage or wear
Before removing the old seat belt, it is important to thoroughly inspect it for any signs of damage or wear. This is essential to ensure your safety as well as the functionality of the new seat belt. Look for any fraying or cuts in the seat belt material, as well as any signs of rips or tears. Check the buckle and latch mechanism to ensure they are in proper working condition.
If you notice any damage or wear, it is recommended to replace the entire seat belt assembly. This will provide you with peace of mind knowing that you have a reliable and secure seat belt in your vehicle.
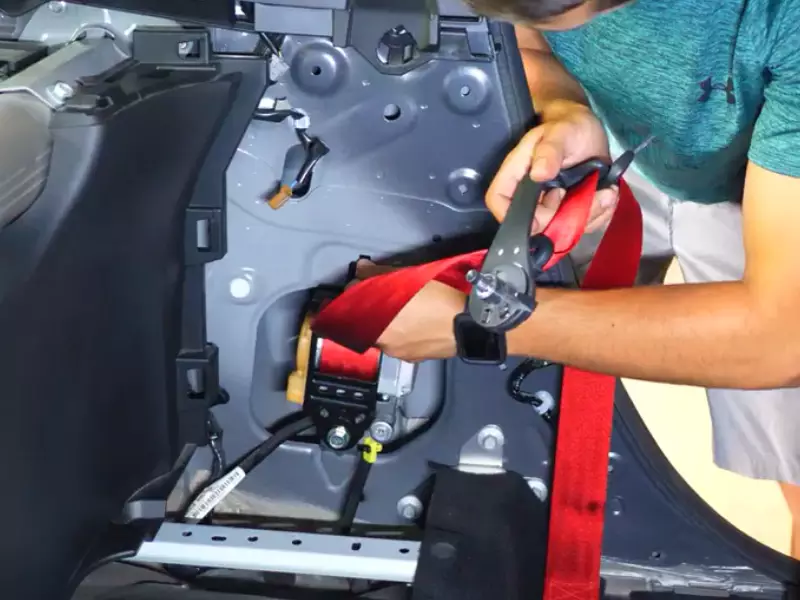
Steps to safely remove the old seat belt
Removing the old seat belt may seem like a daunting task, but it can be done with the right tools and steps. Follow these instructions to safely remove the old seat belt:
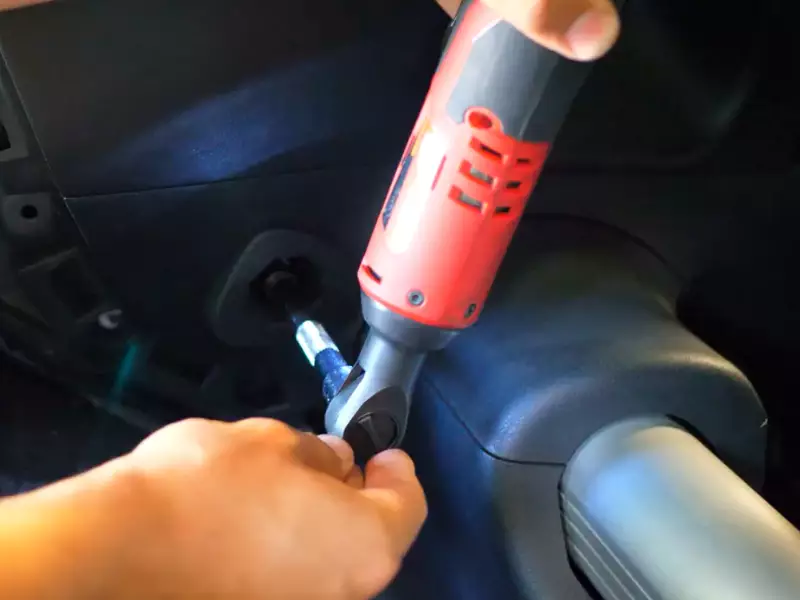
- Locate the mounting bolts: The seat belt is usually secured to the vehicle with mounting bolts or screws. These are typically located on the floor or side panel of the vehicle. Refer to your vehicle’s manual to find the exact location of these bolts.
- Use the appropriate tools: Once you have located the mounting bolts, use the appropriate tools, such as a socket wrench or screwdriver, to remove them.
- Detach the seat belt: With the mounting bolts removed, you can now detach the seat belt from the vehicle. Gently pull the seat belt out from its housing, making sure to avoid any unnecessary force or tugging.
- Disconnect any electrical connectors: In some vehicles, the seat belt may be connected to an electrical system. If this is the case, locate and disconnect any electrical connectors before completely removing the seat belt.
By following these steps, you can safely remove the old seat belt from your vehicle. Remember to handle the seat belt with care and avoid any sudden movements that may cause damage.
Note: If you are unsure or uncomfortable performing this task on your own, it is always best to consult a professional who has experience with seat belt installation and removal.
Measure And Position The New Seat Belt
Installing a seat belt is crucial for the safety of yourself and your passengers. It not only helps in preventing serious injuries during an accident, but also ensures a comfortable and secure driving experience. One of the most important steps in installing a seat belt is to measure and position it correctly. In this section, we will discuss the importance of proper positioning and provide guidelines to measure and mark the new seat belt accurately.
Importance of proper positioning
Proper positioning of the seat belt is essential to maximize its effectiveness. A seat belt that is positioned incorrectly may fail to provide adequate protection during a crash. It is important to understand that the seat belt should rest snugly across the occupant’s body, without being too tight or too loose. If the seat belt is too loose, it may not hold the occupant securely in place, increasing the risk of injuries. On the other hand, if it is too tight, it can cause discomfort and restrict the occupant’s movement. Therefore, taking the time to measure and position the seat belt correctly is of utmost importance.
Measuring and marking guidelines for accuracy
When measuring and marking the new seat belt, it is crucial to follow certain guidelines to ensure accuracy. Here are some steps to help you in this process:
- Begin by determining the anchor points for your seat belt, which are usually located on the floor or the sides of the vehicle. These points will be used to secure the seat belt.
- Once the anchor points are identified, measure the length required for the seat belt to span between them. Use a measuring tape to get an accurate measurement, ensuring that the tape is taut and straight.
- Make sure to account for any necessary adjustments or slack in the seat belt length. It is better to have slightly more length than necessary, as you can always adjust it later.
- Using a marker or a piece of tape, mark the measurement on the new seat belt. This mark will serve as a reference point for cutting the seat belt to the correct length.
- Before cutting the seat belt, double-check the measurements and ensure that it is marked at the appropriate length. Be precise and extra cautious during this step.
By adhering to these measuring and marking guidelines, you can ensure that the new seat belt is accurately measured and positioned. Remember, the accuracy of these measurements is crucial for the proper functioning and effectiveness of the seat belt, so take your time and double-check your work.
Secure The New Seat Belt
Step-by-step instructions for securing the seat belt
Ensuring the proper installation of a seat belt is crucial for the safety of drivers and passengers. Once you have carefully removed the old seat belt and obtained a new one, it’s time to secure it in place. Follow these step-by-step instructions to properly secure the new seat belt:
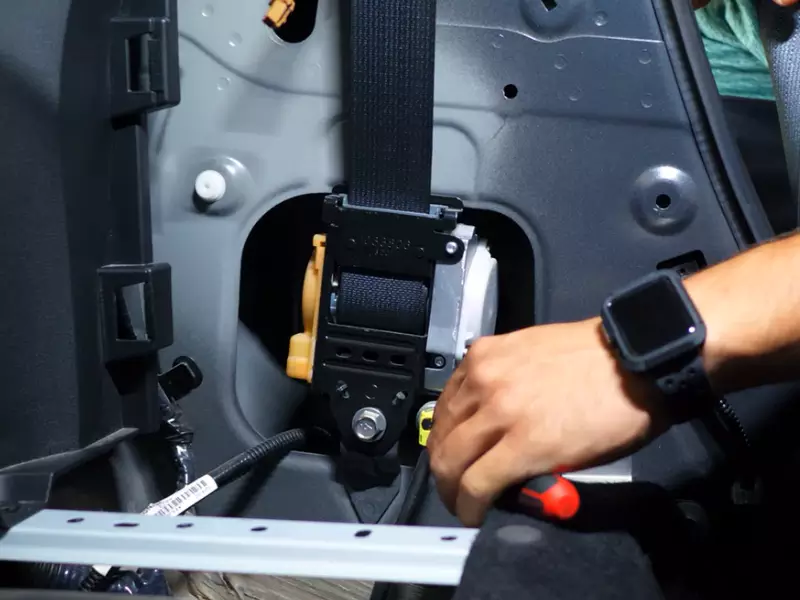
- Locate the anchor point: Before you begin securing the new seat belt, find the anchor point where it will be attached. This is typically located on the vehicle’s frame or underneath the seat. Refer to your vehicle’s manual for specific instructions.
- Attach the anchor plate: Once you have located the anchor point, take the anchor plate that came with the new seat belt and position it over the anchor point. Make sure it is aligned properly and flush with the anchor point.
- Use the appropriate fasteners: Check the manual to determine the type of fasteners recommended for your specific make and model. Using the provided hardware, secure the anchor plate to the anchor point. Tighten the fasteners to ensure a secure fit, but be careful not to overtighten and damage any components.
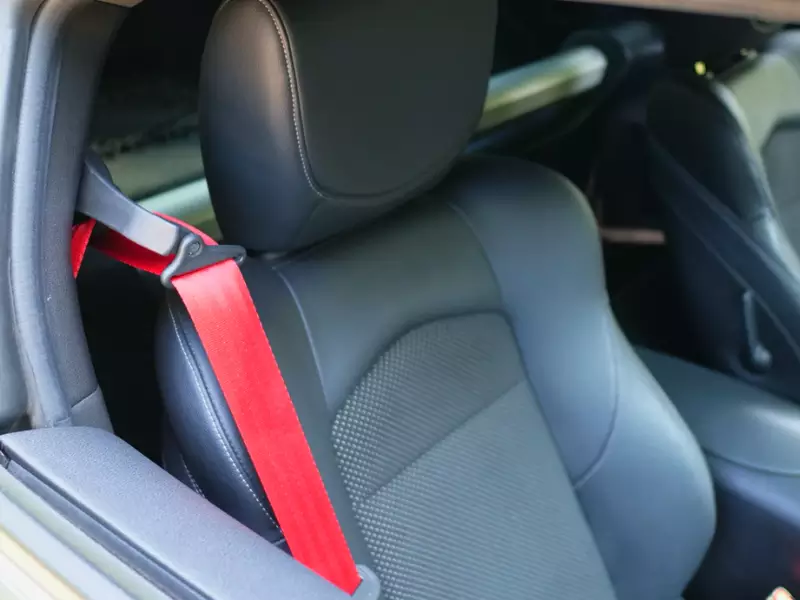
- Connect the seat belt buckle: After securing the anchor plate, you can now connect the seat belt buckle. Insert the metal tongue of the seat belt into the buckle until you hear a click, indicating it is securely locked in place.
- Test the seat belt: Once the seat belt buckle is connected, give it a gentle tug to make sure it is properly latched. It should not easily come undone or slip out of the buckle. If you encounter any issues, double-check the installation or consult a professional.
Proper use of tools and fasteners
Using the right tools and fasteners is essential to ensure a secure installation of the seat belt. Improper use can lead to a faulty or loose seat belt, which may compromise safety. Here are a few tips to keep in mind:
- Refer to the installation manual: Each seat belt manufacturer provides specific instructions for installation, including the recommended tools and fasteners. Carefully review these guidelines to ensure you have the correct tools and hardware.
- Use appropriate fasteners: Fasteners come in various sizes and types. It’s crucial to select the fasteners that are compatible with your vehicle’s anchor point and the provided anchor plate. Using the wrong fasteners may result in an insecure installation.
- Tighten securely but don’t overtighten: When securing the anchor plate and fasteners, ensure they are tightened properly. However, be cautious not to overtighten, as it can damage the anchor point or the anchor plate. Use a torque wrench if needed to achieve the correct level of tightness.
By following these guidelines and using the appropriate tools and fasteners, you can ensure a safe and secure installation of your new seat belt.
Test And Adjust The Seat Belt
One of the most crucial steps in installing a seat belt is to test and adjust it for functionality and safety. Ensuring that the seat belt is in proper working condition and provides a snug fit is essential for the safety of both the driver and the passengers. In this section, we will discuss the importance of testing for functionality and safety, as well as provide instructions for adjusting the seat belt for a snug fit.
Importance of Testing for Functionality and Safety
Before hitting the road, it is vital to test the seat belt to ensure that it functions properly. Testing for functionality helps to identify any issues or malfunctions that could put lives at risk. Safety should always be a top priority when it comes to seat belts, and conducting a thorough test is a simple yet effective way to ensure the seat belt’s reliability.
Here are a few steps to test the functionality of a seat belt:
- Verify that the seat belt clicks securely into the buckle. This confirms that the latch mechanism is working correctly.
- Pull the seat belt to check for any slack or looseness. The seat belt should retract smoothly without any resistance, but still remain firmly in place when pulled tightly. If there is excessive slack or resistance, further investigation or adjustment may be necessary.
- Check the locking mechanism by giving the seat belt a sharp tug once it is fully extended. The locking mechanism should engage and prevent further extension to hold the passenger securely in place during sudden stops or impacts.
By performing these simple tests, you can ensure that the seat belt is functioning properly and will provide the necessary protection in case of an accident or sudden stop.
Instructions for Adjusting the Seat Belt for a Snug Fit
Adjusting the seat belt to fit snugly is essential to maximize its effectiveness. A properly adjusted seat belt helps to distribute the force of a collision across the strongest parts of the body, reducing the risk of injury.
Follow these steps to adjust the seat belt for a snug fit:
- Start by sitting in the driver’s seat or the seat where you plan to install the seat belt.
- Pull the seat belt across your body, ensuring that it sits comfortably over your shoulder and across your chest without any twists or knots.
- Check that the lap belt portion of the seat belt rests low on your hips, snug but not too tight.
- If your vehicle has an adjustable seat belt anchor, move it up or down until the seat belt fits snugly and conforms to your body shape.
- Ensure that there is no excessive slack in the seat belt. It should fit snugly but not be overly restrictive.
Remember, a properly adjusted seat belt is a crucial part of protecting yourself and your passengers on the road. Taking the time to ensure a snug fit can make all the difference in the event of a collision or sudden stop.
Final Checks And Safety Tips
Before you hit the road after installing a seat belt, it is crucial to perform some final checks to ensure everything is in place and working correctly. Additionally, be aware of some essential safety tips to keep in mind for your own and your passengers’ safety. Let’s discuss each of these aspects further.
Double-checking the installation for any issues
After you have installed a seat belt, it is essential to double-check the installation to ensure there are no issues that could compromise your safety. Here are a few steps to follow:
- Ensure that the seat belt is securely fastened to the vehicle frame or structure. Check all the bolts and screws to make sure they are tightened properly. If you notice any loose connections, tighten them immediately to avoid potential accidents.
- Test the seat belt by pulling it firmly to ensure it locks correctly. It should retract smoothly without any resistance. If you encounter any difficulties, it may signify a problem with the installation.
- Check the seat belt fabric for any signs of fraying, tearing, or damage. Damaged seat belts should be replaced immediately to ensure optimal protection.
- Inspect the seat belt buckle to ensure it engages securely and releases without any issues. It is crucial for the buckle to operate smoothly to maximize safety in case of an emergency.
Essential safety tips to keep in mind after installing a seat belt
Once you have installed a seat belt, it’s essential to remember some safety tips to make the most of this safety feature:
- Always wear your seat belt, and encourage your passengers to do the same. Seat belts are your primary line of defense in case of an accident, providing protection and reducing the risk of severe injuries.
- Avoid placing any objects or clothing that may interfere with the seat belt’s proper functioning. Loose objects or bulky clothing can prevent the seat belt from restraining you effectively.
- Ensure that the seat belt is properly positioned across your lap and shoulder. The lap belt should lie snugly across your hips and the shoulder belt should extend over your shoulder and chest without cutting into your neck.
- Be mindful of the seat belt’s condition and replace it if you notice signs of wear and tear. Regularly inspect the seat belt for any damages and address them promptly to maintain its effectiveness.
- Remember to buckle up, even on short trips. Accidents can happen at any time, so make it a habit to buckle up before starting the engine.
- Do not tamper with or modify the seat belt system. Alterations to the seat belt’s design can compromise its effectiveness and put your safety at risk.
By double-checking the seat belt installation for any issues and adhering to these essential safety tips, you can ensure the proper functioning of your seat belt and maximize your safety on the road.
Frequently Asked Questions For How To Install A Seat Belt
Can I Install My Own Seat Belts?
No, it is not recommended to install your own seat belts. This task requires professional expertise to ensure proper installation and safety compliance. Always consult a qualified technician to install seat belts correctly.
How Do You Put Up A Seat Belt?
To put up a seat belt, follow these steps:
1. Locate the seat belt buckle.
2. Insert the metal tongue into the buckle until it clicks.
3. Pull the lap belt across your lap and adjust the tightness.
4. Pull the shoulder belt over your shoulder and across your chest.
5. Make sure the seat belt is snug and secure.
How Long Does It Take To Install A Seat Belt?
It typically takes around 30 minutes to install a seat belt. The process is quick and straightforward, ensuring proper safety and compliance.
How Do You Install A 3-Point Seat Belt?
To install a 3-point seat belt, follow these steps:
1. First, locate the anchor points for the seat belt. They are usually found on the vehicle’s frame or chassis.
2. Attach the seat belt to the anchor points, ensuring it is securely fastened.
3. Next, route the seat belt through any necessary guides or brackets.
4. Adjust the belt’s length to fit the intended occupant, ensuring it is not too loose or too tight.
5. Finally, test the seat belt to ensure it is properly functioning before use.
Remember, if you are uncertain about the installation process, it’s best to seek professional assistance to ensure safety.
Conclusion
Installing a seat belt is a crucial step towards ensuring safety while driving. By following the steps outlined in this blog post, you can easily install a seat belt in your vehicle without any hassle. Remember, your safety is of utmost importance, and taking the time to properly secure a seat belt can make all the difference in the event of an accident.
So, don’t hesitate, take action, and prioritize safety on the road today.