To install a rear view camera, first, find a suitable location on the back of your vehicle. Then, mount the camera and connect it to the power source and the display unit inside your car.
Introducing a rear view camera to your vehicle can greatly enhance your safety and improve your parking skills. By providing a clear view of what’s behind your car, a rear view camera helps you avoid accidents and obstacles. Whether you have a large SUV or a compact sedan, installing a rear view camera is a straightforward process.
We will guide you through the steps to install a rear view camera in your vehicle, ensuring a hassle-free and successful installation. So, let’s get started with the installation process to enjoy all the benefits of a rear view camera in your car.
Enhancing Safety And Visibility
A rear view camera is a highly beneficial device that can greatly enhance your safety and visibility while driving. With its advanced technology and ease of installation, it allows you to have a clear view of what’s happening behind your vehicle, eliminating blind spots and reducing the risk of accidents and collisions.
Decrease accidents and collisions
One of the key benefits of installing a rear view camera is the significant decrease in accidents and collisions. Traditional mirrors can often fail to provide a comprehensive view of what’s behind your vehicle, especially in larger vehicles or situations where objects or pedestrians may be in blind spots.
However, with a rear view camera, you can have a detailed and real-time view of the area behind your vehicle right from the dashboard or rearview mirror. This allows you to see approaching vehicles, pedestrians, or any obstacles that may be in your path, contributing to a safer driving experience.
Improve visibility in blind spots
Blind spots can be a major source of concern for drivers, as they can block your view of surrounding traffic and make changing lanes or maneuvering in tight spaces challenging. Rear view cameras effectively minimize this risk by providing enhanced visibility in these blind spots.
By installing a rear view camera, you gain a wide-angle view of the area surrounding your vehicle, enabling you to spot any vehicles or objects that may be hiding in your blind spots. This not only helps you to make safer lane changes but also ensures that you can park and maneuver with confidence, knowing that you have a clear view of your surroundings.
Additionally, rear view cameras can be especially helpful when parking in tight spaces or reversing out of driveways. With a clear and accurate view of what’s behind you, you can navigate these situations with ease, reducing the risk of accidental collisions and damages to your vehicle.
Overall, the installation of a rear view camera is a worthwhile investment that significantly enhances safety and visibility while driving. By decreasing accidents and collisions and improving visibility in blind spots, this device provides peace of mind and allows you to be more aware of your surroundings on the road.
Legal Requirements
When it comes to installing a rear view camera, it’s important to understand the legal requirements that you need to adhere to. Regulations regarding rear view cameras have been put in place to ensure the safety of both drivers and pedestrians. In this article, we will explore the mandatory installation of rear view cameras in certain vehicles and the guidelines you should follow.
Regulations regarding rear view cameras
The regulations regarding rear view cameras vary depending on your location. In many countries, it is not mandatory to have a rear view camera installed in your vehicle. However, it is highly recommended due to the added safety and convenience it provides. But there are certain guidelines that you should keep in mind if you decide to install a rear view camera in your car.
- Display location: The display for the rear view camera should be located in a position that does not obstruct the driver’s view of the road. It should be easy to see and operate without causing any distractions.
- Image quality: The quality of the camera’s image should be clear and of sufficient resolution to provide a clear view of the surroundings. This ensures that the driver can accurately assess the objects or people behind the vehicle.
- Automatic activation: Some regulations may require the rear view camera to automatically activate when the vehicle is put in reverse gear. This ensures that the camera is always ready for use when needed.
Mandatory installation in certain vehicles
In certain vehicles, the installation of rear view cameras is mandatory by law. This is especially true for larger vehicles like trucks, buses, and recreational vehicles, as they have larger blind spots and are more prone to accidents while reversing. The specific requirements for mandatory installation may vary depending on the jurisdiction and vehicle type.
| Vehicle Type | Mandatory Installation Requirement |
|---|---|
| Trucks | Rear view cameras must be installed to assist with reversing and maneuvering. |
| Buses | Rear view cameras are required to ensure the safety of passengers and nearby pedestrians. |
| Recreational Vehicles | Rear view cameras are mandatory to aid in parking and reversing in tight spaces. |
In addition to these specific vehicles, it is important to note that some newer car models may also come equipped with rear view cameras as a standard feature. This demonstrates the increasing recognition of the importance of rear view cameras in enhancing safety on the road.
By understanding the legal requirements and regulations surrounding the installation of rear view cameras, you can ensure that you comply with the necessary guidelines while also benefiting from the added safety and convenience these cameras provide.
Types Of Rear View Cameras
When it comes to installing a rear view camera, it’s important to understand the different types available in the market. Each type of camera has its own unique features and benefits. In this article, we will discuss the two main types of rear view cameras: wired vs. wireless cameras and traditional vs. backup mirror cameras.
Wired vs. Wireless Cameras
One of the first decisions you’ll need to make when choosing a rear view camera is whether you want a wired or wireless system. Both options have their advantages and it’s important to consider your specific needs before making a decision.
Wired cameras: As the name suggests, wired cameras require a physical connection between the camera and the monitor in your vehicle. This connection ensures a stable and reliable video feed, making wired cameras a popular choice among professionals. Additionally, wired cameras eliminate the need for batteries or charging, as they are powered by the vehicle’s electrical system.
Wireless cameras: On the other hand, wireless cameras are becoming increasingly popular due to their ease of installation. These cameras transmit video wirelessly to a monitor or receiver in your vehicle, eliminating the need for complicated wiring. Wireless cameras are a great option if you want a hassle-free installation process, but keep in mind that they may be more prone to interference or signal loss in certain environments.
Traditional vs. Backup Mirror Cameras
Another factor to consider when choosing a rear view camera is whether you want a traditional camera or a backup mirror camera. Each type offers a different viewing experience and it’s important to understand their pros and cons.
Traditional cameras: Traditional rear view cameras are typically mounted on the rear bumper or license plate and provide a wide-angle view of the area behind your vehicle. These cameras offer a clear and detailed image on a display inside the vehicle, making it easier to navigate and park in tight spaces. They are especially useful for larger vehicles such as vans or RVs.
Backup mirror cameras: On the other hand, backup mirror cameras are designed to replace the standard rearview mirror in your vehicle. These cameras provide a convenient and seamless integration into your vehicle’s interior, offering a constant view of the rear. Backup mirror cameras are a great option if you want to maintain the aesthetics of your vehicle while still benefiting from a rear view camera system.
In conclusion, whether you choose a wired or wireless camera and a traditional or backup mirror camera, installing a rear view camera can greatly enhance your safety and convenience on the road. Take into consideration your specific needs and preferences to choose the right type of camera for your vehicle.
Factors To Consider
It’s important to consider several factors when choosing a rear view camera for your vehicle. Taking the time to assess these factors will ensure you find the perfect camera that meets your needs and helps enhance your overall driving experience. In this article, we’ll explore three critical factors to consider: compatibility with your vehicle, image quality and resolution, and night vision capabilities.
Compatibility with your vehicle
When it comes to installing a rear view camera, compatibility with your vehicle is of utmost importance. Not all cameras are suitable for every car make and model, so it’s essential to choose one specifically designed to work with your vehicle. Check the camera’s specifications and make sure it is compatible with your car’s electrical system and display unit. Installing a compatible camera will not only ensure seamless integration but also prevent any potential malfunctions or wiring issues.
Image quality and resolution
Nothing is more frustrating than having a rear view camera with poor image quality and low resolution. When evaluating cameras, pay close attention to their image quality and resolution capabilities. Look for cameras that offer high-definition (HD) resolution and vibrant color reproduction. This will provide you with a clear view of your surroundings, making parking and reversing safer and more convenient. Additionally, cameras with wide-angle lenses can capture a broader field of view, minimizing blind spots and increasing your overall awareness.
Night vision capabilities
Driving in low-light conditions or at night can be challenging, but having a rear view camera with night vision capabilities can greatly enhance your visibility. Look for cameras equipped with infrared (IR) LEDs that provide excellent night vision performance. These LEDs illuminate the area behind your vehicle, allowing the camera to capture clear images even in complete darkness. Having a rear view camera with reliable night vision capabilities will give you the confidence to navigate parking lots and maneuver in tight spaces, no matter the time of day.
Gather The Necessary Tools And Equipment
Before beginning the installation process for a rear view camera, it is essential to gather all the necessary tools and equipment. Having these items ready will help ensure a smooth and efficient installation. Below, you will find a list of the essential tools and equipment required for installing a rear view camera.
Screwdriver
A screwdriver is a basic yet indispensable tool that you will need for installing a rear view camera. It will be used to remove screws and fastenings, allowing you to safely and securely attach the camera to your vehicle. Make sure to have a screwdriver set with various sized heads, as different screws may require different types of heads.
Power Drill
A power drill will come in handy when dealing with more complicated installations that may require drilling holes for mounting brackets or running wires through the vehicle’s structure. This tool provides the necessary power to quickly and efficiently create the necessary openings for your rear view camera installation.
Wire Connectors
Wire connectors are crucial for ensuring proper electrical connections during the installation process. They help to join wires securely, reducing the risk of loose connections that could affect the camera’s functionality. Having a variety of wire connectors, such as butt connectors or crimp connectors, will enable you to choose the most suitable option for the specific wiring needs of your rear view camera.
To summarize, it is important to gather the necessary tools and equipment before installing a rear view camera. These include a screwdriver, power drill, and wire connectors. Ensuring you have these items will make the installation process smoother and increase the likelihood of successful camera integration with your vehicle.
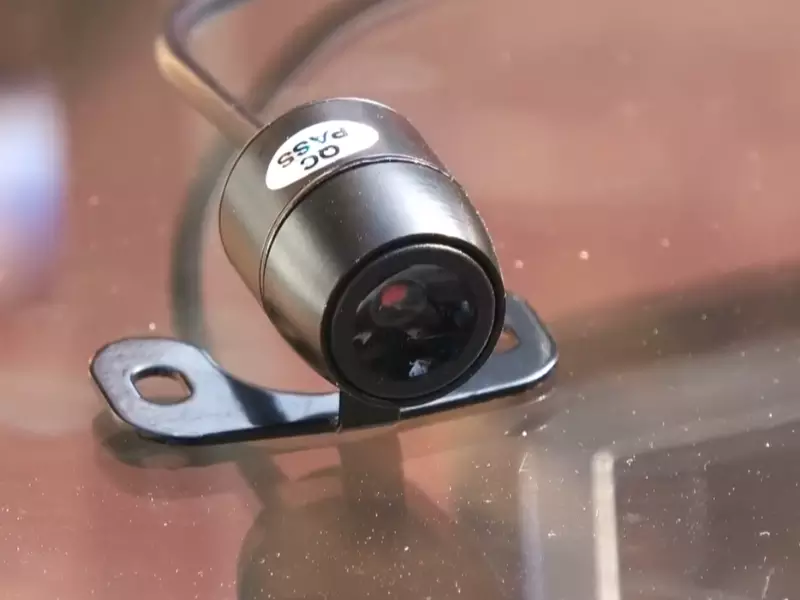
Preparing The Rear View Camera
Installing a rear view camera on your vehicle is a game-changer when it comes to safety and peace of mind. With this small yet powerful device, you can eliminate blind spots and maneuver with confidence. But before you can begin enjoying the benefits of a rear view camera, there are a few important steps to take to prepare and position the camera correctly. In this section, we’ll guide you through the process of mounting the camera on the rear of your vehicle and ensuring proper positioning for optimal visibility.
Mounting the camera on the rear of the vehicle
The first step in preparing your rear view camera is to securely mount it on the rear of your vehicle. This placement is critical as it will determine the camera’s field of vision and functionality. To mount the camera, follow these steps:
- Locate a suitable spot on the rear of your vehicle for camera installation. This is typically near the license plate or the bumper.
- Clean the mounting location with a gentle cleanser to ensure there is no dust, dirt, or debris that could interfere with the adhesive or screws.
- If your camera comes with adhesive backing, remove the protective film and firmly press the camera onto the chosen location. Make sure it is level and securely attached.
- If your camera requires screws for mounting, use a drill to create small pilot holes in the chosen location. Then, align the camera with the holes and insert the screws to secure it in place.
Ensuring proper positioning for optimal visibility
Once you have mounted the camera, it’s crucial to ensure it is properly positioned for optimal visibility. The camera’s field of vision should cover the rear of your vehicle, including the blind spots that may not be visible through the rearview mirror alone. Here are some tips to ensure proper positioning:
- Adjust the camera angle to aim directly at the area behind your vehicle. This will provide a clear view of any obstacles or approaching vehicles.
- Ensure that the camera is positioned at an appropriate height. Too high or too low placement can affect visibility and distort the image.
- Consider the viewing angle of the camera. It should capture a wide perspective without significant distortion or fish-eye effect.
By following these steps, you can ensure that your rear view camera is properly prepared and positioned for optimal visibility. Now that you have successfully prepared the camera, the next step is to connect it to a compatible display device and power source. Stay tuned for our next section on how to connect and configure your rear view camera for seamless functionality.
Wiring And Connecting The Camera
Once you have chosen the ideal location for your rear view camera, it’s time to start wiring and connecting it to your vehicle. This step is crucial, as proper installation ensures a seamless and reliable performance. In this section, we will guide you through the process step by step.
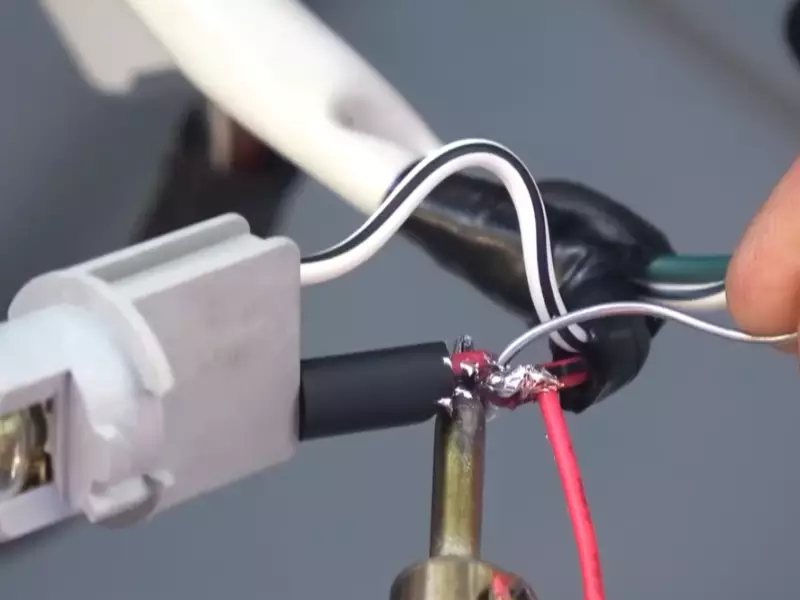
Running the camera’s cables through the vehicle
To begin, gather the necessary tools for running the camera’s cables through your vehicle. You will need a wire stripper, electrical tape, zip ties, and a long, flexible wire. Before starting, make sure to disconnect the vehicle’s battery to avoid any electrical mishaps.
- Identify the route: Determine the most efficient route for running the camera cables from the rear of your vehicle to the dashboard. This typically involves locating existing cable conduits or creating a new path.
- Prepare the wiring: Carefully strip the insulation from the camera’s power and video wires, ensuring the bare ends are clean and free from any frayed edges.
- Secure the wiring: Use zip ties to fasten the camera’s wiring along the vehicle’s existing cable conduits or securely attach it to any interior panels or trim. This step helps prevent any loose cables that may interfere with vehicle operation.
- Protect the connections: As you route the cables, ensure they are well insulated and protected from any potential damage. Use electrical tape to wrap any exposed wires and provide an extra layer of protection.
Connecting the camera to the power source
Once you have successfully routed the camera’s cables, it’s time to connect the camera to the power source. This connection facilitates the camera’s functionality and allows it to transmit video feed to your display device. Follow these steps to achieve a secure and reliable power connection:
- Locate a suitable power source: Identify a power source near the rear of your vehicle, such as the reverse lights or the vehicle’s fuse box. Ensure the power source is capable of handling the camera’s power requirements.
- Prepare the power wire: Strip the insulation from the power wire’s end, exposing the bare wire. If necessary, crimp a connector onto the wire to ensure a solid connection with the power source.
- Connect the power wire: If using the reverse lights as the power source, attach the camera’s power wire to the positive (+) wire of the reverse light. Alternatively, if connecting to the fuse box, locate a suitable fuse that powers on when the vehicle is in reverse and insert a fuse tap, then connect the camera’s power wire to the tap.
- Ensure a secure connection: Once the power wire is connected, use electrical tape or heat shrink tubing to protect the connection and prevent any water or moisture ingress.
With the camera’s cables properly routed and the power source connected securely, you have successfully completed the wiring and connecting process. Take a moment to ensure all connections are tight and secure before moving on to the next steps in the installation process. In the following section, we will discuss how to properly mount and adjust the camera for optimal performance.
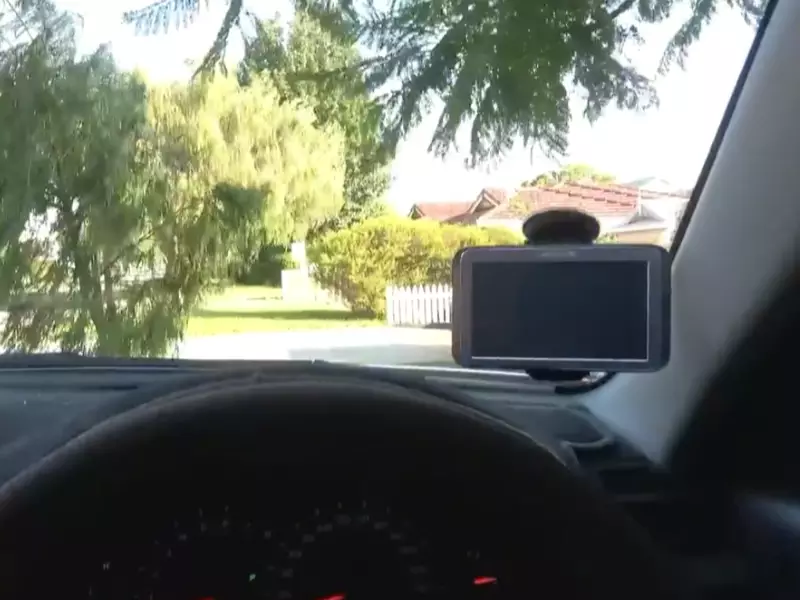
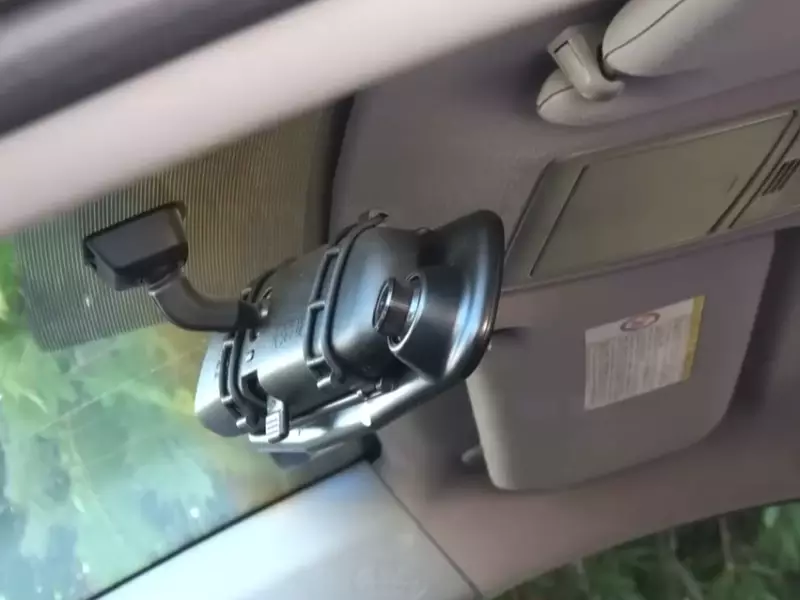
Mounting And Connecting The Monitor
Choosing the location for the monitor
When it comes to installing a rear view camera, one of the crucial steps is determining the perfect location for the monitor. The monitor serves as your window into the rear view camera’s perspective, so it’s important to choose a spot that offers optimal visibility while not obstructing your line of sight while driving.
Take into consideration factors such as the size and placement of your dashboard, as well as the type of vehicle you own. You want the monitor to be easily accessible and not too distracting, but still in a position where you can easily view the live feed from the rear camera.
Once you’ve identified a suitable location, ensure that it provides a clear line of sight and won’t block any necessary controls or indicators on your dashboard. Keep in mind that a closer placement to the driver’s side can offer better visibility but may require additional wiring and installation effort.
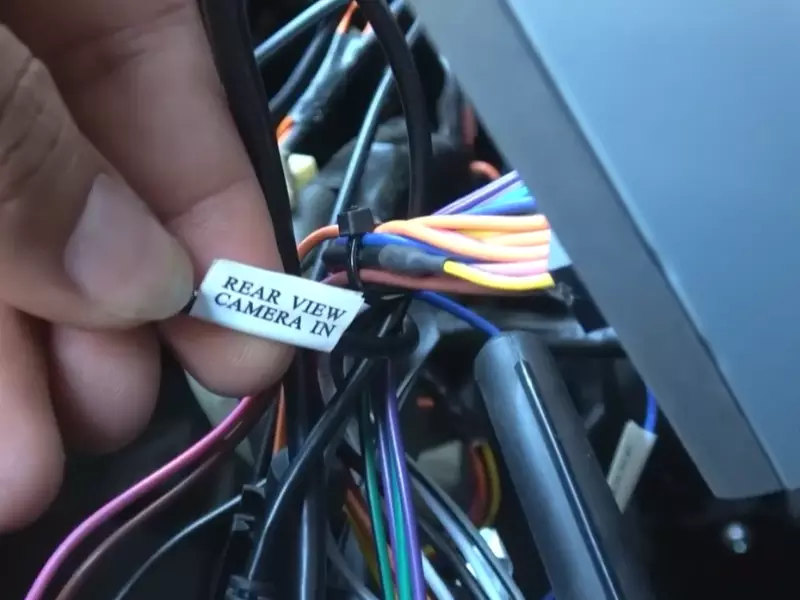
Wiring the monitor to the power source and camera
After choosing the ideal location for the monitor, the next crucial step is wiring it to the power source and camera. This ensures that the monitor receives the necessary power supply and can display the live feed from the rear view camera.
To start, check the wiring instructions provided with your rear view camera kit. Typically, you’ll need to connect the power wire of the monitor to a constant power source in your vehicle, such as the fuse box or the cigarette lighter socket. Refer to your vehicle’s manual or consult a professional if you’re unsure about the specific power source to use.
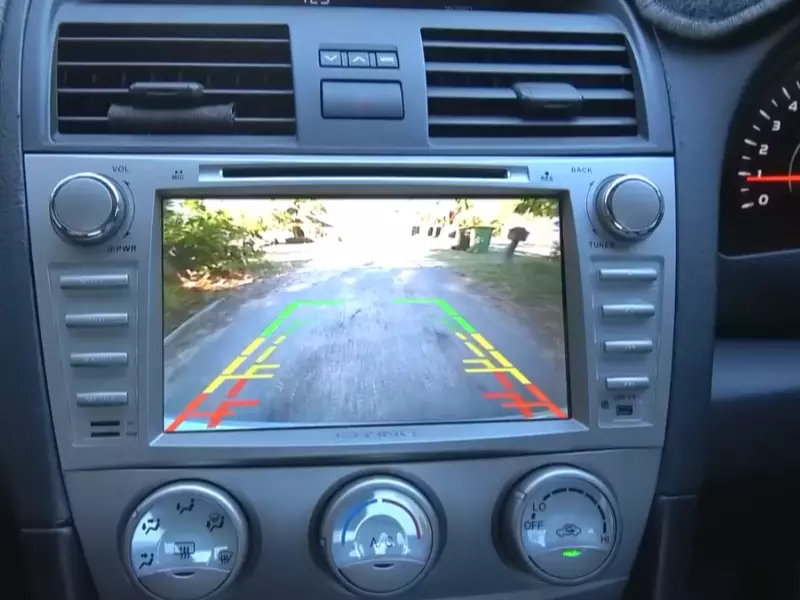
Next, connect the video cable from the camera to the video input port on the monitor. This cable allows the transmission of visual data from the rear camera to the monitor. Make sure to secure the cables properly to prevent any loose connections or interference.
Additionally, you may need to connect other wires for features like automatic powering on or reversing guidelines. Follow the instructions provided in your rear view camera kit to properly wire these additional features, if applicable.
Before finalizing the connections, it’s always a good idea to test the setup to ensure everything is functioning as expected. Turn on your vehicle and check if the monitor powers on and displays the live feed from the rear camera. Make any necessary adjustments or corrections before securing the wiring in its final position.
Once you’re satisfied with the installation and the monitor is successfully connected to the power source and camera, you can proceed to tidy up the wiring and secure it in place. Use cable ties or electrical tape to bundle and secure the wires against any potential movement or damage.
In conclusion, choosing the right location for the monitor and properly wiring it to the power source and camera are essential steps in installing a rear view camera. By following these guidelines and taking your specific vehicle’s layout into consideration, you’ll be able to enjoy the benefits of enhanced visibility and safety while driving.
Testing And Adjusting The Camera System
Checking the Camera’s Functionality
Before you hit the road, it’s crucial to ensure that your rear view camera is functioning properly. Follow these steps to check the camera’s functionality:
- Start by turning on your vehicle and engaging the reverse gear.
- Look at the rear view display screen to see if any image appears. If there’s no image, make sure the camera is securely connected to the wiring harness.
- Inspect the camera for any physical damage or obstruction, such as dirt or debris on the lens. If necessary, clean the lens gently with a soft cloth.
- Check the camera’s power supply. Ensure that it is receiving sufficient power and that all connections are properly secured.
- If the camera still isn’t functioning, consult the user manual or contact the manufacturer for troubleshooting assistance.
Adjusting the Camera’s Angle and Image Settings
Properly adjusting your rear view camera’s angle and image settings is essential for a clear and accurate view of what’s happening behind your vehicle. Follow these steps to ensure optimal visibility:
- Position your vehicle on a level surface, such as a flat driveway or parking lot.
- Engage the reverse gear and observe the rear view display screen.
- Adjust the camera’s angle by loosening the mounting screws and pivoting it until you have the desired view. Retighten the screws to secure the camera in place.
- Check the image settings, if available, on your rear view display. These settings might include brightness, contrast, and color adjustments. Tweak the settings until you get a clear and balanced image.
- If the display has guidelines or grid lines, make sure they are aligned properly with the objects in your surroundings.
- Ask a helper to stand behind your vehicle at different distances while you make adjustments. This will help you gauge the accuracy of the display’s perspective.
- Once you’re satisfied with the camera’s angle and image settings, test it by reversing your vehicle while closely monitoring the display screen.
By performing these simple checks and adjustments, you can ensure that your rear view camera is fully functional and optimally aligned for a safe driving experience. Remember to regularly clean the camera lens to maintain clear visibility, especially in adverse weather conditions. With a properly installed and adjusted rear view camera, you’ll have an extra layer of safety and peace of mind every time you reverse your vehicle.
Blurry Or Distorted Image
One of the common issues that you may encounter with the rear view camera installation is a blurry or distorted image. This can be frustrating as it defeats the purpose of having a camera to assist you while parking or reversing your vehicle. Fortunately, there are a few steps you can take to address this problem and ensure that your rear view camera provides you with a clear and sharp image.
Cleaning the camera lens
The first step in resolving a blurry or distorted image issue is to clean the camera lens. Over time, dirt, dust, and fingerprints can accumulate on the lens, which can obstruct the camera’s view and affect the quality of the image. To clean the lens, follow these simple steps:
- Start by gently wiping the lens with a soft, lint-free cloth. Avoid using abrasive materials or harsh chemicals as they can damage the lens.
- If the dirt or fingerprints are stubborn, you can dampen the cloth with a gentle lens cleaning solution or isopropyl alcohol. Make sure to apply the solution to the cloth, not directly to the lens.
- Once the lens is clean, use a dry cloth to remove any moisture or residue.
Cleaning the camera lens regularly, especially during dusty or rainy seasons, can help maintain the clarity of the image and prevent blurry or distorted visuals.
Adjusting the camera’s focus
If cleaning the lens doesn’t resolve the issue, you may need to adjust the camera’s focus. Different camera models may have different methods for adjusting focus, so referring to the manufacturer’s instructions is highly recommended. However, here are some general steps that can help you in adjusting the camera’s focus:
- Locate the focus adjustment mechanism on the camera. It is usually a small dial or screw.
- With the help of a small screwdriver or your fingers, gently turn the dial or screw to adjust the focus. Start by turning it slightly and then test the image to see if it improves.
- Continue making small adjustments until you achieve a clear image with sharp details.
It’s important to be patient and make small tweaks while adjusting the focus. Making drastic changes can lead to an overly blurry or overly sharp image.
By following these steps for cleaning the camera lens and adjusting the focus, you can significantly improve the image quality of your rear view camera. Remember to perform these checks and adjustments periodically to ensure that your camera continues to provide you with a clear and reliable view while backing up or parking your vehicle.
No Power Or Signal
When installing a rear view camera, it can be frustrating to encounter issues with power or signal. Without a proper power source or a stable signal, your camera won’t function effectively. Fortunately, there are steps you can take to troubleshoot and rectify this problem. Let’s delve into some of the possible causes and solutions for a rear view camera with no power or signal.
Checking the camera’s wiring connections
A faulty or loose wiring connection can be the primary reason behind a rear view camera not receiving power or signal. To resolve this issue, you need to inspect the camera’s wiring connections.
- Start by locating the camera and follow the wire that connects it to the power source or display unit.
- Ensure that the wiring is securely connected and free from any damage or corrosion.
- If you notice any loose connections or damaged wiring, fix or replace them accordingly.
- Once the connections are secured, test the camera to see if it receives power and displays a signal.
Testing the power source
If the camera’s wiring connections are intact, the issue might be with the power source. To check for power-related problems, follow these steps:
- Inspect the fuse box to ensure the fuse related to the camera’s power supply is not blown.
- If the fuse is faulty, replace it with the appropriate one to restore power to the camera.
- Next, verify that the power source, such as the reverse lights or auxiliary power, is functioning correctly.
- If the power source is faulty, troubleshoot and resolve the underlying issue.
By checking the camera’s wiring connections and testing the power source, you can effectively troubleshoot the no power or signal issue. Remember, proper installation and maintenance are the keys to ensuring your rear view camera functions optimally. Now that you’ve addressed the power and signal problems, you can enjoy the added convenience and enhanced safety that a rear view camera provides!
Interference Or Poor Reception
When installing a rear view camera, one of the common challenges that many people encounter is interference or poor reception. This can be frustrating and may compromise the effectiveness of the camera system. However, by ensuring proper positioning of the camera and monitor and checking for nearby sources of interference, you can minimize these issues and ensure a clear and reliable image.
Ensuring proper positioning of the camera and monitor
Positioning is crucial to achieve optimal performance and minimize interference. Here are a few important points to consider:
- Mount the camera at the right height: The camera should be positioned at an appropriate height on the rear of your vehicle. Mounting it too high or too low can affect the camera’s field of view and lead to subpar reception. Aim for a positioning that provides a clear and unobstructed view of the area behind your vehicle.
- Check the angle and tilt: The angle and tilt of the camera can impact the quality of the image. It’s essential to ensure the camera is angled correctly to capture the desired view. Take time to adjust the camera’s position and test it to achieve the best angle for your needs.
- Securely mount the monitor: The monitor, which displays the camera feed, should be securely mounted in a convenient location within your vehicle. Avoid placing it in a position that obstructs your view or interferes with your driving. Additionally, consider placing the monitor away from direct sunlight to prevent glare on the screen, which can affect image visibility.
Checking for nearby sources of interference
Interference can occur due to various sources present in the vicinity of your camera system. To mitigate potential problems, follow these steps:
- Identify wireless devices: Wireless devices such as Wi-Fi routers, Bluetooth devices, or other cameras operating in the same frequency range can cause interference with your rearview camera. Check for nearby devices and try to avoid placing your camera system in close proximity to them to minimize signal interference.
- Avoid metal objects: Metal objects, including antennas, brackets, or other vehicle parts, can cause signal interference. Ensure that the camera and its wiring are positioned away from any metal objects that could disrupt the signal transmission.
- Inspect nearby power cables: Power cables, especially those for audio equipment or aftermarket accessories, might generate electrical interference. Carefully route the camera’s wiring away from these cables to prevent potential disruptions to the camera’s signal.
- Test the camera in different locations: If you’re still experiencing interference or poor reception, try testing your camera system in different locations. A change in position might resolve the issue by avoiding potential sources of interference.
By ensuring proper positioning and checking for nearby sources of interference, you can significantly improve the reception and performance of your rear view camera system. Taking the time to carefully install and optimize your camera setup will provide you with the peace of mind and enhanced safety while reversing or parking your vehicle.
Frequently Asked Questions On How To Install A Rear View Camera
Can You Install Your Own Rear View Camera?
Yes, you can install your own rear view camera. It is a simple process that can be done quickly with the right tools and instructions. Be sure to follow the guidelines provided with the camera and read the manual thoroughly.
Is It Hard To Install A Rear View Camera?
Installing a rear view camera is fairly straightforward and not overly difficult. It’s a simple process that can usually be done by following the instructions provided with the camera. With basic tools and some patience, you can have your rear view camera installed and running in no time.
Can You Put A Rear View Camera In Any Car?
Yes, rear view cameras can be installed in any car.
How Much Does It Cost To Install A Reversing Camera?
The cost to install a reversing camera varies, but it typically ranges from $100 to $500. The price can depend on factors like the camera model, vehicle type, and additional installation requirements. It’s best to consult with a professional for an accurate estimate.
Conclusion
Installing a rear view camera is a relatively simple process that can greatly enhance your driving safety. By following the steps outlined in this guide, you can ensure a smooth installation and enjoy the benefits of improved visibility when reversing.
Remember to choose a high-quality camera and test it thoroughly before hitting the road. Happy driving!