To install a navigation system in your car, first, identify a suitable GPS unit. Then, follow the manufacturer’s instructions for installation and connect the system to your vehicle’s power supply and audio system.
Finally, mount the GPS unit in a convenient location and ensure it has a clear line of sight to the sky for accurate satellite reception. Driving to unfamiliar destinations can be a daunting task, especially when relying solely on paper maps or smartphone apps.
Fortunately, installing a navigation system in your car can provide instant access to accurate directions and traffic updates, making your journeys stress-free and efficient. In this guide, we will walk you through the process of installing a navigation system in your car, ensuring you can enjoy the benefits of modern technology on the road. So, let’s get started and make your travels easier and more enjoyable.
Factors To Consider When Selecting A Navigation System
Choosing the right navigation system for your car can greatly enhance your driving experience and provide you with the convenience of accurate directions and reliable route guidance. However, with so many options available in the market, it can be overwhelming to make a decision. To help you narrow down your choices, there are several factors you should consider before purchasing a navigation system for your car.
Price Range and Budget
One of the most important factors to consider when selecting a navigation system for your car is your budget. Navigation systems come in a wide range of prices, from budget-friendly options to high-end models with advanced features. Before making a decision, it is essential to determine how much you are willing to invest in a navigation system. Consider your needs and preferences, and find a system that provides the best value for your money. Remember to take into account any additional costs, such as installation or subscription fees, when setting your budget.
Compatibility with Your Car’s Make and Model
Another crucial factor to consider is the compatibility of the navigation system with your car’s make and model. Not all navigation systems are designed to work with every vehicle. It is vital to ensure that the system you choose is compatible with your car’s operating system, interface, and connections. Research the specifications of the navigation system and check if it is suitable for your specific car model. This will save you from potential compatibility issues and ensure a seamless integration with your vehicle’s existing features.
Features and Functionalities Offered
When selecting a navigation system, it is essential to consider the features and functionalities it offers. Different systems come with a variety of capabilities, such as voice guidance, real-time traffic updates, points of interest (POI) databases, and multimedia integration. Consider your specific needs and prioritize the features that are most important to you. For example, if you frequently drive in heavy traffic areas, a navigation system with real-time traffic updates can help you avoid congestion and save time. Look for systems that offer the features that align with your requirements.
User Interface and Ease of Use
The user interface and ease of use are important factors to consider when selecting a navigation system. A system that is intuitive and user-friendly will make your driving experience more enjoyable and less distracting. Look for systems with clear and responsive touchscreens, easy-to-navigate menus, and simple voice commands. Reading user reviews and test driving the system if possible can help you gauge its user-friendliness. Avoid systems that are overly complicated or have complex instructions, as they may cause frustration and hinder your ability to use the system effectively.
By considering these factors, you can make a well-informed decision when selecting a navigation system for your car. Remember to prioritize your needs and preferences, and choose a system that offers the best combination of price, compatibility, features, and user interface. With the right navigation system, you can navigate confidently and explore the world around you with ease.
Researching Navigation System Brands And Models
Installing a navigation system in your car can be a game-changer when it comes to making your journeys more convenient and stress-free. But with so many brands and models available in the market, it can be overwhelming to choose the right one. In this section, we will explore key factors to consider when researching navigation system brands and models. Whether you are an enthusiastic car owner or a professional, these pointers will guide you toward making an informed decision.
Popular brands and their reputation
When it comes to navigation systems, certain brands have established a strong reputation over the years. Let’s take a look at some of the top brands that are widely recognized for their quality and reliability:
| Brand | Reputation |
|---|---|
| Garmin | Known for its user-friendly interface and accurate navigation |
| TomTom | Renowned for its advanced features and real-time traffic updates |
| Pioneer | Favored by car enthusiasts for its seamless integration with car audio systems |
Online reviews and ratings
One of the best ways to gauge the performance of a navigation system is by reading online reviews and checking ratings from users who have already experienced the product. Look for reviews on reputable websites and forums dedicated to car technology. Pay attention to common feedback and recurring issues mentioned by users. This will give you valuable insights into the strengths and weaknesses of different models, helping you make an educated decision.
Recommendations from car enthusiasts or professionals
Seeking recommendations from car enthusiasts or professionals can provide you with expert opinions based on their hands-on experience with navigation systems. They can offer insights regarding compatibility with different car models, ease of installation, and additional features that might be of interest to you. Whether it’s contacting a car enthusiast group or consulting with a professional installer, their guidance can help narrow down your choices and ensure you select a navigation system that perfectly matches your preferences and requirements.
Gathering The Necessary Tools And Equipment
When it comes to installing a navigation system in your car, one of the first and most important steps is gathering the necessary tools and equipment. By having the right tools at your disposal, you can ensure a smooth and efficient installation process, saving you time and frustration down the road. In this section, we will discuss the tools and equipment you will need to successfully install a navigation system in your car.
Screwdriver set
A screwdriver set is an essential tool for any DIY car installation project. It allows you to easily remove and tighten screws, which is crucial when mounting and securing the navigation system in your car. Make sure to have a variety of screwdriver sizes and types in your set, including flathead and Phillips screwdrivers, to accommodate different types of screws.
Wire cutter/stripper
A wire cutter/stripper is necessary for handling any electrical wiring involved in the installation process. This tool allows you to cleanly cut through wires and remove the insulation, ensuring a secure and proper connection. Having a wire cutter/stripper at hand will make it easier to connect the wiring of the navigation system to your car’s electrical system.
Electrical tape
Electrical tape is a must-have item for insulating and securing electrical connections. It acts as a protective barrier, preventing exposed wires from coming into contact with each other or other metal components in your car. Make sure to use high-quality electrical tape to ensure a durable and long-lasting installation.
Mounting brackets or dash kit
Depending on the specific navigation system you have chosen, you may need mounting brackets or a dash kit to properly install it in your car. These accessories allow you to securely attach the navigation system to your car’s dashboard or another suitable location. Before purchasing these additional components, make sure to check the specifications and recommendations of your navigation system for compatibility.
Understanding Your Car’s Electrical System
If you’re planning to install a navigation system in your car, it’s important to have a good understanding of your car’s electrical system. This knowledge will help you navigate through the installation process with ease and ensure that everything works smoothly. In this section, we’ll cover two crucial aspects of understanding your car’s electrical system: identifying the fuse box location and familiarizing yourself with the wiring diagram.
Identifying the fuse box location
The first step in understanding your car’s electrical system is to locate the fuse box. The fuse box is where all the electrical circuits in your car are controlled and protected. It contains a number of fuses and relays that help distribute power to various components of your car.
To find the fuse box in your car, you can refer to your car’s owner manual. Typically, the fuse box is located under the dashboard or in the engine compartment. Once you’ve located the fuse box, make sure to familiarize yourself with the labels and diagrams on the fuse box cover. These labels will help you identify the different fuses and their corresponding circuits.
Familiarizing yourself with the wiring diagram
Another important aspect of understanding your car’s electrical system is to familiarize yourself with the wiring diagram. The wiring diagram is a visual representation of how the electrical components in your car are interconnected.
Consult your car’s service manual or the navigation system’s installation manual to find the wiring diagram specific to your car model. The diagram will provide you with valuable information, such as the color codes for the wires, the location of the different connectors, and the routing of the wires throughout your car.
| Tips for understanding the wiring diagram | |
|---|---|
| 1. | Take your time to study the wiring diagram thoroughly before starting the installation process. Pay attention to the different symbols and their meanings. |
| 2. | Use a magnifying glass or a zoom function on your device to clearly see the details of the wiring diagram. |
| 3. | Highlight or mark the important sections of the diagram to make it easier to reference during the installation. |
By understanding the location of the fuse box and familiarizing yourself with the wiring diagram, you’ll be well-equipped to install a navigation system in your car. These two steps will help you navigate through the electrical system of your car and ensure a successful installation. Remember to follow any specific instructions provided by the navigation system’s manufacturer and take necessary safety precautions throughout the process.
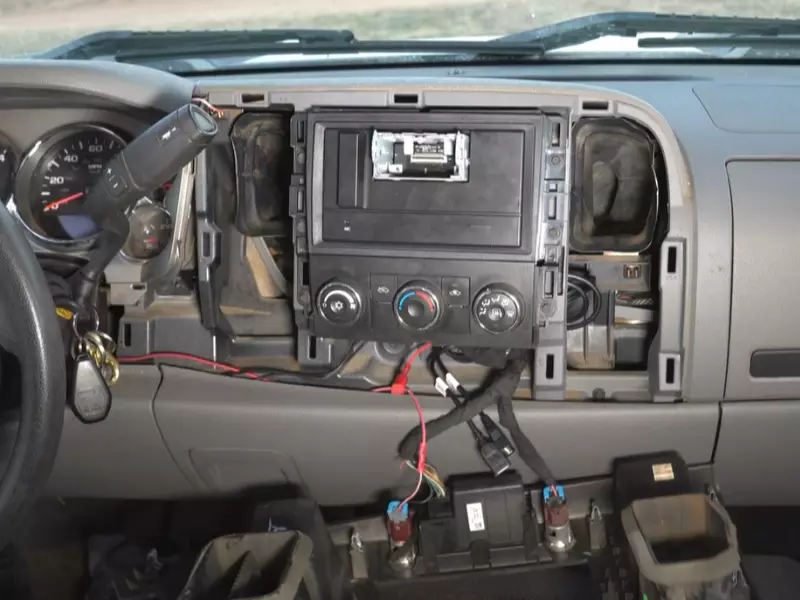
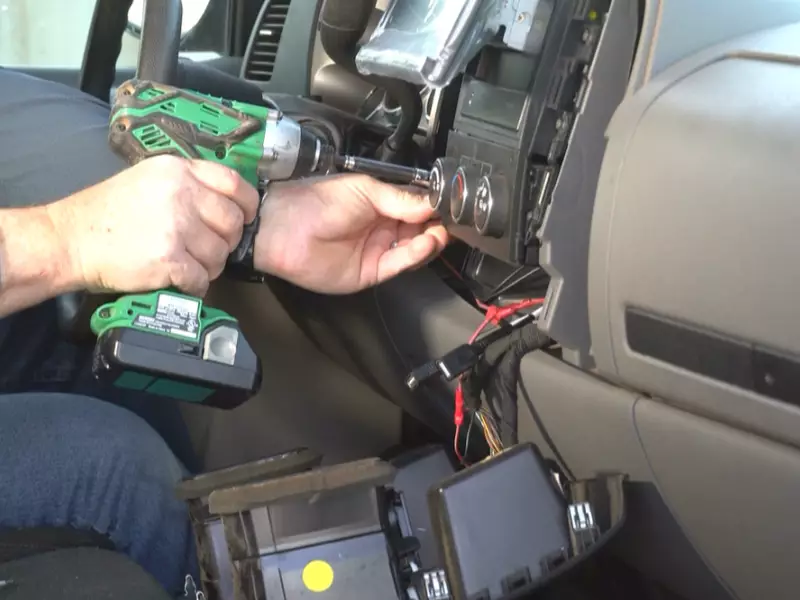
Removing The Old Head Unit
Disconnecting the negative battery terminal
Before beginning the process of removing the old head unit from your car, it is crucial to disconnect the negative battery terminal. This step is important for safety reasons and helps prevent any electrical mishaps during the installation process. To do this, follow these simple steps:
- Locate the negative battery terminal, usually marked with a “-” symbol.
- Using a wrench or pliers, loosen the bolt or clamp that secures the terminal.
- Gently remove the negative cable from the terminal and set it aside, ensuring that it doesn’t come into contact with any metal surfaces.
Removing the trim panels and securing screws
With the negative battery terminal safely disconnected, the next step in removing the old head unit is to take off the trim panels and securing screws. These panels and screws keep the head unit in place and require careful attention to avoid damage. Here’s how you can accomplish this:
- Identify the trim panels around the head unit, which may vary depending on the make and model of your car.
- Using a trim removal tool or a flathead screwdriver wrapped in cloth to prevent scratches, gently pry off the trim panels, starting from the edges and working your way around.
- Once the trim panels are removed, you will likely uncover securing screws holding the head unit in place.
- Using the appropriate screwdriver, carefully loosen and remove these screws, keeping them in a safe place for later use.
Detaching the old head unit from the car’s frame
After removing the trim panels and securing screws, the final step is to detach the old head unit from the car’s frame. This requires precision and attention to detail to avoid any unintentional damage. Here’s a step-by-step guide:
- With the trim panels and securing screws removed, you should now be able to access the head unit.
- Identify the wiring harness and antenna cable connected to the back of the head unit.
- Carefully disconnect these cables by firmly gripping the connectors and pulling them apart. Avoid yanking or pulling on the cables themselves.
- Next, locate any additional connections such as USB or auxiliary cables and disconnect them as well. Take note of their positions for the installation of the new unit.
- Once all the cables are disconnected, gently slide the old head unit out of the car’s frame.
Congratulations! You’ve successfully removed the old head unit from your car. Now you’re one step closer to installing a new navigation system that will enhance your driving experience.
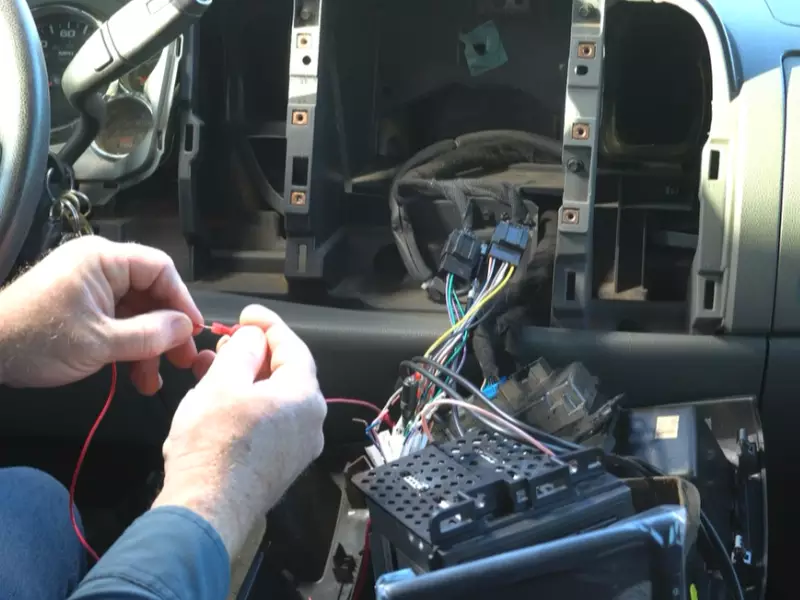
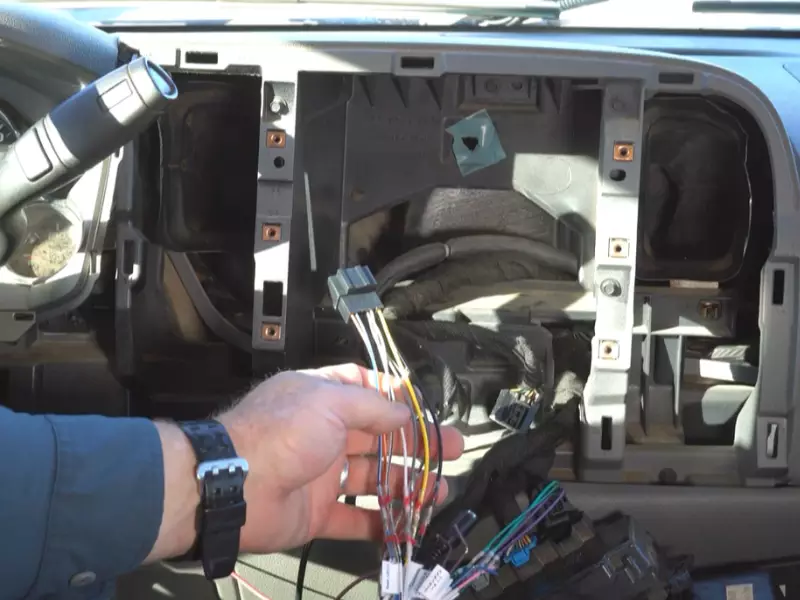
Connecting The Wiring Harness
Once you have successfully mounted the navigation system in your car, the next step is to connect the wiring harness. This crucial step ensures that the system functions seamlessly and integrates with the existing wiring in your car. In this section, we will guide you through the process of matching the wires from the harness to your car’s wiring and securing the connections.
Matching the Wires from the Harness to the Car’s Wiring
Before you begin connecting the wires, it is important to identify the wiring harness that came with your navigation system. This harness contains a variety of colored wires, each serving a specific purpose. Similarly, your car’s wiring also consists of wires that serve different functions. To connect the two, you need to match the wires from the harness to the corresponding wires in your car.
Start by referring to the user manual or installation guide provided with your navigation system. This resource will usually include a wiring diagram that shows the color coding for each wire. Take note of the wire colors and their corresponding functions.
Now, locate the matching wires in your car’s wiring. These can usually be found in the dashboard area, near the stereo or radio. Although the colors may not always match exactly, the functions of the wires usually remain consistent across different car models and makes. Take your time to carefully match each wire from the harness to the corresponding wire in your car. Double-check the connections to ensure accuracy.
Securing the Connections with Crimp Connectors or Soldering
Once you have successfully matched the wires, it’s time to secure the connections. There are two common methods to achieve this: crimp connectors and soldering.
Crimp Connectors: Crimp connectors are a popular choice due to their ease of use and reliability. These connectors come in various sizes to accommodate different wire gauges. To use crimp connectors, strip a small portion of the insulation from the ends of both the harness wire and the car’s wire. Insert both stripped ends into the crimp connector and use a crimping tool to compress the connector, creating a secure connection. Repeat this process for each wire connection, ensuring a tight and secure fit.
Soldering: Soldering is another method used to ensure strong and durable connections. This method involves melting solder onto the joint of the two wires, creating a solid bond. To solder the wires, strip a small portion of the insulation from both wires. Twist the exposed wire ends together and apply heat using a soldering iron. Once the wires are heated, apply solder to the joint, allowing it to melt and flow smoothly. This creates a strong, permanent connection. Remember to let the joint cool before moving on to the next connection.
When securing the connections, it is essential to ensure that each connection is properly insulated. This will prevent any short circuits or electrical hazards. You can use electrical tape or heat shrink tubing to cover the exposed wire connections.
By carefully matching the wires from the harness to your car’s wiring and securing the connections using either crimp connectors or soldering, you will have successfully connected the wiring harness of your navigation system. This step brings you closer to enjoying the convenience and functionality of a fully integrated navigation system in your car.
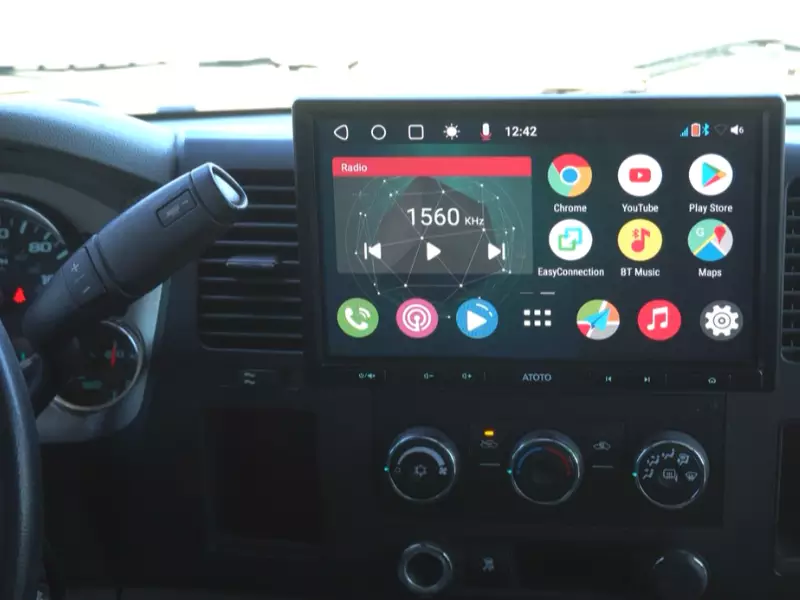
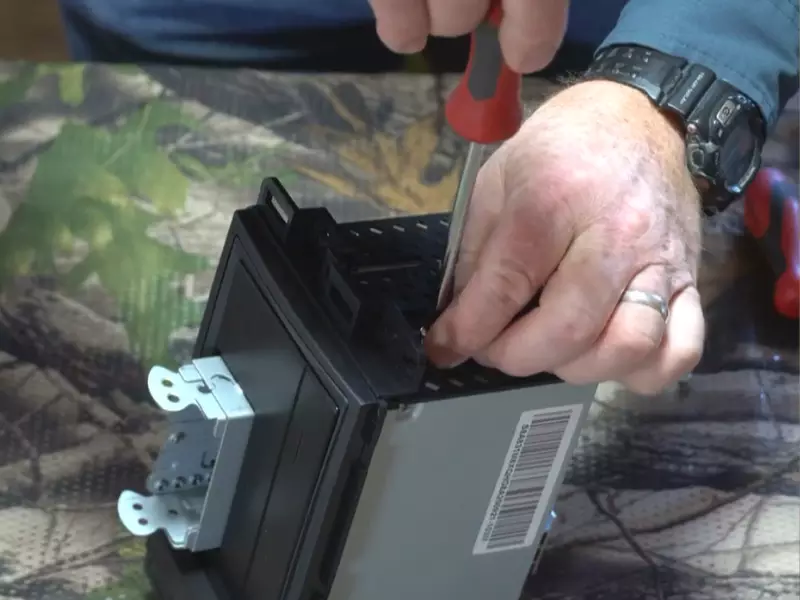
Mounting The Navigation Unit
Attaching the mounting brackets or dash kit
Before you can install your navigation unit in your car, you’ll need to attach the mounting brackets or dash kit. These brackets or kits are designed to securely hold your navigation unit in place, preventing it from moving or falling while you drive. To attach the brackets or kit, follow these steps:
- Start by locating the mounting points in your car. These points are typically found on the dashboard or the center console.
- Once you’ve identified the mounting points, use a screwdriver or other appropriate tool to remove any screws or bolts that may be covering them.
- Take the mounting brackets or dash kit and align them with the mounting points. Make sure they fit properly and sit flush against the surface of your car.
- Use the provided screws or bolts to secure the brackets or kit into place. Tighten them firmly, but be careful not to overtighten, as this may cause damage to your car’s interior.
- Once the mounting brackets or dash kit are securely in place, you’re ready to move on to the next step.
Sliding the navigation unit into place and securing it
Now that you’ve attached the mounting brackets or dash kit, it’s time to slide your navigation unit into place and secure it. Follow these steps:
- First, locate the slots or guides on the mounting brackets or dash kit. These are designed to hold your navigation unit securely in place.
- Carefully slide your navigation unit into the slots or guides, making sure it fits snugly and is aligned correctly.
- Once the unit is in position, check if there are any additional clips or locks provided with the brackets or kit. These can be used to further secure the unit in place.
- If there are clips or locks, attach them according to the manufacturer’s instructions. This will ensure that your navigation unit is securely fastened and won’t move during vehicle operation.
- Once everything is secured, double-check that the unit is firmly in place and doesn’t wobble or shift when you touch it.
By following these steps, you can successfully mount your navigation unit in your car. This not only enhances your driving experience by providing easy access to navigation features but also adds a modern and sophisticated touch to your vehicle’s interior. Now that the navigation unit is securely installed, you can hit the road with confidence, knowing that you have reliable guidance at your fingertips.
Connecting The Power And Accessories
Connecting the main power wire to the fuse box
One of the most important steps in installing a navigation system in your car is connecting the main power wire to the fuse box. This ensures that the navigation system has a reliable source of power to work efficiently. To do this, follow the steps below:
- Locate the fuse box in your car. The fuse box is usually located under the dashboard or in the engine compartment. Refer to your car’s manual if you’re unsure about its exact location.
- Identify a fuse that has a constant power supply, even when the ignition is turned off. Most cars have a dedicated fuse for accessories like the navigation system.
- Using a fuse tap or an add-a-circuit, connect the main power wire from the navigation system to the selected fuse. This allows power to be drawn from the fuse without affecting the original circuit.
- Secure the connection by tightening the fuse tap or add-a-circuit.
By connecting the main power wire to the fuse box, you ensure that the navigation system receives a stable power supply, enabling it to function properly without draining the car’s battery.
Connecting the accessory wire for additional functionalities
In addition to the main power wire, you may also need to connect an accessory wire to enable additional functionalities of the navigation system. These functionalities may include features like automatic dimming, backlight control, or steering wheel controls integration. To connect the accessory wire, follow these steps:
- Identify an accessory wire in your car’s wiring harness. This wire provides power only when the ignition is turned on, allowing the navigation system to turn on and off with the car.
- Using a wire stripper, carefully strip off a small section of insulation from the accessory wire.
- Connect the accessory wire from the navigation system to the stripped section of the car’s accessory wire using a butt connector or soldering.
- Secure the connection by crimping the butt connector or insulating the soldered joint with electrical tape.
By connecting the accessory wire, you enable the navigation system to sync with the car’s functionalities and enhance the overall user experience.
Securing the wires and using electrical tape for insulation
Once you have connected the main power wire to the fuse box and the accessory wire for additional functionalities, it is crucial to secure the wires properly and insulate them to prevent any electrical hazards. To do this:
- Use zip ties or adhesive clips to secure the wires along the existing wiring harness or other suitable locations. This prevents them from dangling or interfering with other components.
- Inspect the connected wires for any exposed metal or bare wires. If any are found, use electrical tape to insulate them. Wrap the exposed area tightly with electrical tape to ensure proper insulation.
- Avoid overcrowding the wires or bending them sharply, as this can lead to damage or short circuits. Allow enough slack in the wires for flexibility and ease of maintenance.
By securing the wires properly and using electrical tape for insulation, you ensure the safety and reliability of the navigation system installation, reducing the risk of electrical issues and potential damage to your car.
Testing The Navigation System
Reconnecting the negative battery terminal
Before testing the navigation system, it’s crucial to reconnect the negative battery terminal. This ensures that the system has enough power to operate and prevents any potential electrical malfunctions. Follow these simple steps to reconnect the negative battery terminal:
- Locate the negative battery terminal, usually marked with a minus sign (-).
- Using a wrench or pliers, loosen the nut that secures the negative battery cable.
- Gently lift the cable off the terminal, ensuring not to touch any other metal parts.
- Align the cable with the negative battery terminal and firmly press it down.
- Tighten the nut back in place, making sure it is secure.
With the negative battery terminal reconnected, you can move on to testing the navigation system.
Turning on the car and checking if the system works properly
Now that the negative battery terminal is reconnected, you can turn on your car and check if the navigation system works properly. Follow these steps to ensure everything is functioning correctly:
- Insert the car key into the ignition and turn it to the “on” position.
- Look out for any error messages or warning lights on the dashboard.
- If everything appears normal, locate the navigation system control panel and turn it on.
- Wait for the system to boot up completely and check if the touchscreen is responsive.
- Try changing settings, entering an address, and accessing different features to ensure everything is working as expected.
If you encounter any issues during this process, refer to the installation instructions or contact the manufacturer for troubleshooting assistance.
Calibrating the GPS and testing navigation features
After verifying that the system powers on and functions correctly, it’s essential to calibrate the GPS and test the navigation features:
- Access the system menu and find the GPS calibration option.
- Follow the on-screen instructions to calibrate the GPS antenna properly.
- Once the GPS is calibrated, enter a known address or destination to test the navigation functionality.
- Observe if the system provides accurate directions, recalculates routes when necessary, and displays your current location correctly.
- Explore additional features like voice commands, real-time traffic updates, and points of interest search to ensure all functions are working smoothly.
By conducting these tests, you can be confident that your newly installed navigation system is functioning correctly. Remember to refer to the user manual for any specific instructions regarding the calibration and navigation features of your particular system.
Common Installation Issues And How To Resolve Them
Installing a navigation system in your car can be beneficial, providing you with accurate directions and helping you navigate through unfamiliar areas. However, like any installation process, you may encounter some common issues along the way. In this section, we will address three frequently encountered problems during the installation process: wiring connection problems, compatibility issues with the car’s electrical system, and software or firmware updates.
Wiring Connection Problems
One common issue that may arise during the installation is wiring connection problems. These problems can occur due to loose connections, incorrect wiring techniques, or damaged cables. It’s crucial to ensure that all the necessary wires are properly connected to their respective terminals to avoid any malfunctions. Here’s how you can troubleshoot wiring connection problems:
- Check the wiring diagram: Consult the user manual or installation guide provided with your navigation system to understand the wiring connections required. Make sure to cross-reference the diagram with your car’s wiring system.
- Inspect the connections: Carefully examine all the wire connections to identify any loose or disconnected wires. Ensure that the wire ends are stripped correctly and securely tightened.
- Test the electrical current: If you suspect a problem with a specific wire, use a multimeter to test the electrical current. This will help you determine if there is any breakage or inconsistency in the connection.
Compatibility Issues with the Car’s Electrical System
Another hurdle you might encounter is compatibility issues between the navigation system and your car’s electrical system. Some navigation systems may not be compatible with certain car models or have limited compatibility with older cars. Here are a few steps to resolve compatibility issues:
- Research compatibility: Before purchasing a navigation system, ensure that it is compatible with your car’s make, model, and year. Visit the manufacturer’s website or consult their customer support for compatibility information.
- Consider adapters and harnesses: If there are compatibility issues, you may need to purchase additional adapters or harnesses for a smooth installation. These accessories can help bridge the compatibility gap between the navigation system and your car’s electrical system.
- Seek professional help: In some cases, compatibility issues may require the expertise of a professional car audio technician. They can provide expert advice and assistance in finding the best solution for your specific car model.
Software or Firmware Updates
Once you have successfully installed the navigation system, it’s essential to keep the software or firmware up to date to ensure optimal performance. Software updates often include bug fixes, new features, and improved compatibility. Follow these steps to perform software or firmware updates:
- Check for updates: Visit the manufacturer’s website or refer to the user manual to find instructions on how to check for software or firmware updates. Usually, updates can be downloaded and installed directly from the navigation system itself.
- Follow the instructions: Carefully read the instructions provided by the manufacturer to perform the update correctly. Ensure that you have a stable internet connection and sufficient battery power during the update process.
- Backup your data: Before initiating any updates, it’s crucial to backup your navigation system’s data to prevent any loss of important information or settings.
By addressing these common installation issues and following the suggested solutions, you can overcome hurdles and enjoy the benefits of a fully functional navigation system in your car.
Tips For Maintaining And Optimizing Your Navigation System
Once you have installed a navigation system in your car, it is important to take care of it to ensure smooth and efficient functioning. Here are some useful tips to help you maintain and optimize your navigation system.
Keeping the system updated with the latest maps and software
Regularly updating the maps and software of your navigation system is essential to ensure accurate and reliable directions. Outdated maps can lead to incorrect routes and missing or incorrect information. To keep your navigation system up to date, follow these steps:
- Check for updates: Most navigation systems have an option to check for updates. Connect your system to a computer or use the built-in Wi-Fi to check for available updates.
- Download and install updates: Follow the instructions provided by the manufacturer to download and install the latest updates for your navigation system.
- Stay connected: Some systems require a subscription or regular connection to the internet to receive updates. Ensure that you have the necessary subscription or connectivity for seamless updates.
Cleaning the screen and buttons regularly
A clean screen and functional buttons are essential for optimal use of your navigation system. Regular cleaning helps maintain clarity and responsiveness. Follow these steps to keep your navigation system in top condition:
- Gently wipe the screen: Use a soft, lint-free cloth to gently wipe the screen of your navigation system. Avoid using abrasive materials or harsh chemicals that can damage the screen or remove the protective coating.
- Remove fingerprints and smudges: If there are fingerprints or smudges on the screen, dampen the cloth with a mild cleaning solution or water and gently wipe the affected areas. Dry the screen with a clean cloth.
- Clean the buttons: Use a clean, damp cloth to wipe the buttons on your navigation system. Be careful not to let any liquid seep into the system through the buttons.
Avoiding excessive exposure to extreme temperatures or direct sunlight
Extreme temperatures and direct sunlight can have a negative impact on the performance and lifespan of your navigation system. To ensure that your system continues to function optimally, follow these guidelines:
- Avoid leaving your car in extreme temperatures: Park your car in a shaded area or use a sunshade to protect your navigation system from excessive heat or cold.
- Remove the system if necessary: If you expect your car to be exposed to extreme temperatures for a prolonged period, consider removing the navigation system and storing it in a safe place.
- Prevent direct sunlight on the screen: Position your car or use sun visors to prevent direct sunlight from falling on the screen of your navigation system. Excessive sunlight can damage the screen and affect visibility.
By following these maintenance tips, you can ensure that your navigation system remains in top condition and continues to guide you accurately and efficiently.
Frequently Asked Questions On How To Install A Navigation System In Your Car
How Much Does It Cost To Install A Navigation System In A Car?
The cost of installing a navigation system in a car can vary depending on factors such as the make and model of the vehicle, the type of navigation system, and any additional features desired. It is best to consult with a professional to get an accurate estimate for your specific requirements.
Can You Add A Navigation System To Any Car?
Yes, a navigation system can be added to any car. It’s possible to install aftermarket navigation systems that meet your needs and preferences. These systems provide turn-by-turn directions, maps, and other features to help you navigate on the road.
Can You Install A Navigation System In An Older Car?
Yes, you can install a navigation system in an older car. There are aftermarket options available that can be easily integrated into your vehicle’s existing audio system. This will allow you to enjoy the benefits of GPS navigation in your older car.
How Do I Get Google Maps To Display On My Car Screen?
To display Google Maps on your car screen, ensure your phone is compatible with your car’s infotainment system. Connect your phone to the car using a USB cable or Bluetooth connection. Open the Google Maps app on your phone, select a destination, and the maps will then display on your car screen.
Conclusion
Installing a navigation system in your car doesn’t have to be a daunting task. By following the step-by-step instructions outlined in this blog post, you can equip your vehicle with a reliable guiding tool that will enhance your driving experience.
Remember to carefully assess your car’s compatibility, gather the necessary tools, and seek professional assistance if needed. With the right approach, you’ll be on your way to enjoying seamless navigation and effortless travel. Happy driving!