To install a Graco car seat forward facing, follow these steps: securely attach the base to the vehicle seat using the seat belt or LATCH system, adjust the recline angle to ensure the seat is level, position the child in the seat, secure the child’s harness and tighten it snugly, and check that the seat is properly installed by giving it a firm shake in different directions. When it comes to the safety of your child while traveling, a properly installed car seat is essential.
Installing a Graco car seat in the forward facing position is relatively straightforward if you follow a few simple steps. In this guide, we will walk you through the process of installing a Graco car seat in the forward facing position.
By following these instructions, you can ensure that your child is safely secured and protected during your car rides. So let’s get started with the installation process.
Before You Begin
Installing a car seat correctly is of utmost importance when it comes to keeping your child safe during car rides. The Graco car seat is a popular choice for many parents, known for its durability and safety features. However, installing the car seat forward facing requires careful attention to ensure it is done correctly. In this blog post, we will guide you through the process step by step, starting with important factors to consider before you begin.
Importance of Installing a Car Seat Correctly
Proper installation of a car seat is not just a matter of convenience or following instructions; it is a matter of your child’s safety. Statistics show that many car seats are incorrectly installed, which can lead to increased chances of injury in the event of an accident. By installing your Graco car seat correctly, you are providing your child with the maximum protection it is designed to offer.

Age and Weight Requirements for Forward-Facing Car Seats
Before installing your Graco car seat forward facing, it is crucial to ensure that your child meets the age and weight requirements. These requirements are set to ensure optimal safety and comfort for your child while traveling in a car seat. The specific age and weight limits may vary depending on the model of the car seat, so it is important to refer to the manufacturer’s guidelines for accurate information.
To give you a general idea, here are the age and weight requirements typically associated with forward-facing car seats:
| Age Range | Weight Range |
|---|---|
| 1 year old | between 22 and 65 pounds |
| 2 years old | between 25 and 65 pounds |
| 3 years old | between 30 and 65 pounds |
Keep in mind that these are general guidelines, and it is essential to consult the specific instructions provided by Graco for your car seat model. Paying attention to these requirements ensures that your child is at the appropriate age and size to be safely restrained in a forward-facing car seat.
Now that you understand the importance of installing a car seat correctly and the age and weight requirements for forward-facing seats, you are ready to proceed with the installation process. In the next section, we will guide you through the necessary steps to install your Graco car seat forward facing.
Step 1: Gather The Necessary Tools
Key Tools Needed for Installing a Graco Car Seat Forward-Facing
Before diving into the installation process, it’s important to gather the necessary tools to ensure a smooth and secure fit for your Graco car seat. Equipping yourself with the right tools will help you save time and avoid any unnecessary frustration. In this step, we’ll walk you through the key tools you’ll need to install your Graco car seat forward-facing.
Tool 1: LATCH Anchors
The LATCH (Lower Anchors and Tethers for Children) system is a universal feature in most cars manufactured after September 1, 2002. It provides an easy and secure way to install your car seat without the need for seat belts. Locate the LATCH anchors in your vehicle. They are usually found in the backseat, between the seat cushions and the seatback.
Tool 2: Car Seat Owner’s Manual
The car seat owner’s manual is a vital tool that provides detailed instructions specific to your Graco car seat model. It contains valuable information on safety guidelines, installation procedures, and usage recommendations. Use the owner’s manual as your go-to resource throughout the installation process to ensure you perform each step correctly.
Tool 3: Tether Strap
The tether strap is an essential component for forward-facing car seat installation. It helps secure the car seat and prevent excessive movement in the event of a collision or sudden stop. Ensure your Graco car seat comes with a tether strap and locate the tether anchor in your vehicle. Typically, the tether anchor is located on the back of the vehicle seat or on the floor.

Tool 4: Level
A level is a simple tool that helps you determine if your car seat is properly installed and leveled. It ensures that the car seat is not reclined too far forward or leaning too far back. This tool is particularly important for maximizing your child’s comfort and safety during travel.
Tool 5: Adjustable Wrench
An adjustable wrench is necessary for securing the tether anchor and other required attachments in place. It allows you to tighten bolts or nuts securely, providing a stable and reliable connection between the car seat and your vehicle.
With these key tools in hand, you’re ready to proceed to the next step and begin installing your Graco car seat forward-facing. Remember to always refer to the specific instructions provided in your car seat owner’s manual for accurate and safe installation.
Step 2: Inspect The Car Seat
Examining the car seat for any damages or defects is a crucial step in ensuring your child’s safety while traveling. Before installing a Graco car seat forward-facing, take the time to carefully inspect the seat to ensure it is in optimal condition. Here are a few things to look out for during your inspection:
1. Check for any visible damages or wear
Inspect the car seat thoroughly for any signs of damage or wear. Look for cracks, tears, or frayed materials on the seat, straps, and cover. Pay close attention to the areas where the seat is frequently adjusted or comes into contact with the vehicle. Any visible damages can compromise the effectiveness of the car seat, so it’s important to address them before installation.
2. Ensure all components are intact
Verify that all the components of the car seat are present and securely attached. Check the harness, buckles, and connectors to ensure they are in good condition and functioning properly. Make sure that the straps are not twisted and can be adjusted smoothly. Additionally, ensure that the LATCH (Lower Anchors and Tethers for Children) system, if applicable, is attached securely.
3. Check for recalls or safety advisories
Before installing your Graco car seat, it’s essential to check for any recalls or safety advisories. Visit the manufacturer’s website or the National Highway Traffic Safety Administration (NHTSA) website to search for any notifications regarding the model and serial number of your car seat. If there are any recalls or safety concerns, follow the recommended steps provided by the manufacturer or contact customer support for further guidance.
4. Verify the expiration date
Car seats have an expiration date, typically printed on a label or embossed into the plastic. It is important to ensure that your Graco car seat has not expired before using it forward-facing. Using an expired car seat can be dangerous, as the materials and safety features may have deteriorated over time. If your car seat has expired, it’s time to invest in a new one for your child’s safety.
By thoroughly examining your Graco car seat for damages or defects, ensuring all components are intact, checking for recalls or safety advisories, and verifying the expiration date, you can ensure that your child travels in a safe and secure manner. Taking these steps will provide you with peace of mind and allow your child to enjoy a comfortable and protected journey.
Step 3: Read The Car Seat Manual
Understanding the specific installation instructions provided by Graco
Step 3: Read the Car Seat Manual
One of the most crucial steps in installing a Graco car seat forward facing is to carefully read and understand the car seat manual. Graco provides specific installation instructions that are unique to each car seat model, so it’s important to familiarize yourself with these instructions before attempting to install the car seat. By taking the time to read the manual thoroughly, you can ensure a proper and secure installation, providing maximum safety for your child on the road.
Why is reading the car seat manual so important?
Reading the car seat manual is vital because it provides all the necessary information and guidance to correctly install your Graco car seat. The manual will outline the specific steps and techniques required to ensure a safe and secure installation in your particular vehicle. It contains valuable information about the car seat’s features, positioning, and other important details that should not be overlooked. Furthermore, the manual often includes helpful illustrations and diagrams to visually guide you through the installation process.
Key points to focus on while reading the car seat manual
- Installation requirements: The manual will specify the requirements for the car seat installation, such as the correct positioning, the necessary attachments, and any additional accessories that may be needed. Pay close attention to these requirements to ensure a proper fit in your vehicle.
- Installation methods: Graco car seats may have multiple installation methods, depending on your vehicle and the seat model. The manual will outline these methods and provide detailed instructions on how to install the car seat using each method. It is essential to understand which installation method is recommended and suitable for your specific situation.
- Tightening and securing: The manual will explain how to properly tighten and secure the car seat in your vehicle. Follow these instructions carefully to ensure a tight and stable installation, as loose or improperly secured car seats can put your child at risk.
- Installing the harness: The manual will guide you through the process of installing and adjusting the harness. It is crucial to understand how to correctly position and secure the harness to provide optimal safety for your child.
Remember, each Graco car seat model may have slightly different instructions and features. Therefore, it is crucial to always refer to the specific car seat manual provided with your car seat to ensure a proper installation. By investing the time to read and understand the manual, you can install your Graco car seat forward facing confidently and provide your child with the highest level of safety on the road.
Step 4: Adjust The Harness Straps
Properly positioning and adjusting the harness straps on your Graco car seat is essential to ensure a snug and secure fit for your child. The harness straps keep your little one safely in place during your car journeys, providing the necessary protection in case of an accident or sudden stops.
Here are the steps to adjust the harness straps:
1. Properly Position the Harness Straps
Before adjusting the harness straps, make sure they are in the correct position. The straps should be at or above your child’s shoulders when facing forward. If they are too low, it can be uncomfortable for your child and may not provide sufficient protection in the event of a crash. Take a moment to double-check the strap position for maximum safety.
2. Loosen the Harness Straps
To adjust the harness straps, start by loosening them. Locate the adjuster, which is usually located at the front of the car seat and pull it forward. This will release tension on the straps, allowing you to make the necessary adjustments easily. Ensure the straps are loose enough to comfortably fit your child.
3. Achieve a Snug Fit
Once the straps are loosened, carefully place your child in the car seat, ensuring their back is firmly against the seatback. Pull both harness straps over your child’s shoulders and buckle the chest clip. It’s important to buckle the chest clip at the level of your child’s armpits for optimal safety.
4. Adjust the Harness Straps
With your child properly positioned and the chest clip secured, it’s time to adjust the harness straps to achieve a snug fit. Pull on the adjuster strap located at the front of the car seat. As you do this, the harness straps will tighten around your child’s shoulders and chest. Make sure the straps are snug, but not too tight. You should be able to fit two fingers between your child’s body and the harness straps.
5. Double-check the Fit
Once the harness straps are adjusted, give them a gentle tug to ensure they are secure. Check that the chest clip is still positioned correctly and that the straps are snug against your child’s shoulders. Additionally, confirm that there is no excess slack or twisting in the harness straps.
By following these steps and adjusting the harness straps correctly, you can provide your child with a secure and comfortable ride in their Graco car seat. Remember, a properly fitted harness is crucial for your child’s safety, so take the time to double-check everything before hitting the road.
Step 5: Install The Car Seat In The Vehicle
Installing a Graco car seat forward facing in your vehicle is a straightforward process that ensures your child’s safety on the road. Once you have completed the necessary preparations and adjustments mentioned in the previous steps, it’s time to secure the car seat in your vehicle. In this step, we will explore two methods: securing the car seat using the LATCH system or the seat belt.
Securing the Car Seat using the LATCH System
The LATCH system, short for Lower Anchors and Tethers for Children, provides an easy and secure way to install your Graco car seat. Follow these steps to ensure a proper installation using the LATCH system:
- Locate the lower anchor bars in your vehicle. These are usually found in the backseat, between the seat cushions.
- Attach the car seat’s lower anchor connectors to the lower anchor bars. Ensure that you hear a click or feel a secure connection.
- Ensure that the car seat is snugly in place by pushing it from side to side and front to back. It should not move more than an inch in any direction.
- Now, locate the top tether anchor in your vehicle. This can usually be found on the back of the rear seat, the floor, or the rear shelf.
- Attach the car seat’s top tether hook to the top tether anchor. Make sure the tether strap is tightened, removing any excess slack.
Securing the car seat using the LATCH system provides a reliable and easy installation method, ensuring your child’s safety during travel.
Securing the Car Seat using the Seat Belt
If your vehicle doesn’t have the LATCH system or you prefer to use the seat belt method, follow these steps to secure the Graco car seat using the seat belt:
- Position the car seat in your vehicle’s desired seating position. Ensure that the seat is level and resting firmly against the back of the seat.
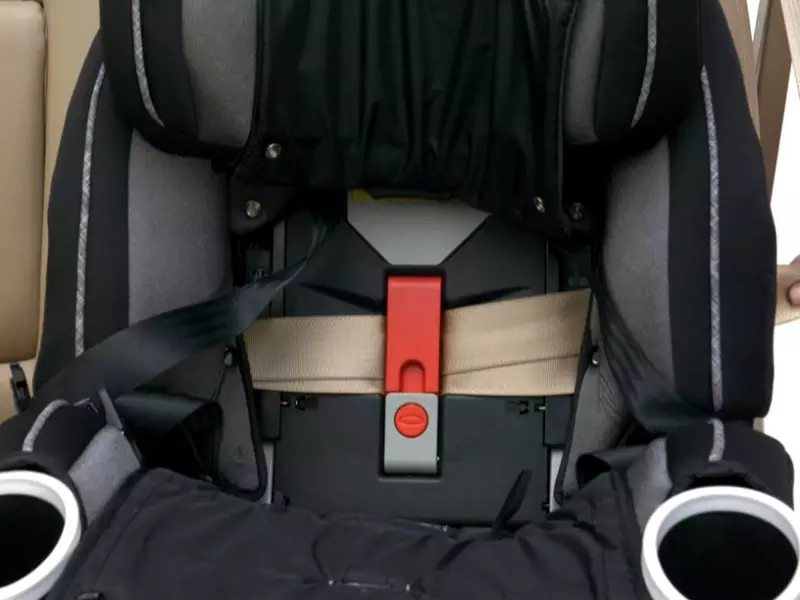
- Thread the seat belt through the car seat’s belt path. The belt path is usually indicated in the car seat’s instruction manual or labeled on the seat itself.
- Buckle the seat belt and ensure that it is properly fastened. Make sure the seat belt is not twisted and is securely locked in place.
- Remove any slack from the seat belt by pressing down on the car seat and pulling the seat belt tight.
- Check that the car seat is snugly in place by pushing it from side to side and front to back. It should not move more than an inch in any direction.
Securing the car seat using the seat belt provides a reliable alternative when the LATCH system is not available or preferred.
Remember, it’s crucial to carefully read the instruction manual provided by Graco for your specific car seat model as installation steps may vary. Following the manufacturer’s guidelines ensures a proper and secure installation, providing peace of mind as you travel with your child.
Step 6: Position The Car Seat At The Correct Angle
Once you have properly secured the Graco car seat forward-facing and tightened the harness straps, it’s crucial to ensure that the car seat is positioned at the correct angle. The angle of the car seat plays a vital role in providing optimal safety and comfort for your child during travel.
Ensuring the car seat is reclined at the appropriate angle for your child’s age
The appropriate angle for the car seat varies based on your child’s age. It’s essential to follow Graco’s guidelines to ensure a secure and comfortable installation.
Below are the recommended car seat angles based on age:
| Age | Recline Angle |
|---|---|
| Infants (0-3 months) | 45 degrees |
| Infants (4-7 months) | 30-45 degrees |
| Toddlers (8 months and above) | Up to 30 degrees |
Ensuring that the car seat is reclined at the appropriate angle for your child’s age is crucial for their safety and comfort throughout the journey.
Properly adjusting the recline angle
To adjust the recline angle, follow these steps:
- Locate the recline adjustment lever located at the base of the car seat.
- Push the lever and adjust the car seat’s recline angle to match the recommended angle for your child’s age.
- Ensure the car seat is properly reclined by pressing it firmly against the seatback while tightening the installation straps.
By following these steps, you can ensure that the car seat is positioned at the correct angle for your child’s age, providing them with the utmost comfort and safety during travel.
Step 7: Tighten And Stabilize The Car Seat
Properly securing your Graco car seat forward-facing is crucial to ensure the safety of your child during car rides. In this step, we will guide you on how to tighten and stabilize the car seat to prevent excessive movement. It is important to follow these instructions carefully to guarantee a secure installation.
1. Secure the seat belt:
- Ensure that the seat belt is threaded through the appropriate belt path on the car seat.
- Insert the seat belt latch plate into the buckle and buckle it securely.
- Pull the shoulder belt and lap belt tightly to remove any slack.
- Double-check that the seat belt is not twisted and is securely fastened.
2. Remove excess slack:
Excessive movement of the car seat can pose a safety risk for your child. To eliminate any unwanted slack, follow these steps:
- Position yourself in front of the car seat.
- Using both hands, firmly grasp the seat and push it back into the vehicle seat.
- Simultaneously pull the seat belt upward and tug the shoulder belt towards you.
- Apply pressure on the car seat while tightening the belt to remove any remaining slack.
3. Stabilize the car seat:
Once the car seat is properly tightened, it’s essential to secure it further using the built-in features:
- Check the car seat’s recline angle according to the manufacturer’s instructions and make necessary adjustments.
- If your car seat has a recline indicator, ensure it is within the acceptable range.
- Attach the top tether to the designated anchor point in the vehicle. Consult your vehicle owner’s manual for the location of the anchor point.
- Confirm that the top tether is tightly secured and free of any twists.
- Double-check the entire car seat installation to ensure there is no excessive movement in any direction.
By following these steps, you can confidently tighten and stabilize your Graco car seat forward-facing, providing your child with a safe and secure ride.
Step 8: Verify The Installation
Checking for a Secure and Correct Installation
Once you have followed all the previous steps to install your Graco car seat forward facing, it is crucial to verify that the installation is secure and correct. This step is essential for the safety of your child and will give you peace of mind while driving.
Perform a Physical Check
Begin by giving the car seat a physical inspection. Make sure that the seat is tightly secured and does not move more than an inch in any direction. Try to wiggle the car seat both side to side and front to back. If you notice any looseness or excessive movement, adjust the installation and retest. The car seat should be snugly attached to the vehicle seat, providing a stable base.

Check the Angle
Next, ensure that the car seat is at the correct angle. Check the manufacturer’s instructions to determine the specific angle requirement for your Graco car seat model. This angle may vary depending on the age and weight of your child. Using a level tool or the built-in level indicator on the car seat, confirm that it is installed at the correct recline angle. If it is not, adjust the seat until it is within the specified range.
Inspect the Harness Straps
Take a close look at the harness straps to ensure they are correctly positioned and secure. Start by confirming that the buckles are properly fastened and engaged. Adjust the straps so they fit snugly around your child, with no slack or twisting. Verify that the chest clip is positioned at armpit level and that the harness straps lie flat over the shoulders without any twists. Proper harness and clip positioning are essential for optimal safety.
Test the Installation
Once you have performed the physical check and inspected the harness straps, it’s time to test the installation. Give the car seat a few gentle tugs to ensure it remains securely in place. Put pressure on the seat from different angles to confirm that it stays firmly attached. Additionally, sit your child in the car seat and fasten the harness properly. Make sure it feels secure and comfortable for your little one. The test phase is crucial in guaranteeing a safe and reliable installation.
Final Thoughts
Verifying the installation of your Graco car seat forward facing is the last and most critical step of the installation process. By performing a physical check, evaluating the angle, inspecting the harness straps, and testing the installation, you can ensure that your child will travel safely in your vehicle. Taking the time to securely install your car seat will provide peace of mind as you embark on your family’s journey.
Step 9: Test The Car Seat’S Stability
Conducting a safety check to ensure the car seat does not move excessively is an essential step in installing a Graco car seat forward facing. Once you have followed all the previous steps to secure the car seat properly, it is crucial to test its stability. This ensures that the seat remains firmly in place, providing maximum protection for your little one in the event of a sudden stop or collision.
Conducting a Safety Check
To test the car seat’s stability, follow these simple steps:
1. Start by placing your hands on the car seat.
2. Firmly push, pull, and wiggle the seat to check for any excessive movement.
3. Pay close attention to the base of the car seat and the attachment points.
Ensuring Proper Installation
During the safety check, make sure to:
- Verify that the car seat does not move more than an inch in any direction.
- Check that the seat belts or LATCH system straps are securely fastened and properly tightened.
- Ensure that the car seat is level and not reclined too far back or positioned too upright.
- Inspect the harness straps for proper adjustment and tightness.
If you detect any excessive movement or find that the car seat is not properly installed, it is crucial to correct the issue before using the seat. Improper installation can significantly compromise the seat’s effectiveness in protecting your child.
Remember, car seat installation can vary depending on the specific Graco model you have. Always refer to the manufacturer’s instructions and follow them carefully to ensure a secure installation. Additionally, it is recommended to have a certified technician inspect your installation to guarantee your child’s safety.
By conducting a thorough safety check and ensuring the car seat is properly installed, you can have peace of mind knowing that your child is riding safely in their Graco car seat.
Step 10: Final Tips And Considerations
Now that you have successfully installed your Graco car seat in the forward-facing position, it’s important to keep in mind a few final tips and considerations to ensure the safety and functionality of the seat.
Additional Tips for Maintaining the Car Seat’s Safety and Functionality
| Tip | Details |
|---|---|
| Regular Check-ups | Regularly inspect the car seat for any signs of wear and tear, loose screws or straps, and any other damage. Address any issues promptly. |
| Tighten Straps Properly | Make sure the harness straps are snugly secured every time you place your child in the car seat. Check for the proper fit by ensuring that there is no slack in the straps and that it passes the pinch test. |
| Secure the Seatbelt | Confirm that the seatbelt is properly buckled and tight once the car seat is installed. A loose seatbelt can compromise the effectiveness of the car seat in a collision. |
| Keep the Manual Handy | Store the car seat manual in an accessible place so that you can refer to it whenever needed, whether it’s for readjustments, cleaning, or answering any questions that may arise. |
| Proper Cleaning | Follow the manufacturer’s instructions for cleaning the car seat. Avoid using harsh chemicals that could damage the seat’s materials. For fabric covers, often, spot cleaning is sufficient. |
By following these additional tips, you can maintain your Graco car seat’s safety and functionality to ensure the utmost protection for your child.
Frequently Asked Questions For How To Install A Graco Car Seat Forward Facing
How Do You Attach A Graco Forward Facing Car Seat?
To attach a Graco forward facing car seat, follow these steps:
1. Secure the base of the car seat with the seat belt or LATCH system.
2. Adjust the seat to the appropriate angle.
3. Buckle your child securely into the seat and tighten the harness.
4. Double-check for a tight and secure installation.
5. Follow the manufacturer’s guidelines and consult the car seat manual for detailed instructions.
When Can You Turn Graco Car Seat Forward Facing?
Graco car seats can be turned forward-facing when your child meets the minimum age and weight requirements specified by the manufacturer. Ensure you carefully follow the guidelines provided in the car seat manual to guarantee your child’s safety.
What Is The First Step To Installing A Forward Facing Car Seat?
To install a forward-facing car seat, the first step is to secure the seat tightly in the back seat. Use either the seat belt or the LATCH system to fasten the seat securely. Make sure to follow the manufacturer’s instructions for installation and positioning the seat properly.
How Do You Install A Forward Facing Car Seat With A Seatbelt?
To install a forward facing car seat with a seatbelt, follow these steps: Place the car seat in the back seat. Thread the seatbelt through the designated path on the car seat, making sure it’s snug. Fasten the seatbelt securely.
Check for a tight fit and ensure the car seat is level.
Conclusion
To sum it up, installing a Graco car seat forward facing is a crucial step in ensuring your child’s safety while on the road. By following the manufacturer’s guidelines and using the correct installation techniques, you can provide a secure and comfortable ride for your little one.
Remember to always double-check the seat’s tightness and adjust the harness for a proper fit. By taking these necessary steps, you can have peace of mind knowing that your child is protected on every journey.