To install a GPS on a car, connect the GPS device to the car’s power source and follow the manufacturer’s instructions for installation. Installing a GPS on a car is a straightforward process that can enhance the navigation capabilities of your vehicle.
By having a GPS installed, you will have access to real-time location information and directions, allowing you to navigate with ease and convenience. This article will guide you through the step-by-step process of installing a GPS on your car, ensuring that you can take advantage of this technology to make your driving experience more efficient and stress-free.
Whether you’re a frequent traveler or simply looking to improve your daily commute, installing a GPS on your car is a beneficial addition that can greatly enhance your driving experience.
Tools And Materials Needed
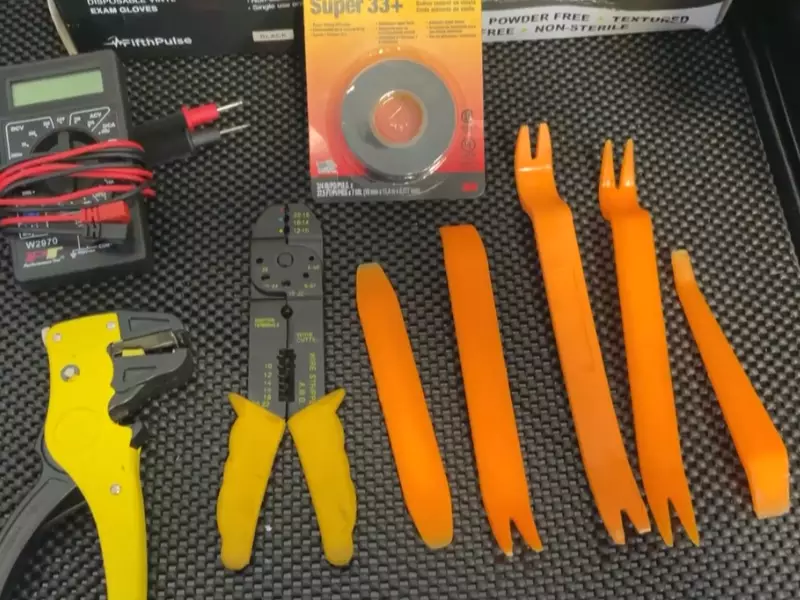
In order to install a GPS device on your car, you will need a few essential tools and materials. These include a GPS device itself, a mounting bracket, power cables, a screwdriver, wire crimps, and electrical tape. Each of these items plays a crucial role in ensuring the successful installation and functionality of your GPS system.

GPS Device
The GPS device is the core component of the installation process. It is the device that will provide you with real-time navigation, allowing you to find your destination with ease. When choosing a GPS device, make sure to consider your specific needs, such as screen size, voice prompts, and additional features like traffic updates or Bluetooth connectivity.
Mounting Bracket
The mounting bracket is an essential accessory for securing your GPS device to your car’s dashboard or windshield. It ensures that the device remains stable and in a convenient position for easy visibility while driving. When selecting a mounting bracket, consider the compatibility with your GPS device and the type of attachment that suits your car best.
Power Cables
To power your GPS device, you will need appropriate power cables. These cables typically come with the GPS device or can be purchased separately if needed. The power cables connect your GPS device to your car’s power supply, such as the cigarette lighter socket or an auxiliary power port, making sure your device stays charged throughout your journey.
Screwdriver
A screwdriver is an essential tool for the installation process. It allows you to securely attach the mounting bracket to your car’s dashboard or windshield. Make sure to choose the appropriate screwdriver type and size based on the screws provided with your mounting bracket.
Wire Crimps
Wire crimps are small connectors that help you establish a reliable electrical connection between the power cables and the power supply in your car. These handy connectors ensure a secure and durable connection, reducing the risk of loose wires or power interruptions while using your GPS system.
Electrical Tape
Electrical tape is a versatile tool that can help you with the installation process. It is used to wrap and insulate wire connections, protecting them from moisture, vibrations, and potential short circuits. This step is crucial to ensure the longevity and safety of your GPS system.
By gathering these tools and materials, you will be well-prepared to install a GPS on your car. The next section will guide you through the step-by-step installation process, making it a hassle-free experience.
Preparing For Installation
Installing a GPS on your car can greatly enhance your navigation and tracking capabilities, providing convenience and peace of mind. Before you begin the installation process, there are a few important steps to take in order to ensure a smooth and successful installation. In this section, we will cover the key aspects of preparing for the installation, which include choosing the right location, checking compatibility, and reviewing the user manual.
Choosing the Right Location
One of the first things to consider when installing a GPS on your car is the ideal location for the device. The position of the GPS can impact its performance and functionality. You’ll want to choose a location that offers a clear line of sight to the sky, as this will ensure optimal signal reception. Avoid placing the GPS device in areas that may obstruct the signal, such as near metal objects, heavily tinted windows, or under the dashboard.
It’s also important to consider the accessibility and visibility of the GPS unit. You’ll want to select a location that is within reach and allows you to easily view the device while driving. Mounting the GPS on the windshield or dashboard is commonly recommended, as it provides a clear view of the screen without obstructing your line of sight on the road.
Checking Compatibility
Before proceeding with the installation, it is crucial to ensure that the GPS device you have purchased is compatible with your car’s make and model. Check the specifications and compatibility information provided by the manufacturer to confirm that the GPS unit is designed to work with your vehicle. Additionally, consider any additional accessories or adapters that may be required for a successful installation.
Reviewing the User Manual
Every GPS device comes with a user manual that contains important instructions and guidance for installation. Take the time to carefully review the user manual before beginning the installation process. Familiarize yourself with the device’s features, functions, and any specific installation requirements mentioned in the manual. This will help you understand the installation process and ensure that you follow the correct steps in order to set up the GPS correctly.
By taking these important preparatory steps, you can ensure a smooth and successful installation of a GPS on your car. Choosing the right location, checking compatibility, and reviewing the user manual will set you on the right path to enjoy the benefits of improved navigation and tracking capabilities.
Installation Process
Disconnecting the battery
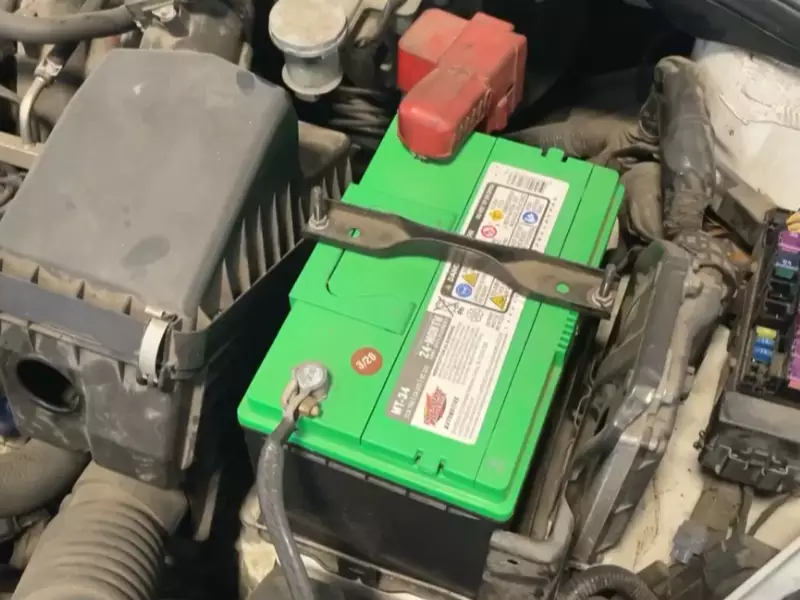
Before starting the installation process, it is important to disconnect the car’s battery. This ensures safety and prevents any electrical mishaps while working on the GPS installation. To disconnect the battery, follow these steps:
- Locate the car’s battery, usually found under the hood.
- Use a wrench to loosen the negative (-) terminal connector.
- Once loosened, remove the negative (-) terminal connector from the battery.
- Next, loosen the positive (+) terminal connector using a wrench.
- After loosening, remove the positive (+) terminal connector from the battery.
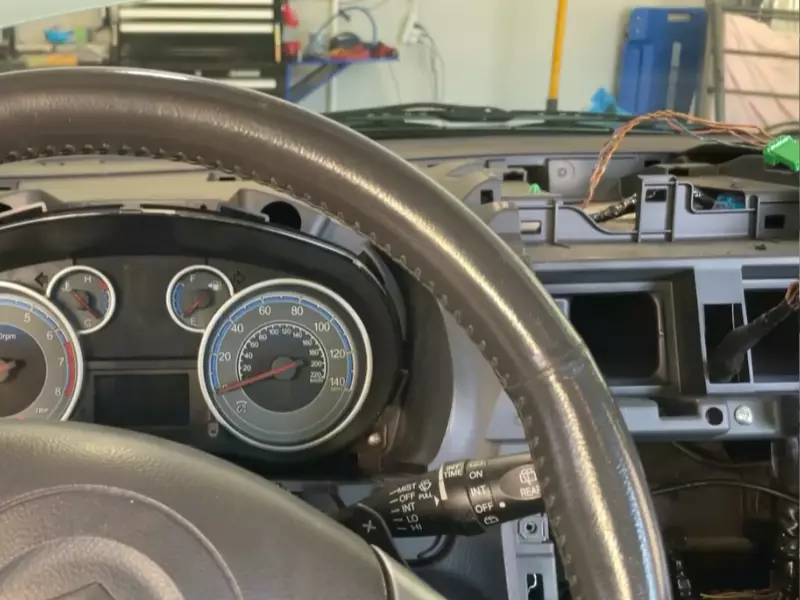
Mounting the GPS device
Now that the battery has been disconnected, it’s time to mount the GPS device securely inside the car. Here’s how to do it:
- Select a suitable location inside the car to mount the GPS device.
- Ensure that the mounting surface is clean and dry.
- Peel off the adhesive backing from the GPS device mount.
- Press the mount firmly against the chosen surface for a secure attachment.
Connecting the power cables
Once the GPS device is mounted, it’s time to connect the power cables. The power cables provide the necessary electrical connection for the GPS device to function properly. Follow these steps:
- Identify the power cable provided with the GPS device.
- Connect the power cable to the GPS device’s power input port.
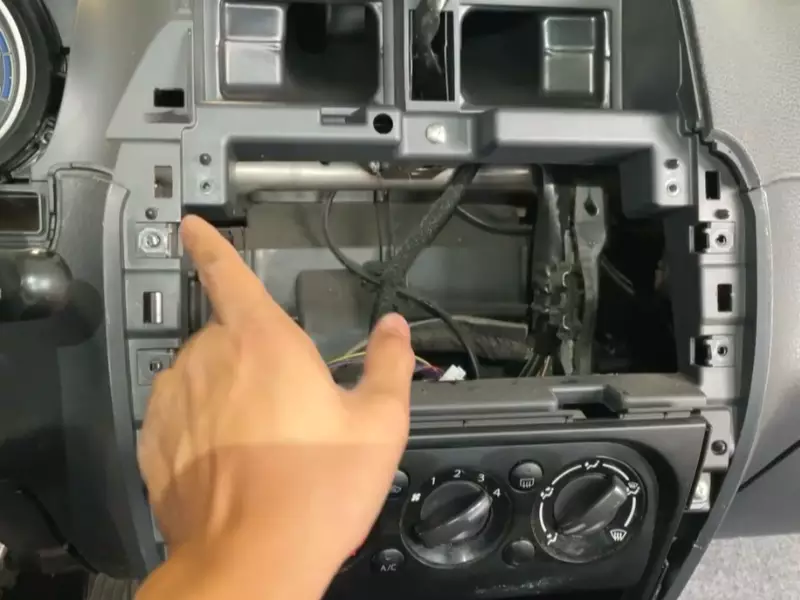
- Locate the car’s fuse box, usually found underneath the dashboard or in the engine compartment.
- Identify a fuse slot that has constant power supply even when the car is turned off.
- Remove the chosen fuse from the slot using a fuse puller or a pair of pliers.
- Insert the power cable’s fuse tap into the vacant slot.
- Insert the taken-out fuse into the fuse tap.
Securing the wiring
Now that the power cables are connected, it’s important to secure the wiring to ensure it doesn’t interfere with other car components or cause any hazards. Follow these steps:
- Neatly arrange and organize the power cables along the car’s interior.
- Secure the wiring using zip ties or adhesive cable clips.
- Avoid obstructing the driver’s visibility or interfering with any of the car’s controls.
Reconnecting the battery
Once the GPS device is securely installed and the wiring is secured, it’s time to reconnect the car’s battery. Follow these steps:
- Reattach the positive (+) terminal connector to the car’s battery and tighten it using a wrench.
- Reattach the negative (-) terminal connector to the car’s battery and tighten it using a wrench.
- Ensure that the connections are secure and tight.
With that, the installation process is complete. The GPS device is now ready to be used, providing accurate navigation and tracking for your car journeys.
Testing And Configuration
Powering on the GPS device
Before you can begin testing and configuring your GPS device, the first step is to power it on. This is a straightforward process that involves connecting the device to a power source, such as the car’s cigarette lighter port or a USB port.
To power on the GPS device, simply plug one end of the power cable into the device and the other end into the designated power source. Once the device is connected, press the power button, usually located on the front or side of the device.
As you power on the GPS device, it will take a few moments to initialize and boot up. You may see the manufacturer’s logo or a loading screen during this time. Once the device is powered on, it will be ready for testing and configuration.
Calibrating the device
Calibrating your GPS device is an important step to ensure accurate and reliable navigation. The calibration process allows the device to establish its position accurately and align its internal sensors.
To calibrate the GPS device, follow these steps:
- Find an open area with a clear view of the sky. This will provide the device with a strong GPS signal.
- Place the device on a stable surface, ensuring that it is not obstructed by any objects.
- Go to the device’s settings menu and locate the calibration option. This can usually be found under the “Location” or “System” settings.
- Follow the on-screen instructions to complete the calibration process. This may involve rotating the device in different directions or following specific patterns.
- Once the calibration is complete, the device will be ready for use.
Configuring settings and preferences
After turning on your GPS device and calibrating it, the next step is to configure the settings and preferences according to your needs. This customization will ensure that the device functions optimally and provides you with the most relevant information during your travels.
Access the settings menu of the GPS device, typically by tapping on the gear icon or selecting “Settings” from the main menu. Within the settings menu, you will find various options to customize the device’s behavior, appearance, and navigation features.
Here are some important settings and preferences that you might want to consider:
- Language and voice guidance: Choose your preferred language and enable voice navigation for clear instructions during your journeys.
- Map display: Adjust the brightness, color scheme, and zoom level of the map to enhance visibility and readability.
- Traffic updates: Enable real-time traffic updates to avoid congestion and find the quickest routes to your destinations.
- Points of interest: Customize the categories of points of interest (POIs) that are displayed on the map, such as restaurants, gas stations, or tourist attractions.
- Vehicle profile: Enter the specifications of your car, including its dimensions and fuel consumption, to receive accurate routing and fuel-efficient suggestions.
Take your time to explore the settings menu and adjust the options according to your preferences. Remember to save your changes before exiting the menu to ensure that the settings are applied.
By following these steps and carefully testing and configuring your GPS device, you will be well-equipped to embark on your journeys with confidence and convenience.
Troubleshooting And Tips
When it comes to installing a GPS on your car, it’s important to know what to do in case you run into any issues. In this section, we will cover some common installation issues, GPS signal reception tips, and the process of updating the software and maps on your GPS device. By following these troubleshooting and tips, you can ensure a smooth and hassle-free installation of your GPS system.
Common installation issues
Installing a GPS on a car may seem straightforward, but there are a few common issues that you may encounter along the way. Here are some troubleshooting tips to help you navigate through the installation process:
- Make sure you have a compatible GPS device for your car model. Check the manufacturer’s specifications or consult with a professional if you are unsure.
- Double-check the wiring connections. Loose or faulty connections can cause the GPS system to malfunction. Ensure all connections are secure and properly attached.
- Ensure the GPS antenna is installed correctly. The antenna should have a clear line of sight to the sky for optimal signal reception.
- Test the power source. If your GPS device is not turning on or displaying any signs of power, check the fuse or battery connection.
- If you are still facing issues during the installation process, it is recommended to consult with a professional or refer to the manufacturer’s troubleshooting guide for further assistance.
GPS signal reception tips
Having a strong GPS signal is crucial for accurate navigation. Here are some tips to improve GPS signal reception:
- Ensure the GPS antenna is positioned correctly. Avoid placing it near metal or any obstructions that may interfere with the signal.
- Consider using an external GPS antenna if your GPS device supports it. External antennas often provide better signal reception, especially in areas with poor coverage.
- Update your GPS device’s software and maps. Outdated software or maps can affect signal reception. We will discuss this further in the next section.
- Try to avoid dense urban areas or areas with tall buildings that may obstruct the GPS signal. If possible, find an open area with a clear view of the sky for optimal reception.
Updating software and maps
Regularly updating your GPS device’s software and maps is important to ensure accurate navigation and improved performance. Follow these steps to update your GPS device:
- Connect your GPS device to a computer using a USB cable or through wireless connectivity if available.
- Visit the manufacturer’s website and download the latest software and map updates for your specific GPS model.
- Follow the instructions provided by the manufacturer to install the updates on your GPS device.
- Once the updates are installed, disconnect your GPS device from the computer and test it to ensure everything is functioning correctly.
By regularly updating your GPS device, you can take advantage of the latest features, improvements, and up-to-date maps, offering you the best navigation experience possible.
Additional Gps Features And Add-Ons
When it comes to installing a GPS on your car, the basic features of getting directions and finding your way are just the beginning. There are a plethora of additional GPS features and add-ons that can take your navigational experience to a whole new level. From Bluetooth connectivity to voice-guided directions and real-time traffic updates, let’s explore the exciting possibilities that these features bring.
Bluetooth Connectivity
The first noteworthy feature is Bluetooth connectivity. By connecting your GPS to your car’s Bluetooth system, you can seamlessly integrate your navigation device with your vehicle’s audio system. This means that you can enjoy hands-free calling and even stream your favorite music or podcasts directly from your GPS device. Gone are the days of cumbersome wired connections – Bluetooth connectivity allows for a clutter-free, enhanced driving experience.
Voice-guided Directions
Imagine driving on unfamiliar roads and effortlessly receiving directions without having to take your eyes off the road. With voice-guided directions, this becomes a reality. Many advanced GPS devices come equipped with voice guidance technology, enabling you to simply listen to step-by-step directions through your vehicle’s speakers. Whether you need to make a turn, change lanes, or exit a highway, the voice prompts will keep you informed and ensure you never miss a beat.
Real-time Traffic Updates
No one wants to be stuck in traffic, and that’s where real-time traffic updates come in. With this feature, your GPS device continuously monitors traffic conditions and provides you with real-time updates to help you avoid congested routes. This not only saves you time but also minimizes stress during your journey. By having the latest information at your fingertips, you can take alternative routes or plan ahead, ensuring a smoother and more enjoyable drive.
Adding these additional features and add-ons to your GPS installation can truly enhance your driving experience. The convenience of Bluetooth connectivity, the ease of voice-guided directions, and the efficiency of real-time traffic updates all work together to make your journeys more enjoyable and stress-free. So, why settle for just basic navigation when you can take advantage of these remarkable features? Upgrade your GPS today and discover a whole new level of convenience and functionality.
Gps Maintenance And Care
Proper maintenance and care are essential to ensure the long-term functionality and reliability of your car’s GPS system. By following some simple steps, you can keep your GPS device and mount in top shape, ensuring accurate navigation and hassle-free journeys. In this section, we will discuss cleaning the device and mount, checking for software updates, and replacing the battery.
Cleaning the Device and Mount
Regularly cleaning your GPS device and mount not only helps maintain their appearance but also enhances performance and longevity. Here are some quick and easy steps to keep your GPS clean:
- Use a soft, lint-free cloth to wipe the screen, mount, and other external surfaces. Avoid using paper towels or rough materials that could potentially scratch the screen.
- If there are stubborn smudges or fingerprints, slightly dampen the cloth with water or a screen-cleaning solution specifically designed for electronic devices.
- Be gentle when cleaning the buttons and ports. Use a cotton swab or soft brush to remove any dirt or debris that might have accumulated.
- Make sure to dry the device and mount thoroughly before reattaching or turning them on. Moisture can damage electronic components.
Checking for Software Updates
Software updates play a vital role in keeping your GPS device up to date with the latest maps, features, and bug fixes. To ensure your GPS is running on the most recent software version:
- Connect your GPS device to your computer using the provided USB cable or docking station.
- Visit the manufacturer’s website and download their software update utility, if available.
- Launch the software update utility and follow the on-screen instructions to check for updates for your specific GPS model.
- If updates are available, proceed with the download and installation process as instructed by the utility.
- Once the update is complete, safely disconnect your GPS device from the computer and restart it to activate the new software.
Replacing the Battery
If your GPS device is powered by a removable battery, it is important to monitor its health regularly. Over time, batteries can wear out and provide less reliable power. Here’s a general guide to replacing the battery:
- Refer to the user manual or manufacturer’s website for specific instructions on removing the battery from your GPS device.
- Ensure you have a replacement battery that is compatible with your specific GPS model. A genuine battery from the manufacturer is usually the best option.
- Power off your GPS device and safely remove the old battery following the provided instructions.
- Insert the new battery into the designated slot, making sure it is properly aligned.
- Secure the battery in place according to the manufacturer’s instructions and reassemble your GPS device.
- Power on the device and verify that it is functioning correctly.
By regularly cleaning your GPS device and mount, checking for software updates, and replacing the battery when necessary, you can ensure the optimal performance and longevity of your car’s GPS system. These simple maintenance practices will help keep you on the right track wherever your journeys may take you.
Frequently Asked Questions For How To Install A GPS on A Car
How Much Does It Cost To Put A GPS on A Car?
The cost of installing a GPS on a car varies depending on the type of system and features you choose. It can range from $100 to $400, or even higher for advanced models.
How Can I Put A Tracker On My Car Without Them Knowing?
One way to install a tracker on your car discreetly is by hiring a professional to do it for you. They can install it in a hidden location where it won’t be easily discovered. This ensures that the tracker remains undetected without the knowledge of others.
Where Do You Plug A GPS into A Car?
Plug a GPS into a car by connecting it to the cigarette lighter or USB port.
How Do I Install A GPS in My Car?
To install a GPS in your car, start by choosing a mounting location that is within your reach but does not obstruct your view while driving. Next, connect the GPS unit to a power source, such as the car’s cigarette lighter socket, and mount it securely using the provided suction cup or adhesive.
Finally, follow the manufacturer’s instructions to set up and calibrate the GPS device.
Conclusion
Installing a GPS system in your car is a simple yet effective way to enhance your driving experience. By following the step-by-step instructions provided in this blog post, you can easily install a GPS on your car without any hassle.
Not only will this technology help you navigate unfamiliar roads, but it will also provide updates on traffic conditions in real time. Embrace the benefits of a GPS and enjoy stress-free journeys wherever you go.