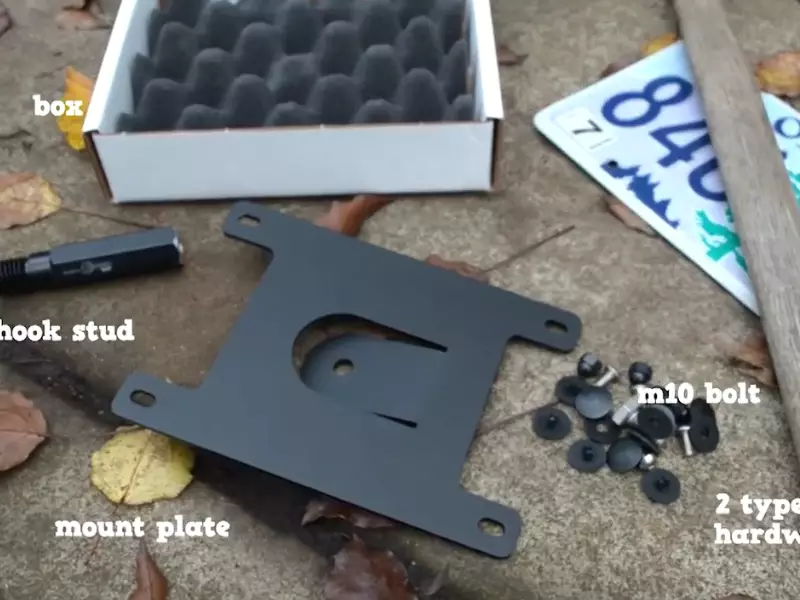
To install a front license plate bracket, you first need to locate the pre-drilled holes in your vehicle’s bumper. Then, use screws and a screwdriver to secure the bracket onto the bumper.
Preparing your vehicle for compliance with local regulations typically involves installing a front license plate bracket. This simple task allows you to attach a front license plate to your vehicle’s front bumper, ensuring legal compliance and avoiding fines. We will guide you through the process of installing a front license plate bracket efficiently and effectively.
Following these steps will enable you to securely attach the bracket to your vehicle within minutes, without the need for professional assistance. Let’s begin by gathering the necessary tools and materials before moving on to the installation process.

Necessary Tools And Materials
When it comes to installing a front license plate bracket on your vehicle, you’ll need a few essential tools and materials. Having these items ready before you begin the installation process will make the task much easier and more efficient. Here are the necessary tools and materials you will need:
Screwdriver
A screwdriver is a must-have tool for installing a front license plate bracket. It will be used to secure the bracket to your vehicle, so make sure you have the appropriate type and size of screwdriver for the screws or bolts included with the bracket.
Drill
In some cases, you may need to use a drill to create holes for the screws or bolts. If your vehicle does not already have pre-drilled holes for the license plate bracket, a drill will be necessary. Make sure you have a drill that is suitable for the material of your vehicle.
Drill bit (appropriate size for your vehicle)
If drilling is required, you will need an appropriate-sized drill bit for your vehicle. The correct drill bit size will ensure that the holes are the right size for the screws or bolts and will provide a secure and stable attachment for the license plate bracket.
License plate bracket
Of course, you will need a front license plate bracket for your vehicle. There are various types of brackets available, so make sure you choose one that is compatible with your vehicle model and year.
Screws or bolts (depending on the bracket)
Depending on the type of license plate bracket you have, you will need either screws or bolts to attach it to your vehicle. Check the instructions provided with the bracket to determine the right type and size of screws or bolts needed for installation.
Level
A level will ensure that your license plate is properly aligned and straight. It will help you position the bracket accurately before securing it to your vehicle. This tool is especially handy if you want your front license plate to be perfectly straight and symmetrical.
Pencil or marker
A pencil or marker will be useful for marking the drill hole locations on your vehicle. This will serve as a guide for drilling the holes in the correct spots and will help ensure that your license plate bracket is securely attached.
Protective eyewear
Safety should always be a priority when working with tools, especially when drilling. Wearing protective eyewear will shield your eyes from any debris or particles that may be produced during the installation process.
Gloves
Wearing gloves while installing a front license plate bracket is not only a safety precaution but also prevents smudging or scratching your vehicle’s surface. They will provide you with a better grip on the tools and protect your hands from sharp edges or rough surfaces.
Preparing The Vehicle
Installing a front license plate bracket is a relatively simple task that can enhance the appearance and functionality of your vehicle. Before you begin the installation process, it’s important to properly prepare the vehicle. This will ensure that the license plate bracket is securely attached and in the optimal position.
Determine the Ideal Location for the License Plate Bracket:
The first step in preparing your vehicle for the front license plate bracket installation is to determine the ideal location for it. The license plate bracket should be placed in a position that is both visible and compliant with local regulations. Take a moment to consider the design and structure of your vehicle, as well as any pre-existing holes or indentations that may be suitable for mounting the bracket.

Clean the Surface:
Once you have identified the ideal location for the license plate bracket, it’s time to clean the surface where it will be attached. A clean surface will ensure a strong and secure bond between the bracket and the vehicle. Begin by using a mild soap or automotive cleaning solution and a soft sponge or cloth to remove any dirt, debris, or wax buildup from the area. Rinse the surface thoroughly and dry it completely before proceeding with the installation.
Measure and Mark the Precise Placement:
Now that the surface is clean, it’s time to measure and mark the precise placement of the license plate bracket. Using a measuring tape or ruler, carefully measure the distance between existing holes or reference points on the vehicle to ensure accurate positioning. Once you have determined the correct measurements, use a marker or pencil to mark the mounting points on the surface. This will serve as a guide during the installation process, ensuring that the license plate bracket is aligned correctly.
With the vehicle properly prepared, you are now ready to move on to the next step in installing a front license plate bracket. Stay tuned for our upcoming blog posts, where we will guide you through the actual installation process, step by step. Remember, the key to a successful installation is careful preparation and attention to detail. By following these steps, you’ll be well on your way to a securely mounted and visually appealing front license plate bracket for your vehicle.
Drilling Holes
Use the appropriate drill bit
Before you start drilling holes for the front license plate bracket, it’s important to use the right drill bit. Choosing the correct drill bit size will ensure that the holes you drill are an exact match for the bolts or screws that will secure the bracket to your vehicle.
Refer to the instructions provided by the manufacturer of the front license plate bracket to determine the appropriate drill bit size. Typically, a 3/16-inch drill bit works well for most standard brackets. However, it’s always a good idea to double-check the recommended size to ensure a precise fit.
Using the appropriate drill bit size is crucial for a couple of reasons. First, it helps prevent the drill bit from slipping or wandering while you drill, ensuring cleaner and more accurate holes. Secondly, it minimizes the risk of damaging the surrounding areas of your vehicle.
Secure the vehicle with jack stands (if necessary)
Prior to drilling holes in your vehicle, it may be necessary to secure it with jack stands. This is particularly important if you are working on a vehicle that sits low to the ground or if you need better access to the front bumper area.
Jack stands to provide stability, ensuring that the vehicle remains securely in place while you work. To use jack stands, follow these steps:
- Loosen the lug nuts on the front wheels.
- Lift the front end of the vehicle using a jack.
- Place the jack stands beneath the vehicle’s frame rails or designated lifting points.
- Lower the vehicle onto the jack stands and ensure that it is stable.
- Double-check that the jack stands are securely in place.
- Gently shake the vehicle to confirm that it is stable before proceeding.
Drill holes for the bracket
Once you have the proper drill bit and have securely positioned your vehicle, it’s time to start drilling holes for the front license plate bracket. Follow these steps:
- Position the bracket on the desired location of your front bumper, ensuring that it is straight and centered.
- Use a pencil or marker to mark the spots where the holes should be drilled.
- Double-check the alignment of the bracket before proceeding.
- Attach the appropriate-sized drill bit to your drill and align it with the marked spots.
- Apply gentle pressure and begin drilling into the marked spots, using a slow and steady motion.
- Allow the drill bit to do the work, avoiding excessive force that could damage the bumper or bracket.
- Once the holes are drilled, remove any debris or shavings from the bumper.
Now that you have successfully drilled the holes for the front license plate bracket, you are ready to secure it in place. Simply align the bracket with the holes and attach it using the provided bolts or screws. Tighten them securely, being careful not to overtighten and damage the bracket or vehicle.
Installing a front license plate bracket with drilled holes ensures a secure attachment and compliance with local regulations. By following these steps, you can confidently complete this installation task, enhancing both the aesthetics and functionality of your vehicle.
Installing The Bracket
Installing the bracket for your front license plate is a simple process that can be completed in just a few steps. By following these instructions, you’ll have your license plate securely attached to your vehicle in no time. Here’s how to install the bracket using HTML syntax.
Align the bracket with the drilled holes
1. Start by preparing your vehicle. Make sure the surface where the license plate bracket will be installed is clean and free of any debris.
2. Take the bracket and align it with the pre-drilled holes on your vehicle’s bumper. The bracket should be positioned vertically with the longer edge facing downward.
3. Once you’ve aligned the bracket, make sure it is centered and level. You can use a measuring tape or visual judgment to ensure it is positioned correctly.

Insert and tighten the screws or bolts
- Once the bracket is properly aligned, it’s time to insert the screws or bolts. These should be provided with your license plate bracket.
- Take the first screw or bolt and insert it through one of the bracket’s holes, then into the corresponding hole on your vehicle’s bumper. Make sure it goes in straight to avoid any damage.
- Begin tightening the screw or bolt using a screwdriver or wrench. Be sure to not overtighten, as this could strip the threads or damage the bracket or bumper.
- Repeat the process for the remaining screws or bolts, inserting them through the remaining holes on the bracket and into the corresponding holes on your vehicle’s bumper.
- Once all the screws or bolts are in place, double-check that the bracket and license plate are secure. Give it a gentle tug to ensure everything is tightly fastened.
Congratulations! You have successfully installed your front license plate bracket. Your license plate is now ready to be attached to the bracket, completing the installation process.
Remember, it’s a good idea to periodically check the bracket’s tightness and make any necessary adjustments to ensure the license plate remains securely attached to your vehicle.
Mounting The License Plate
Attach the license plate to the bracket
Once you have securely installed the front license plate bracket on your vehicle, it’s time to attach the license plate itself. Follow these simple steps to ensure a proper and secure mounting:
- Gather your tools: Before you begin, make sure you have the necessary tools and materials. You will need a screwdriver or drill with the appropriate bit, screws, and washers that are suitable for the bracket and your license plate.
- Position the license plate: Place the license plate onto the bracket, aligning the holes on the plate with the holes on the bracket. Ensure that the plate is centered and straight.
- Insert the screws: Take one of the screws and insert it through one of the holes on the license plate, passing it through the corresponding hole on the bracket. Place a washer over the screw on the other side of the bracket to provide a more secure fastening.
- Tighten the screws: Using the screwdriver or drill, tighten the screw until it is snug against the bracket. Be careful not to overtighten, as it may damage the plate or bracket.
- Repeat for remaining holes: Repeat the process for the remaining holes on the license plate, inserting screws through each hole and tightening them with the appropriate pressure.
Ensure proper alignment and leveling
Properly aligning and leveling your front license plate is essential for both aesthetics and functionality. Follow these steps to ensure a professional and appealing appearance:
- Step back and assess: Step away from your vehicle and evaluate the positioning of the license plate. Check for symmetry, making sure it is centered both vertically and horizontally.
- Make adjustments if needed: If you notice any misalignment, use your hands to gently shift the license plate into the desired position. Take your time to achieve the perfect look.
- Utilize a level: To ensure that your license plate is perfectly level, you can use a small carpenter’s level. Place it on top of the license plate and adjust as necessary until the bubble is centered.
Remember, the license plate is an important aspect of your vehicle’s appearance, so taking the time to properly mount and align it will enhance the overall look and present a more polished impression.
Additional Tips And Considerations
When it comes to installing a front license plate bracket, there are a few additional tips and considerations that can make the process smoother and ensure compliance with local regulations. From confirming the rules in your area to exploring alternative mounting methods, these factors can play a significant role in the successful installation of your front license plate.
Confirm local regulations and requirements
To avoid any legal issues or citations, it is crucial to understand the local regulations and requirements regarding front license plates. Different states or jurisdictions may have specific laws in place, such as the mandatory display of a front license plate or restrictions on the placement and mounting.
Before proceeding with the installation, take the time to research and familiarize yourself with the specific guidelines relevant to your area.
Use alternative mounting methods if desired
If you prefer a different aesthetic or want to explore alternative options for mounting your front license plate bracket, there are a few methods to consider. Some individuals may opt for a bumper-mounted bracket, which attaches directly to the front bumper itself.
This method can provide a cleaner look and may be suitable for certain vehicle models. Another alternative is a tow hook mount, ideal for vehicles with a front tow hook attachment. These alternative mounting methods can offer flexibility and customization while still maintaining compliance with local regulations.
Regularly check and maintain the bracket and license plate
Once your front license plate bracket is installed, it’s important to regularly check and maintain its condition. Exposure to the elements, such as rain, snow, and UV rays, can deteriorate the bracket over time.
Inspect the fasteners, ensuring they are tight and secure, and replace any worn-out or damaged parts as needed. Additionally, regularly check and clean the license plate itself to maintain visibility and ensure it remains securely attached to the bracket.
Frequently Asked Questions Of How To Install A Front License Plate Bracket
How Do You Attach A Front License Plate Without Drilling Holes?
You can attach a front license plate without drilling holes by using an adhesive mounting bracket or a license plate holder that attaches to the front bumper. These options provide a secure and non-permanent solution for attaching the license plate.
Should I Drill Holes In the Front License Plate?
Yes, you should drill holes for a front license plate. It is required by law in most states to have a visible front license plate on your vehicle. Drilling holes ensures proper attachment and compliance with regulations.
What If My Car doesn’t have A Front License Plate Holder In California?
If your car doesn’t have a front license plate holder in California, you are required by law to affix the front license plate to the bumper. Failure to comply may result in a fine or other penalties.
How To Install Honda Front License Plate Bracket?
To install a Honda front license plate bracket, first, gather all the necessary tools and the bracket itself. Next, locate the mounting holes on the front bumper of your Honda. Align the bracket with the holes and secure it using screws or bolts provided.
Ensure it is tightly fitted.
Conclusion
Installing a front license plate bracket may seem like a daunting task, but with the step-by-step guide provided in this blog post, you can confidently take on the challenge. By following the instructions, you’ll ensure the proper placement and secure attachment of your front license plate.
Remember to check your local laws and regulations before proceeding. With the right tools and a little patience, you’ll have your front license plate bracket installed in no time. Safe driving!
