To install a Cosco car seat, follow these steps: Read the manufacturer’s instructions carefully, buckle the car seat securely into the back seat of your vehicle using the seat belt or LATCH system, adjust the harness straps so they fit snugly around your child, and check that the car seat is properly installed by giving it a firm tug from side to side and front to back. Car seats are a crucial safety measure for parents to ensure their children’s protection during car rides.
Installing a Cosco car seat correctly is essential to guarantee its effectiveness in keeping your child safe. With a focus on simplicity and safety, Cosco has designed their car seats to be easy to install. This article will guide you through the step-by-step process of installing a Cosco car seat, providing you with confidence and peace of mind during your travels.
By adhering to the manufacturer’s instructions and following these straightforward steps, you can ensure your child’s car seat is properly installed and secure.
Step-By-Step Guide For Cosco Car Seat Installation
Installing a car seat properly is crucial for the safety of your child while traveling. In this step-by-step guide for Cosco car seat installation, we will walk you through the process so that you can have peace of mind knowing that your child is secure and protected.

Preparation for Installation
Before you begin, gather all the necessary tools and materials for the installation process. This will ensure a smooth and efficient installation. Here are the steps to prepare for installing your Cosco car seat:
- Read the instruction manual: Familiarize yourself with the specific instructions provided by Cosco for your car seat model. These instructions will guide you through the installation process.
- Choose the appropriate location: Find the ideal location for your car seat in your vehicle. It is recommended to have the car seat installed in the back seat, as it provides better protection in case of an accident.
- Inspect the car seat: Examine the car seat for any damages or defects. If you notice any issues, contact Cosco for assistance or consider replacing the seat.
- Prepare the vehicle: Ensure that your vehicle is free from clutter and clean before installation. This will help you have a clear space to work with.
Attaching the Base of the Car Seat
Now that you are prepared, it’s time to attach the base of your Cosco car seat. Follow these steps:
- Identify the base: Locate the base of the car seat. It is typically labeled or recognizable by its unique shape and attachments.
- Position the base: Place the base on the back seat of your vehicle in the desired location.
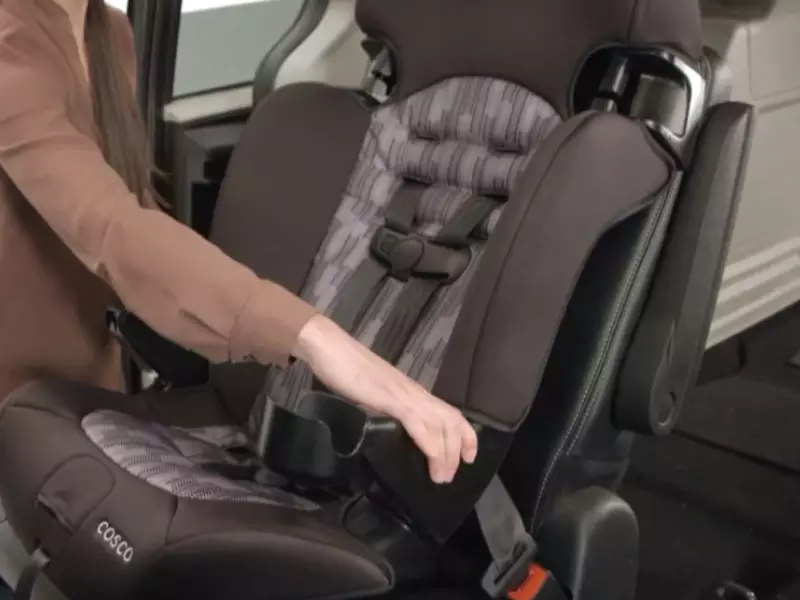
- Secure the base: Fasten the base using the vehicle’s seat belt or the LATCH system, whichever is recommended by your car seat’s instructions.
- Verify stability: Ensure the base is securely installed by pressing down and checking for minimal movement.
Installing the Car Seat Securely
Once the base is attached, it’s time to install the car seat securely. Follow these steps:
- Detach the car seat from the base: Depending on your car seat model, you may need to detach the seat from the base before installing it.
- Position the car seat: Place the car seat on the base, following the guidelines provided in the instruction manual.
- Secure the car seat: Fasten the car seat to the base using the recommended method (e.g., seat belt or LATCH system).
- Check for proper installation: Verify that the car seat is securely attached to the base by giving it a gentle tug.
Remember to double-check the tightness of all connections and ensure that there is no excessive movement. If you have any doubts about the installation, it is always recommended to consult a professional or contact Cosco’s customer service. Your child’s safety is paramount, and a properly installed car seat can make all the difference in case of an accident.
Safety Tips To Consider
Installing a car seat is a crucial step in ensuring your child’s safety while traveling. To properly install a Cosco car seat, there are certain safety tips that you need to consider. By following these guidelines, you can ensure that your car seat is properly secure and your child is protected.
Ensuring proper seat position in the vehicle
The first step in installing a Cosco car seat is to ensure that it is in the correct position in your vehicle. Here are a few key points to keep in mind:
- Place the car seat in the back seat of your vehicle. This is the safest location for your child.
- Make sure the car seat is installed in a rear-facing position for infants and young children.
- Ensure that the car seat is reclined at the proper angle. Follow the manufacturer’s guidelines for the specific model you are using.
Checking the seatbelt or LATCH system
Next, you need to check the seatbelt or LATCH (Lower Anchors and Tethers for Children) system to secure the car seat in place. Consider the following steps:
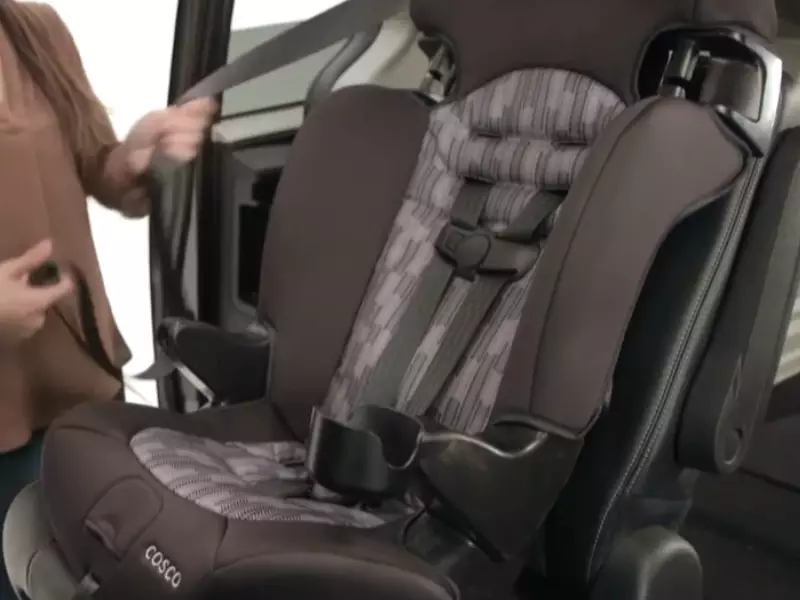
- Check the seatbelt to ensure it is tightly fastened and does not have any twists or slack.
- If using the LATCH system, locate the lower anchors in your vehicle’s seat crack. Attach the lower anchors of the car seat to these anchors.
- For forward-facing car seats, use the tether strap of the LATCH system. Attach it to the tether anchor located in the vehicle.
Testing the car seat for stability
Once the car seat is installed, it is essential to check its stability to ensure your child’s safety. Follow these steps to test the stability:
- Secure the car seat tightly, pressing it firmly into the seat cushion.
- Check for any movement side to side or front to back. The car seat should be snug and not move more than an inch in any direction.
- Double-check all the connections and straps, making sure everything is properly secured.
By following these safety tips, you can install your Cosco car seat correctly and provide your child with the highest level of safety during your travels.
Common Mistakes To Avoid
Installing a Cosco car seat can seem like a daunting task, but it doesn’t have to be. By following the correct steps and guidelines, you can ensure your child’s safety and peace of mind. However, there are some common mistakes that many parents make when installing a Cosco car seat. By understanding these mistakes and how to avoid them, you can ensure that your car seat is properly installed and your child is safely secured.
Loose installation
One of the most common mistakes parents make when installing a Cosco car seat is not tightening the seat securely. A loose car seat can lead to serious injuries in the event of an accident. To avoid this mistake, always follow the manufacturer’s instructions and guidelines for installing the car seat. Make sure the car seat is firmly and tightly secured to the vehicle’s seat. To check for a tight installation, try to wiggle the car seat from side to side and front to back. If it moves more than an inch in any direction, it is not properly installed. Take the time to adjust and tighten the seat until it is securely in place.
Incorrect use of the harness
Using the harness incorrectly is another common mistake that can compromise the safety of the car seat. It is important to ensure that the harness is positioned and adjusted properly to secure your child. Start by adjusting the harness straps to the correct height, making sure they are just above your child’s shoulders. Next, buckle the harness and tighten it snugly, ensuring that there is no slack in the straps. To check for a proper fit, you should not be able to pinch any excess webbing between your fingers. Additionally, make sure the chest clip is positioned at armpit level to keep the straps properly positioned on your child’s shoulders.
Failure to secure the car seat properly
Securing the car seat properly in the vehicle is crucial for your child’s safety. If the car seat is not correctly installed, it can become a projectile in the event of a crash. To avoid this, always read the car seat manual and follow the manufacturer’s instructions for securing the car seat. Ensure that the car seat is positioned at the correct angle. Many car seats have built-in level indicators to help you achieve the proper angle. Additionally, use the appropriate method to secure the car seat in your vehicle, whether it be using the LATCH system or the seat belt. Double-check that the car seat is securely in place before each trip.
Avoid these common mistakes and take the time to properly install your Cosco car seat. By doing so, you are ensuring your child’s safety and peace of mind every time they are in the car.
Understanding The Latch System
Welcome to our comprehensive guide on how to install a Cosco car seat. In this section, we will discuss the LATCH system and its importance in ensuring a safe and secure installation. Understanding the LATCH system is crucial for every parent or caregiver who wants to transport their child safely in a car seat. Let’s dive in!
What is the LATCH system?
The LATCH system, which stands for “Lower Anchors and Tethers for Children,” is a standardized installation system designed to simplify the process of securing a car seat in a vehicle. It eliminates the need to use the vehicle’s seat belt and provides a more secure attachment for the car seat. The LATCH system consists of two lower anchor points, located in the crease of the vehicle’s seat, and a top tether anchor, usually found on the back of the vehicle’s seat or on the cargo area floor. Using the LATCH system can help ensure that the car seat stays in place during sudden stops or collisions.
How to locate and use the LATCH anchor points
Locating and using the LATCH anchor points in your vehicle is relatively straightforward. Most vehicles manufactured after September 1, 2002, are LATCH-equipped. Check your vehicle’s owner’s manual to locate the anchor points in your specific model. Generally, the anchor points are indicated by small fabric tags or plastic covers on the vehicle’s seat. Once you’ve located the anchor points, they can be easily accessed by lifting the covers or sliding your fingers underneath the tags.
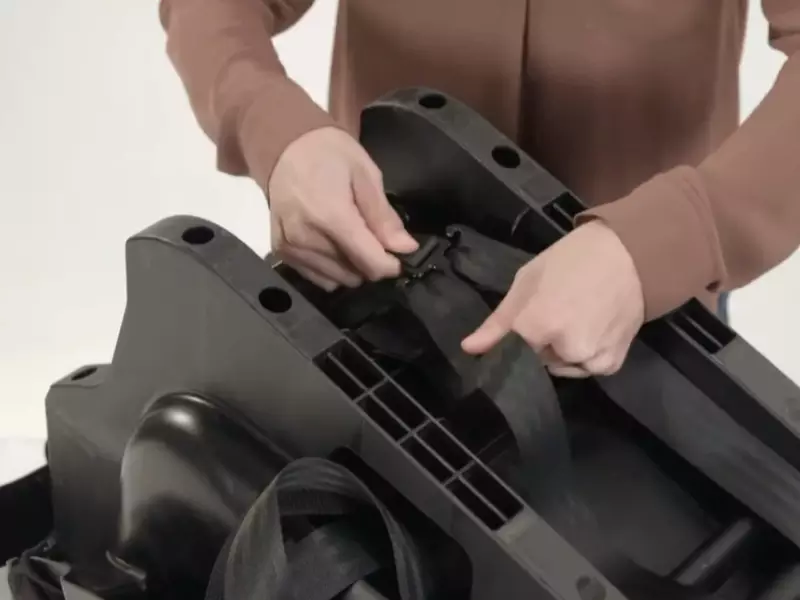
To use the lower anchor points, attach the LATCH connectors on the car seat to the corresponding vehicle anchor points. The connectors are usually located at the base of the car seat, and they consist of a hook or a buckle-like mechanism. Insert the connectors into the anchor points until you hear a satisfying click, indicating a secure connection. Ensure that the connectors are tightly attached without any visible slack or twisting.
Installing the top tether is equally important. Find the top tether anchor in your vehicle, typically located behind the vehicle’s seat or on the cargo area floor. Connect the top tether strap of the car seat to the anchor by threading it through the anchor point and pulling it tightly. This additional point of attachment enhances the stability and reduces forward movement of the car seat during a crash or sudden stop.
Proper installation of the car seat using the LATCH system
To ensure a proper installation of the car seat using the LATCH system, follow these steps:
- Read the car seat manufacturer’s instructions and the vehicle owner’s manual to familiarize yourself with the LATCH system and its specific installation requirements.
- Position the car seat in the desired seating position, ensuring a proper recline angle and facing direction according to the manufacturer’s guidelines.
- Locate the lower anchor points and the top tether anchor in your vehicle as explained in the previous section.
- Attach the lower anchor connectors to the anchor points by inserting them until they click securely into place. Check for any visible slack or twisting in the connectors.
- Thread the top tether strap through the top tether anchor point and pull it tightly to minimize any unnecessary movement.
- Apply firm pressure to the car seat and test its stability by shaking it from side to side and front to back. It should not move more than an inch in any direction.
- Verify that the car seat is securely installed by consulting the car seat manual and the vehicle’s owner’s manual.
Congratulations! You have successfully installed your Cosco car seat using the LATCH system. Remember, it is essential to follow the car seat manufacturer’s instructions and the vehicle owner’s manual for the best installation results. By utilizing the LATCH system correctly, you are taking a significant step towards ensuring your child’s safety during car journeys.
Installing A Rear-Facing Cosco Car Seat
Installing a rear-facing Cosco car seat is an essential step to ensure the safety of your little one during car rides. Rear-facing car seats are recommended for infants and toddlers by experts, as they provide the best protection in the event of a crash. In this guide, we will walk you through the process of properly installing a rear-facing Cosco car seat.
Positioning the car seat in the rear-facing mode
The first step in installing a rear-facing Cosco car seat is to find the optimal position in your vehicle’s backseat. It is crucial to check your vehicle’s owner manual for specific instructions regarding car seat placement. Once you’ve identified the ideal spot, proceed with the following steps:
- Place the car seat in the rear-facing position and ensure it is resting securely on the vehicle’s seat.
- Check that the car seat is centered on the seat, avoiding any contact with the vehicle’s doors or other objects.
- Make sure the car seat is positioned at the appropriate angle for your child’s age and weight. The Cosco car seat usually provides an angle indicator to help you determine the correct recline angle.
Adjusting the recline angle
Creating the correct recline angle for your rear-facing Cosco car seat is essential. The ideal recline angle is dictated by your child’s age, weight, and the specific guidelines provided by the car seat manufacturer. To adjust the recline angle:
- Refer to the car seat’s instruction manual to identify the recommended recline angle for your child.
- Use the recline adjustment feature provided by the car seat manufacturer to achieve the desired angle.
- Verify that the car seat is reclined within the acceptable range specified by the manufacturer.
Securing the car seat using the seatbelt or LATCH system
Once the rear-facing Cosco car seat is properly positioned and adjusted for recline, it’s time to secure it using either the seatbelt or the LATCH (Lower Anchors and Tethers for Children) system. Follow these steps to ensure a secure installation:
Using the seatbelt:
- Position the car seat on the vehicle’s seat and thread the seatbelt through the designated path in the car seat.
- Buckle the seatbelt and ensure it is pulled tight.
- Check for any excess seatbelt slack and remove it by pressing down firmly on the car seat while pulling the seatbelt tight.
- Verify that the car seat is tightly secured and does not move more than an inch in any direction.
Using the LATCH system:
- Locate the LATCH anchors in your vehicle’s backseat. These are usually identified by small plastic covers.
- Attach the LATCH connectors on the car seat to the LATCH anchors in your vehicle. Ensure each connector clicks securely into place.
- Press down firmly on the car seat to tighten the LATCH straps.
- Confirm that the car seat is firmly installed and does not move more than an inch in any direction.
By following these simple steps, you can confidently install a rear-facing Cosco car seat for your child’s safety and your peace of mind. Remember to consult the car seat’s instruction manual and your vehicle’s owner manual for specific guidance tailored to your particular model.
Installing A Forward-Facing Cosco Car Seat
When your child reaches the appropriate age and weight, it’s time to transition from a rear-facing to a forward-facing car seat. Installing a Cosco car seat in the forward-facing mode is a crucial step in ensuring your child’s safety while traveling. In this section, we will guide you through the process step by step, so you can have peace of mind knowing your child is secure.
Transitioning from rear-facing to forward-facing mode
Before proceeding with the installation, make sure your child meets the minimum size requirements for using a forward-facing car seat. Typically, this is around the age of two and a weight of at least 20 pounds. Refer to your car seat’s instruction manual for specific guidelines.
Here’s how to transition your Cosco car seat from rear-facing to forward-facing mode:
- Remove the car seat from the vehicle and detach the shoulder straps at the back of the car seat.
- Rotate the car seat to face forward, making sure it is securely locked in position.
- Reattach the shoulder straps by threading them through the appropriate slots designated for forward-facing mode.
- Adjust the car seat harness height to fit your child properly.
- It’s important to note that you should never use the car seat’s recline feature in the forward-facing mode. Keep the seat in an upright position to ensure your child’s safety.
Adjusting the car seat harness height
The harness height of your Cosco car seat needs to be adjusted to fit your child snugly and securely. Follow these steps to ensure proper harness height:
- Locate the harness slots at the back of the car seat.
- Unbuckle the car seat harness and remove your child from the seat.
- Reposition the shoulder straps into the suitable slots that align with your child’s shoulder height.
- Make sure the straps are not twisted and that they lie flat against your child’s chest.
- Buckle the harness and perform a pinch test. You should not be able to pinch any excess webbing after buckling.
Installing the car seat securely in the forward-facing mode
Now that you’ve transitioned your Cosco car seat and adjusted the harness height, it’s time to install it securely in the forward-facing mode. Follow these steps for a safe and secure installation:
- Place the car seat in the desired forward-facing position in your vehicle.
- Locate the lower anchors or seatbelt anchors, depending on your vehicle and car seat model.
- Attach the lower anchors or thread the seatbelt through the designated path according to your specific installation method.
- Tighten the lower anchors or secure the seatbelt until the car seat is firmly in place, with minimal side-to-side or forward-backward movement.
- Verify the stability of the installation by performing a final tug test on the car seat. It should not move more than one inch in any direction.
Remember, always double-check that all installation steps are followed correctly according to your Cosco car seat’s instruction manual. Regularly inspect the installation for any signs of loosening or wear and make adjustments if necessary.
Quick Tips For Easy Installation
Installing a Cosco car seat is an essential step in ensuring your child’s safety while traveling. However, the process can sometimes be confusing, especially for first-time parents. To help simplify the installation process, we have compiled some quick tips that will make the task a breeze. Remember to follow these steps carefully and always refer to your car seat manual for specific instructions.
Using a Locking Clip for Vehicles without Locking Seatbelts
If your vehicle does not have locking seatbelts, don’t worry. You can still safely install your Cosco car seat by using a locking clip. A locking clip is a small, metal device that helps secure the seatbelt and prevent it from loosening. Here’s how you can use a locking clip:
- Thread the seatbelt through the appropriate slots on the car seat.
- Buckle the seatbelt and adjust it snugly across the car seat.
- Locate the correct belt path on the car seat and slide the locking clip onto the seatbelt.
- Push the locking clip down as far as possible, ensuring a secure fit.
- To test if the seatbelt is securely locked, gently pull the shoulder belt to check for any movement. If there is minimal to no movement, your car seat is properly installed.
Regularly Checking the Car Seat for Recalls or Expiration Dates
Ensuring the safety of your child is a top priority, and one way to do this is by regularly checking your Cosco car seat for recalls or expiration dates. Car seats have an expiry date, typically around six years from the date of manufacture. To make this process easy, follow these steps:
- Locate the date of manufacture on your car seat. It is usually printed on a sticker or molded into the plastic.
- Visit the Cosco website or the National Highway Traffic Safety Administration (NHTSA) website to check for any recalls or safety notices related to your model.
- If your car seat is expired or subject to a recall, discontinue its use immediately and follow the manufacturer’s instructions for repair or replacement.
Seeking Professional Assistance if Unsure about Installation
While installing a Cosco car seat can be done by most parents, it is perfectly okay to seek professional assistance if you are unsure about the process. Car seat safety technicians have the necessary expertise and knowledge to ensure a secure installation. If you are unsure about any aspect, don’t hesitate to reach out to a certified technician. They will provide guidance and assist you in installing your car seat correctly.
By following these quick tips, you can streamline the installation process and have peace of mind knowing that your child is traveling safely and securely in their Cosco car seat.
Frequently Asked Questions For How To Install A Cosco Car Seat
How Do You Install A Cosco Forward Facing Car Seat?
To install a Cosco forward facing car seat, follow these steps:
1. Find the lower anchors or seat belt path in your car.
2. Position the car seat facing forward and secure it using either the lower anchors or the seat belt.
3. Adjust the seat’s recline angle if necessary.
4. Make sure the car seat is firmly installed by checking for minimal movement.
5. Fasten your child securely in the car seat using the harness straps and ensure that the chest clip is at armpit level.
Should Baby Seat Be Behind Driver Or Passenger?
The baby seat can be placed behind either the driver or passenger, depending on personal preference and safety guidelines.
How Do You Attach A Cosco Car Seat To A Stroller?
To attach a Cosco car seat to a stroller, follow these steps:
1. Ensure both products are compatible.
2. Locate the adapters on the stroller and the car seat.
3. Align and secure the car seat onto the adapters.
4. Double-check the attachment to ensure it is secure.
5. Confirm the connection by gently shaking the car seat.
How Do You Install A Car Seat Step By Step?
To install a car seat, follow these steps:
1. Read the car seat manual for specific instructions.
2. Position the seat in the backseat of the car.
3. Attach the seat using either the seat belt or LATCH system.
4. Tighten the straps and ensure a secure fit.
5. Check that the seat doesn’t move more than an inch in any direction.
Conclusion
Installing a Cosco car seat properly ensures the safety of your child while traveling. By following the step-by-step instructions discussed in this blog post, you can confidently install the car seat in a few simple steps. Remember to read the car seat manual thoroughly, secure the seat tightly, and regularly check for proper installation.
Now, you can embark on a worry-free journey with your little one, knowing that their safety is well taken care of.