To install a convertible top, first, remove the old top carefully, then position and attach the new top securely. A convertible top can be installed by following these steps.
Introducing a convertible top to your vehicle can provide a stylish and enjoyable driving experience. Whether you’re replacing an existing top or installing one for the first time, it’s essential to understand the process involved. In this guide, we will outline the necessary steps to ensure a successful installation.
By carefully removing the old top and securely attaching the new one, you can enjoy the open-air exhilaration of a convertible with ease. Follow these instructions to revitalize your vehicle and enjoy the perks of driving a convertible.
Preparing The Vehicle
When it comes to installing a convertible top, proper preparation is key to ensure a smooth and successful installation. Preparing the vehicle involves a few important steps, such as inspecting the convertible top, gathering the necessary tools and materials, and removing the existing convertible top. By following these steps, you’ll be well on your way to enjoying a brand-new top that looks great and functions perfectly.
Inspecting the Convertible Top
Before you start the installation process, it’s important to inspect the convertible top to identify any potential issues that may need to be addressed. Look for any tears, discoloration, or signs of wear and tear. Pay close attention to the seams and edges, as these areas are often more prone to damage.
If you notice any significant damage, it may be necessary to replace the entire top instead of attempting a repair. Inspecting the convertible top thoroughly will give you a better idea of what needs to be done and allow you to plan accordingly.
Gathering the Necessary Tools and Materials
Once you’ve inspected the convertible top and determined that it is in good enough condition for installation, the next step is to gather the necessary tools and materials. Having everything you need readily available will save you time and ensure you have a smooth installation process. Here are some of the tools and materials you’ll typically need for installing a convertible top:
| 1. | Screwdriver |
| 2. | Pliers |
| 3. | Tape measure |
| 4. | Trim removal tool |
| 5. | Socket set |
| 6. | Adhesive |
| 7. | Fabric cleaner |
| 8. | Convertible top material |
| 9. | Replacement hardware |
By having these tools and materials ready, you’ll be able to work efficiently and effectively during the installation process.
Removing the Existing Convertible Top
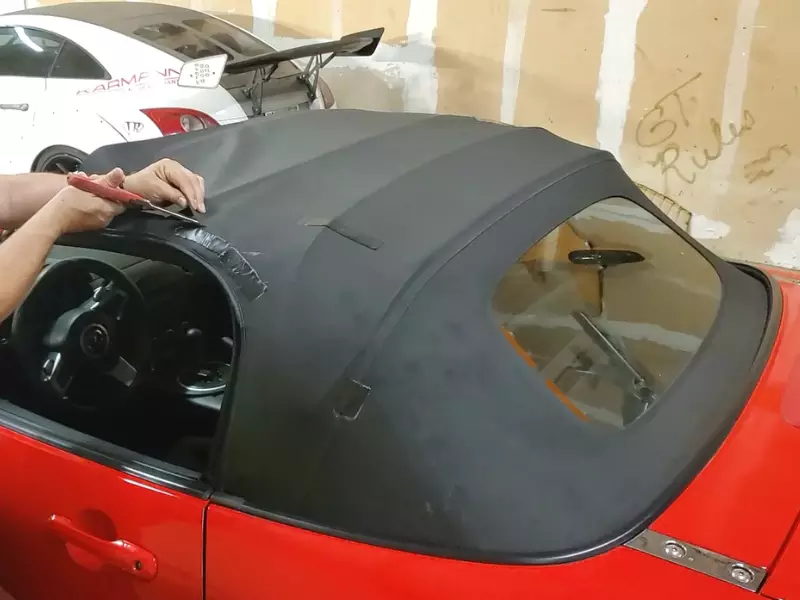
Before you can install a new convertible top, you’ll need to remove the existing one. This step requires careful and detailed work to ensure that you don’t damage any components of the vehicle. First, identify all the fasteners and hardware that are securing the top. Use a screwdriver or socket set to gradually remove them, taking note of their location for easy reference during the installation of the new top.
Once all the fasteners are removed, carefully detach the convertible top from the frame and lift it away from the vehicle. Be mindful of any electrical connections or components that may be attached to the top and remove them as necessary. Remember to store the old top in a safe place in case you need to reference it later.
Now that you have successfully prepared the vehicle by inspecting the convertible top, gathering the necessary tools and materials, and removing the existing top, you’re ready to move on to the next step of the installation process. Stay tuned for our next blog post on how to properly fit and secure the new convertible top.
Installing The New Convertible Top
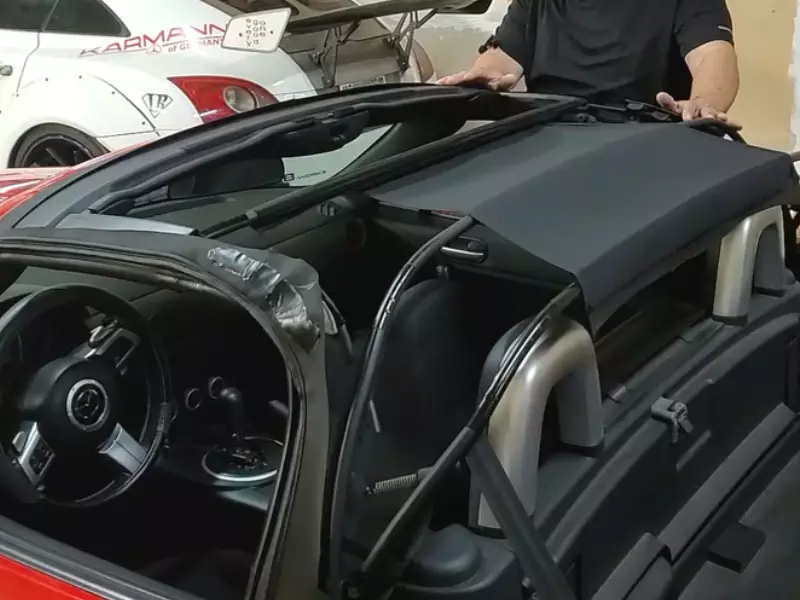
Fitting the Convertible Top Frame
Before installing the new convertible top, it’s crucial to ensure that the frame is properly fitted. Start by carefully examining the frame for any damage or worn-out parts that may hinder the installation process. Inspect the hinges, latches, and any other components to make sure they are in good working condition.
If you notice any issues with the frame, it’s recommended to replace or repair the damaged parts before proceeding with the installation. This will ensure a smooth and secure fit for the new convertible top.
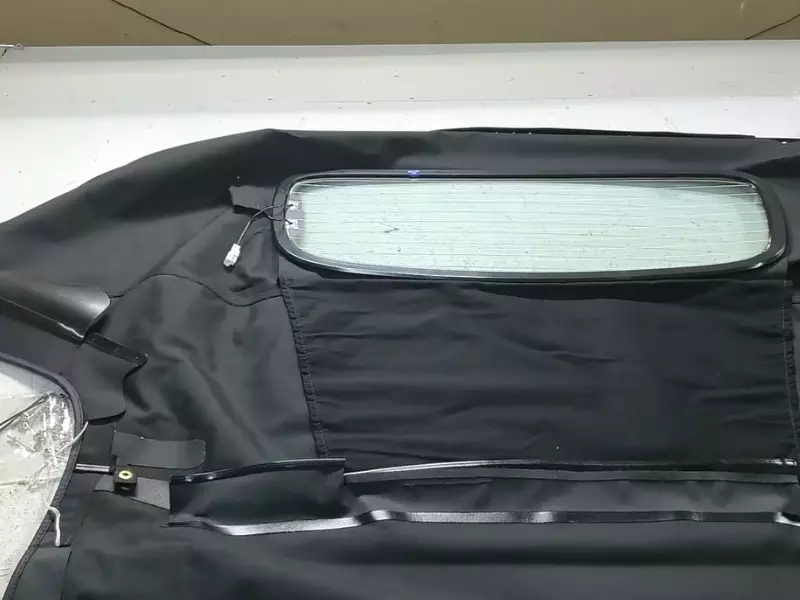
Securing the Convertible Top Fabric
Once the frame is ready, it’s time to secure the convertible top fabric onto the frame. Begin by laying the fabric over the frame, making sure it is properly aligned and centered. Take note of any seams or attachments that need to be matched with the corresponding sections on the frame.
Gradually stretch the fabric over the frame, starting from one side and working your way to the other. This will help prevent any wrinkles or unevenness in the fabric. Pay close attention to the corners and curves of the frame, ensuring that the fabric stays tight and properly fitted.
Installing the Convertible Top Weatherstripping
After securing the fabric, it’s important to install the convertible top weatherstripping. This will help seal the top and prevent any water leakage or air drafts. Begin by carefully laying the weatherstripping along the edges of the frame, making sure it lines up properly.
Depending on the type of weatherstripping, you may need to use adhesive or clips to secure it in place. Follow the manufacturer’s instructions for the specific type of weatherstripping you are using. Make sure to press firmly along the edges to ensure a tight seal.
Once the weatherstripping is installed, double-check the fabric to ensure it is still properly aligned and tight. Make any necessary adjustments, and then give the convertible top a final inspection to ensure everything is securely in place.
By following these steps, you can successfully install a new convertible top on your vehicle. Remember to take your time and pay attention to detail to achieve a professional and secure fit. Enjoy the open-air experience with your newly installed convertible top!
Finalizing The Installation
After carefully installing and securing the new convertible top onto your beloved car, it’s time to finalize the installation process. This crucial step ensures that the convertible top is properly aligned, adjusted, and fully functional. Let’s take a look at the essential tasks involved in finalizing the installation.
Aligning and Adjusting the Convertible Top
Proper alignment and adjustment of the convertible top are crucial for it to operate smoothly and look aesthetically pleasing. Here are the steps to follow:
- Start by closing the convertible top completely to allow access to the alignment points.
- Check the alignment of the top by examining the gaps along the edges. They should be consistent and even on both sides.
- If you find any alignment issues, use the manufacturer’s instructions to make the necessary adjustments. This may involve loosening or tightening specific bolts or adjusting the tension cables.
- Once you’ve made the adjustments, test the alignment by opening and closing the top several times. Ensure it opens and closes smoothly without any misalignments or binding.
- Repeat the adjustment process if needed until the convertible top aligns perfectly with the body of the car.
Testing the Convertible Top Movements
Now that your convertible top is aligned, it’s time to test its movements to ensure they are functioning correctly. Follow these steps:
- Open the convertible top and observe its movement. It should glide smoothly without any jerks or obstructions.
- During the opening and closing process, listen for unusual noises or creaks that could indicate a problem.
- Check the latches and locks to ensure they engage properly and securely when closing the top.
- If you encounter any issues, refer to the manufacturer’s instructions to troubleshoot and resolve them.
- Repeat the testing process until you are confident that the convertible top operates flawlessly.
Performing a Water Leak Test
A water leak can quickly ruin your driving experience and damage the interior of your car. To prevent this, perform a water leak test on your newly installed convertible top. Follow these steps:
- Thoroughly clean and dry the exterior of your car, paying special attention to the convertible top and its seals.
- Close the top securely and lock all the latches.
- Using a hose or a low-pressure water source, gently spray water over the convertible top.
- Inspect the interior of your car for any signs of water leaks.
- If you notice any leaks, identify the source and make the necessary adjustments or repairs to the seals.
- Repeat the water leak test until you are confident that the convertible top is completely watertight.
Congratulations! By aligning and adjusting the convertible top, testing its movements, and performing a water leak test, you have successfully finalized the installation. Enjoy the exhilarating experience of driving with your new convertible top, knowing that it has been installed with precision and attention to detail.
Frequently Asked Questions On How To Install A Convertible Top
Is It Hard To Install A Convertible Top?
Installing a convertible top can be challenging for some, but with proper guidance and instructions, it can be done. Following step-by-step instructions and having some mechanical knowledge can help make the installation process easier. It is recommended to consult a professional or refer to the car’s manual for specific instructions.
Can You Replace A Convertible Top By Yourself?
Yes, you can replace a convertible top by yourself. With proper tools and instructions, it is doable. However, it requires skill and patience, so it’s recommended to seek professional assistance for a successful replacement.
How Much Does It Cost To Put A Convertible Top On A Car?
The cost of installing a convertible top on a car varies depending on factors like the make and model of the vehicle. It’s best to contact a professional car shop for an accurate quote.
What Do You Glue A Convertible Top With?
You can use adhesive specifically designed for convertible tops to ensure a secure bond.
Conclusion
Installing a convertible top may seem daunting at first, but with the right guidance and a little patience, anyone can accomplish this task. By following these step-by-step instructions, you can transform your vehicle and enjoy the freedom of open-air driving.
Remember to gather all the necessary tools and materials, educate yourself about the specific requirements of your car, and take your time throughout the process. Happy top-down driving!