To install a CB antenna, mount the antenna in a suitable location on your vehicle, such as the roof or fender, and secure it with the necessary brackets and connections. When it comes to installing a CB antenna, there are a few key steps you need to follow.
Mounting the antenna on a suitable location, such as the roof or fender of your vehicle, is essential. Once mounted, secure the antenna using the necessary brackets and connections. By following these steps, you can ensure a successful installation and enjoy clear communication while using your CB radio.
Things To Consider Before Installation
Installing a CB antenna requires careful consideration to ensure optimal performance and functionality. Before beginning the installation process, there are a few important factors that you should contemplate. By taking these considerations into account, you can ensure that your CB antenna installation is a success.
Choosing the Right Location for Your CB Antenna
One of the most crucial aspects of CB antenna installation is selecting the right location for it. The placement of your antenna can significantly impact its effectiveness. A good location for your CB antenna is one that ensures maximum range and minimal interference.
Here are a few factors to consider when choosing the location:
- The height of the antenna should be sufficient to allow for optimal transmission and reception.
- Away from obstructions such as buildings, trees, or metal structures that can interfere with the signal.
- Avoid mounting the antenna near sources of electrical interference, such as power lines or other electronic devices.
- Ensure that the antenna is placed in an area with a clear line of sight for better signal reception.
Ensuring Proper Grounding for Optimal Performance
In order to achieve optimal performance with your CB antenna, proper grounding is essential. Grounding helps to protect your equipment from static discharge and can improve signal reception.
Here are a few tips for ensuring proper grounding:
- Use a high-quality grounding wire to connect the CB antenna mount to a solid ground point, such as the vehicle chassis.
- Clean the grounding point to remove any paint or rust that may interfere with the grounding process.
- Securely fasten the grounding wire to the ground point to ensure a reliable connection.
- Regularly check the grounding connections for any signs of corrosion or damage.
Determining Mounting Options for Your CB Antenna
The choice of mounting options can significantly impact the performance and longevity of your CB antenna. There are various mounting options available, each with its own advantages and considerations.
Consider the following mounting options:
- Roof Mounting: Provides excellent signal reception and is ideal for vehicles with a large roof area.
- Mirror Mounting: Attaches the antenna to the side mirror bracket, offering a convenient and secure mounting solution.
- Bumper Mounting: A practical option for trucks and SUVs, allowing for easy installation on the front or rear bumper.
- Magnet Mounting: Perfect for temporary installations, such as rental vehicles, as it utilizes a strong magnet to secure the antenna to the vehicle’s roof.
Before deciding on a mounting option, consider the specific requirements of your vehicle and your personal preferences.
By considering these factors before installing your CB antenna, you can ensure that it is positioned for optimal performance and durability. Choosing the right location, ensuring proper grounding, and determining the best mounting option are essential steps to take in order to enjoy clear and reliable communication on your CB radio.
Gathering The Necessary Tools And Materials
Gathering the necessary tools and materials is the first step in installing a CB antenna. Having the right equipment before you begin will help ensure a smooth installation process and proper functionality of your antenna system. Below, we outline the essential tools and materials you’ll need to gather before getting started.
Antenna Mount
The antenna mount is a crucial component for securing your CB antenna to your vehicle. It serves as a sturdy foundation and ensures the antenna stays in place while you’re on the road. Depending on your vehicle’s make and model, you may need a specific type of mount. Common options include roof mounts, mirror mounts, and bumper mounts. It’s important to choose a mount that is compatible with your vehicle and offers a secure and stable attachment point for your CB antenna.
Coaxial Cable
The coaxial cable is responsible for transmitting the CB radio signals between your antenna and the CB radio itself. It’s important to select a high-quality coaxial cable that is suitable for outdoor use and has low signal loss. The standard type of coaxial cable used for CB antennas is RG-58 or RG-8X. Make sure to choose a cable that is long enough to reach from the antenna mount to your CB radio without any extra slack.
SWR Meter
An SWR (Standing Wave Ratio) meter is an essential tool for properly tuning your CB antenna. It helps you measure the SWR of your antenna system and make adjustments to optimize performance. An SWR meter allows you to adjust the antenna’s length or perform other necessary tweaks to achieve the lowest SWR possible, which will result in better signal transmission and reception.
Wrenches and Screwdrivers
Depending on the type of antenna mount you’ve chosen, you’ll likely need wrenches and screwdrivers to secure it in place. These tools will help you tighten bolts and screws, ensuring a secure and stable installation. It’s important to have a set of wrenches and screwdrivers in various sizes to accommodate different mounting hardware.
Electrical Tape or Heat Shrink Tubing
To protect your connections from moisture and ensure long-term durability, it’s essential to have electrical tape or heat shrink tubing. These materials are used to cover and seal the connections between the coaxial cable and the antenna, as well as the connections between the cable and the CB radio. Electrical tape provides an easy and flexible option, while heat shrink tubing offers a more secure and waterproof seal.
By gathering all these necessary tools and materials, you’ll be well-prepared to install your CB antenna successfully. Remember to carefully follow the manufacturer’s instructions for your specific antenna and mount to ensure a proper and reliable installation.
Installing The Cb Antenna Components
Installing a CB antenna is a crucial step in setting up a powerful and reliable communication system. The antenna components play a vital role in ensuring clear reception and transmission of signals. In this section, we will guide you through the process of attaching the mounting bracket to your vehicle, connecting the antenna mast to the mounting bracket, and securing the coaxial cable to the antenna mast.
Attaching the Mounting Bracket to Your Vehicle
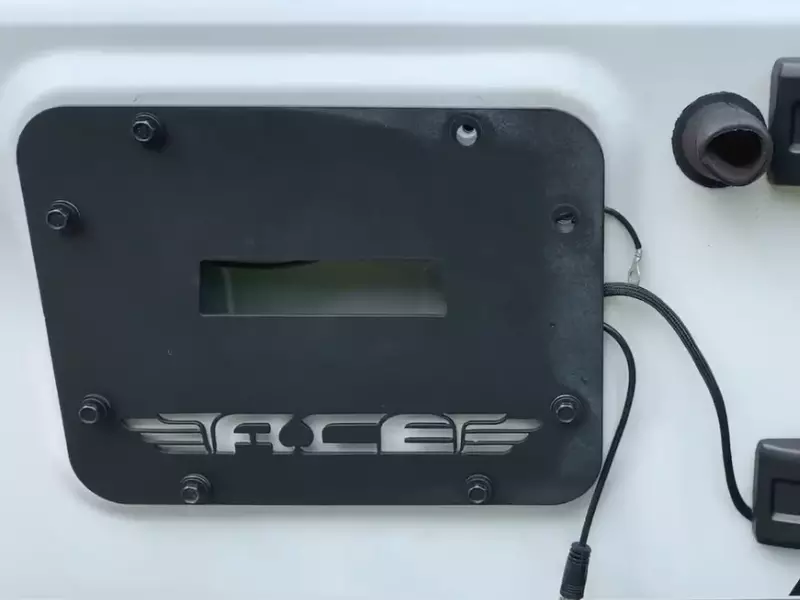
Before you start installing the CB antenna, it’s crucial to find the perfect spot on your vehicle to attach the mounting bracket. Look for a point that has a strong metal surface and is relatively free from obstructions. Here’s how you can attach the mounting bracket:
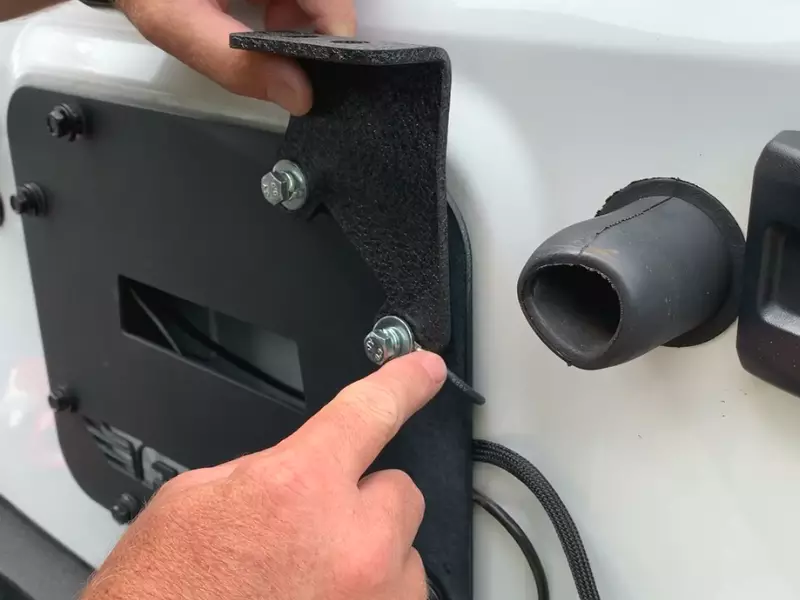
- Using a screwdriver or a drill, carefully align the mounting bracket holes with the chosen spot on your vehicle.
- Insert the screws provided with the mounting kit into the holes and tighten them securely. Ensure that the bracket is firmly attached to the vehicle’s surface.
Connecting the Antenna Mast to the Mounting Bracket
After successfully attaching the mounting bracket, it’s time to connect the antenna mast. The mast is the vertical rod on which the antenna is mounted. Follow these steps to connect the antenna mast:
- Slide the bottom end of the antenna mast into the mounting bracket’s tube.
- Align the holes present at the bottom part of the mast with the holes on the mounting bracket.
- Insert the cotter pin through the holes, ensuring that it passes through both the mast and the mounting bracket. This will secure the antenna mast to the mounting bracket, preventing it from shifting during use.
Securing the Coaxial Cable to the Antenna Mast
The coaxial cable is the key element that connects your CB radio to the antenna. It’s important to secure it properly to ensure optimal signal quality. Here’s how you can do it:
- Using zip ties or adhesive clips, fasten the coaxial cable along the antenna mast.
- Make sure the cable is taut and free from any obstructions or potential damage.
- At the top of the mast, carefully attach the connector of the coaxial cable to the antenna connector, ensuring a snug and secure fit.
By following these steps, you can successfully install the CB antenna components. Remember to double-check all connections and ensure that the antenna is stable before hitting the road. A well-installed CB antenna will enhance your communication capabilities and provide a reliable means of staying connected on your journeys.
Routing And Connecting The Coaxial Cable
Installing a CB antenna requires proper routing and connecting of the coaxial cable to ensure optimal signal quality and efficient performance. In this section, we will discuss how to identify the best route for the coaxial cable, run it from the antenna to the CB radio, and properly connect it to ensure a secure and reliable connection.
Identifying the Best Route for the Coaxial Cable
Before beginning the installation process, it is important to identify the best route for the coaxial cable. This will ensure that the cable is out of the way and free from any potential obstructions or interference. Here are some tips to help you with this:
- Choose a route that minimizes the cable’s exposure to sharp edges or hot surfaces to avoid any damage that may compromise the signal quality.
- Keep the cable away from any sources of electrical interference, such as power cables or ignition systems, to prevent signal distortion.
- If possible, route the cable through existing holes or openings in the vehicle to maintain a neat and professional installation.
By following these guidelines, you can ensure that the coaxial cable is correctly routed for optimal signal performance.
Running the Coaxial Cable from the Antenna to the CB Radio
Now that you have identified the best route for the coaxial cable, it’s time to run the cable from the antenna to the CB radio. This process involves routing the cable through the vehicle’s interior and ensuring a secure and hidden installation. Follow these steps to do it right:
- Start by locating a suitable entry point on the vehicle where the coaxial cable can safely pass from the exterior to the interior.
- Carefully feed the cable through the entry point, taking care not to damage the insulation or shielding.
- Route the cable along the designated path, securing it with cable ties or clips to prevent any sagging or movement.
- Avoid routing the cable near sources of heat or sharp objects that could potentially damage the cable.
- Continue routing the cable towards the CB radio, keeping it hidden from view and securing it along the way.
By following these steps, you can ensure a clean and secure installation of the coaxial cable from the antenna to the CB radio.
Properly Connecting the Coaxial Cable to the CB Radio
Once you have successfully routed the coaxial cable to the CB radio, it’s time to properly connect it to establish a strong and reliable connection. Here’s how you can do it:
- Locate the antenna input on the CB radio, typically labeled as “ANT” or “ANTENNA”.
- Ensure that the connection point on the CB radio is clean and free from any dirt or debris that may affect the signal quality.
- Take the connector at the end of the coaxial cable and firmly push it into the antenna input on the CB radio.
- Rotate the connector clockwise until it is securely fastened, making sure not to overtighten it.
With the coaxial cable properly connected to the CB radio, you can now enjoy optimal signal reception and transmission.
Grounding And Tuning The CB Antenna
When it comes to installing a CB antenna, ensuring proper grounding and tuning is crucial for optimal performance. This step-by-step guide will walk you through the process of grounding and tuning your CB antenna to ensure effective transmission and reception.
Ensuring Proper Grounding for Effective Performance
Proper grounding is essential for the effective performance of your CB antenna. Without proper grounding, your antenna may not function optimally and may lead to poor transmission or reception. To ensure proper grounding, follow these steps:
- Select a suitable grounding location: Choose a spot on your vehicle’s chassis that is clean, free from rust, and close to your antenna mount. This location will serve as the grounding point for your antenna system.
- Prepare the mounting location: Using sandpaper or a wire brush, remove any paint, rust, or debris from the chosen grounding spot. This will ensure a solid and conductive connection for your antenna.
- Attach the grounding wire: Securely attach a copper grounding wire to the grounding spot using a bolt or a screw. Ensure that the wire is tightly connected to the metal surface to create a strong electrical bond.
- Route the grounding wire: Carefully route the grounding wire from the grounding spot to the CB radio’s ground terminal. Use zip ties or adhesive clips to keep the wire tidy and free from any obstructions.
Adjusting the Antenna’s Standing Wave Ratio (SWR)
The Standing Wave Ratio (SWR) is a measure of how well your antenna is matched to your CB radio. A high SWR can lead to poor transmission and potential damage to your radio. Follow these steps to adjust the antenna’s SWR:
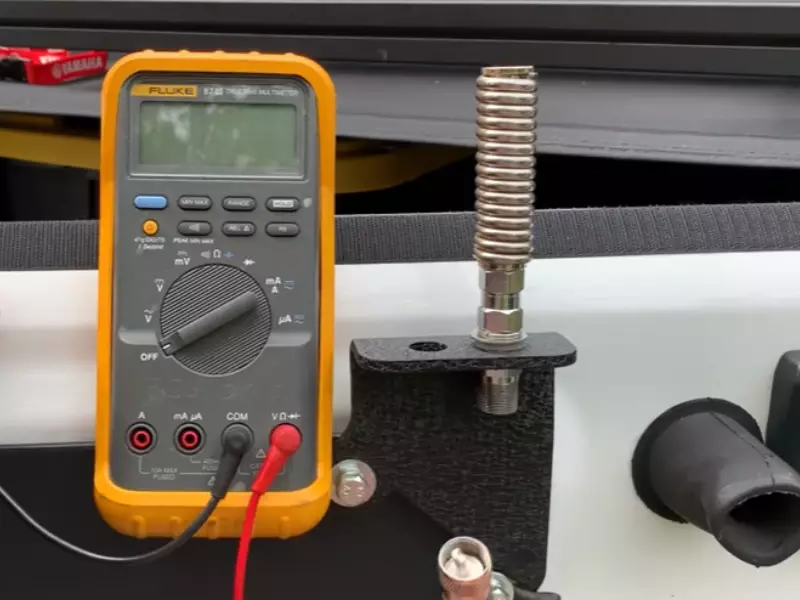
- Set up your SWR meter: Connect the SWR meter between your CB radio and antenna. Ensure that the meter is properly calibrated according to the manufacturer’s instructions.
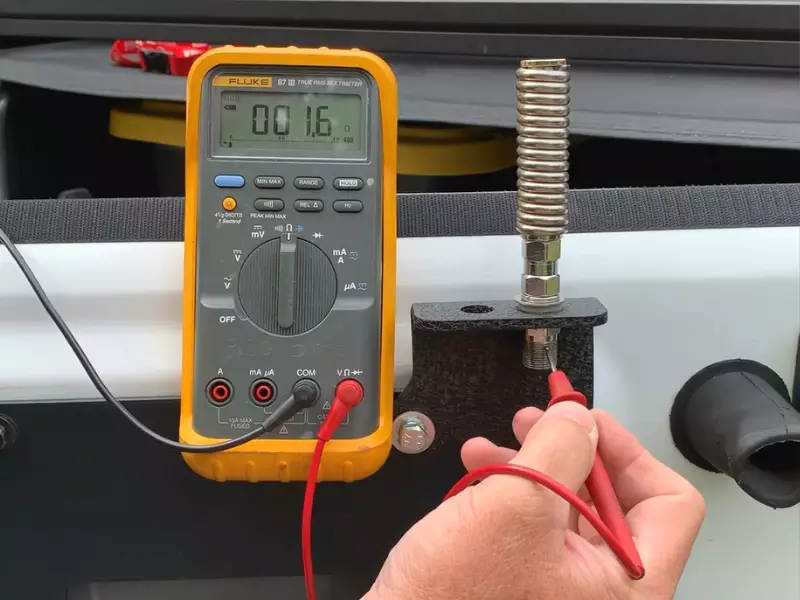
- Check the initial SWR reading: Transmit a signal while monitoring the SWR meter. Take note of the initial SWR reading.
- Adjust the antenna length: If the initial SWR reading is high, you will need to adjust the length of your CB antenna. Typically, a shorter antenna length will decrease the SWR, while a longer length will increase it. Refer to your antenna’s instruction manual for specific adjustment instructions.
- Repeat the process: Make small adjustments to the antenna length and check the SWR reading again. Repeat this process until you achieve the desired SWR reading within an acceptable range.
Fine-tuning the SWR for Optimal Transmissions
After achieving an acceptable SWR reading, it’s important to fine-tune it for optimal transmissions. Follow these steps for fine-tuning the SWR:
- Choose a channel for tuning: Select the center frequency channel, usually channel 19 (27.185 MHz), for fine-tuning the SWR.
- Adjust the antenna length: Make small adjustments to the antenna length while monitoring the SWR meter. Fine-tune the length to achieve the lowest SWR reading possible on the chosen channel.
- Repeat the process: Check the SWR reading on other channels to ensure that it remains within an acceptable range. Make any necessary adjustments to achieve consistent SWR readings across different channels.
By following these steps for grounding and tuning your CB antenna, you can ensure effective performance and optimal transmission and reception. Proper grounding will provide a solid foundation for your antenna system while adjusting the SWR will fine-tune your antenna for the best possible transmission.
Testing And Troubleshooting
Once you have successfully installed your CB antenna, it’s important to test and troubleshoot your setup to ensure optimal performance. This step is crucial as it allows you to verify the quality of your installation, identify any potential issues, and address any signal interruptions or interference that may arise.
Conducting a SWR Test to Verify Installation Quality
A Standing Wave Ratio (SWR) test is essential in determining the efficiency and correctness of your CB antenna installation. This test measures the amount of power reflected back from the antenna, indicating potential issues and adjusting accordingly to achieve optimal performance.
To conduct a SWR test, follow these steps:
- Start by tuning your CB radio to channel 1, the lowest frequency available.
- Ensure the antenna’s coaxial cable is properly connected to the radio.
- Choose an external SWR meter compatible with your radio and connect it between the radio and the antenna.
- Tune the meter to the frequency of channel 1.
- While holding the microphone key, adjust the SWR meter to the “FWD” or “REF” setting.
- Take note of the SWR reading displayed on the meter.
- Repeat the process for channel 19, the highest frequency used for CB communication, and record the SWR reading.
- Compare the SWR readings with the ideal range of 1.5 or below for an optimal installation. If the readings are higher, adjustments are necessary.
Troubleshooting Common CB Antenna Installation Issues
During the installation process, certain challenges may arise that can impact the performance of your CB antenna. By troubleshooting these common issues, you can identify the problem and implement the appropriate solutions. Some typical problems include:
| Issue | Possible Cause | Solution |
|---|---|---|
| Poor signal reception | Incorrect antenna or cable connection | Re-check and secure all connections, ensuring proper grounding |
| Excessive static or noise | Metal interference or poor grounding | Reposition the antenna away from metal objects or ground it properly |
| Low SWR readings | Short or open circuit in the antenna system | Inspect and replace any damaged or faulty components in the antenna system |
Addressing Interference and Signal Interruptions
Interference from other electronic devices or environmental factors can cause signal interruptions and degrade the performance of your CB antenna. To address these issues, consider the following:
- Identify potential sources of interference, such as power lines, fluorescent lights, or nearby transmitters.
- Reposition your antenna to minimize the impact of these interferences.
- Install a noise filter or ground loop isolator to reduce electromagnetic interference.
- If nearby transmitters are causing issues, adjust your antenna’s direction or consider using a directional antenna.
By conducting regular tests, troubleshooting common installation issues, and addressing interference, you can optimize your CB antenna’s performance for clear and reliable communication. Remember, a well-installed and properly maintained antenna is crucial for a successful CB radio experience.
Finalizing The Installation
Congratulations! You’ve completed the major steps of installing your CB antenna and now it’s time to finalize the installation. This last phase involves securing loose cables and components, weatherproofing the antenna connection points, and taking a test drive to ensure the antenna is functioning properly.
Securing Loose Cables and Components
Before hitting the road, it’s crucial to secure all the cables and components of your CB antenna to prevent any potential damage or interference. Take a few minutes to inspect the installation area and make sure everything is tightly fastened and in its proper place.
If you notice any loose cables, use zip ties or cable clamps to neatly bundle them together and attach them securely to the vehicle’s body. This helps to minimize cable movement and ensures a stable connection. Additionally, check all the connection points and tighten them as necessary to avoid any signal loss.
Weatherproofing the Antenna Connection Points
While CB antennas are built to withstand various weather conditions, it’s still important to take steps to weatherproof the antenna connection points. Moisture and debris can cause corrosion and weaken the signal, so protecting these areas is crucial for optimal performance.
One way to weatherproof the antenna connection points is by applying a corrosion inhibitor or dielectric grease. This helps to seal and protect the connectors from moisture and contaminants. Apply a small amount to each connection point using a clean cloth or a disposable brush.
Another effective method is to use self-amalgamating tape, which creates a watertight seal around the connections. Simply wrap the tape tightly around the connection points, ensuring full coverage and a snug fit. This extra layer of protection can significantly extend the lifespan of your antenna.
Taking a Test Drive to Test the Antenna’s Functionality
Now that you have secured the connections and weatherproofed the antenna, it’s time to put it to the test. Take a short test drive to ensure that everything is working smoothly and that you are getting clear reception.
Tune your CB radio to a channel with regular activity and listen for any unwanted noise, static, or weak signals. If you encounter any issues, double-check the connections and adjustments to eliminate any potential problems.
During the test drive, pay attention to the antenna’s performance while driving at different speeds and in various terrains. This will help you evaluate its performance under real-world conditions and identify any adjustments that may be needed.
Remember, the proper installation and finalization of your CB antenna are essential for optimal performance and communication. By securing loose cables and components, weatherproofing the antenna connections, and taking a test drive to test functionality, you’ll ensure a smooth and reliable CB experience on the road.
Frequently Asked Questions Of How To Install A Cb Antenna
How Should A Cb Antenna Be Mounted?
To mount a CB antenna: choose a location on your vehicle’s roof, bumper, or trunk; ensure a metal ground plane beneath the antenna; use a sturdy antenna mount that fits the specific antenna type; secure the mount tightly; and connect the antenna to the CB radio with appropriate coaxial cable.
Does A Cb Antenna Mount Need To Be Grounded?
Yes, a CB antenna mount needs to be grounded. Grounding ensures proper functioning, reduces interference, and provides safety by directing excess electrical energy away from the antenna. It helps improve signal quality and protects equipment from damage.
Where Is The Best Place To Mount A Cb Antenna?
The best place to mount a CB antenna is on the roof of your vehicle. This location provides optimal signal strength and range for effective communication. Avoid mounting near metal or reflective surfaces to prevent interference.
Does Cb Antenna Have To Be Mounted On Metal?
Yes, a CB antenna needs to be mounted on a metal surface for better reception and performance.
Conclusion
Installing a CB antenna can greatly enhance your communication experience on the road. By following the step-by-step guide provided in this blog post, you will have the knowledge and confidence to complete the installation process successfully. Remember to choose the right location, ensure proper grounding, and connect all the necessary components.
With a properly installed CB antenna, you’ll be ready to enjoy clear and reliable communication while driving. Safe travels!