To install a car window, start by cleaning the window frame and removing any debris. Then, apply adhesive to the window frame and carefully position the new window in place.
Preparing For The Installation
Before installing a new car window, it is essential to properly prepare the area to ensure a smooth and successful installation. This involves gathering the necessary tools and materials, removing any existing window tint (if applicable), and cleaning the window frame and glass surface. Let’s go through each step in detail.
Gather the necessary tools and materials
Before you begin the installation process, it’s important to have all the tools and materials required. Here is a list of what you’ll need:
| Tools | Materials |
| Protective gloves | New car window |
| Tape measure | Window cleaner |
| Masking tape | Lint-free cloth |
| Razor blade or utility knife | Primer (if required) |
| Screwdriver or socket set | Adhesive or sealant |
| Plastic scraper | Painter’s tape |
Make sure you have all the items listed above on hand before you start working on the installation. It will help ensure a smoother process and save you from any unnecessary interruptions.
Remove any existing window tint (if applicable)
If your car’s window already has tint applied to it, it needs to be removed before installing the new window. Follow these steps to remove the window tint:
- Start by spraying the window tint with soapy water. This will help soften the adhesive.
- Using a razor blade or utility knife, gently scrape off the tint. Be careful not to scratch the glass surface.
- If the tint is stubborn, you can use a handheld steamer or heat gun to further soften the adhesive.
- Once the tint is removed, clean the glass surface thoroughly with a lint-free cloth and window cleaner.
Removing the tint ensures a clean and even surface for the new window installation.
Clean the window frame and glass surface
Prior to installing the new car window, it’s essential to clean both the window frame and the glass surface. This will help ensure proper adhesion and a secure fit. Follow these steps:
- Start by using a plastic scraper to remove any dirt or debris from the window frame.
- Next, clean the frame and glass surface with a lint-free cloth and window cleaner.
- Pay close attention to the edges and corners of the frame, ensuring all dust and grime are removed.
- If the window frame has any rust or corrosion, address it before installation. Sand the affected area and apply a rust inhibitor if necessary.
By thoroughly cleaning the window frame and glass surface, you’ll create an optimal environment for the new window installation.
Following these steps will help you prepare for the installation of a car window. Gathering the necessary tools and materials, removing any existing window tint, and cleaning the window frame and glass surface are crucial steps to ensure a successful and hassle-free installation.
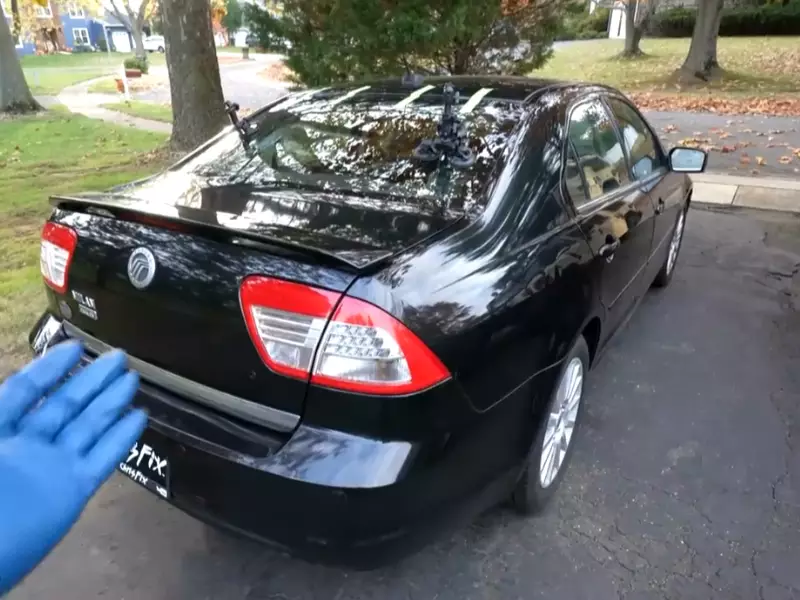
Removing The Old Window
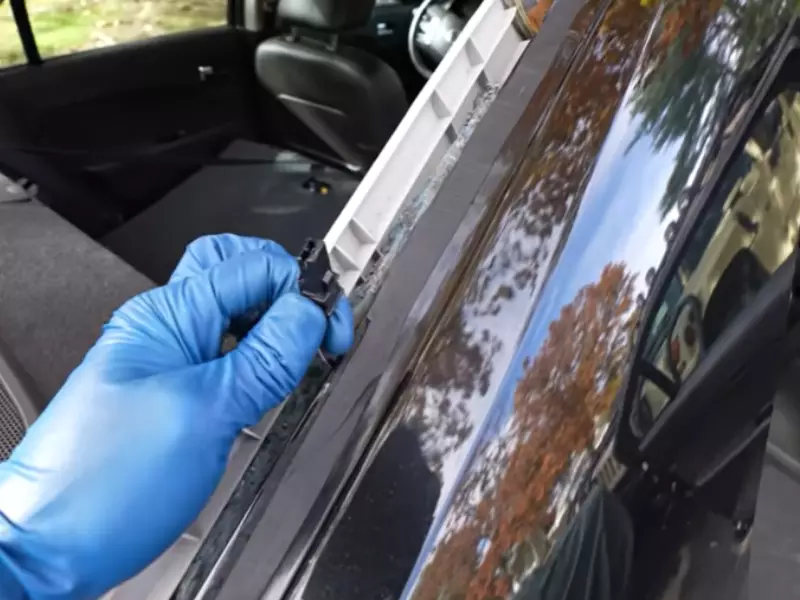
Safely remove the door panel
Before you can remove the old car window, you need to safely remove the door panel. This step is crucial to access the window hardware and wiring. Follow these steps to remove the door panel:
- Start by locating the screws or clips that attach the door panel to the door frame. These are usually situated near the edges of the panel.
- Once you find the screws, use a screwdriver to remove them. If there are clips, gently pry them off using a trim tool or a flathead screwdriver.
- Slowly and carefully pull the door panel away from the frame, ensuring not to force it. There may be connectors attached to the panel, so check for any wires or cables that need to be disconnected.
- If there are electrical connectors, carefully detach them by pressing the small release tab and pulling the connector apart. Keep in mind the specific locations of each connector for reassembly later.
- Once all connectors are disconnected, remove the door panel completely and set it aside in a safe place until you are ready to reinstall it.
Disconnect any electrical components (such as power windows)
To proceed with removing the old car window, you must disconnect any electrical components, such as power windows. This step ensures the safety of both the window and the car’s electrical system. Follow these steps to disconnect electrical components:
- Locate the power window switch panel on the door panel or armrest. This panel usually has one or more buttons or switches for controlling the window.
- Carefully pry off the power window switch panel using a trim tool or a flathead screwdriver. Be gentle to avoid damaging the panel or the surrounding area.
- Once the panel is removed, you will see electrical connectors attached to the back. Disconnect each connector by pressing the release tab and pulling the connector apart.
- After disconnecting all electrical connectors, set the power window switch panel aside in a secure place, making sure not to misplace any screws or clips.
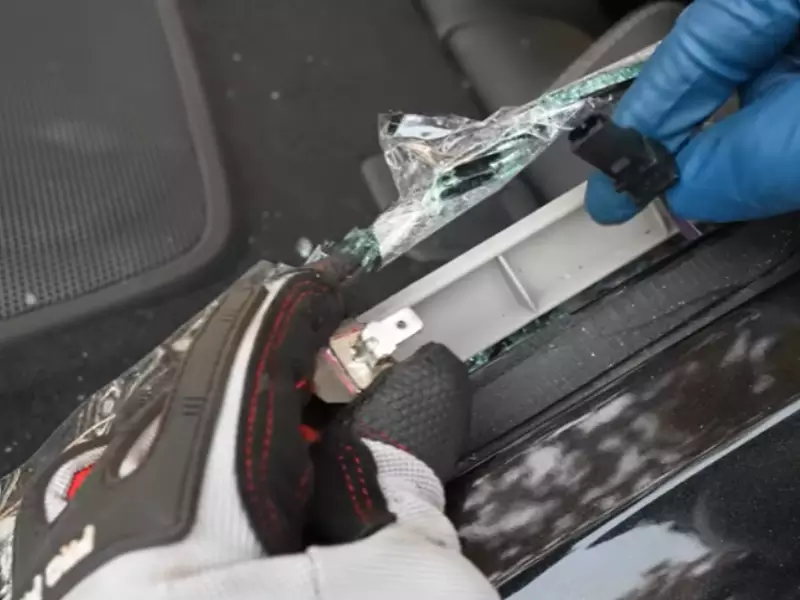
Remove any remaining glass or adhesive residue
Before installing the new car window, it is essential to remove any remaining glass or adhesive residue left from the old window. This step ensures a clean and smooth surface for the new window to be installed properly. Follow these steps to remove any remaining glass or adhesive residue:
- Wear protective gloves and goggles to prevent injuries while handling glass remnants.
- Carefully remove any large pieces of broken glass using gloved hands or pliers. Be cautious not to cut yourself during this process.
- Use a plastic scraper or a razor blade with a glass cleaner to remove any adhesive residue on the window frame. Gently scrape the residue, ensuring not to damage the frame surface.
- Wipe the window frame with a clean cloth or paper towel to remove any remaining residue or debris.
- Inspect the window frame thoroughly to ensure all glass and adhesive residue have been removed. The frame should be clean and smooth before proceeding.
Installing The New Window
Once you have prepared the old window frame for removal, it’s time to install the new window. This process requires careful attention to detail to ensure a proper fit and secure placement. Follow these steps to successfully install your new car window.
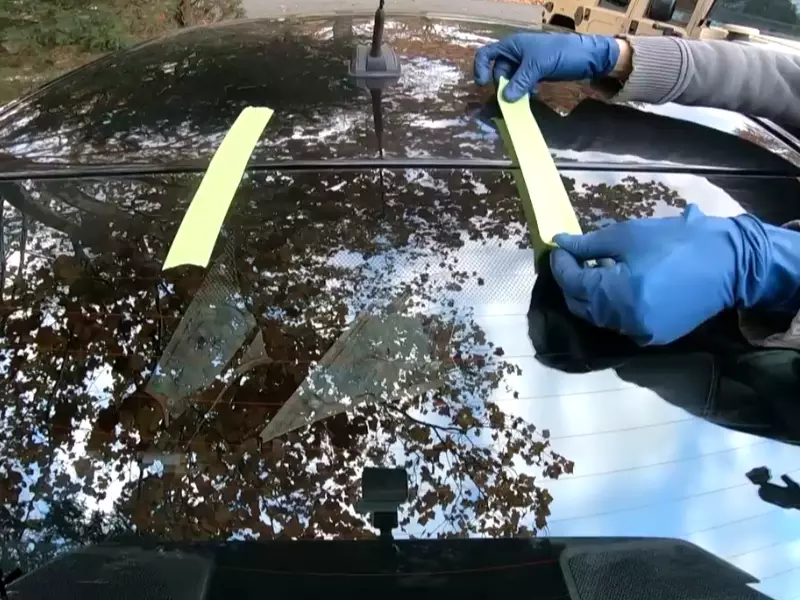
Prepare the new window for installation
Before you begin the installation process, take a few moments to prepare the new window. Inspect it for any damage or defects, ensuring it is free from cracks or chips. Additionally, clean the glass thoroughly to remove any fingerprints or debris that could affect the adhesive’s performance.
Apply adhesive to the window frame
Once the new window is ready, apply adhesive to the window frame. Using a high-quality automotive adhesive is essential for ensuring a strong bond. Squeeze a generous amount of adhesive onto the frame, focusing on the areas where the glass will make contact. Be sure to follow the manufacturer’s instructions for the adhesive application and curing time.
Carefully place the new window into the frame
- With the adhesive applied, it’s time to carefully place the new window into the frame. Make sure you have a firm grip on the window, as it can be heavy and fragile.Align the edges of the window with the frame and slowly lower it into position. Take your time to ensure a precise fit, avoiding any unnecessary jostling or force that could damage the glass or compromise the adhesive bond.
- As you place the window into the frame, ensure that each side of the frame properly adheres to the adhesive.
- Press firmly on the edges of the window to help create a strong bond and seal. If your vehicle has any weatherstripping or rubber seals around the window, make sure they align properly and are not interfering with the installation.
- Once the window is in place, clean up any excess adhesive that may have squeezed out from the edges. Be careful not to smear the adhesive onto the glass surface.
- Allow the adhesive to cure fully according to the manufacturer’s instructions before operating the window. This will ensure that the bond is strong and secure.
Congratulations! You have successfully installed a new car window. Remember, if you are unsure about any step of the installation process, it is always recommended to consult a professional for assistance or guidance.
Securing The Window
Securing the window is a crucial step in the car window installation process. After reconnecting any electrical components and ensuring proper alignment and fit, you need to secure the window in place by reinstalling the door panel. Follow these steps to successfully secure the window:
Reconnect any electrical components
Before securing the window, it is essential to reconnect any electrical components that were disconnected during the removal process. This includes reconnecting the power window switch, door lock switch, and any other electrical connections specific to your vehicle. Check the owner’s manual or consult a professional if you are unsure about the proper connections.
Ensure proper alignment and fit
Proper alignment and fit are vital to ensure the window operates smoothly and seamlessly. Double-check the alignment by gently sliding the window up and down to ensure it fits perfectly within the window frame. Adjust as necessary to avoid any obstructions or misalignment that could impede the window’s performance.
Secure the window in place by reinstalling the door panel
Now that the electrical components are reconnected and the window is properly aligned, it’s time to secure the window in place by reinstalling the door panel. Follow these steps:
- Line up the door panel with the door frame, making sure all the clips and screws align correctly.
- Apply gentle pressure to the door panel, ensuring it is securely attached.
- Reinsert and tighten all screws and bolts that hold the door panel in place. Refer to your vehicle’s manual for specific screw and bolt locations.
- If applicable, reconnect any wiring harnesses and cables that were disconnected earlier.
- Test the window by operating the power window switch to ensure it moves freely and without any issues.
Once the window is securely in place, and you’ve verified that it functions correctly, congratulations! You have successfully installed a new car window. Remember to clean the window thoroughly and remove any adhesive residue before completing the installation process. Enjoy the clear view and improved functionality of your newly installed window!
Testing And Finishing Touches
Once you have successfully installed a car window, it is important to perform a series of tests to ensure that it is operating smoothly. In addition to testing, there are also a few finishing touches you can add to enhance the overall look and functionality of the window. In this section, we will explore the steps for testing the window for proper operation, cleaning the new window, and applying window tint if desired.
Test the window for proper operation
Before considering the window installation complete, it is essential to test its functionality. Follow these steps to ensure that the window operates smoothly:
- Roll up and down: Using the window switch, roll the window up and down several times. Pay close attention to any unusual sounds or resistance during operation.
- Check alignment: Make sure the window aligns properly with the window frame when closed. Ensure it sits flush and does not rattle.
- Test auto feature (if applicable): If your car has an auto feature for the window, test it to confirm that the window automatically rolls up all the way when fully closed.
- Ensure proper sealing: Verify that the window creates a tight seal when closed. Run your hand along the edges to check for any gaps or air leaks.
By performing these tests, you can be confident that the newly installed window is functioning as it should.
Clean the new window
After installing a car window, it is common to find some dirt, fingerprints, or adhesive residue on the glass surface. To give your window a flawless finish, follow these cleaning steps:
- Use a glass cleaner: Spray a suitable glass cleaner onto a lint-free cloth or paper towel. Avoid using abrasive cleaners or materials that may scratch the glass.
- Gently wipe the surface: Starting from the top, wipe the glass surface in a horizontal motion. Apply slight pressure to remove any dirt or residue.
- Repeat if necessary: If there are still smudges or streaks, repeat the cleaning process using a fresh cloth or paper towel.
- Inspect for cleanliness: After cleaning, inspect the window thoroughly. Ensure there are no remaining spots or streaks, as they can obstruct visibility.
Following these steps will leave your new car window crystal clear and free from any imperfections.
Apply window tint (if desired)
If you prefer added privacy or want to protect your car’s interior from harmful UV rays, you may choose to apply window tint to your newly installed window. Here’s how to do it:
- Gather the necessary materials: You will need window tint film, a spray bottle filled with a soapy water solution, a squeegee, and a sharp knife or blade.
- Clean the window: Ensure the window is clean and free from any debris or dirt.
- Measure and cut the tint film: Measure the dimensions of the window and cut the tint film slightly larger to allow for trimming.
- Wet the window: Spray the outside of the window thoroughly with the soapy water solution.
- Apply the tint film: Peel the backing off the tint film and carefully apply it to the wet window surface. Use the squeegee to smooth out any wrinkles or air bubbles.
- Trim the excess film: Using a sharp knife or blade, trim the excess tint film along the edges of the window.
- Let it dry: Allow the tint film to dry completely before rolling down the window or touching it.
Adding window tint can not only enhance the aesthetics of your car but also provide numerous benefits such as heat reduction and protection against harmful UV rays.
Troubleshooting Common Issues
Installing a car window may seem like a straightforward task, but sometimes complications arise that can leave you scratching your head. In this section, we’ll be addressing some common issues that may occur during the installation process. By acquainting yourself with these troubleshooting techniques, you’ll be better prepared to tackle any challenges that come your way.
Window not operating smoothly
If you find that your newly installed car window is not operating as smoothly as it should be, there may be a few underlying causes. Let’s take a look at some possible solutions:
- Inspect the window track for any debris or obstructions that may be hindering smooth movement. Remove any dirt, dust, or foreign objects that you find.
- Check the window regulator for any signs of damage or wear. A faulty or worn-out regulator can cause the window to operate unevenly. If necessary, replace the regulator.
- Ensure that the window motor is functioning properly. Use a multimeter to test the motor’s voltage and check for any signs of malfunction. If the motor is faulty, it may need to be replaced.
- Finally, lubricate the window track and moving parts with a silicone-based lubricant. This can help improve the overall smoothness of the window’s operation.
Window alignment issues
Proper alignment is key to the successful installation of a car window. If you encounter alignment issues, consider the following troubleshooting steps:
- Check the window guide rail for any signs of damage or misalignment. If necessary, adjust or replace the guide rail to ensure proper alignment.
- Inspect the window regulator for any signs of misalignment or damage. If the regulator is not aligned correctly, it may need to be adjusted or replaced.
- Ensure that the window glass is properly seated within the window frame. Adjust the glass as needed to achieve proper alignment.
- Finally, double-check the mounting hardware to ensure that it is secure and properly tightened. Loose or improperly installed hardware can cause alignment issues.
Adhesive not properly bonding
When installing a car window, it is crucial that the adhesive bonds securely to the vehicle. If you’re experiencing issues with the adhesive not properly bonding, try the following troubleshooting steps:
- Ensure that the surface of the window frame is clean and free from any dirt, dust, or debris. Use a window cleaner or rubbing alcohol to thoroughly clean the area before applying the adhesive.
- Check the temperature and humidity conditions. Adhesive bonding is optimal within certain temperature and humidity ranges. Make sure the conditions are suitable for the adhesive to cure effectively.
- Apply even pressure to the window after installing it. This will help ensure proper bonding between the glass and the adhesive. You can use clamps or tape to hold the window in place while the adhesive cures.
- If all else fails, consider using a different adhesive or seeking professional assistance. Sometimes, certain adhesives may not work well with specific types of glass or window frames.
Troubleshooting common issues during the installation of a car window can help save you time and frustration. By following these tips, you’ll be better equipped to handle any challenges that may arise, ensuring a successful and smooth installation process.
Frequently Asked Questions On How To Install A Car Window
Can I Install My Own Car Window?
Yes, you can install your own car window by following proper guidelines and being cautious. It’s important to gather the necessary tools and materials, carefully remove the old window, clean the area, and properly install the new window. However, it is recommended to seek professional help for a safe and effective installation.
How Do You Put A Car Window Back Up?
To put a car window back up, simply follow these steps:
- Locate the window control panel near the driver’s seat.
- Press the button or switch that corresponds to the specific window.
- Hold the button or switch until the window reaches the desired position.
- Release the button or switch to stop the window at the desired height.
- Check if the window is securely closed and functioning properly.
How Long Does It Take To Install A Side Car Window?
It typically takes about 1-2 hours to install a side car window.
How Long Does It Take To Put A Back Window In A Car?
It typically takes about 1-2 hours to install a back window in a car.
Conclusion
Installing a car window may seem daunting, but with the right steps and tools, you can do it yourself. From preparing the window frame to carefully fitting the glass, following a systematic approach ensures a successful installation. Remember to take safety precautions, and seek professional help if needed.
By installing a car window confidently, you can save money and gain a sense of accomplishment. So, go ahead, take it slow, and enjoy the satisfaction of completing this task on your own!