To install a car thermostat, begin by locating the thermostat housing. Then, remove the housing and old thermostat, and install a new thermostat and gasket.
Gather The Necessary Tools And Supplies
Before you begin installing a car thermostat, it’s important to gather all the necessary tools and supplies. Having everything on hand before you start will ensure a smooth and efficient installation process. Here is a list of tools and supplies required for the installation process:
List of tools and supplies required for the installation process:
- Socket set
- Ratchet
- Extension bar
- Flathead screwdriver
- Phillips head screwdriver
- Pliers
- Shop towels
- New thermostat
- New gasket
- Antifreeze coolant
- Bucket or drain pan
- Funnel
- Owner’s manual
Step-by-step instructions on how to gather all the necessary items:
1. Locate and identify the tools:
Go through your toolbox to ensure that you have all the required tools. Check for a socket set, ratchet, extension bar, flathead screwdriver, Phillips head screwdriver, and pliers. If any of these tools are missing, consider borrowing or purchasing them to have everything ready for the installation.
2. Purchase any missing tools or supplies:
If you find that some tools or supplies are missing from your collection, it’s important to purchase them before starting the installation process. Consider visiting your local auto parts store or checking online retailers to acquire any missing items, such as a new thermostat, gasket, or antifreeze coolant.
3. Prepare a workspace:
Before you gather all the necessary items, it’s crucial to prepare a suitable workspace. Find a well-lit and spacious area in your garage or driveway where you can comfortably work on your car. Clear any clutter or obstacles that might hinder your progress, ensuring a clean and safe environment to complete the installation.
4. Collect the remaining supplies:
Next, gather the remaining supplies required for the installation. This includes shop towels to clean any spills or leaks, antifreeze coolant to refill the system, a bucket or drain pan to collect the old coolant, and a funnel to pour in the new coolant. Check your owner’s manual if you’re unsure about the coolant type recommended for your specific vehicle.
By following these step-by-step instructions, you can easily gather all the necessary tools and supplies required for installing a car thermostat. Having everything ready before you begin will save you time and ensure a successful installation process.
How To Select The Correct Thermostat For Your Car
Key Factors to Consider When Choosing a Car Thermostat
When it comes to selecting the correct thermostat for your car, there are several key factors you need to consider. The right thermostat can ensure optimal engine performance, efficient fuel consumption, and help prevent overheating issues. To help you make an informed decision, here are some important factors to keep in mind:
- Temperature Range: The temperature range of the thermostat is crucial as it determines when the valve opens and closes. It’s important to choose a thermostat that matches the temperature range recommended by your vehicle manufacturer to ensure proper cooling system operation.
- Engine Compatibility: Different engines have different cooling system requirements. Make sure to select a thermostat that is specifically designed for your vehicle’s make, model, and engine type to ensure a perfect fit and optimal performance.
- Thermostat Type: There are two main types of thermostats – mechanical and electronic. Mechanical thermostats use a wax element to sense engine temperature and open or close the valve accordingly. Electronic thermostats, on the other hand, use sensors and an electric motor to control the valve. Consider your car’s specifications and choose the thermostat type that is most suitable for your vehicle.
- Brand and Quality: It’s always a good idea to choose a thermostat from a reputable brand known for manufacturing high-quality automotive parts. Investing in a reliable and durable thermostat will ensure better performance and longevity.
- Price: While it’s important to consider your budget, it’s also crucial to remember that a thermostat is a crucial component of your car’s cooling system. Opting for a cheaper, low-quality thermostat may lead to engine problems in the long run. Find a balance between affordability and quality to make the best choice for your vehicle.
Tips on Selecting the Compatible Thermostat for Your Vehicle
When selecting a compatible thermostat for your vehicle, follow these tips to ensure a smooth installation process and optimal functioning:
- Consult Your Vehicle’s Manual: Start by referring to your vehicle’s manual or consult with a trusted mechanic to understand the specific thermostat requirements for your car. The manual will provide valuable information regarding the recommended temperature range and other specifications.
- Research and Compare: Do some research online and compare different thermostats available in the market. Look for customer reviews, ratings, and recommendations to gauge their performance and reliability. This research will help you make an informed decision.
- Consider OEM Thermostats: Original Equipment Manufacturer (OEM) thermostats are specifically designed to match the specifications of your vehicle. While they may be slightly more expensive, OEM thermostats ensure a perfect fit and optimal performance.
- Seek Professional Advice: If you’re unsure about which thermostat to choose or how to install it, don’t hesitate to seek professional advice. A certified mechanic can guide you through the selection process, recommend the right thermostat, and even assist with the installation if needed.
By considering these key factors and following these tips, you’ll be able to select the correct thermostat for your car, ensuring efficient cooling system operation and prolonged engine life.
Step-By-Step Guide To Installing A Car Thermostat
Installing a car thermostat is an important part of ensuring your vehicle’s cooling system functions properly. Over time, thermostats can become worn out or stuck, leading to overheating issues. In this step-by-step guide, we will walk you through the process of installing a new car thermostat, helping you keep your engine cool and running efficiently.
Preparing the car for installation
Before you begin the installation process, make sure your vehicle is parked on a level surface and the engine has cooled down. This will help ensure your safety and prevent any potential injuries.
Draining the coolant
The first step is to drain the coolant from your vehicle’s cooling system. Place a collection pan underneath the radiator drain plug and remove it using a wrench. Allow the coolant to completely drain into the pan. Remember to dispose of the old coolant properly.
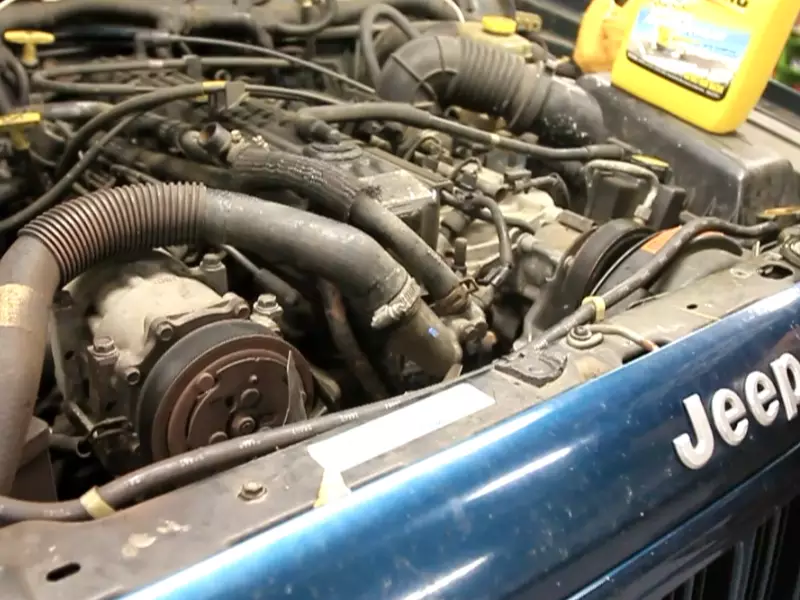
Locating the thermostat housing
Next, you will need to locate the thermostat housing. Consult your vehicle’s owner manual to find out its exact location. Typically, the housing is located near the engine block and can be identified by its shape and size.
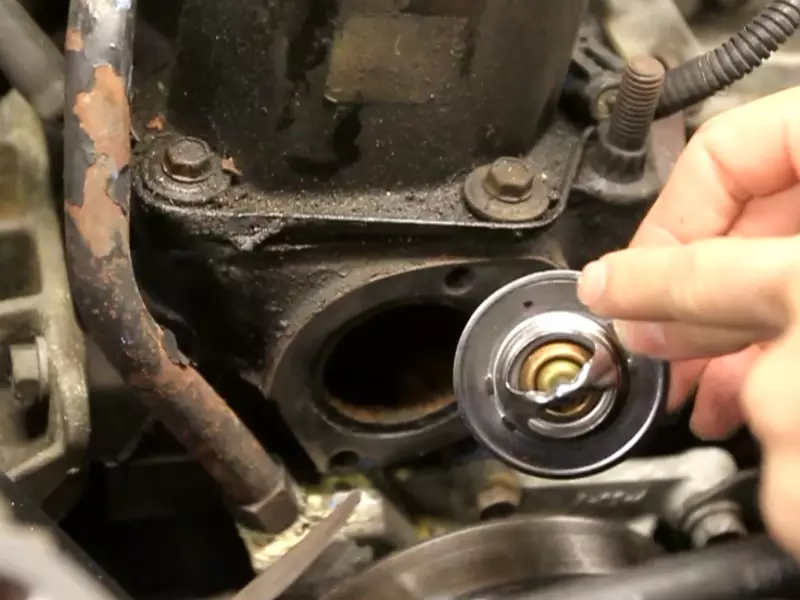
Removing the old thermostat
Using a wrench or socket set, carefully remove the bolts that secure the thermostat housing cover in place. Gently lift off the cover to reveal the old thermostat.
Taking out the old thermostat
Remove the old thermostat from its housing. Take note of its orientation to ensure the new thermostat is installed correctly.
Installing the new thermostat
It’s now time to install the new thermostat. Place the new thermostat in the housing, making sure it is correctly aligned and seated securely.
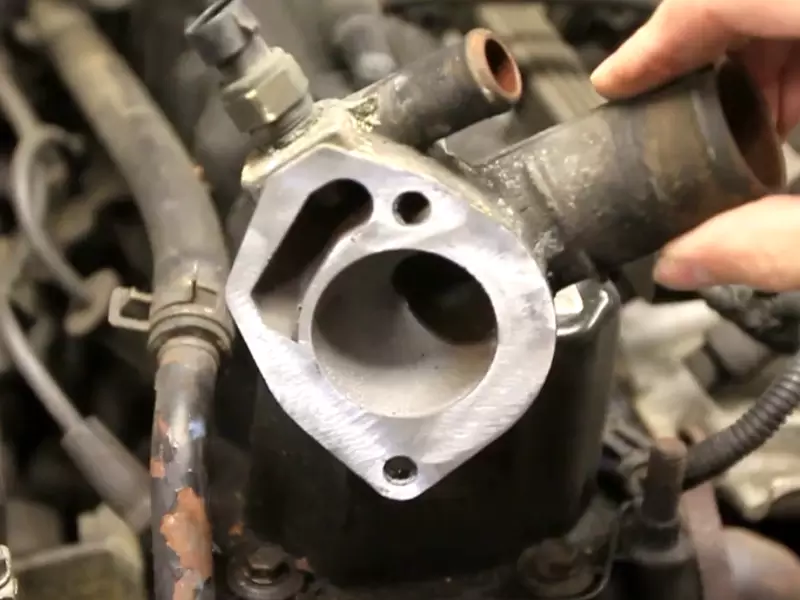
Cleaning the housing and adding sealant
Before reassembling the thermostat housing, clean the surfaces to ensure a proper seal. You can use a scraper or a clean cloth to remove any debris or old gasket material. Apply a thin layer of automotive sealant to both sides of the new thermostat gasket.
Placing the new thermostat in position
Carefully place the new thermostat back into the housing, aligning it with the mounting holes. Make sure it sits flush and in the correct orientation.
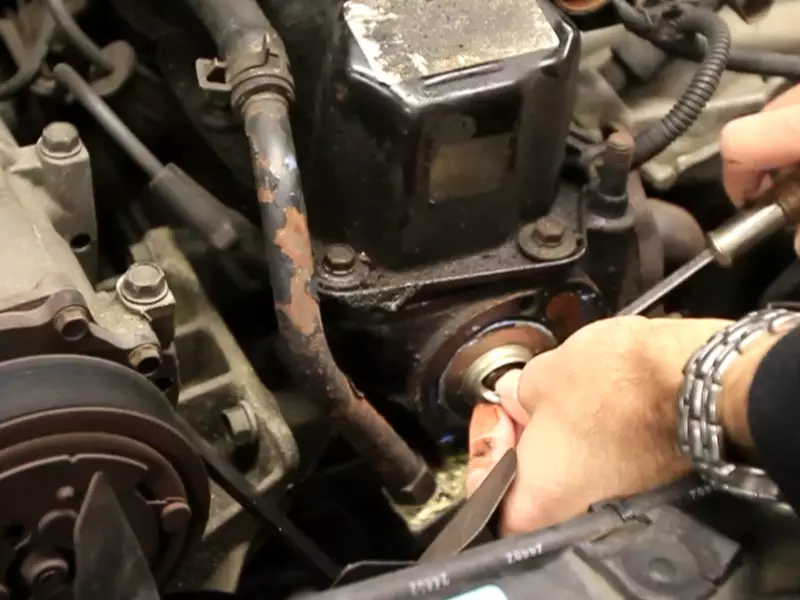
Reassembling the thermostat housing
Once the thermostat is in place, reattach the housing cover. Use a torque wrench to tighten the bolts securely. Refer to your vehicle’s specifications for the correct torque values.
Refilling the coolant
Now it’s time to refill the cooling system with fresh coolant. Slowly pour the appropriate coolant mixture into the radiator until it reaches the recommended level. Remember to use the coolant recommended by your vehicle’s manufacturer.
Bleeding the air out of the cooling system
To ensure the cooling system functions properly, it’s important to bleed out any trapped air. Start your engine and let it run for a few minutes, allowing the coolant to circulate. Open the bleeder valve(s) if present, and close them once a steady stream of coolant is observed.
By following this step-by-step guide, you can confidently install a new car thermostat, improving the efficiency and performance of your cooling system. Regular maintenance and timely thermostat replacements will prevent overheating and keep your engine running smoothly for years to come.
Testing The Thermostat And Finishing Up
Checking for leaks and proper functioning
Before you finish up the installation process, it’s important to check for leaks and ensure that the thermostat is functioning correctly. This step is crucial to make sure that the engine is operating at the optimal temperature and that there are no issues that could lead to overheating or other problems down the line.
To check for leaks, start by visually inspecting the thermostat housing and the surrounding area for any signs of coolant leakage. Look for any puddles or stains that could indicate a problem. Additionally, you can use a pressure tester to pressurize the cooling system and check for any leaks under pressure.
Once you’ve confirmed that there are no leaks, it’s time to ensure that the thermostat is functioning correctly. Start by running the engine and letting it reach its operating temperature. Use a thermometer to check the temperature of the upper radiator hose. It should gradually warm up and then suddenly get hot when the thermostat opens. This indicates that the thermostat is functioning properly.
Ensuring the thermostat is functioning correctly
In addition to the temperature test, another way to ensure the thermostat is functioning correctly is by performing a flow test. This can be done by removing the thermostat and placing it in a pot of boiling water. The thermostat should open fully at the specified temperature. If it doesn’t, it’s recommended to replace the thermostat to avoid any future issues with engine temperature regulation.
Once you’re satisfied with the thermostat’s performance and have confirmed that there are no leaks, it’s time to move on to the final steps of the installation process.
Final steps to complete the installation process
To complete the installation process, follow these final steps:
- Reinstall the thermostat housing and tighten the bolts or screws to the manufacturer’s specifications. Be careful not to overtighten, as this could damage the housing.
- Reconnect any hoses or components that were disconnected during the installation process. Ensure that all connections are secure.
- Refill the cooling system with the appropriate type and amount of coolant. Refer to your vehicle’s manual or consult a professional to determine the correct coolant specifications for your car.
- Bleed the cooling system to remove any air pockets. This can be done by running the engine with the radiator cap off and the heater set to the highest temperature. As the engine warms up, air bubbles may be released from the open radiator neck. Once steady coolant flow is observed, replace the radiator cap.
- Start the engine and let it run for a few minutes to ensure everything is functioning properly. Monitor the temperature gauge and look for any signs of leaks or abnormalities.
By following these final steps, you can complete the installation of a car thermostat with confidence, knowing that you’ve tested its functionality and ensured proper functioning. Now you can hit the road with peace of mind, knowing that your engine’s temperature is being regulated accurately and efficiently.
Frequently Asked Questions For How To Install A Car Thermostat
What Is The Correct Way To Install A Car Thermostat?
To install a car thermostat correctly, follow these steps: 1. Turn off the engine and let it cool down. 2. Locate the thermostat housing. 3. Remove the old thermostat and clean the surface. 4. Install the new thermostat and gasket. 5.
Reinstall the housing, fill the coolant, and start the engine.
Can I Replace Car Thermostat Myself?
Yes, you can replace the car thermostat yourself. It is a relatively simple task that you can do with basic tools. Just make sure to follow a step-by-step guide or watch a tutorial for your specific car model. Always exercise caution and consult your car’s manual for any specific instructions.
Is Changing A Car Thermostat Hard?
Changing a car thermostat is not difficult. It can be done with basic mechanical knowledge and tools. However, it’s important to follow the manufacturer’s instructions and take necessary precautions.
How Long Does It Take To Change A Thermostat In A Car?
Changing a thermostat in a car typically takes around 1-2 hours. The process involves draining coolant, removing the old thermostat, and installing the new one.
Conclusion
To sum up, installing a car thermostat is a simple process that can be done with just a few basic tools. By following the step-by-step instructions provided in this blog post, you can ensure that your car’s engine stays at the optimal temperature for efficient and safe operation.
Remember to always consult your car’s manual for specific instructions and seek professional help if needed. With a properly functioning thermostat, you can enjoy a smoother and more reliable driving experience.