To install a car starter, first, disconnect the negative battery cable, then remove the old starter by disconnecting the wires and removing the mounting bolts. (19 words) Installing a car starter can be a straightforward process if you follow the right steps.
In this guide, we will explain how to safely install a car starter in your vehicle. Whether you’re replacing a faulty starter or upgrading to a new one, this article will provide you with a step-by-step guide to get the job done efficiently.
By the end, you’ll have a clear understanding of the installation process and the tools required to ensure a smooth and successful installation. So, let’s get started with this informative guide on how to install a car starter.
Getting Started
Installing a car starter can greatly enhance your driving experience, especially during those cold winter mornings when the engine seems reluctant to start. Not only does it provide the luxury of warming up your vehicle before getting in, but it also ensures a smoother ignition process, prolonging the life of your engine. Before you dive into the installation process, it’s important to gather the necessary tools and materials, understand the importance of a car starter, and take some safety precautions to ensure a successful and accident-free installation.
Tools and Materials Needed
To install a car starter, you’ll need the following tools and materials:
| Tools | Materials |
|
|
Importance of a Car Starter
A car starter plays a crucial role in the overall functioning of your vehicle. Whether you have a manual or automatic transmission, the starter is responsible for initiating the engine’s combustion process. Without a reliable starter, you would need to manually crank the engine, which can be time-consuming and physically draining.
Additionally, a faulty starter can lead to repeated engine failures, increased fuel consumption, and damage to other engine components. By installing a car starter, you ensure a swift and hassle-free ignition every time you start your vehicle, no matter the weather conditions.
Safety Precautions
Before you begin the installation process, it’s essential to take the following safety precautions:
- Disconnect the battery: Before working on any electrical components, always disconnect the negative terminal of the battery to prevent accidental shocks or circuit short-circuits.
- Wear insulated gloves: Protect your hands from potential electrical shocks by wearing insulated gloves throughout the installation process.
- Identify and test fuses: Locate the fuses related to the starter system and use a fuse tester to ensure they are in proper working condition. Replace any blown fuses before proceeding.
- Inspect wiring carefully: Examine the wiring connections and insulation for any signs of wear, damage, or corrosion. Replace or repair as necessary to ensure a secure and reliable connection.
- Refer to manufacturer instructions: Always consult the car starter kit’s manufacturer instructions for specific safety guidelines and installation steps to follow.
By adhering to these safety precautions, you can minimize the risk of accidents and ensure a smoother and safer installation process.
Preparing For Installation
Before you start installing a car starter, it is crucial to prepare yourself and your vehicle for the installation process. This involves disconnecting the battery, locating the car starter, and understanding the wiring system. By following these steps, you’ll be well-prepared to install a car starter efficiently and safely.
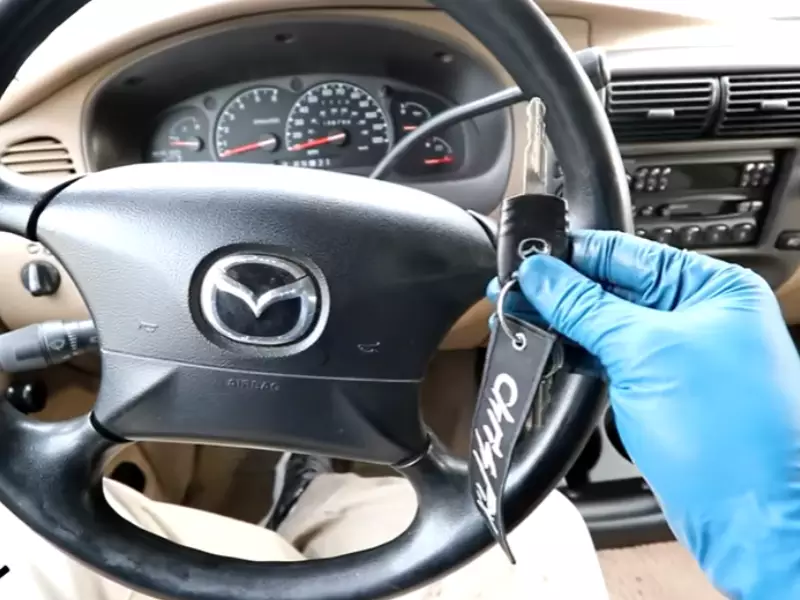
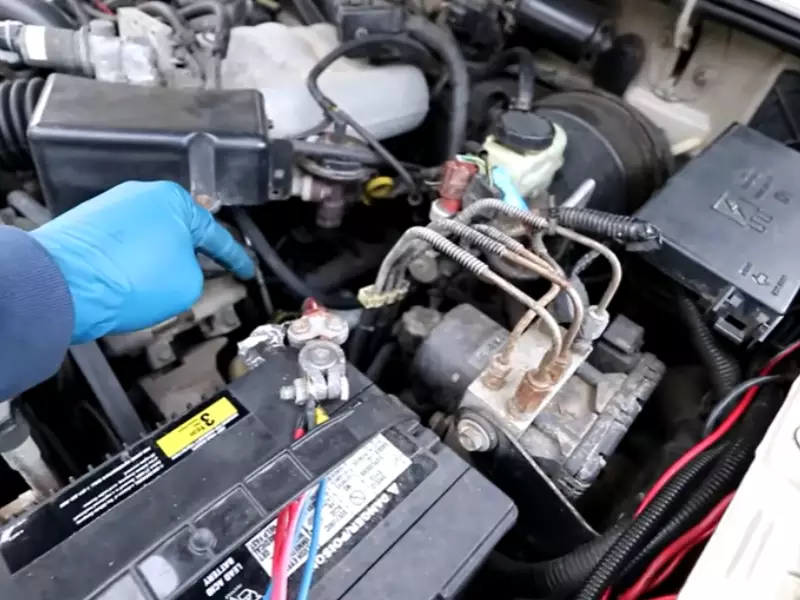
Disconnecting the Battery
Before you begin working on your car’s electrical system, your first step is to disconnect the battery. This is an important safety measure and helps prevent any accidental electrical shocks or damages during the installation process. To disconnect the battery:
- Park your vehicle in a safe area and engage the parking brake to ensure it doesn’t move.
- Open the hood and locate the battery, which is usually situated in the engine bay. It is typically enclosed in a rectangular battery tray.
- Identify the negative (-) terminal and use a wrench to loosen the nut securing the negative cable clamp.
- Once loosened, carefully lift the negative cable clamp off the battery terminal.
- Repeat the same process for the positive (+) cable clamp. Ensure that both clamps are kept away from the battery terminals.
Locating the Car Starter
After disconnecting the battery, the next step is to locate the car starter. The car starter is typically located in the engine bay near the transmission bell housing. The specific location may vary depending on the make and model of your vehicle.
Understanding the Wiring System
Prior to installation, it’s essential to understand the wiring system of your car starter. Take some time to familiarize yourself with the different wires and their corresponding functionalities. A wiring diagram for your car starter can be found in the installation manual or by conducting a quick search online.
Some common wire connections you may encounter include:
| Wire Color | Functionality |
|---|---|
| Red | Power (usually connected to the battery’s positive terminal) |
| Black | Ground (usually connected to the chassis of the vehicle) |
| Yellow | Ignition (receives signal from the ignition system to start the vehicle) |
| Orange | Accessory (provides power to accessories when the ignition is on) |
Understanding the wiring system beforehand will help you make the correct connections during the installation process, avoiding any potential issues or errors.
By following these steps, you are now ready to install a car starter. The next section will guide you through the installation process itself, ensuring a successful installation.
Installing The Car Starter
Removing old starter
Before installing the new car starter, you need to carefully remove the old one. This ensures a smooth and hassle-free installation process. To remove the old starter, follow these steps:
- First, locate the starter under the hood of your car. It is typically mounted on the engine block.
- Next, disconnect the negative terminal of the car battery to ensure your safety.
- Using a wrench or socket set, remove the mounting bolts that secure the starter to the engine. Take note of the size and type of bolts for future reference.
- With the mounting bolts removed, gently lower the old starter and carefully disconnect any wiring or connectors attached to it.
- Once all the wiring is detached, you can now fully remove the old starter and set it aside.
Installing new starter
Now that the old starter has been successfully removed, you can proceed with installing the new car starter. Here’s how to do it:
- Take the new starter and position it correctly in place of the old starter. Ensure that it aligns properly with the mounting holes on the engine block.
- Secure the new starter by tightening the mounting bolts using the same size and type that were used for the old starter. Make sure they are tightened securely but not overly tightened.
- Double-check the alignment of the new starter to ensure it is properly installed and securely fastened.
- Once the new starter is securely in place, you can move on to reconnecting the wiring.
Reconnecting the wiring
The final step in installing the car starter is reconnecting the wiring. This allows the starter to receive the necessary electrical signals to start your vehicle. Follow these steps to connect the wiring:
- Start by identifying the wiring harness that needs to be connected to the new starter.
- Carefully attach each wire or connector to its corresponding terminal on the new starter. Make sure the connections are secure.
- Check the wiring connections one more time to ensure that everything is properly connected.
- Finally, reattach the negative terminal of the car battery that was previously disconnected.
With the old starter removed, the new starter installed, and the wiring reconnected, you have successfully completed the installation process. Start your car to ensure that the starter is working correctly. If everything is functioning as it should, you can now enjoy a smooth and reliable start every time you turn on your vehicle.
Testing And Troubleshooting
Testing the starter
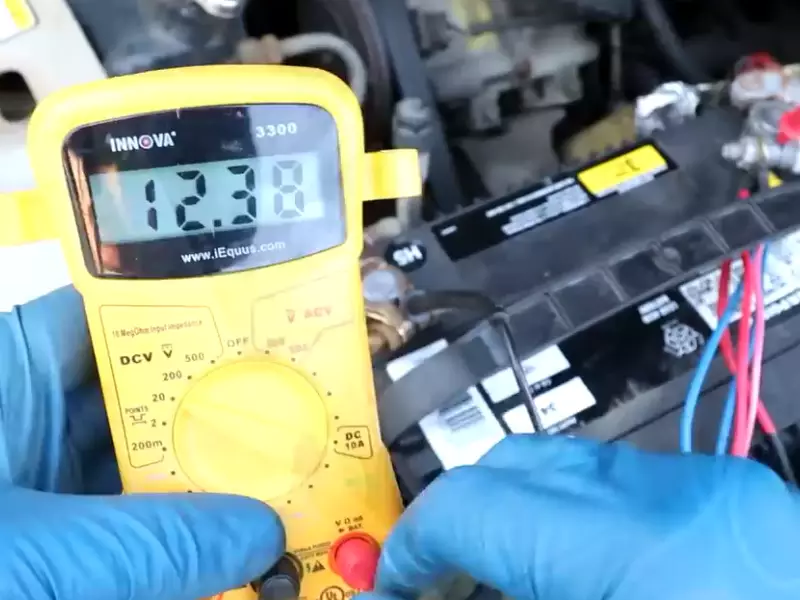
Before installing a car starter, it is essential to test it to ensure it is in proper working condition. Testing the starter requires a few simple steps:
- First, ensure that the car’s battery is fully charged. A low battery voltage can affect the starter’s performance.
- Next, locate the starter motor. In most vehicles, it is situated near the bottom of the engine on the side of the transmission.
- To test the starter, connect a voltmeter’s positive lead to the positive terminal of the starter motor while grounding the negative lead to a metal surface.
- Once the voltmeter is connected, have someone turn the ignition key. If the voltmeter reads around 12 volts, it indicates a healthy starter.
- Alternatively, if the voltmeter reading is significantly lower or shows zero volts, it may indicate a faulty starter that requires replacement or repair.
Common troubleshooting tips
In case the starter is not functioning correctly, here are some common troubleshooting tips:
- Check the battery terminals for corrosion or loose connections. Clean the terminals and tighten any loose connections.
- Inspect the ignition switch. A faulty ignition switch can prevent the starter from receiving power.
- Ensure the gear shift is in “Park” or neutral position. Some cars have safety mechanisms that prevent the starter from engaging in other gears.
- Inspect the starter solenoid for any signs of damage or wear. Replace it if necessary.
- Verify that the starter motor ground connection is secure and free from rust or debris.
Replacing faulty components
If testing and troubleshooting reveal that the starter is indeed faulty, it may be necessary to replace certain components. Here are the steps to follow:
- Identify the faulty component, such as the starter motor, starter solenoid, or ignition switch.
- Consult the vehicle’s manual or seek professional advice to determine the correct replacement part.
- Disconnect the battery to ensure safety during the replacement process.
- Remove any necessary components blocking access to the faulty part, such as the air intake or engine cover.
- Replace the faulty component with the new one, ensuring proper alignment and connection.
- Reassemble any components that were removed for access.
- Finally, reconnect the battery and test the newly installed component by starting the car.
By following these steps to test, troubleshoot, and replace faulty components, you can successfully install a car starter and ensure your vehicle starts reliably.
Frequently Asked Questions Of How To Install A Car Starter
Can You Install A Car Starter Yourself?
Yes, you can install a car starter yourself. It’s a DIY task that requires basic knowledge. Make sure to follow instructions carefully and use the right tools. Consider your car’s specific requirements and consult a manual or online resources. Safety precautions and professional help might be necessary for some vehicles.
How To Install A Starter?
To install a starter, first locate the old starter under the hood. Disconnect the electrical connections and remove the mounting bolts. Install the new starter in reverse order and tighten the mounting bolts. Reconnect the electrical connections and test the starter to ensure it’s working properly.
Is Installing A Remote Car Starter Hard?
Installing a remote car starter can be challenging for some. It requires technical knowledge and expertise.
How Much Does It Cost To Put A Car Starter In Your Car?
The cost of installing a car starter varies, but on average, it can range from $150 to $500.
Conclusion
Installing a car starter doesn’t have to be a daunting task. By following the step-by-step instructions and referencing the necessary tools, you can successfully install a car starter and enjoy the convenience it brings. Remember to prioritize safety and consult professional help if needed.
Now, you have the knowledge and confidence to tackle this task yourself. Get ready to hit the road with ease and start your car hassle-free!