To install a car radio, first, disconnect the negative battery cable and remove the trim panel. Then, connect the wiring harness and antenna adapter before installing the new radio into the mounting kit.
Thinking about upgrading your car audio system? Installing a new car radio can greatly enhance your driving experience. Whether you want better sound quality or additional features, the process of installing a car radio can seem daunting at first. However, with the right tools and a little bit of know-how, you can easily complete the installation yourself.
In this guide, we will walk you through the step-by-step process of installing a car radio, from removing the old unit to connecting the wiring and mounting the new radio. So, let’s get started!
Preparing For Installation
Before you begin the installation process of a new car radio, it’s important to take a few steps to ensure a smooth and successful installation. This section will cover checking the compatibility of the new car radio with your vehicle, gathering the necessary tools for the installation, and ensuring a safe working environment.
Checking the compatibility of the new car radio with your vehicle
One of the first things you need to do before installing a new car radio is to check its compatibility with your vehicle. Not all car radios are universal, and they may vary in size, shape, and connector types. To avoid any frustrations or setbacks during the installation process, you’ll need to ensure that the new radio is compatible with your vehicle’s make and model.
To do this, you can check the owner’s manual of your car or consult the manufacturer’s website for compatibility information. Additionally, you can reach out to a professional car audio installer or contact the manufacturer directly for any specific questions you may have. It’s crucial to gather this information beforehand to avoid purchasing a car radio that won’t fit or work properly in your vehicle.
Gathering the necessary tools for the installation
Once you’ve confirmed the compatibility of the new car radio, you’ll need to gather the necessary tools for the installation. Having the right tools can make the process much smoother and efficient. Here are some essential tools you may need:
- Wire strippers
- Screwdriver set
- Electrical tape
- Trim removal tools
- Wire connectors
- Panel removal tools
Make a checklist of these tools and ensure you have them readily available before you begin the installation. This will save you time and frustration of having to pause the process to find a missing tool.
Ensuring a safe working environment
Safety should always be a top priority when working on your car. Before you start installing the new car radio, you’ll want to create a safe working environment. Here are some tips:
- Disconnect the car battery to prevent any electrical mishaps.
- Work in a well-lit area, ideally with good ventilation.
- Remove any distractions or obstacles from your workspace.
- Wear proper protective gear, such as gloves and safety glasses.
By taking these precautionary measures, you’ll minimize the risk of accidents or damage to your vehicle during the installation process. Safety should never be overlooked when working with car electronics.
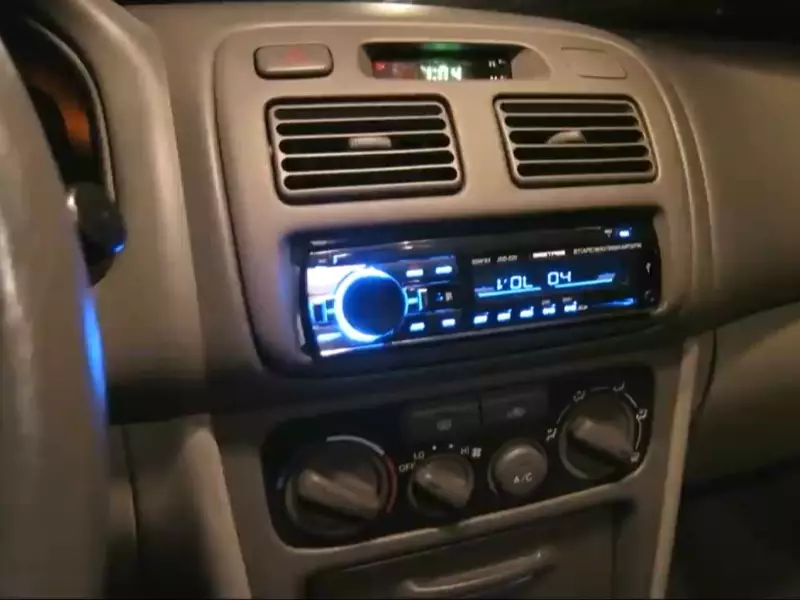
Removing The Old Car Radio
Upgrading the audio system of your car can make your driving experience more enjoyable. However, before you can install a new car radio, you first need to remove the old one. Follow these simple steps to remove the old car radio and make way for an upgraded sound system.
Disconnecting the negative battery terminal
Start by disconnecting the negative battery terminal. This is an important step to ensure your safety and prevent any potential electrical issues. Locate the negative battery terminal, marked with a minus (-) sign, and use a wrench to loosen the nut. Once it’s loose, remove the terminal from the battery.
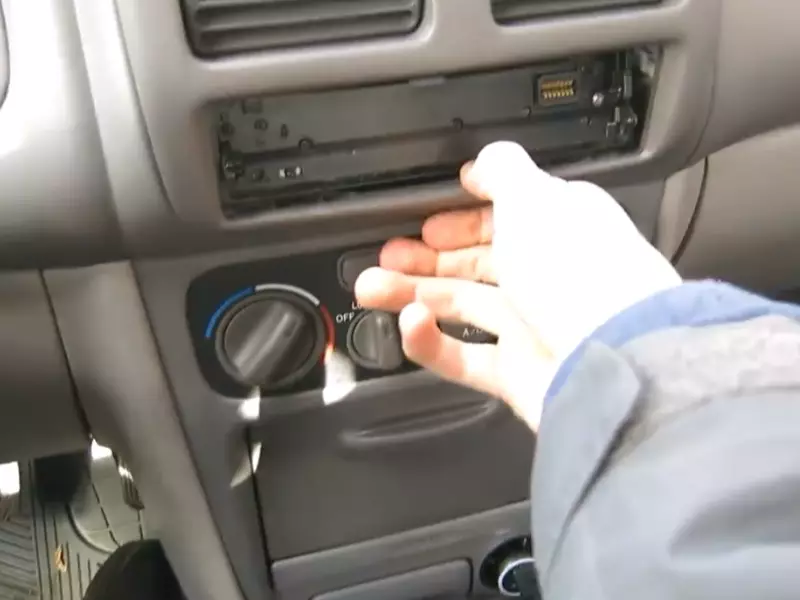
Removing the trim panel or faceplate covering the old radio unit
Next, you’ll need to remove the trim panel or faceplate covering the old radio unit. This panel is usually made of plastic and can be found surrounding the radio. Use a trim panel removal tool or a flathead screwdriver wrapped in a cloth to gently pry off the panel. Start from one corner and slowly work your way around until the panel is completely loose. Be careful not to scratch or damage the surrounding dashboard.
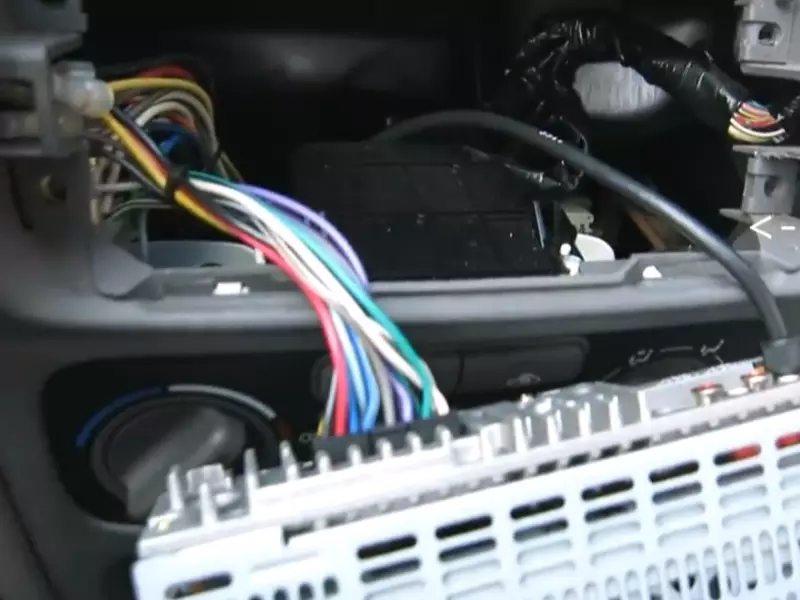
Unplugging the wiring harness and antenna cable connections
Once the trim panel is removed, you’ll see the wiring harness and antenna cable connections attached to the back of the old radio unit. To remove these connections, simply unplug them one by one. Most wiring harnesses have clips that need to be squeezed or tabs that need to be pushed down before they can be unplugged. Gently tug on each connection to ensure they are securely unplugged.
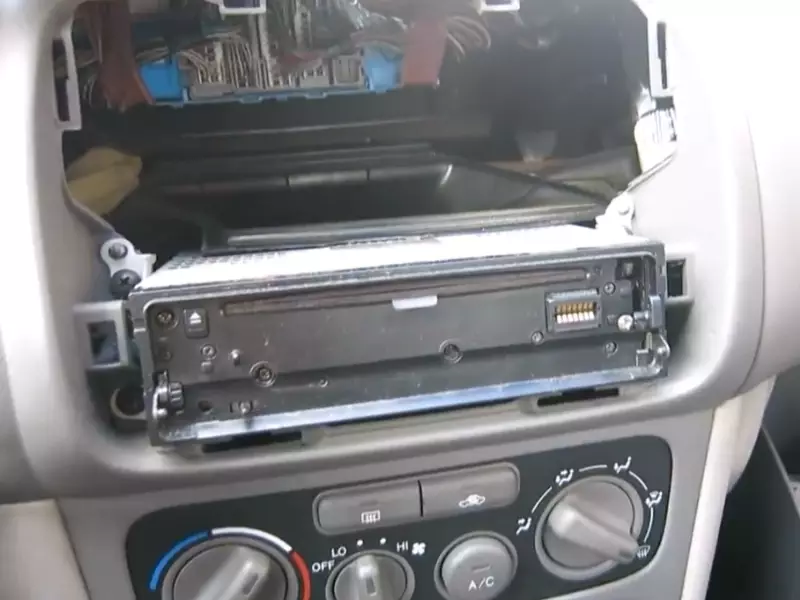
Removing the mounting screws or brackets securing the radio
With the wiring harness and antenna cable connections unplugged, the final step is to remove the mounting screws or brackets securing the old radio. These screws or brackets can typically be found on the sides or in the corners of the unit. Use a screwdriver or a socket wrench to loosen and remove these screws or brackets. Once all the screws or brackets are removed, carefully pull the old radio unit out of the dashboard.
Congratulations! You have successfully removed the old car radio. Now you’re ready to install the new radio and enjoy a better sound experience on your journeys.
Wiring The New Car Radio
When installing a new car radio, it is crucial to properly wire it to ensure all the functionalities work seamlessly. This step-by-step guide will walk you through the process of wiring the new car radio, from identifying the wiring harnesses and their functions to securing the wiring connections with electrical tape or wire connectors.
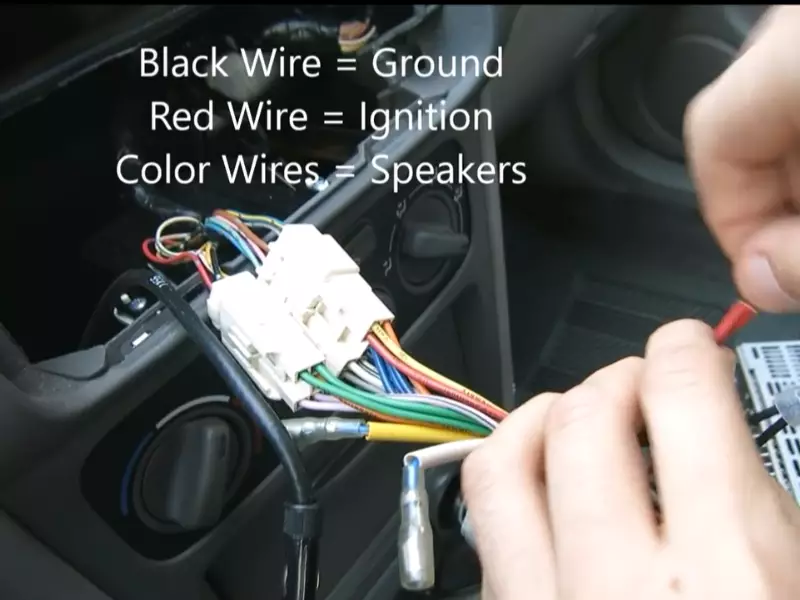
Identifying the wiring harnesses and their functions
The first step in wiring the new car radio is to identify the wiring harnesses and understand their respective functions. Most vehicles have two main wiring harnesses:
- Main Harness: This harness connects to the vehicle’s electrical system and provides power to the radio.
- Speaker Harness: This harness connects the radio to the speakers in the car.
Identifying these harnesses is crucial as they ensure the proper functioning of your car radio.
Matching the wire colors between the vehicle and the new radio
Once you have identified the different harnesses, the next step is to match the wire colors between the vehicle and the new radio. This ensures a seamless connection and prevents any electrical mishaps. Here’s a table that shows the standard wire colors and their corresponding functions:
| Wire Color | Function |
|---|---|
| Red | Power (+) |
| Black | Ground (-) |
| Yellow | Memory |
| Blue | Remote Turn-On |
| Green | Left Rear Speaker (+) |
| Purple | Right Rear Speaker (+) |
By matching the wire colors, you can easily connect the right wires together, ensuring a proper functioning car radio.
Connecting the wiring harnesses to their respective connectors
Now that you have identified the wire colors, it’s time to connect the wiring harnesses to their respective connectors. This is where the wire colors come into play. Match the wires of the new car radio’s harness with the corresponding wires on the vehicle’s harness, and securely connect them.
You can use wire connectors or electrical tape to create a secure and stable connection. Make sure to wrap the connections properly to prevent any loose wires that could cause interference or electrical issues.
Securing the wiring connections with electrical tape or wire connectors
Once you have connected the wiring harnesses, it’s essential to secure the wiring connections properly. This ensures the durability and stability of the connections, preventing any accidental disconnections or interference.
There are two common methods to secure the wiring connections:
- Electrical Tape: Wrap each connection with electrical tape, ensuring that all the wires are tightly secured together. This method provides flexibility and easy accessibility for future changes or modifications.
- Wire Connectors: Use wire connectors to join the wires together. These connectors provide a more professional and secure connection, minimizing any chances of loose connections or electrical issues.
When using either method, make sure to test the connections and ensure everything is working correctly before finalizing the installation.
By following these steps and properly wiring the new car radio, you can enjoy a smooth and seamless listening experience while driving.
Installing The New Car Radio
Mounting the new radio using the provided brackets or mounting sleeve
One of the first steps to installing your new car radio is to mount it in the designated slot. To do this, you’ll need to use the provided brackets or mounting sleeve, which typically come with the radio. Start by attaching the brackets to the sides of the radio, ensuring they are securely in place. Alternatively, if your radio comes with a mounting sleeve, slide it into your vehicle’s radio slot until it fits snugly.
Connecting the wiring harness and antenna cable to the new radio
Next, it’s time to connect the wiring harness and antenna cable to your new car radio. Refer to the wiring diagram that came with your radio to identify the corresponding wires. Connect the wires from the wiring harness to the matching wires on the back of the radio. Make sure to match the colors and connectors properly to ensure a secure connection. Once the wiring harness is connected, plug the antenna cable into the back of the radio. This will allow your new radio to receive radio signals and provide better reception.
Sliding the new radio into the mounting location
With the brackets or mounting sleeve in place and the wiring harness and antenna cable connected, it’s time to slide the new radio into the mounting location. Carefully align the radio with the opening and gently push it in, ensuring it fits snugly. Take your time to ensure proper alignment and fit, as a loose or misaligned radio can cause issues with functionality and appearance.
Securing the new radio with screws or clips
Once the new radio is in place, the final step is to secure it with screws or clips. Consult the instruction manual that came with your radio to determine the appropriate method for securing it. Some radios may require screws to be inserted through the mounting brackets, while others may have clips that need to be snapped into place. Whatever the case, make sure to follow the manufacturer’s instructions carefully to ensure a secure and stable installation.
Testing And Finalizing The Installation
Now that you have successfully installed your new car radio, it’s time to test it and ensure everything is working properly. This final step is crucial in confirming that the installation is complete and that your new radio is functioning as it should. Follow the steps below to reconnect the negative battery terminal, turn on the vehicle’s ignition, check for proper functionality and sound quality, and adjust any necessary settings.
Reconnecting the negative battery terminal
The first step in testing and finalizing the installation is to reconnect the negative battery terminal. This ensures that power is restored to your vehicle’s electrical system and allows the new radio to operate. To do this, follow these simple steps:
- Locate the negative battery terminal, which is usually marked with a minus (-) sign.
- Carefully attach the negative cable clamp to the negative battery terminal.
- Tighten the clamp securely using a wrench or pliers.
By reconnecting the negative battery terminal, you are ready to power on your vehicle and test the new radio.
Turning on the vehicle’s ignition to test the new radio
With the negative battery terminal reconnected, it’s time to turn on the vehicle’s ignition and test your new radio. Follow these steps to ensure a proper test:
- Insert your vehicle key into the ignition switch.
- Turn the key to the “on” position, but do not start the engine.
- Listen for any sounds indicating that the radio is receiving power. You should hear a brief “click” or see the radio display light up.
If the radio powers on without any issues, you can proceed to the next step. However, if there are any problems, such as the radio not turning on or strange noises, you may need to double-check the installation or seek professional assistance.
Checking for proper functionality and sound quality
Now that the radio is powered on, it’s time to check for proper functionality and sound quality. Perform the following steps:
- Tune in to a radio station and listen for clear and uninterrupted audio. Check for any static or distortion.
- Test each of the radio’s buttons, knobs, and features to ensure they are working correctly.
- Try switching between different sources, such as AM/FM radio, CD player, or auxiliary input, if available, to confirm that they are functioning correctly.
During this test, be sure to pay attention to any noticeable issues or abnormalities. If everything seems to be working properly, you are one step closer to enjoying your new car radio.
Adjusting any radio settings or settings related to the installation
To finalize the installation, it’s important to adjust any necessary radio settings or settings related to the installation. This ensures that you optimize the radio’s performance and tailor it to your preferences. Follow these steps:
- Refer to the user manual or manufacturer’s instructions to access the radio’s settings menu.
- Adjust settings such as the equalizer, balance, fade, and audio presets to achieve your desired sound quality.
- If you installed any additional features, such as a Bluetooth module or steering wheel controls, make sure to properly configure and calibrate them.
Take your time to explore the various settings and make any necessary tweaks until you are satisfied with the sound quality and overall performance of your new car radio.
By following these steps to test and finalize the installation, you can be confident that your new car radio is installed correctly and ready to provide you with an enhanced audio experience during all of your drives.
Troubleshooting Tips
Installing a car radio can be an exciting project, but sometimes issues may arise during the installation process. Don’t panic! Troubleshooting common problems can help you get your new radio up and running in no time. Here are some troubleshooting tips to keep in mind:
Checking for loose or disconnected wiring connections
A common cause of radio malfunction is loose or disconnected wiring connections. Before you start troubleshooting, make sure to turn off your car’s ignition and disconnect the negative battery terminal. Then, follow these steps to check for loose or disconnected wiring connections:
- Inspect the wiring harness connections to ensure they are secure and snugly attached.
- Verify that the power, ground, and speaker wires are properly connected according to the radio’s wiring diagram.
- If any connections are loose or disconnected, reconnect them securely.
- Once the connections are tightened, reconnect the negative battery terminal and turn on the ignition to check if the issue is resolved.
Verifying that the new radio is receiving power
If you’re experiencing a complete radio blackout, it’s important to verify that the new radio is receiving power. Here’s how you can do it:
- Start by checking the fuse box in your car for any blown fuses related to the radio. Replace any blown fuses with ones of the same amperage.
- Next, use a multimeter or a test light to check if the power wires connected to the radio are receiving electrical current.
- If there is no power coming to the radio, check the wiring harness and ensure it is properly connected.
- If the power wires are receiving current, but the radio still doesn’t turn on, the issue may lie within the radio itself. Consider contacting the manufacturer for further assistance.
Troubleshooting common installation issues, such as no sound or poor reception
After successfully installing the new radio, you might encounter issues like no sound or poor reception. Here are a few troubleshooting steps you can follow:
- Check the audio settings on the radio to ensure the volume is not muted or turned down.
- Inspect the speaker connections to make sure they are secure and properly insulated.
- If the sound quality is poor, ensure that the antenna is properly connected and positioned.
- Consider checking the radio’s manual for any specific troubleshooting steps related to audio problems or reception issues.
Seeking professional assistance if needed
If you’ve tried troubleshooting the issues on your own and are still unable to resolve them, seeking professional assistance is recommended. Car audio experts have the knowledge and experience to diagnose and fix complex installation problems efficiently. Don’t hesitate to reach out to a professional if you’re stuck.
Remember, troubleshooting is a necessary part of installing a car radio, and with these tips, you’ll be better equipped to handle any issues that may arise. Happy troubleshooting and enjoy your upgraded car audio system!
Additional Considerations
Updating the new radio’s firmware or software, if necessary
Before installing the new car radio, it’s important to check if the firmware or software of the radio needs to be updated. Manufacturers often release updates to improve performance or add new features. To update the firmware or software, follow these steps:
- Visit the manufacturer’s website and look for the support or downloads section.
- Search for the specific model of your car radio and download the latest firmware or software file.
- Save the file to a USB drive.
- Insert the USB drive into the USB port on your car radio.
- Follow the on-screen instructions on the radio to complete the update process.
Installing additional features or accessories, such as Bluetooth adapters or steering wheel controls
If you want to enhance your car radio’s functionality, you can consider installing additional features or accessories. Some popular options include:
- Bluetooth adapters: These allow you to connect your phone or other devices wirelessly to the car radio, enabling hands-free calling and music streaming.
- Steering wheel controls: These controls enable you to change the radio station, adjust the volume, and control other audio features without taking your hands off the steering wheel.
To install these additional features or accessories, follow the manufacturer’s instructions provided with the specific product you choose. These instructions may vary depending on the brand and model.
Taking proper care of the audio system and keeping it clean
Maintaining your car radio will ensure its longevity and optimal performance. Here are some tips to keep your audio system clean:
- Use a soft microfiber cloth to wipe the touchscreen or control panel, removing smudges and fingerprints.
- Avoid using harsh chemicals or abrasive materials that may damage the surface.
- Regularly inspect the wiring connections and clean any dust or debris that may accumulate.
- Keep the car interior clean to prevent dust and dirt from settling on the audio system.
Exploring advanced installation options or customization possibilities
If you are a car audio enthusiast or want to take your car radio installation to the next level, there are advanced options and customization possibilities to consider. These may include:
| Option | Description |
|---|---|
| Amplifiers | Installing amplifiers can significantly improve the audio quality and power of your car radio. |
| Equalizers | Equalizers allow you to adjust the sound frequencies to tailor the audio output to your preferences. |
| Sound processors | Sound processors help optimize the audio signal and provide advanced audio control options. |
| Custom speaker installations | Upgrading your car’s speakers with higher quality ones can enhance the audio experience. |
When exploring these advanced options or customization possibilities for your car radio, it’s recommended to consult with professionals or experienced car audio enthusiasts to ensure proper installation and compatibility with your vehicle.
Frequently Asked Questions For How To Install A Car Radio
Can You Install Your Own Car Radio?
Yes, you can install your own car radio. It is a straightforward process that can be done by following the instructions provided. However, it is important to have some basic knowledge of car electronics and the right tools for the job.
Do I Need A Wiring Harness To Install A Car Stereo?
Yes, you need a wiring harness to install a car stereo. A wiring harness connects the stereo to the car’s electrical system, making installation easier and ensuring compatibility. It simplifies the process and prevents damage to the car’s wiring.
What Color Wires Go Together In A Car Stereo?
Car stereo wire colors vary, but generally, the most common are red for power, yellow for ignition, black for ground, and blue for amplifier remote. However, it’s best to refer to the specific car stereo’s manual for accurate wire pairing information.
Do I Need A Dash Kit For A New Radio?
Yes, you need a dash kit for a new radio. A dash kit provides a secure and professional installation of the radio in your car’s dashboard. It ensures a custom fit and prevents any damage or gaps between the radio and the dashboard.
Conclusion
Installing a car radio doesn’t have to be a complicated task. By following the step-by-step guide provided in this blog post, you can easily replace your old radio and enjoy an upgraded audio experience in your vehicle. Remember to gather all the necessary tools and consult the instruction manual specific to your car model.
With patience and attention to detail, you’ll soon be enjoying your favorite tunes on the road. So go ahead and give it a try!