To install a car horn, locate a suitable position near the bumper and attach the horn securely using bolts and screws. Installing a car horn is a straightforward process that can be completed in a few simple steps.
A car horn serves as an essential safety feature, alerting others on the road to your presence. Whether you are replacing a faulty horn or upgrading to a louder one, the installation process remains the same. We will provide a step-by-step guide on how to install a car horn.
So, let’s get started and ensure your vehicle has a fully functional horn for safe driving.

Selecting The Right Car Horn
Factors to consider when choosing a car horn
When it comes to selecting the right car horn, there are a few important factors to consider. By taking the time to analyze these factors, you can ensure that you select a car horn that meets your needs and preferences. Below are the key factors to keep in mind:
Sound volume and tone
One of the most crucial aspects to consider is the sound volume and tone of the car horn. After all, the primary purpose of a car horn is to grab the attention of others on the road. It is essential to choose a car horn that has a loud and clear sound that can be easily heard in various driving conditions, including heavy traffic and harsh weather. Additionally, some drivers may have a preference for a specific tone, such as a classic honking sound or a more modern sound.
Compatibility with vehicle
Another crucial factor to consider is the compatibility of the car horn with your vehicle. Different car models have different wiring setups, mounting positions, and available space for the horn. It is important to choose a car horn that is specifically designed to fit your vehicle’s make and model. This ensures a seamless installation process and eliminates the need for any modifications or alterations to your vehicle.
Legal requirements and regulations
When it comes to installing a car horn, it is vital to ensure that it complies with all legal requirements and regulations in your area. Different regions may have specific rules regarding the sound level and tone of car horns. It is crucial to familiarize yourself with these regulations to avoid any legal issues or fines. Additionally, some states or countries may require specific certifications or approvals for aftermarket car horns.
Gathering The Necessary Tools And Materials
Before you can start installing a car horn, it’s important to gather all the tools and materials you will need for the job. By having everything prepared in advance, you can ensure a smooth and efficient installation process. Below is a list of the tools and materials that are essential for installing a car horn:
List of tools and materials needed for the installation
- Car horn: The main component of the installation is the car horn itself. It is advisable to choose a horn that suits your preferences and meets the legal requirements of your region.
- Wiring kit: A wiring kit is essential to properly connect the car horn to the electrical system of your vehicle. It typically contains the necessary wires and connectors required for the installation.
- Electrical connectors: These connectors are used to securely attach and establish electrical connections between the wires of the car horn and the vehicle’s electrical system.
- Screwdriver: A screwdriver is needed to remove any screws or fasteners that may be holding the old horn in place, as well as to secure the new horn during installation.
- Wire cutters: Wire cutters are essential for cutting and trimming wires to the appropriate length during the installation process. They ensure a clean and precise connection.
- Electrical tape: Electrical tape is used to protect and insulate exposed wires, preventing any potential short circuits or electrical issues. It provides an extra layer of safety.
By having these tools and materials ready, you will be well-equipped to install a car horn with ease. Remember to follow the manufacturer’s instructions and take all necessary safety precautions while performing the installation. In the next section, we will go through the step-by-step process of installing the car horn, ensuring a successful outcome.
Preparing For Installation
Before you can install a new car horn, it’s important to properly prepare for the installation process. This involves disconnecting the battery, locating the existing car horn, removing the old car horn, and examining and cleaning the mounting area. Taking these steps will ensure a smooth and successful installation of your new car horn.
Disconnecting the battery
The first step in preparing for the installation of a new car horn is to disconnect the battery. This is an important safety precaution that will prevent any accidental electrical shocks or damage. To disconnect the battery, follow these simple steps:
- Park your car on a flat surface and engage the parking brake.
- Open the hood of your car and locate the battery.
- Using a wrench or socket set, loosen the nut on the negative terminal of the battery.
- Once the nut is loose, remove the negative cable from the battery terminal and secure it away from the battery.
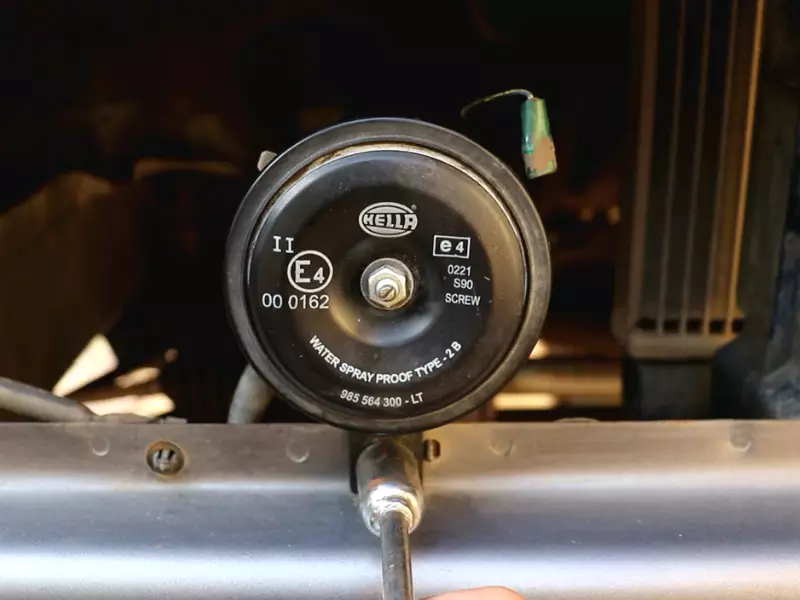
Locating the existing car horn
After disconnecting the battery, the next step is to locate the existing car horn. Depending on the make and model of your car, the car horn can usually be found in one of the following places:
- Under the hood, near the front grille
- Behind the front bumper
- Near the radiator or engine compartment
- Inside the wheel well
Refer to your car’s owner’s manual or do a quick online search to find specific instructions for locating the horn in your particular vehicle.
Removing the old car horn
Once you have located the existing car horn, it’s time to remove it. Follow these steps to safely remove the old car horn:
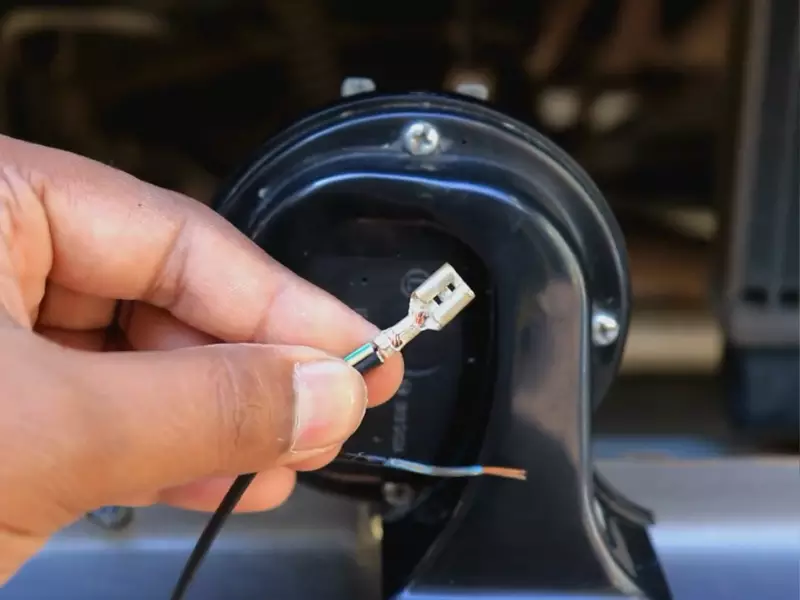
- Identify the wiring harness that connects the car horn to the electrical system of your car.
- Using a wrench or socket set, loosen and remove the bolts or screws that secure the car horn to its mounting bracket.
- Disconnect the wiring harness from the car horn by gently pulling it apart.
- Once the wiring harness is disconnected, carefully remove the old car horn from its mounting location.
Examining and cleaning the mounting area
With the old car horn removed, take a moment to examine the mounting area and ensure it is clean and free from any debris or obstructions. Cleaning the mounting area will ensure a secure and stable installation of the new car horn. Use a rag or brush to gently clean the mounting area, removing any dirt, rust, or other contaminants.
Now that you have successfully prepared for the installation of a new car horn, you can proceed with installing the new horn. Stay tuned for our next blog post where we will discuss the step-by-step process of installing a car horn.
Wiring The New Car Horn
Locating the wiring connections
When it comes to wiring the new car horn, the first step is to locate the wiring connections in your vehicle. To do this, you will need to consult your car’s manual or do some research online to find the specific location of the wiring connections. Typically, the car horn wiring can be found near the front of the vehicle, close to the battery or fuse box.
Connecting the new car horn to the wiring system
Once you have located the wiring connections, it’s time to connect the new car horn to the wiring system. To do this, you will need a few tools such as wire cutters, wire strippers, and crimp connectors. Start by cutting the wire leading from the old car horn, making sure to leave enough length to connect the new horn. Use the wire strippers to remove a small portion of insulation from each end of the cut wire.
Now, take the wire from the new car horn and strip the ends as well. Match the positive (+) wire from the new horn to the positive (+) wire from the wiring system and use a crimp connector to secure them together. Repeat the same process for the negative (-) wire. It’s important to ensure that the connections are secure and that there is no exposed wire that could cause a short circuit.
Securing the wires and ensuring proper grounding
Once you have connected the new car horn to the wiring system, it’s crucial to secure the wires and ensure proper grounding. Use zip ties or electrical tape to secure the wires in place, making sure they are not loose or in the way of any moving parts. This will prevent any potential damage or interference with the horn’s functionality.
Additionally, check the grounding connection of the new car horn. Most horns require a solid ground connection to function properly. Ensure that the ground wire is securely attached to a metal part of the vehicle’s body. This will provide a reliable ground connection and prevent any issues with the horn’s operation.
To sum up, wiring the new car horn involves locating the wiring connections, connecting the new horn to the wiring system, and securing the wires while ensuring proper grounding. By following these steps and taking the necessary precautions, you can successfully install a new car horn and enjoy a loud and clear sound whenever you need it on the road.
Mounting The New Car Horn
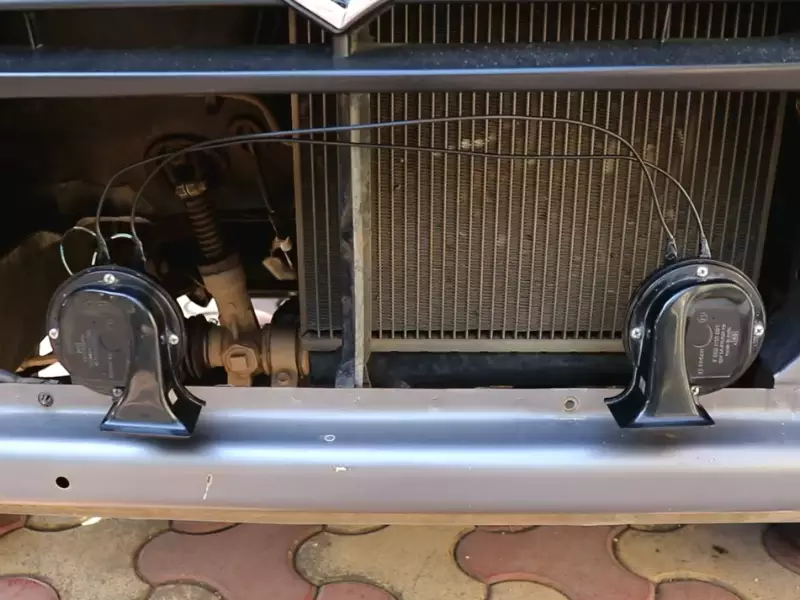
Determining the Appropriate Mounting Location
Before installing your new car horn, it is crucial to determine the most suitable mounting location. This will ensure optimal sound projection and proper functionality of the horn. Here’s how to find the ideal spot:
- Choose a location that allows for easy access and visibility.
- Consider the horn’s compatibility with your specific car model and body type.
- Avoid mounting the horn in areas that are prone to excessive heat or moisture.
- Make sure the chosen location does not obstruct other vehicle components or impede the driver’s view.
By following these guidelines, you can determine the perfect mounting location that meets both practical and functional requirements.
Installing the Car Horn Using the Provided Hardware
Once you have identified the appropriate mounting location, it’s time to install the car horn using the hardware provided with your purchase. Follow these steps for a successful installation:
- Refer to the manufacturer’s instructions to understand the specific installation requirements for your car horn model.
- Gather the necessary tools and hardware, including bolts, screws, brackets, and wiring connectors.
- Position the horn in the chosen mounting location, ensuring it aligns properly with the vehicle’s front end.
- Attach the horn securely using the provided brackets and screws, ensuring a tight fit.
- Connect the wiring to the horn, following the color-coded instructions to ensure the correct connections.
- Double-check all connections and tighten any loose components.
By carefully following these installation steps and utilizing the included hardware, you can successfully install your new car horn and be ready to enhance the audibility of your vehicle.
Double-Checking the Stability and Alignment of the Horn
Once the car horn is securely installed, it’s crucial to double-check its stability and alignment to ensure proper functionality. Here’s what you need to do:
- Inspect the horn for any signs of looseness or instability.
- Tighten any connections or mounting hardware that appear to be loose.
- Test the horn by gently tapping on it to ensure it is firmly in place.
- Turn on your vehicle’s ignition and use the horn to verify that it produces the desired sound.
- If necessary, make minor adjustments to the horn’s position or alignment to optimize its sound projection.
By performing these double-checking procedures, you can ensure that your car horn is securely mounted, stable, and functioning correctly, providing you with peace of mind while driving.
Connecting The Battery And Testing The Car Horn
Reconnecting the Battery:
After you have successfully installed the car horn, it’s time to reconnect the battery to ensure that your new horn functions properly. Follow these steps to reconnect the battery:
- Locate the car battery under the hood of your vehicle.
- Identify the positive (+) and negative (-) terminals on the battery. The positive terminal is usually marked with a plus sign or the letters “POS,” while the negative terminal is marked with a minus sign or the letters “NEG.”
- Take your wrench or pliers and remove the negative cable from the battery. Loosen the nut or bolt securing the cable to the terminal, and then gently lift the cable off the terminal.
- Repeat the same process for the positive cable, ensuring to loosen the nut or bolt and lifting the cable off the positive terminal.
- Carefully connect the positive cable to the positive terminal. Slide the cable onto the terminal and tighten the nut or bolt securely.
- Repeat the previous step for the negative cable, connecting it to the negative terminal and tightening the nut or bolt.
- Ensure that both cables are securely connected and that there are no loose connections.
Testing the Car Horn for Functionality:
Once you have reconnected the battery, it’s time to test your car horn to ensure that it is working correctly. Follow these steps to test the car horn:
- Sit in the driver’s seat of your vehicle and turn the ignition key to the “On” position. This will supply power to the car horn.
- Locate the horn button on your vehicle’s steering wheel. Gently press the horn button to activate the horn.
- Listen for a loud, audible sound coming from the car horn. If the horn emits a weak or muffled sound, there may be an issue with the electrical connection or the horn itself.
- If the horn does not make any sound at all, double-check the wiring connections to ensure they are properly connected. Ensure that the wires are securely connected to both the car horn and the battery terminals.
- If there are still issues with the functionality of the car horn, you may need to seek professional assistance or consult the user manual for troubleshooting tips.
Troubleshooting Common Issues:
If you are experiencing common issues with your car horn, try these troubleshooting tips:
- Ensure that the car horn is securely mounted and does not come loose.
- Check the fuse box to see if the fuse for the car horn has blown. If it has, replace it with a new fuse of the proper rating.
- Inspect the wiring connections for any signs of damage or corrosion. Clean or repair any damaged connections.
- Test the car horn with a voltmeter to check for proper voltage output. If the voltage is insufficient, there may be an issue with the horn relay or wiring.
- If these troubleshooting steps do not resolve the issue, it is recommended to consult a professional mechanic for further assistance.
By following these steps, you can confidently connect the battery and test your car horn for functionality. Remember to prioritize safety throughout the installation process and consult your vehicle’s user manual for any specific instructions. Enjoy your newly installed car horn and ensure that you are audible on the road when necessary.
Car Horn Maintenance
Your car horn is a crucial safety feature that helps you communicate with other drivers on the road. Just like any other component in your vehicle, it requires regular maintenance to ensure optimal performance.
By taking a few simple steps, you can keep your car horn in top condition and ensure it works when you need it the most. In this section, we will discuss some essential tips for maintaining the car horn’s performance.
Tips for maintaining the car horn’s performance
Regular cleaning and inspection
Regular cleaning and inspection are fundamental to keep your car horn operating smoothly. Over time, dirt, dust, and debris can accumulate on the horn’s surface, affecting its sound quality. To thoroughly clean your car horn, follow these steps:
- Start by disconnecting the horn’s wiring to prevent accidental honking.
- Use a soft cloth or sponge to wipe away any dirt or grime from the exterior of the horn.
- Gently clean the interior of the horn with a small brush to remove any debris.
- Once you’ve cleaned the horn, make sure it is completely dry before reconnecting the wiring.
- Regularly inspect the horn’s mounting brackets and ensure they are secure. If you notice any damage or corrosion, consider replacing them to avoid any future problems.
Checking for loose connections
Loose connections can significantly impact the performance of your car horn. To check for loose connections, follow these steps:
- Locate the horn’s wiring connections and visually inspect them for any signs of looseness or corrosion.
- If you find any loose connections, gently tighten them using a wrench or socket.
- Ensure all connections are secure and free from corrosion or rust.
- By regularly checking for loose connections, you can prevent any electrical issues that may affect the functioning of your car horn.
Replacing worn-out components
Over time, certain components of your car horn may wear out and affect its performance. By periodically replacing these components, you can maintain the horn’s functionality. Here are some common components that might need replacing:
- Horn relay: This electrical component controls the horn’s operation. If you notice a decrease in sound quality or the horn not honking at all, consider replacing the horn relay.
- Horn switch: The switch is responsible for activating the car horn. If you experience difficulty honking the horn or the button feels loose, it may be time to replace the switch.
- Wiring: Frayed or damaged wiring can cause electrical issues and affect the horn’s performance. Inspect the wiring regularly and replace any damaged sections.
By replacing worn-out components, you can ensure your car horn functions reliably.
Regular maintenance is essential to keeping your car horn in optimal condition. By following these tips for maintaining the car horn’s performance, you can enhance safety on the road and be confident that your horn will work when you need it most.
Frequently Asked Questions For How To Install A Car Horn
Can You Replace A Car Horn Yourself?
Yes, you can replace a car horn yourself. It is a simple DIY task that requires basic tools and the right replacement part. Just follow the instructions in your car’s manual or search online for a step-by-step guide. Safety is important, so make sure to disconnect the car battery before starting the replacement process.
Is Replacing A Car Horn Hard?
Replacing a car horn is not difficult. With basic tools and a little know-how, it can be done easily. Just locate the horn, disconnect the wiring, remove the old horn, and install the new one. Test if it works. That’s it!
How Much Does It Cost To Put A Horn In Your Car?
The cost to install a horn in your car varies depending on the type of horn and location. It can range from $20 to $200.
How Do You Wire A 12V Car Horn?
To wire a 12-volt car horn, first identify the positive and negative terminals on the horn. Connect the positive terminal to the positive wire coming from the car’s battery, and connect the negative terminal to the grounding wire or the metal part of the vehicle.
Check for proper connections and test the horn.
Conclusion
With these simple steps, you can easily install a car horn and enhance the safety and functionality of your vehicle. By following the proper procedures and using the right tools, you will be able to complete the installation without any hassle.
So, get started and enjoy the peace of mind that comes with a loud and clear car horn. Remember, safety on the road should always be a top priority.