To install a car camera, start by finding a suitable location to mount it securely and connect the power cable to the vehicle’s fuse box or cigarette lighter. Adjust the camera angle as desired.
Understanding The Basics
Installing a car camera is a smart move for any vehicle owner. Whether you are a cautious driver or just want to keep an eye on your surroundings, a car camera can provide you with an extra level of security and peace of mind. In this guide, we will take a closer look at the basics of installing a car camera, starting with the importance of having one.
Importance of installing a car camera
A car camera, also known as a dashcam or dashboard camera, has become increasingly popular due to its numerous benefits. Let’s explore why it’s important to have a car camera installed:
- Documenting accidents: A car camera records everything that happens while you’re on the road, including any accidents or incidents. This footage can be invaluable when it comes to insurance claims, proving fault, or protecting yourself against false accusations.
- Preventing fraud: Car accidents involving insurance fraud can be a frustrating and expensive ordeal. A car camera can help prevent fraud by capturing clear and undeniable evidence of what exactly transpired during an accident.
- Improving your driving habits: By having a car camera installed, you can gain valuable insight into your driving habits. Reviewing your footage can help you identify areas for improvement, such as speeding, aggressive driving, or distracted driving.
Key benefits and features of car cameras
Car cameras come with a range of benefits and features that make them an invaluable accessory for any vehicle. Here are some key advantages:
- High-resolution video: Most car cameras offer high-definition video recording, ensuring that the details of any incident are captured with utmost clarity. This allows for accurate identification of license plates, faces, and other important details.
- Loop recording: Car cameras typically utilize loop recording, which means that when the storage is full, the camera automatically overwrites the oldest footage. This ensures that you never run out of storage space and can continuously record without worrying about manually deleting files.
- Impact sensor: Some car cameras have built-in impact sensors that can detect sudden movements or impacts. When an impact is detected, the camera automatically saves and locks the footage, preventing it from being overwritten.
- Night vision: Many car cameras come with night vision capabilities, utilizing infrared technology to capture clear footage even in low-light conditions. This is particularly useful for incidents that occur during nighttime driving.
Choosing the right type of car camera for your needs
Now that you understand the importance and benefits of having a car camera, it’s essential to choose the right type for your specific needs. Consider the following factors when selecting a car camera:
- Resolution: Look for a car camera with high-definition resolution, preferably 1080p or higher, to ensure clear and detailed footage.
- Field of view: The wider the field of view, the more of the road you can capture. Aim for a camera with at least 120 degrees of coverage.
- Additional features: Consider whether you want additional features such as GPS tracking, Wi-Fi connectivity, or a dual-channel system to capture both the front and rear of your vehicle.
- Installation: Decide whether you want a camera that mounts on the windshield, rearview mirror, or directly on the dashboard. Each installation option has its own pros and cons.
By understanding the basics of car cameras and considering your specific needs, you can choose the perfect camera to enhance your driving experience and provide you with a reliable record of your journeys.
Preparing For Installation
When it comes to installing a car camera, proper preparation is essential. Taking the time to gather the necessary tools and equipment, assessing your vehicle’s compatibility, and finding the optimal mounting position can make the entire installation process smoother and more successful. In this section, we will walk you through each step of the preparation process, ensuring that you have all the information you need to install your car camera effectively.
Gathering the necessary tools and equipment
Before you begin the installation process, it’s important to gather all the tools and equipment you will need. Having everything on hand will save you time and frustration during the installation. Here’s a list of the essential tools and equipment:
| Tools | Equipment |
|---|---|
|
|
Assessing your vehicle’s compatibility for installation
Not all vehicles are created equal when it comes to car camera installations. Take some time to assess your vehicle’s compatibility before proceeding with the installation. Consider the following factors:
- Your vehicle’s make and model: Different car cameras are designed for different types of vehicles. Ensure that your car camera is compatible with your specific make and model.
- Power source: Determine where you will draw power for your car camera. Some vehicles have dedicated ports for accessory power, while others may require additional wiring.
- Mounting options: Take a look at your vehicle’s interior and exterior to determine the best mounting options for your car camera. Consider factors such as visibility, convenience, and safety.
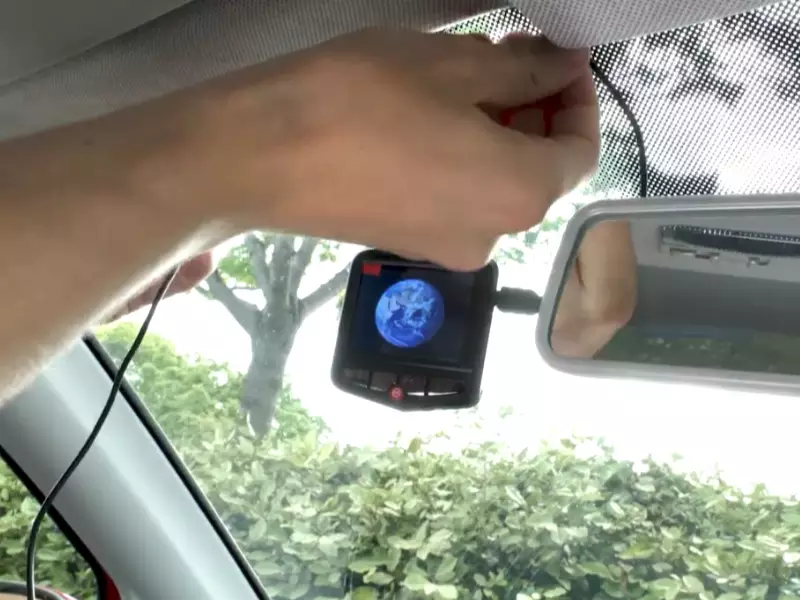
Finding the optimal mounting position for the car camera
Finding the optimal mounting position for your car camera is crucial for effective recording and capturing accurate footage. Consider the following tips:
- Ensure a clear view: The car camera should have an unobstructed view of the road ahead. Avoid mounting it behind rearview mirrors or other objects that may block or distort the camera’s view.
- Minimize vibrations: Mount the car camera in a location that minimizes vibrations for stable and clear footage. Avoid mounting it in areas prone to excessive shaking or movement.
- Concealment: If you prefer a discreet installation, choose a mounting position that allows the car camera to be concealed from plain sight. This can help deter theft or tampering.
By following these steps and adequately preparing for the installation process, you will be well on your way to successfully installing your car camera. In the next section, we will guide you through the actual installation steps, ensuring that you have a smooth and hassle-free experience.
Installing The Car Camera
Installing a car camera can be a valuable addition to your vehicle, providing an extra layer of security and peace of mind. In this guide, we will walk you through the process of installing a car camera, covering important considerations such as wiring and power source options, securing the car camera mount, and connecting the camera to power and the vehicle’s electrical system.
Wiring and Power Source Considerations
When it comes to installing a car camera, proper wiring and power source selection are crucial. Here are a few important points to consider:
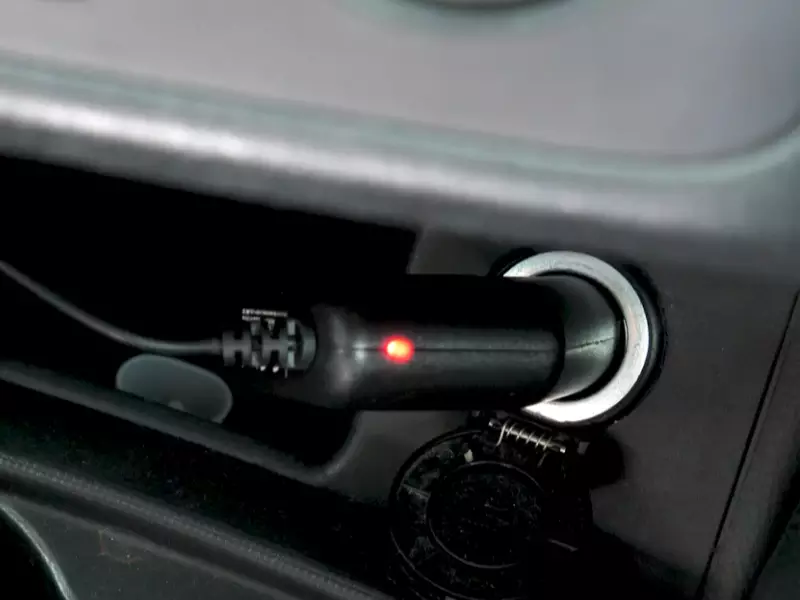
- Choose the Right Power Source: Before starting the installation process, determine where you will draw power for your car camera. This can be from the vehicle’s fuse box, cigarette lighter socket, or directly from the battery. Consider factors such as ease of installation, available power supply, and the ability to hide the wiring.
- Ensure Proper Voltage: Check the voltage requirements of your car camera and make sure the power source you choose provides the necessary voltage. Choosing an incorrect power source can lead to a malfunctioning camera or even potential damage.
- Hide the Wiring: Once you have selected the power source, it’s important to hide the wiring to maintain a clean and professional installation. Safely route the wires along the vehicle’s interior, tucking them away from view and securing them to avoid any interference with the driver or passengers.
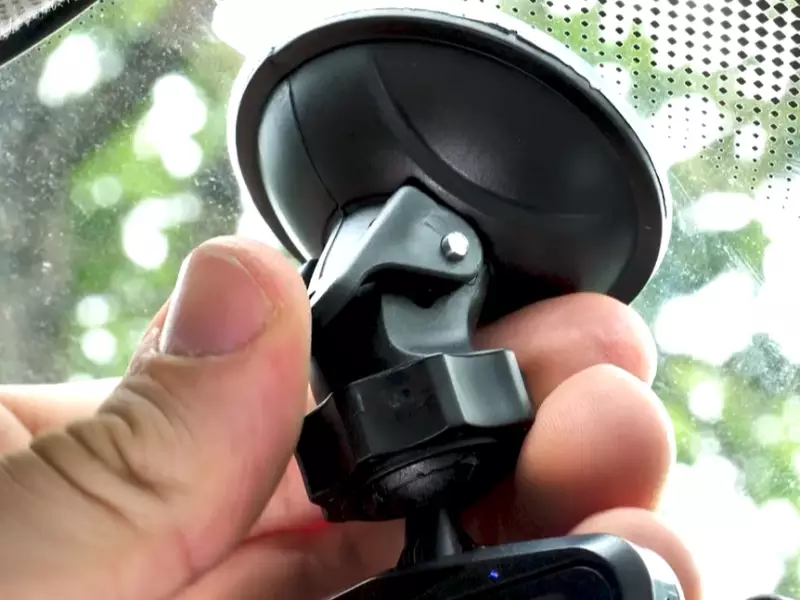
Securing the Car Camera Mount
Securing the car camera mount properly is essential to ensure the camera remains stable and steady during use. Here’s how you can effectively secure the car camera mount:
- Choose the Mounting Location: Select a suitable location inside your vehicle to mount the camera. This can be on the windshield, dashboard, or rearview mirror, depending on your preference and local laws.
- Clean the Mounting Surface: Before attaching the mount, clean the chosen surface thoroughly to ensure proper adhesion. Use a non-abrasive cleaner to remove any dirt, dust, or oils that may hinder the adhesive.
- Attach the Mount: Peel off the protective film on the adhesive side of the car camera mount and firmly press it onto the cleaned mounting surface. Apply pressure for a few seconds to help the adhesive bond and ensure a secure attachment.
Connecting the Camera to Power and the Vehicle’s Electrical System
Once you have securely mounted the car camera, it’s time to connect it to power and the vehicle’s electrical system. Follow these steps for a proper and safe connection:
- Identify the Power Connector: Locate the power connector on the car camera. It is usually located at the back or bottom of the device.
- Connect the Power Cable: Insert the power cable into the camera’s power connector. Make sure it is securely inserted and properly aligned.
- Connect to the Power Source: Take the other end of the power cable and connect it to the power source you have chosen earlier. Follow the manufacturer’s instructions for proper connection.
- Test the Connection: Before finalizing the installation, test if the car camera receives power from the chosen power source. Turn on your vehicle’s ignition and ensure that the camera powers up successfully.
Once you have completed these steps, you can enjoy the benefits of having a car camera installed. Remember to periodically check the camera’s performance and make any necessary adjustments to ensure optimal functionality.
Adjusting And Testing The Car Camera
Properly adjusting and testing your car camera is crucial to ensure optimal performance and accurate recordings. In this section, we will guide you through the process of setting up the camera’s viewing angle, adjusting image settings and preferences, and testing the camera for functionality and proper alignment.
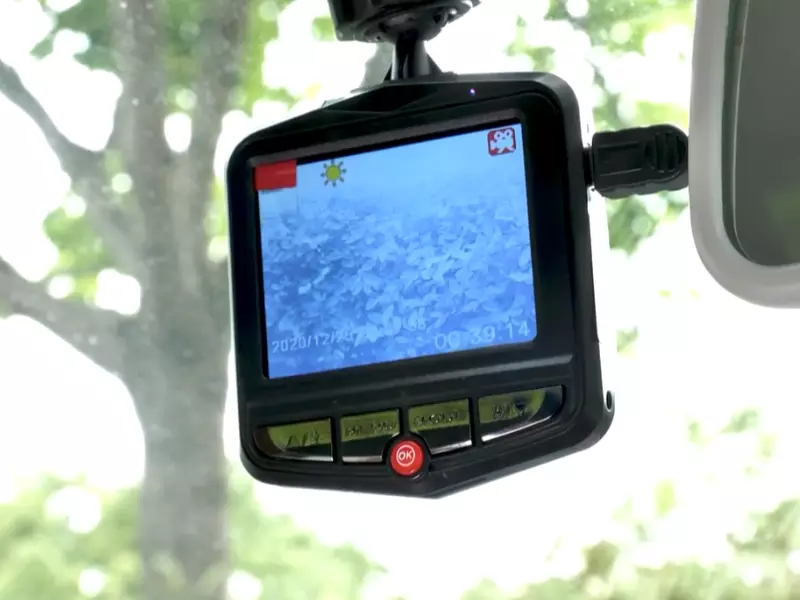
Setting up the camera’s viewing angle
One of the most important steps in installing a car camera is setting up the viewing angle. This will determine the area that will be captured by the camera and what will be visible in the recordings. Follow these steps to set up the viewing angle:
- Mount the camera securely on the dashboard or windshield using the provided mounting bracket.
- Ensure that the camera is positioned in a way that it does not obstruct your view while driving.
- Adjust the camera’s angle by tilting and swiveling it until you have the desired view of the road ahead.
- Once you have found the optimal viewing angle, fasten the camera in place to prevent any movement or vibrations.
It is recommended to consult the camera’s user manual for specific instructions on adjusting the viewing angle as different models may have varying mechanisms.
Adjusting image settings and preferences
After setting up the viewing angle, you may need to adjust the image settings and preferences to ensure that the recordings are clear and accurate. Follow these steps to adjust the image settings:
- Access the camera’s settings menu by navigating through the on-screen display or using the provided remote control.
- Locate the image settings options, which may include brightness, contrast, saturation, exposure, and white balance.
- Adjust these settings according to your preference and the lighting conditions you expect to encounter during your drives.
- Take test recordings and review them to determine if any further adjustments are needed.
It is important to note that each car camera model may have different options and terminology for image settings. Refer to the user manual for specific instructions based on your camera model.
Testing the camera for functionality and proper alignment
Once you have set up the viewing angle and adjusted the image settings, it is essential to test the camera for functionality and proper alignment. Follow these steps to ensure that your camera is working correctly:
- Start your vehicle and check if the camera turns on automatically when the ignition is switched on.
- Ensure that the camera is recording and capturing the desired area by reviewing the live feed on its display or through a connected mobile app.
- Perform test drives in various conditions to evaluate the camera’s performance, including during daytime, nighttime, and in different weather conditions.
- Check the recorded footage to ensure that the camera is aligned correctly, capturing the view you desire without any obstructions or distortions.
- If any issues are detected, consult the user manual or contact the manufacturer’s customer support for troubleshooting assistance.
Regularly testing your car camera’s functionality and alignment is recommended to ensure that it continues to operate effectively. Additionally, periodically reviewing the recordings can help you identify and address any potential issues or incidents on the road.
Troubleshooting And Maintenance Tips
In order to ensure the car camera functions optimally and has a longer lifespan, it is essential to troubleshoot and perform regular maintenance. By addressing common installation issues, maintaining cleanliness, and implementing some helpful tips, you can ensure the camera operates smoothly and captures high-quality footage on a consistent basis. Below are some troubleshooting and maintenance tips to keep in mind:
Common installation issues and how to resolve them
If you encounter any issues during the car camera installation, here are some common problems you may face and the steps to resolve them:
| Issue | Resolution |
|---|---|
| The camera does not power on. | Check the power connection and ensure it is securely plugged into the car’s power source. Also, verify that the power source is functional. |
| Camera footage is distorted or blurry. | Ensure the lens is clean and free from any smudges or dirt. Adjust the focus if necessary. If the problem persists, it may be due to a faulty camera, and you may need to contact the manufacturer for further assistance. |
| The camera keeps freezing or restarting. | Try formatting the memory card in the camera or replacing it with a new one. Ensure the camera firmware is up to date, as outdated firmware can lead to performance issues. If the problem persists, it may be a hardware issue, and you should seek professional help. |
Regular maintenance and cleaning of the car camera
To maintain the longevity of your car camera and ensure it continues to function optimally, regular cleaning and maintenance are necessary. Here are some maintenance tips to keep in mind:
- Keep the camera lens clean by wiping it gently with a microfiber cloth. Avoid using abrasive materials that may scratch the lens.
- Regularly check the mounting brackets and connections to ensure they are secure. Any loose connections may impact the camera’s stability and image quality.
- Inspect the cables for any signs of wear or damage. If you notice any frayed wires or exposed cables, replace them immediately.
- Protect the camera against extreme temperatures. Excessive heat or cold can damage the internal components. If you live in an area with extreme weather conditions, consider parking your car in a shaded area or using a sunshade.
Tips for ensuring optimal performance and longevity of the camera
Follow these additional tips to maximize the performance and lifespan of your car camera:
- Regularly update the camera firmware to benefit from the latest features and improvements.
- Choose a high-quality memory card with sufficient storage capacity and fast write speeds.
- Avoid exposing the camera to direct sunlight for prolonged periods, as it can cause overheating.
- Remove the camera from the mounting bracket when not in use for an extended period to prevent unnecessary wear and tear on the device.
- If you notice any sudden changes in camera performance or encounter persistent issues, don’t hesitate to contact the manufacturer’s customer support for assistance.
By troubleshooting common installation issues, performing regular maintenance and cleaning, and following these tips, you can ensure your car camera works reliably and captures clear footage, adding an extra layer of security and peace of mind to your driving experience.
Frequently Asked Questions For How To Install A Car Camera
Can I Install Car Camera Myself?
Yes, you can install a car camera yourself. It is a simple process and can be done without professional help. Just follow the instructions provided with the camera and ensure it is securely mounted in your car. Take your time to properly connect all the wires and position the camera for optimal visibility.
How Do You Install A Dash Cam?
To install a dash cam, follow these steps:
- Choose a suitable location on your windshield.
- Mount the dash cam securely using its adhesive or suction cup.
- Connect the power cable to your car’s cigarette lighter or fuse box.
- Adjust the camera angle for optimal recording.
- Test the dash cam to ensure it’s working properly.
Is There A Dash Cam With No Wires?
Yes, there are dash cams available without wires. These wire-free dash cams use batteries or capacitors for power, eliminating the need for any wires. They offer convenience and easy installation in your vehicle. Simply mount it, and you’re ready to go.
Enjoy hassle-free recording on the road.
Where Is The Best Place To Put A Camera In Your Car?
The best place to put a camera in your car is on the dashboard or windshield. This location provides optimal visibility and captures a wide view of the road ahead. It’s important to ensure the camera doesn’t obstruct your view while driving.
Conclusion
Installing a car camera is a simple yet essential step to enhancing your driving experience. By following the steps outlined in this guide, you can easily install a car camera and enjoy the benefits of added safety and security. Remember to choose the right camera for your needs, position it correctly, and test it thoroughly.
With a car camera in place, you can drive with confidence and peace of mind. Don’t hesitate, install your car camera today and embark on safer journeys ahead.