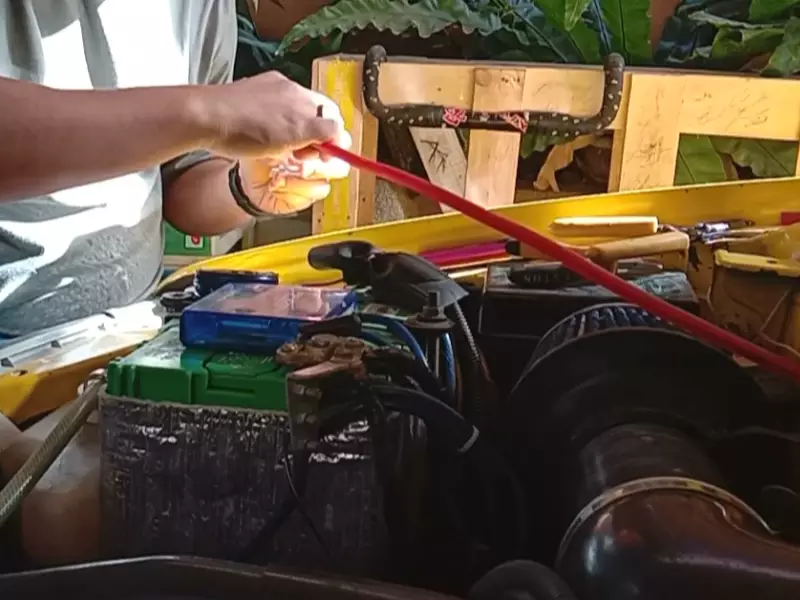
To install a car amplifier diagram, first, disconnect the negative terminal of the car battery. Then, connect the power wire from the amplifier to the positive terminal of the battery and install a fuse holder on the power wire near the battery.
Finally, connect the remote turn-on wire to the remote turn-on lead on the stereo and connect the speaker wires from the amplifier to the speakers. Ensure all connections are secure and properly insulated. Installing a car amplifier diagram involves a few simple steps that can enhance your vehicle’s audio system.
By following the proper installation process, you can improve the sound quality of your car. This article will guide you through the necessary steps to install a car amplifier and provide insights on the diagram. From disconnecting the negative terminal of the battery to connecting the power wire, fuse holder, remote turn-on wire, and ultimately the speaker wires, this comprehensive guide will help you successfully install a car amplifier. Ensure you have the necessary tools and components on hand and proceed with caution to achieve optimal results.
Choosing The Right Car Amplifier For Your Vehicle
If you want to improve the audio quality in your car, installing a car amplifier is a fantastic option. A car amplifier will provide more power and clarity to your speakers, resulting in a more enjoyable listening experience. However, choosing the right amplifier for your vehicle is crucial. In this blog post, we will discuss the factors you need to consider and the important aspects of amplifier power and impedance ratings. By understanding these factors, you can make an informed decision and select the perfect car amplifier for your needs.
Factors to Consider When Selecting a Car Amplifier
Before purchasing a car amplifier, there are several essential factors to consider. These factors will help you ensure that the amplifier you choose is compatible with your vehicle and audio system. Let’s delve into these considerations:
- Power requirements: Different amplifiers have varying power outputs. Determine the power requirements of your speakers and make sure the amplifier you select can deliver the necessary power. Selecting an amplifier with too little power may result in distorted sound, while an amplifier with excessive power can damage your speakers.
- Number of channels: Consider the number of speakers you have or plan to install in your vehicle. If you have multiple speakers, you will need a multi-channel amplifier to power each one properly. However, if you only have a single speaker, a mono-channel amplifier will suffice.
- Budget: Set a budget for your car amplifier purchase. Amplifiers come in various price ranges, so determining your budget will help narrow down your options.
- Space limitations: Depending on the size of your vehicle and available installation area, consider the dimensions of the amplifier. Ensure it will fit in your allotted space without any issues.
Matching the Amplifier to Your Vehicle’s Audio System Needs
It is crucial to match the amplifier to your vehicle’s audio system needs. Each vehicle has unique audio requirements, and understanding these needs will help you select the appropriate amplifier. Consider the following factors:
- Speaker impedance: Determine the speaker impedance of your vehicle’s audio system. Impedance refers to the resistance speakers pose to the flow of electrical current. Select an amplifier with a matching impedance rating to achieve optimal performance.
- Audio system compatibility: Ensure that the amplifier you choose is compatible with your vehicle’s audio system. Check the specifications and consult with experts if needed to make sure the amplifier will work seamlessly with your existing setup.
Importance of Understanding Amplifier Power and Impedance Ratings
Understanding amplifier power and impedance ratings is essential when selecting a car amplifier. The power rating indicates how much output power the amplifier can provide. It’s crucial to choose an amplifier with sufficient power to match your speakers’ needs without overpowering them. Similarly, impedance ratings determine how well the amplifier and speakers will work together. Matching impedance ratings will ensure efficient power transfer and prevent any damage to your audio system.
By considering all these factors and understanding the significance of power and impedance ratings, you can confidently choose the right car amplifier for your vehicle. Remember to consult with experts or refer to your car’s manual if you have any doubts or questions during the selection process.
Gathering The Necessary Tools And Materials
Installing a car amplifier can be an exciting endeavor that enhances your car’s audio system. However, before diving into the installation process, it is crucial to gather the necessary tools and materials. Proper preparation ensures a smooth and successful installation. In this section, we will explore the essential tools, materials, and tips for selecting high-quality wires, connectors, and fuses.
Essential tools needed for installing a car amplifier
Before getting started, make sure you have the following tools on hand:
- Screwdriver set
- Socket set
- Wire crimpers
- Wire stripper
- Tape measure
- Electrical tape
- Flashlight
- Drill with drill bits
- Multimeter
List of materials required for a successful installation
In addition to the tools, you will need several materials to ensure a successful installation:
| Materials | Description |
|---|---|
| Car amplifier | Choose the amplifier that best suits your audio needs and car’s specifications. |
| Amplifier wiring kit | Look for a kit that includes power and ground wires, RCA cables, remote turn-on wire, fuses, and connectors. |
| Speaker wire | High-quality speaker wire is essential for delivering crisp and clear audio signals. |
| Fuse holder | A fuse holder protects the amplifier and the car’s electrical system from potential damage. |
| Wire connectors | Ensure secure connections between wires by using high-quality connectors. |
Tips for selecting high-quality wires, connectors, and fuses
When selecting wires, connectors, and fuses for your car amplifier installation, keep these tips in mind:
- Choose wires with a suitable gauge to handle the power requirements of your amplifier.
- Opt for oxygen-free copper (OFC) speaker wire for better conductivity and audio performance.
- Invest in connectors that are specifically designed for car audio systems to ensure a secure and reliable connection.
- Select fuses with the appropriate amperage rating to protect your amplifier and car’s electrical system.
By gathering the necessary tools and materials, you are taking the essential first steps towards installing a car amplifier. This preparation ensures that you have everything you need for a successful installation, enabling you to enjoy enhanced audio quality in your car.
Preparing Your Vehicle For Amplifier Installation
Before you dive into the exciting process of installing a car amplifier, it’s crucial to ensure your vehicle is ready for the task. By taking the necessary steps to prepare your vehicle, you can ensure a smooth and successful installation. In this section, we will explore three important aspects of preparing your vehicle for amplifier installation: Understanding the electrical system of your car, locating the ideal mounting spot for the amplifier, and steps to ensure a clean and secure installation.
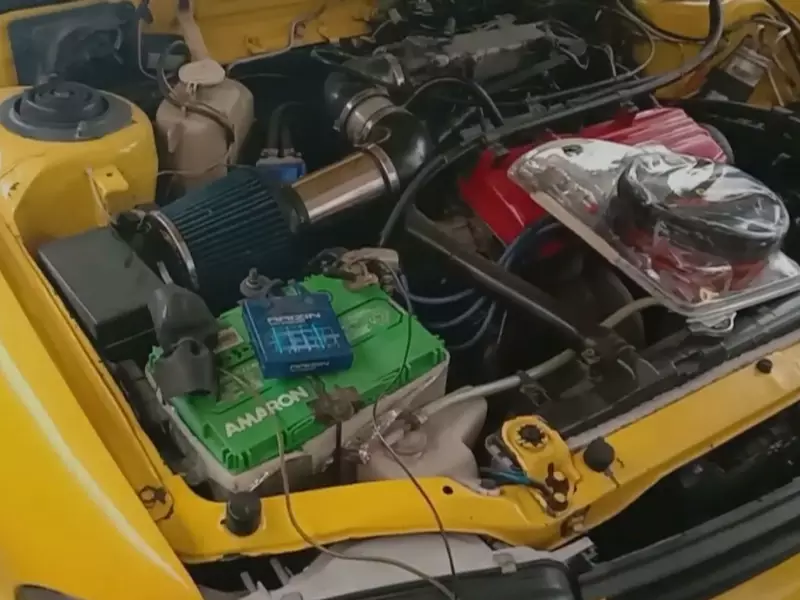
Understanding the electrical system of your car
It’s essential to have a good understanding of your car’s electrical system before installing a car amplifier. This will help you identify the necessary connections and ensure that you make the right choices. Here are a few key points to consider:
- Familiarize yourself with the car’s battery location and terminals. Understanding how to disconnect and reconnect the battery safely will be necessary.
- Identify the location of the car’s fuse box. You may need to tap into the fuse box for power connections.
- Check the car’s wiring diagram or manual to understand the different wires and colors associated with the electrical system.
Locating the ideal mounting spot for the amplifier
Choosing the right mounting spot for your amplifier is crucial to ensure optimal performance and prevent any potential hazards. Here’s what you should consider when locating the ideal spot:
- Look for an area in the car’s trunk or interior that is well-ventilated to prevent overheating.
- Ensure that the location is sturdy enough to hold the amplifier securely, minimizing vibrations and potential damage.
- Keep the amplifier away from any moisture or water sources to avoid damage.
Steps to ensure a clean and secure installation
Once you have identified the appropriate spot for your amplifier, it’s time to proceed with the installation. Here are the steps to ensure a clean and secure installation:
- Plan your wiring route carefully to avoid any interference with other car components.
- Use high-quality wiring and connectors to ensure a reliable connection.
- Securely mount the amplifier using brackets or screws, ensuring it is firmly in place.
- Neatly bundle and secure the wiring using zip ties or adhesive clips to minimize the risk of damage or tangling.
- Double-check all connections to ensure they are tight and secure.
By following these steps, you can prepare your vehicle for amplifier installation and set yourself up for a successful outcome. With a clear understanding of your car’s electrical system, careful selection of the mounting spot, and attention to the installation process, you’ll be ready to enjoy enhanced audio performance in your vehicle.
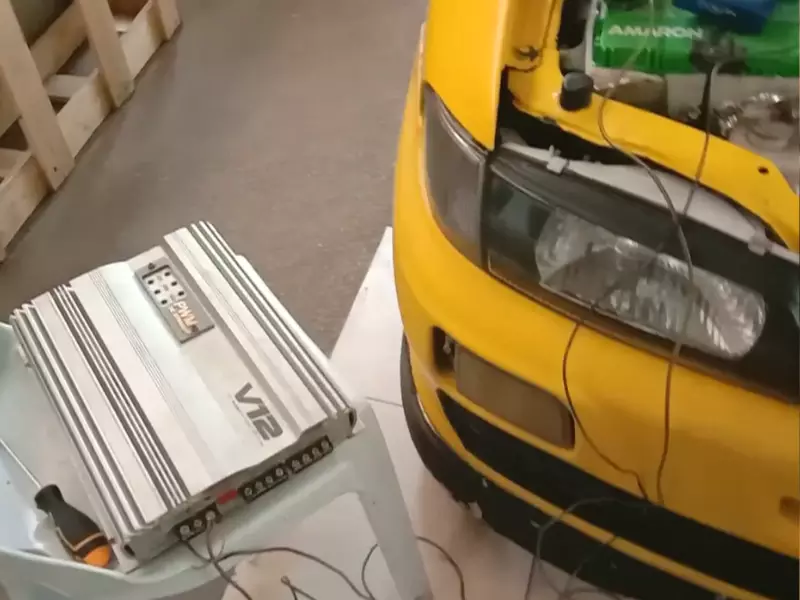
Wiring The Power And Ground Connections
When it comes to installing a car amplifier, one of the crucial steps is wiring the power and ground connections. Properly establishing these connections ensures that your amplifier operates efficiently and delivers optimal sound quality. In this section, we will discuss the guidelines for connecting the power wire to the battery, steps to establish a reliable ground connection, and tips for safely routing the power and ground wires through the vehicle.
Guidelines for properly connecting the power wire to the battery
Connecting the power wire to the battery is a critical step in the installation process. By following these guidelines, you can ensure a secure and efficient power connection:
- Locate the positive battery terminal and remove the protective cover.
- Measure the distance from the battery to the amplifier, allowing for enough wire length to reach comfortably.
- Select an appropriate gauge power wire that can handle the amplifier’s power requirements and length of the cable.
- Strip approximately 1 inch of insulation from the end of the power wire using wire strippers.
- Insert the stripped end of the power wire into the positive terminal of the battery and tighten the connection securely.
- Ensure that the power wire is well-routed and secured away from any moving parts or sources of heat within the engine bay.
Steps to establish a reliable ground connection for the amplifier
Establishing a reliable ground connection is essential for the amplifier to function properly and eliminate any potential noise or humming issues. Follow these steps to ensure a solid ground connection:
- Identify a suitable ground point near the amplifier. It should be a bare metal surface, preferably directly connected to the vehicle’s chassis.
- Remove any paint, rust, or debris from the ground point using sandpaper or a wire brush to establish clean metal-to-metal contact.
- Strip approximately 1 inch of insulation from the end of the ground wire.
- Securely attach the stripped end of the ground wire to the ground point using a properly sized ring terminal or grounding screw.
- Check the tightness of the ground connection to ensure a solid and reliable electrical connection.
Tips for safely routing the power and ground wires through the vehicle
Routing the power and ground wires through your vehicle requires careful planning to avoid potential hazards and interference with other components. Consider the following tips to ensure safe and efficient wire routing:
- Choose the most direct route from the amplifier to the battery while avoiding sharp edges and hot areas.
- Use wire loom, zip ties, or adhesive clips to secure the wires along their path and prevent them from moving or getting damaged.
- Keep the power and ground wires separated to minimize the risk of interference or electrical noise.
- Avoid running the wires parallel to audio signal cables, as this can introduce unwanted noise into the audio system.
- If necessary, use grommets or protective tubing to protect the wires when passing through a firewall or body panels.
By following these guidelines and tips, you can confidently wire the power and ground connections for your car amplifier, ensuring a safe and reliable installation. Taking the time to establish proper connections and route the wires correctly will greatly enhance your audio system’s performance and overall listening experience.
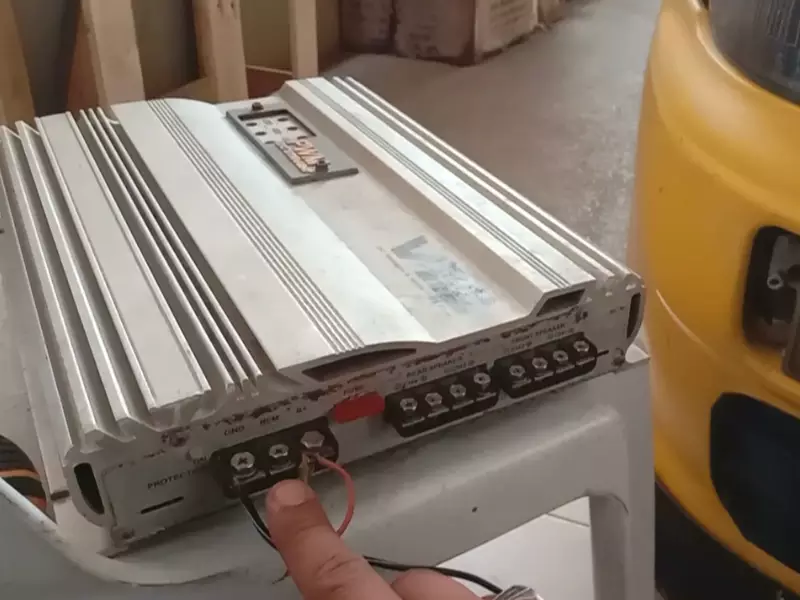
Connecting The Amplifier To The Head Unit
Identifying the Appropriate Connections on the Head Unit and Amplifier
Before you can connect the amplifier to the head unit, it’s crucial to identify the appropriate connections on both devices. Start by examining your head unit and amplifier for RCA inputs and outputs, as these will be key to establishing the connection. Look for labeled ports or consult the user manuals for guidance. Typically, the head unit will have RCA outputs, whereas the amplifier will have RCA inputs. Take note of the color coding on the inputs and outputs, as this will aid in the correct connection.
Techniques for Connecting the Amplifier to the Head Unit Using RCA Cables
Once you’ve identified the appropriate connections, it’s time to establish the connection using RCA cables. RCA cables are commonly used to transmit audio signals from the head unit to the amplifier. To connect the devices:
- Start by locating the RCA outputs on your head unit. These are often color-coded red and white.
- Insert one end of the RCA cable into the corresponding RCA output ports on the head unit. Ensure a secure connection by firmly pushing the cables in.
- Identify the RCA inputs on the amplifier, which are usually located close to the speaker wire connections.
- Connect the other end of the RCA cable into the matching color-coded RCA input ports on the amplifier. Again, ensure a secure connection.
- If you are connecting multiple amplifiers to your head unit, repeat the process for each amplifier, making sure to connect the appropriate RCA cables to their respective amplifiers.
Adjusting the Gain and Crossover Settings for Optimum Sound Quality
Now that the amplifier is properly connected to the head unit, it’s important to adjust the gain and crossover settings to achieve optimum sound quality.
The gain setting controls the amplification level of the audio signal coming from the head unit. It’s crucial to set it correctly to avoid distortion or clipping. Start by turning the gain knob on the amplifier to its lowest level and gradually increasing it until you achieve the desired volume without any distortion or clipping. It’s best to make small adjustments and test the sound quality as you go.
The crossover settings determine the frequency range of the audio signal that is sent to different speakers or subwoofers. Adjusting these settings can help optimize the sound output of your car audio system. Consult the user manual for your amplifier to understand how to adjust the crossover settings effectively. Experiment with different settings to find the balance that suits your personal preferences.
Remember to make these adjustments while playing music or audio sources that you commonly listen to, as it will give you a better understanding of how the changes impact the overall sound quality.
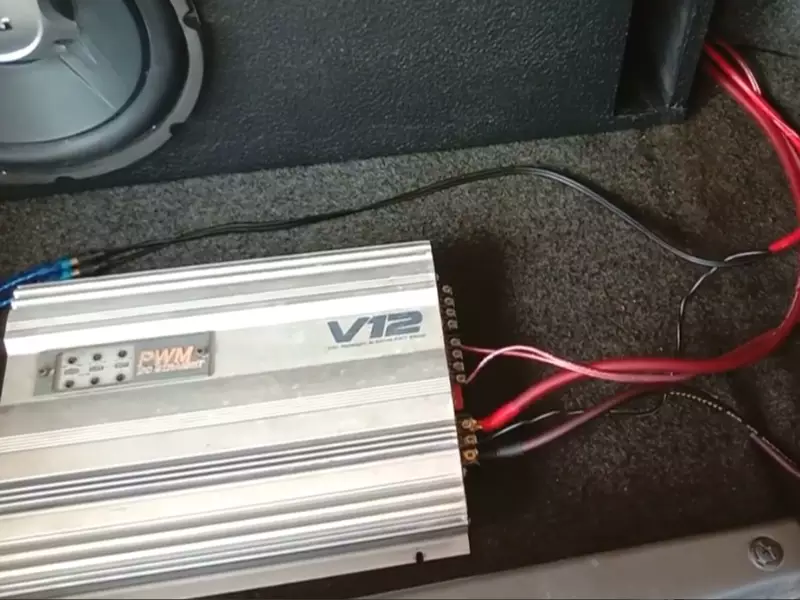
Installing And Connecting Speakers To The Amplifier
When it comes to upgrading your car audio system, installing a car amplifier can significantly enhance the sound quality and overall performance. But before you can enjoy your music with crystal-clear clarity and powerful bass, you need to know how to properly install and connect the speakers to the amplifier. In this guide, we’ll walk you through the considerations for selecting the right speakers, the steps to mount and connect them to the amplifier, and how to test and adjust the speaker connections for optimal performance.
Considerations for selecting the right speakers for your amplifier
Before you dive into the installation process, it’s important to choose the right speakers for your amplifier. Here are some important considerations:
- Power handling: Ensure that the speakers you select can handle the power output of your amplifier. Refer to the specifications of both the speakers and the amplifier to make sure they are compatible.
- Speaker size: Check the dimensions of your car’s speaker locations to determine the appropriate speaker size. Consider any modifications that may be required for installation.
- Speaker type: Choose the speaker type that suits your audio preferences. Options include coaxial speakers, component speakers, and subwoofers.
- Budget: Set a budget for your speaker purchase and find options that offer the best value for your money.
Steps to mount and connect speakers to the amplifier
Once you’ve selected the right speakers, it’s time to mount and connect them to your amplifier. Follow these steps for a smooth installation process:
- Prepare the speakers: Remove any grille covers and connect the speaker wires to the speaker terminals in accordance with the manufacturer’s instructions.
- Identify the mounting locations: Determine the desired locations for your speakers. Make sure they fit properly and won’t interfere with any other car components.
- Mount the speakers: Attach the speakers to their respective mounting locations using the appropriate screws or brackets. Ensure a secure fit to minimize vibrations.
- Connect the speaker wires: Run the speaker wires from the amplifier to each speaker. Connect the positive and negative wires of each speaker to the corresponding terminals on the amplifier.
If you’re unsure about the wiring configuration, consult the wiring diagram provided by the amplifier manufacturer.
Testing and adjusting speaker connections for optimal performance
Once your speakers are mounted and connected, it’s crucial to test and adjust the speaker connections to achieve optimal audio performance. Follow these steps:
- Power on the audio system: Turn on your car’s audio system and play some music.
- Equalize the sound: Use the equalizer controls on your amplifier or head unit to adjust the sound levels of each speaker. This will ensure a balanced audio experience.
- Fine-tune the settings: Experiment with different settings such as bass, treble, and balance to achieve your desired sound quality.
- Test the speakers: Play a variety of music genres and check if all speakers are functioning properly. Listen for any distortions or imbalances in sound.
By following these steps, you can ensure that your speakers are properly connected and configured for optimal performance.
Securing And Testing The Amplifier Installation
Securing and testing the amplifier installation is a crucial step in ensuring optimal performance and longevity of your car audio system. Properly securing the amplifier not only prevents rattling or damage but also helps maintain a clean and tidy installation. Furthermore, checking for any loose connections and ensuring everything is securely in place is essential for error-free operation. Finally, testing the amplifier and adjusting settings as needed ensures that you are getting the best sound quality possible. Below, we outline the steps for securing, checking, and testing your car amplifier installation.
1. Properly securing the amplifier to prevent rattling or damage
When it comes to securing your car amplifier, there are a few important aspects to consider. First and foremost, you want to make sure that the amplifier is mounted in a sturdy location within your vehicle. This will help reduce any potential vibrations that could lead to rattling or damage over time. Additionally, the amplifier should be secured using suitable mounting hardware, such as screws or brackets, to ensure it stays in place, even during bumpy rides.
If you are unsure where to mount your amplifier, consult your vehicle’s owner’s manual or seek professional installation advice. Remember to choose a location that provides adequate ventilation to prevent overheating.
2. Checking for any loose connections and ensuring everything is secure
Before testing your amplifier, it’s important to check for any loose connections. Start by inspecting the power and ground connections, ensuring that they are tight and free from any corrosion. A loose connection can lead to poor performance or even damage to your amplifier.
Next, examine the speaker connections, ensuring that they are properly connected and secure. A loose or faulty speaker connection can result in distorted sound or no sound at all. Take the time to inspect all the wiring connections, including RCA cables, to guarantee a reliable and stable connection throughout your audio system.
3. Steps for testing the amplifier and adjusting settings as needed
Once you have secured all the connections and ensured everything is tight, it’s time to test your amplifier and make any necessary adjustments to optimize sound quality. Here are the steps to follow:
- Start by turning on your vehicle and the audio system.
- Play a variety of audio sources, such as music or spoken content, to test the different frequency ranges and volumes.
- Listen closely to the sound produced by your speakers. If you notice any distortion, adjust the gain control on your amplifier accordingly. Gradually increase the gain until you achieve a clear and balanced sound without distortion.
- If your amplifier has additional settings, such as bass boost or crossover controls, experiment with these to fine-tune the sound to your preferences. Take note of the changes you make, so you can easily revert back or make further adjustments if needed.
- Continue tweaking the settings until you are satisfied with the overall sound quality of your system.
Remember to be patient during the testing process. It may take some time and experimentation to achieve the perfect balance of sound for your specific audio setup.
By following these steps to secure and test your car amplifier installation, you can ensure that you enjoy the best possible audio experience while on the road. Take the time to properly secure your amplifier, check for any loose connections, and test and adjust settings as needed. Your ears will thank you for the enhanced sound performance.
Troubleshooting Common Issues
Identifying and troubleshooting potential problems with the amplifier
While installing a car amplifier can greatly enhance your audio system’s performance, it’s not uncommon to encounter issues along the way. Identifying and troubleshooting these problems promptly can save you a great deal of frustration. Let’s delve into some common issues you might come across:
Solutions for dealing with issues like buzzing, distortion, or no sound
It can be incredibly frustrating when you encounter buzzing, distortion, or no sound after installing a new car amplifier. Here are some solutions to help you tackle these problems:
Tips for maintaining and prolonging the lifespan of your amplifier
Once you’ve overcome any initial issues with your car amplifier installation, it’s vital to take steps to maintain and prolong its lifespan. Here are some essential tips to keep your amplifier performing at its best:
Frequently Asked Questions For How To Install A Car Amplifier Diagram
How Do You Hook Up A Car Amplifier?
To hook up a car amplifier, follow these steps:
- Connect the power cable to the amplifier’s positive terminal.
- Connect the ground cable to a metal part of the car’s body.
- Connect the RCA cables from the head unit to the amplifier’s RCA inputs.
- Connect the speaker wires from the amplifier to the speakers.
- Finally, connect the remote turn-on wire from the head unit to the amplifier’s remote turn-on input.
How Do I Supply Power To My Car Amp?
To supply power to your car amp, you need two main components: a power cable and a ground cable. Connect the power cable to the positive terminal of your car battery and run it to the amp. Attach the ground cable to a sturdy metal part of your car’s chassis and connect it to the amp’s ground terminal.
Make sure to use appropriate gauge cables for your amp’s power requirements.
How Do I Add An Amp To My Factory Radio?
To add an amp to your factory radio, you will need to connect it using a wiring harness. Firstly, disconnect the negative battery cable. Then, locate the wiring harness behind the factory radio and connect the amp’s wiring harness to it.
Finally, connect the amp’s power and ground wires, as well as the speaker and RCA cables.
What Wire Does The Remote Wire Connect To?
The remote wire connects to the appropriate terminal or connector on the device or component that it is intended for.
Conclusion
To wrap up, installing a car amplifier may seem like a daunting task, but with the help of our step-by-step diagram, it becomes a manageable project. By following the outlined instructions, you can enhance the sound quality and overall experience in your vehicle.
Remember to take your time, double-check your connections, and ensure safety precautions are followed. With these guidelines in mind, you’ll be on your way to enjoying a powerful audio system on your drives. Happy amplifying!