To install a capacitor in your car, first, gather the necessary tools like a capacitor, a digital multimeter, wire strippers, electrical tape, and zip ties. Then, locate the car’s battery and disconnect the negative terminal.
Next, identify a suitable mounting location for the capacitor, preferably near the amplifier. After that, connect the power wire from the amplifier to the positive terminal of the capacitor and secure it. Connect the ground wire from the amplifier to a suitable grounding point on the car’s chassis.
Finally, reconnect the battery’s negative terminal and test the system to ensure proper functioning.
Benefits Of Installing A Capacitor
Installing a capacitor in your car can provide several important benefits that enhance both the performance of your vehicle and the audio experience in your car. These benefits include smoother power delivery, enhanced audio performance, and a reduction in electrical noise. By understanding how a capacitor works and the specific advantages it offers, you can make an informed decision about whether to install one in your car.
Smoother Power Delivery
A capacitor can help maintain a constant flow of electrical power, which is especially beneficial in cars with high-demand audio systems or powerful amplifiers. When your vehicle’s audio system requires a sudden surge of power, the capacitor acts as a buffer, ensuring that the necessary energy is readily available. This results in a smoother power delivery to your audio system, preventing voltage drops and potential distortion that can significantly impact audio quality.
Enhanced Audio Performance
With a capacitor in place, your car’s audio system can operate at its full potential. By providing immediate power whenever needed, the capacitor helps your amplifiers deliver consistent and clear sound without any performance hiccups caused by inadequate power supply. This enhanced audio performance allows you to enjoy your favorite music and podcasts with greater clarity, depth, and detail, elevating your overall driving experience.
Reduction in Electrical Noise
Electrical noise can be a nuisance in car audio systems, leading to hissing, buzzing, or popping sounds that can detract from the listening experience. A capacitor helps to reduce electrical noise, acting as a filter by stabilizing voltage levels and smoothing out fluctuations in the electrical system. This improvement in the quality of power delivered to your audio system results in minimal interference and a cleaner, more enjoyable sound.
Understanding Capacitors And Their Role In A Car
What is a Capacitor?
A capacitor is an electronic component that is commonly used in car audio systems to store and discharge electrical energy. It acts as a reservoir for power, helping to ensure a stable and uninterrupted flow of electricity to various components in your car’s audio system.
Capacitors in Car Audio Systems
When it comes to car audio systems, capacitors play a vital role in enhancing performance and preventing voltage drops. These drops can occur when there is a sudden demand for power, such as during heavy bass notes or when the volume is turned up.
A capacitor acts as a buffer, supplying the extra power needed for these peak moments. It stores electrical energy when the demand is low and releases it when the demand exceeds the capabilities of the car’s electrical system.
How Capacitors Help Maintain Voltage
One of the main reasons car audio enthusiasts choose to install capacitors is to ensure that the voltage remains stable, especially during intense sound production. Here’s how capacitors help:
- Reduce Voltage Drops: Capacitors can store a significant amount of electrical energy and deliver it quickly when needed. This helps to supplement the car’s electrical system during heavy power demands, preventing voltage drops that can lead to distortion or even damage to the audio system.
- Provide Quick Power: Capacitors act as a power reservoir, feeding the audio system with the necessary energy when the demand spikes. This ensures that the system receives a steady and uninterrupted power supply, allowing it to perform at its best.
- Minimize Dimming Lights: In some cases, car audio systems can cause the headlights or interior lights to dim due to the high power draw. By installing a capacitor, you can reduce this dimming effect, as the capacitor helps to supply the extra power needed without straining the car’s electrical system.
In conclusion, installing a capacitor in your car’s audio system can enhance its performance and ensure a stable power supply. By understanding the role capacitors play in maintaining voltage, you can make an informed decision to optimize your audio experience on the road.
Preparing For The Installation
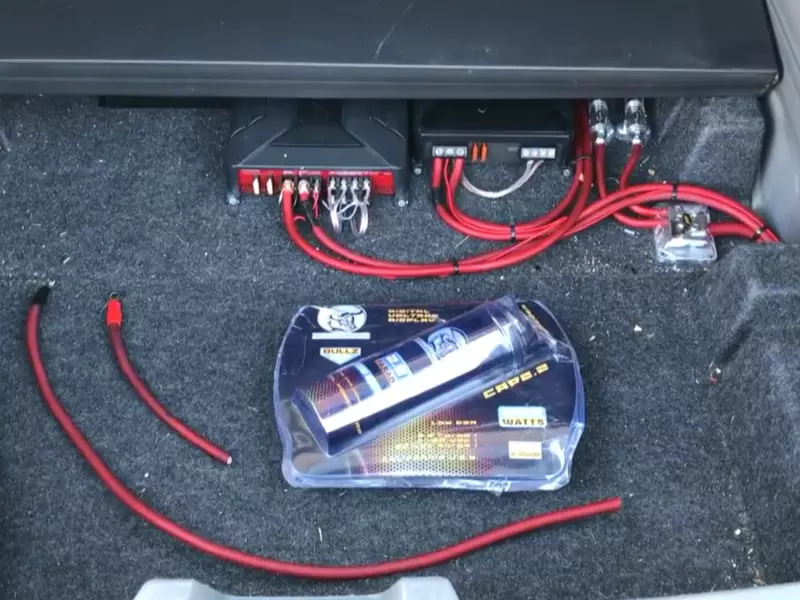
Gather the Necessary Tools and Materials
Before jumping into the installation process, ensure that you have all the essential tools and materials at hand. This will save you time and frustration later on. Here’s a list of items you’ll need:
- A capacitor (make sure it is compatible with your car’s electrical system)
- A socket set
- A wire cutter/stripper
- Crimping tool
- Electrical tape
- Wire connectors
- Fuse holder and fuse
- Ring terminals
- Basic hand tools (screwdriver, pliers, etc.)
Having these tools readily available will make the installation process smoother and more efficient.
Choosing the Right Capacitor for Your Car
When selecting a capacitor for your car, it’s important to choose one that is suitable for your car’s electrical needs. Here are a few factors to consider:
- Capacitance: This refers to the amount of electrical charge a capacitor can store. To determine the capacitance you need, consider the size of your car’s audio system and the power it requires.
- Voltage Rating: Ensure that the capacitor you choose has a voltage rating that matches or exceeds your car’s electrical system.
- Physical Size: Take into account the available space in your car for the capacitor. Measure the dimensions and compare them to the size of the capacitor before making a purchase.
- Additional Features: Some capacitors come with features such as voltage meters, digital displays, or built-in fuses. Decide if any of these additional features are important to you and choose accordingly.
By considering these factors, you’ll be able to select a capacitor that meets your car’s specific requirements.
Disconnecting The Battery And Panels
One of the essential steps in installing a capacitor in your car is disconnecting the battery and panels. This ensures your safety and allows you to gain access to the necessary components. In this guide, we will cover two crucial aspects: safely disconnecting the car battery and removing interior panels for access.
Safely Disconnecting the Car Battery
Before you start working on your car’s electrical system, it is crucial to disconnect the car battery to avoid any potential accidents or damage. Follow these steps to safely disconnect the car battery:
- Park your car in a safe and well-ventilated area. Engage the parking brake and turn off the ignition.
- Open the hood of your car and locate the battery. It is usually situated in the engine compartment.
- Identify the negative terminal of the battery. It is marked with a minus (-) sign.
- Using a wrench or a suitable tool, loosen the bolt or nut attaching the negative terminal to the battery.
- Once the negative terminal is loose, carefully lift it off the battery and secure it away from the battery’s contact.
By following these steps, you have successfully disconnected your car battery, ensuring a safe working environment for the rest of the installation process.
Removing Interior Panels for Access
Now that your car battery is safely disconnected, you can proceed to remove the interior panels to gain access to the areas where the capacitor installation is required. Here’s a step-by-step guide:
- Identify the panels that need to be removed. These panels can vary depending on the make and model of your car. Common panels include the kick panels, center console, or door panels.
- Using a suitable tool, carefully remove any screws or fasteners securing the panels in place.
- Once the screws or fasteners are removed, gently pry the panel away from its mounting points. Be cautious not to use excessive force to avoid damaging the panel or surrounding components.
- If necessary, disconnect any electrical connectors attached to the panel. Take note of their positions to reconnect them correctly later on.
- Store the removed panels in a safe place, away from any potential damage or dirt.
With the interior panels removed, you now have easy access to the areas where you need to install the capacitor. Take your time and ensure a clean and organized working environment to make the installation process smoother.
Remember, always exercise caution and follow safety procedures when working on your car’s electrical system. By safely disconnecting the car battery and removing the interior panels, you are one step closer to successfully installing a capacitor in your car!
Installing The Capacitor
Installing a capacitor in your car’s audio system can help improve the overall performance of your sound system. A capacitor acts as a power storage device, ensuring that your amplifier gets a steady and reliable power supply without draining your car’s battery. However, it’s important to install the capacitor correctly to ensure optimal performance. In this section, we will discuss the steps involved in installing a capacitor in your car.
Identifying the Best Location for the Capacitor
Before installing the capacitor, it’s crucial to identify the best location for it in your car. The ideal spot should meet a few criteria. First, it should be close to the amplifier to minimize the length of the power wires required. Second, it should be easily accessible for future maintenance or adjustments. Lastly, it should be away from any heat sources that could potentially damage the capacitor.
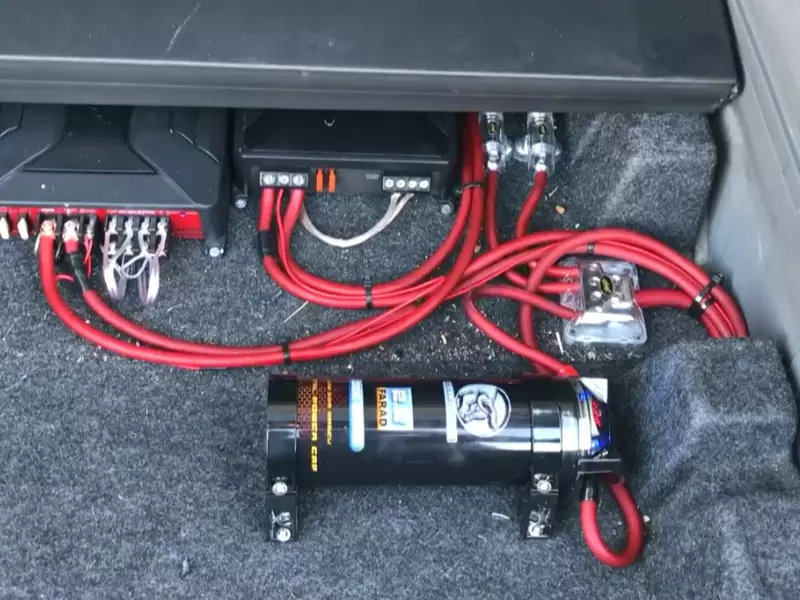
Mounting the Capacitor in the Car
Once you have found the perfect location, it’s time to mount the capacitor in your car. This typically involves securing it to a solid surface using mounting brackets or screws. Make sure the mounting surface is clean and free of any debris. Additionally, you may want to consider using vibration damping materials to prevent any unwanted noise or rattling caused by the capacitor.
Connecting the Capacitor to the Battery and Amplifier
Now that the capacitor is securely mounted, it’s time to connect it to the battery and amplifier. Start by disconnecting the negative terminal of the car’s battery to prevent any accidental short circuits. Then, connect the positive terminal of the capacitor to the positive terminal of the battery using an appropriate gauge power wire. Use crimp connectors or solder the wires for a secure connection.
Next, connect the positive terminal of the amplifier to the positive terminal of the capacitor using another power wire of adequate gauge. Again, ensure a secure and proper connection. Finally, reconnect the negative terminal of the car’s battery.
It’s essential to double-check all the connections to ensure they are securely tightened and properly insulated. Inspect the wires for any signs of damage or fraying. Once everything is in place, you can turn on your car’s audio system and enjoy the enhanced performance with the newly installed capacitor.
Testing And Adjustment
Once you have successfully installed a capacitor in your car’s electrical system, it is crucial to test and adjust it to ensure optimal performance. Testing the capacitor’s voltage and making adjustments accordingly will help optimize its charging and discharging cycles, allowing for improved power distribution and overall electrical stability.
Checking the Capacitor’s Voltage
Before proceeding with any adjustments, it is necessary to check the voltage of your car’s capacitor. This will give you a baseline measurement to work with and help you gauge the capacitor’s charging and discharging capabilities. To check the voltage, follow these simple steps:
- Ensure that your car’s ignition is in the off position and all electronic devices are turned off.
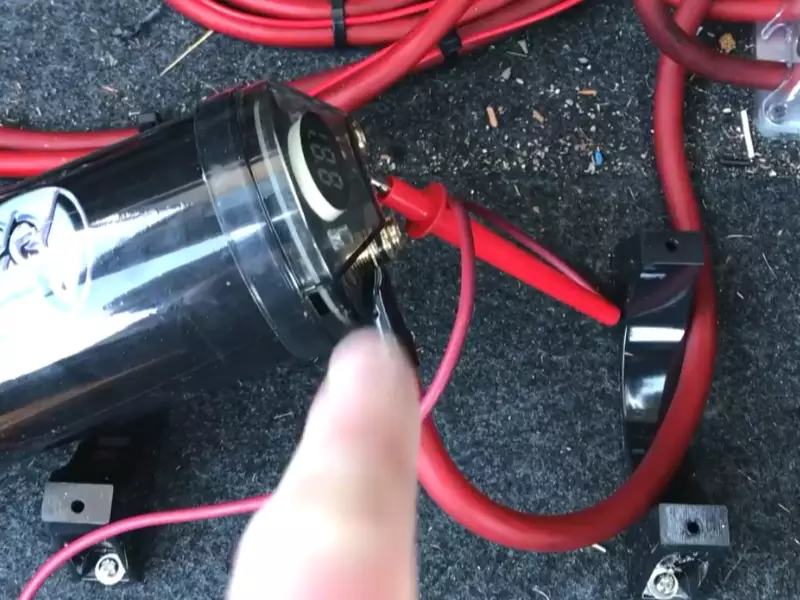
- Locate the positive and negative terminals on the capacitor.
- Using a digital multimeter, set the meter to DC voltage measurement.
- Connect the positive (+) probe of the multimeter to the positive terminal of the capacitor and the negative (-) probe to the negative terminal.
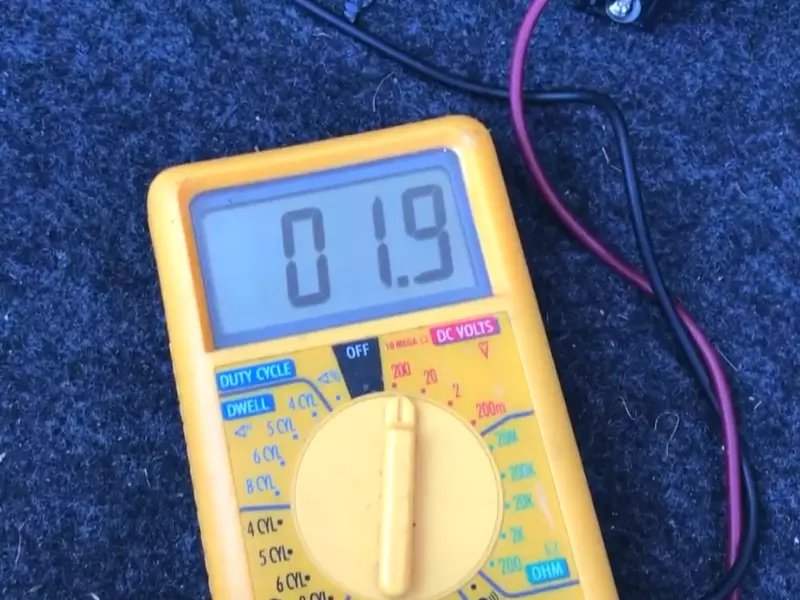
- Read the voltage displayed on the multimeter. This reading will indicate the current charge level of your capacitor.
Based on the voltage reading, you can determine whether your capacitor needs adjustment or not. If the voltage is significantly lower than the recommended level, it may require additional charging to function optimally.
Adjusting the Capacitor to Optimize Performance
Now that you have measured the voltage of your capacitor, it’s time to make necessary adjustments to optimize its performance. Follow these steps to adjust the capacitor:
- Disconnect the positive terminal of the capacitor from the power source.
- Using an appropriate charging device, connect the positive and negative terminals of the capacitor to the charger, ensuring the correct polarity.
- Refer to the manufacturer’s instructions to determine the recommended charging time and voltage.
- Monitor the voltage with a multimeter while the capacitor is charging.
- Once the voltage reaches the recommended level, disconnect the charger and reconnect the capacitor to the power source.
By following these steps, you will effectively adjust the capacitor’s charge level to optimize its performance. It is important to note that overcharging the capacitor beyond the manufacturer’s recommendations can lead to potential damage, so always adhere to the guidelines provided.
Regularly checking and adjusting your car’s capacitor will help ensure the consistent and reliable flow of power throughout your electrical system. This will contribute to enhanced audio quality, improved performance of electronic devices, and reduced strain on your car’s battery. With a properly adjusted capacitor, you can enjoy a smoother and more efficient driving experience.
Wiring And Grounding
One crucial step in installing a capacitor in your car is ensuring proper wiring and grounding. This is essential for the capacitor to work effectively and prevent any electrical issues. In this section, we will cover the importance of using proper gauge wiring and ensuring a solid ground connection.
Using Proper Gauge Wiring
When installing a capacitor, it’s important to use the appropriate gauge wiring for your car’s electrical system. Inadequate wiring can cause the capacitor to malfunction or even damage your vehicle’s existing electrical components.
To determine the correct gauge wiring, you need to consider the current draw of your amplifier or amplifiers. Generally, a rule of thumb is:
- If your amplifier(s) draw less than 50 amps: You can use 8 or 10-gauge wiring.
- If your amplifier(s) draw between 50 and 100 amps: You should use 4 or 6-gauge wiring.
- If your amplifier(s) draw more than 100 amps: You need to use 0 or 2-gauge wiring.
By using the appropriate gauge wiring, you ensure that the capacitor receives the necessary power to function optimally, preventing any potential electrical problems down the line.
Ensuring a Solid Ground Connection
Another vital aspect of installing a capacitor is establishing a solid ground connection. A strong ground connection ensures that the electrical current flows smoothly and reduces the risk of any electrical interference or damage.
Here are a few crucial steps to ensure a solid ground connection:
- Find a suitable grounding point: Look for a metal surface in your car’s vicinity that has direct contact with the chassis. Make sure to choose a clean and unpainted spot for the best connection.
- Remove any paint or debris: Use sandpaper or a wire brush to remove any paint, rust, or debris from the grounding point. This ensures a clean connection with the metal surface.
- Secure the ground wire: Attach one end of the ground wire to the grounding point and the other end to the capacitor’s ground terminal. Ensure that the connection is tight and secure.
By following these steps, you create a solid and reliable ground connection for your capacitor, allowing it to function efficiently and effectively.
Remember, ensuring proper wiring and grounding during the installation of a capacitor in your car is crucial for optimal performance and preventing any electrical issues. By using the correct gauge wiring and establishing a solid ground connection, you can enjoy improved audio quality and protect your car’s electrical system.
Maintaining The Capacitor
A capacitor is an essential component of your car’s electrical system that helps provide a stable power supply. To ensure optimal performance and functionality, regular maintenance of the capacitor is crucial. In this section, we will discuss two key aspects of maintaining the capacitor: regular inspection and cleaning, as well as recharging when needed.
Regular Inspection and Cleaning
Just like any other component in your car, the capacitor can accumulate dust, debris, or even corrosion over time. Regular inspection and cleaning are necessary to prevent any potential issues from arising.
Here are some simple steps you can follow:
- Turn off the power: Before inspecting or cleaning the capacitor, make sure to turn off the power to avoid any electrical shocks.
- Visually inspect: Carefully examine the capacitor for any signs of physical damage or corrosion. If you notice any cracks, bulges, or leaks, it may indicate a faulty capacitor that needs to be replaced.
- Clean the capacitor: Using a soft cloth or a brush, gently remove any dust or debris that may have accumulated on the capacitor. Be cautious not to apply excessive pressure or use any abrasive materials that could damage the component.
A regular inspection and cleaning routine for the capacitor will help maintain its performance and extend its lifespan, ensuring your car’s electrical system remains in top shape.
Recharging the Capacitor When Needed
Over time, capacitors may lose their charge, which can affect their ability to provide a stable power supply. Recharging the capacitor when needed is essential to maintain optimal performance.
Here’s how you can recharge your car’s capacitor:
- Disconnect the power: Before recharging the capacitor, make sure to disconnect the power source to avoid any electrical accidents.
- Identify the charging terminals: Locate the charging terminals on the capacitor. These terminals are usually marked with “+” and “-” signs.
- Connect the charger: Attach the charger’s positive terminal to the capacitor’s positive terminal, and similarly, connect the negative terminal of the charger to the capacitor’s negative terminal.
- Set the charging voltage: Set the charger to an appropriate voltage as specified by the capacitor’s manufacturer. This information can usually be found in the capacitor’s manual or on its label.
- Charge the capacitor: Once the connections are properly made and the voltage is set, start the charging process. Monitor the charging progress and ensure the capacitor reaches its recommended voltage.
- Disconnect the charger: Once the capacitor is fully charged, disconnect the charger from the terminals, making sure to remove the negative terminal first.
By periodically recharging your car’s capacitor, you can maintain its power storage capabilities and ensure consistent electrical performance.
Professional Installation Options
When it comes to installing a capacitor in your car, you have two options: doing it yourself or seeking professional installation services. While the DIY route may seem appealing, it’s important to consider the benefits of having a professional handle the installation. Below, we explore the advantages of professional installation and why it may be the best choice for you.
Considering Professional Installation Services
If you’re not confident in your car’s electrical system or don’t have experience with car audio installations, professional installation services are worth considering. Installing a capacitor requires technical knowledge and the right tools, which may not be readily available to everyone. By opting for professional installation services, you can ensure a smooth and efficient installation process without the risk of damaging your car or the capacitor itself.
Benefits of Professional Installation
There are several benefits to having a professional install a capacitor in your car:
- Expertise: Professional installers have the expertise and experience necessary to properly install a capacitor in your car. They are familiar with various capacitor models and know how to select the right one for your specific equipment and vehicle.
- Efficiency: Professional installers work efficiently, ensuring that the capacitor is installed correctly and in a timely manner. They have the necessary tools and equipment to complete the installation quickly, saving you time and effort.
- Ensured Compatibility: Professional installers will ensure that the capacitor is compatible with your car’s electrical system and audio equipment. They will also make any necessary adjustments to optimize its performance, preventing potential issues down the line.
- Warranty: Many professional installers offer warranties on their work, providing you with peace of mind knowing that any future issues will be addressed. This can save you from costly repairs or replacements in the event of any installation-related problems.
By choosing professional installation services, you can ensure a hassle-free and efficient installation of your car’s capacitor. It’s a worthy investment that can enhance the performance of your audio system and provide you with long-term peace of mind.
Frequently Asked Questions On How To Install A Capacitor In My Car
Will A Capacitor Drain My Battery?
No, a capacitor will not drain your battery. It stores and releases energy, helping to stabilize voltage and prevent sudden drops in power. However, always use a capacitor suitable for your electrical system to avoid any potential issues.
How Do You Connect A Capacitor To A Battery?
To connect a capacitor to a battery, simply connect the positive terminal of the battery to the positive side of the capacitor, and the negative terminal of the battery to the negative side of the capacitor. Make sure to observe the polarity markings on both the battery and the capacitor.
It’s as simple as that!
Where Should You Put The Capacitor?
Place the capacitor near the power source or as close as possible to the load. This ensures stable voltage levels and minimizes electrical noise. In circuits with multiple capacitors, distribute them evenly for optimal performance. Remember to follow the manufacturer’s guidelines for proper placement.
Do I Need A Capacitor For My Car Audio?
Yes, a capacitor is recommended for car audio systems. It helps stabilize voltage levels and provides extra power when needed, reducing strain on the electrical system. This ensures better sound quality and prevents issues like dimming lights or frequent amplifier shutdowns.
Conclusion
To sum it up, installing a capacitor in your car can improve the overall performance of your audio system and prevent voltage drops. By following the step-by-step guide we provided, you can successfully install a capacitor and enjoy crisp and powerful sound.
Remember to turn off the power before starting the installation process and double-check your connections. With proper installation, you’ll experience enhanced audio quality and a smoother ride. So, go ahead and give it a try!