To install a Britax car seat, follow these steps: first, position the seat in your car’s backseat; second, thread the seat belt through the appropriate slots and buckle it; finally, tighten the seat belt and check for a secure fit. Introducing the Britax car seat to your vehicle may seem daunting, but with these simple steps, you can ensure your child’s safety on the road.
A reliable car seat is essential for protecting your little one during travel, providing peace of mind for parents everywhere. Whether you’re a new parent or simply upgrading your current car seat, this concise guide will walk you through the installation process, ensuring an effortless experience.
By adhering to the following instructions, you’ll have your Britax car seat securely installed in no time, ready to embark on countless safe and comfortable journeys.
Choosing The Right Britax Car Seat For Your Child
Choosing the Right Britax Car Seat for Your Child<
When it comes to keeping your child safe while driving, choosing the right car seat is paramount. Britax car seats are known for their top-notch quality, innovative design, and commitment to safety. With a wide range of options available, it’s essential to understand the factors to consider when selecting a Britax car seat for your child, the different types of Britax car seats available, and the safety features each one offers.
By taking these factors into account, you can ensure that your child is protected while on the road.
Factors to Consider When Selecting a Britax Car Seat
Before purchasing a Britax car seat, there are a few key factors you should consider to ensure the perfect fit for your child:
- Age and Weight: Determining your child’s age and weight is crucial in selecting a car seat that offers optimal safety and support. Britax offers car seats suitable for infants, toddlers, and older children of various weight ranges.
- Installation Method: Britax car seats come with different installation options, such as rear-facing or forward-facing. Consider your vehicle’s design and your comfort level with installing a car seat to find the best fit.
- Budget: Cost is an important factor for many parents. Britax car seats offer a range of prices, so it’s essential to determine your budget beforehand.
- Lifestyle: Assess your lifestyle and transportation needs. If you frequently travel or use multiple cars, look for car seats with easy installation or compatibility with different vehicles.
Understanding the Different Types of Britax Car Seats Available
Britax offers a variety of car seat options to meet different age and weight requirements. Understanding the types available will help you select the best fit for your child:
| Type | Description |
|---|---|
| Infant Car Seats | Designed for newborns and infants, usually with a weight range from 4 to 35 pounds. These seats are rear-facing and provide excellent support for a baby’s delicate head and neck. |
| Convertible Car Seats | Convertible car seats can be used in both rear-facing and forward-facing positions, making them suitable for infants and toddlers. They typically accommodate children from 5 to 65 pounds. |
| Booster Seats | Booster seats are designed for older children who have outgrown their convertible car seats. They provide a boost for the child to sit comfortably and safely using the vehicle’s seat belt. |
Evaluating the Safety Features of Britax Car Seats
When it comes to your child’s safety, Britax car seats leave no stone unturned. Each car seat model is equipped with a range of safety features to provide maximum protection on the road:
- Side Impact Protection: Britax car seats feature advanced side impact protection systems that shield your child from potential collisions and provide added safety.
- Energy-Absorbing Foam: The energy-absorbing foam found in these car seats helps cushion the impact during an accident, reducing the risk of injury.
- Sturdy Construction: Britax car seats are built with high-quality materials and durable frames to ensure long-lasting performance and reliability.
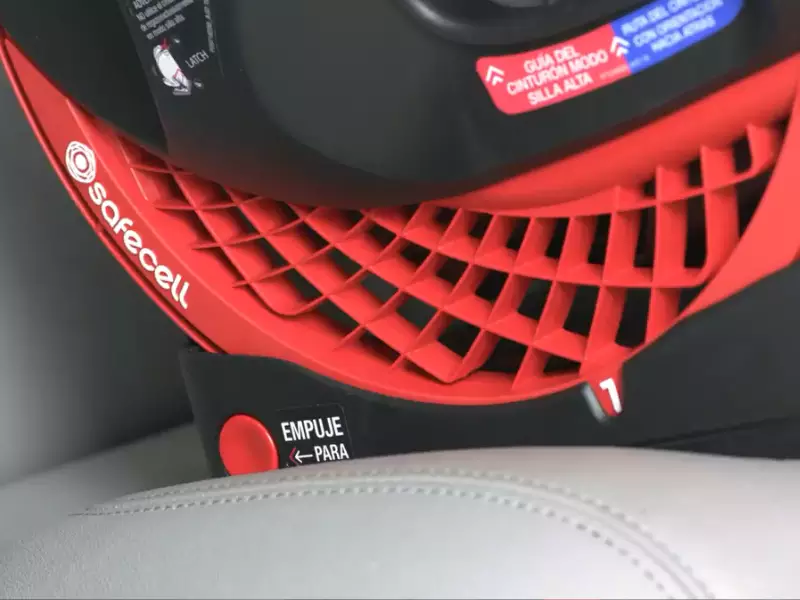
- Easy Installation: Many Britax car seats come with user-friendly installation features, including LATCH connectors and clear guidelines, to facilitate proper and secure installation in your vehicle.
- Adjustable Straps and Harness: The adjustable straps and harness systems ensure a snug fit for your child at every stage, providing optimal comfort and safety.
By thoroughly evaluating the factors discussed above and considering the different types of Britax car seats available, you can make an informed decision to select the perfect car seat for your child. With Britax’s commitment to safety and innovative design, you can have peace of mind knowing that your little one is protected during every journey.

Preparing For Installation
Installing a Britax car seat is an essential step in ensuring your child’s safety on the road. Before you begin the installation process, there are a few important steps to take to ensure a successful and secure fit. By following the guidelines below, you can make the installation process more seamless and ensure that your child is protected while traveling.
Gathering the necessary tools for installing a Britax car seat
Before you start installing your Britax car seat, it’s important to gather all the necessary tools to make the process easier and more efficient. Here’s a list of tools you may need:
- Seat belt or latch system compatible with your vehicle
- Towel or cleaning cloth
- Soap or child-safe cleaning solution
- Soft brush
- Inspection checklist
Gathering these tools beforehand will save you time and ensure a smoother installation process.
Checking the compatibility of your vehicle with the Britax car seat
It’s crucial to check the compatibility of your vehicle with the Britax car seat before installing it. Although most Britax car seats are designed to fit in a wide range of vehicles, it’s important to ensure that your specific car model is compatible. To do this, refer to the car seat’s instruction manual or the Britax website for a list of compatible vehicles. Additionally, you can contact Britax customer support for further assistance in confirming compatibility.
Cleaning and inspecting the car seat for any damages or defects
Prior to installation, it’s vital to thoroughly clean and inspect the Britax car seat for any damages or defects. This step ensures that your child rides in a safe and secure environment. Here’s a step-by-step guide to cleaning and inspecting your car seat:
- Remove the car seat cover and set it aside.
- Using a soft brush, gently remove any dirt or debris from the car seat.
- Mix a mild soap or child-safe cleaning solution with water.
- Using a clean towel or cloth, dampen it with the soapy solution and wipe down the car seat thoroughly.
- Allow the car seat to air dry completely before moving on to the next step.
- While the car seat is drying, inspect it for any damages or defects, such as loose straps, broken buckles, or tears in the fabric.
- If you notice any damages or defects, refrain from installing the car seat and contact Britax customer support for further guidance.
By adhering to these cleaning and inspection guidelines, you can ensure that your child’s car seat is in optimal condition for installation.
Now that you have gathered the necessary tools, checked the compatibility of your vehicle, and cleaned and inspected the car seat for any damages or defects, you are ready to move on to the next step of installing your Britax car seat. In the next section, we will guide you through the installation process step by step, ensuring a secure fit and enhanced safety for your child.
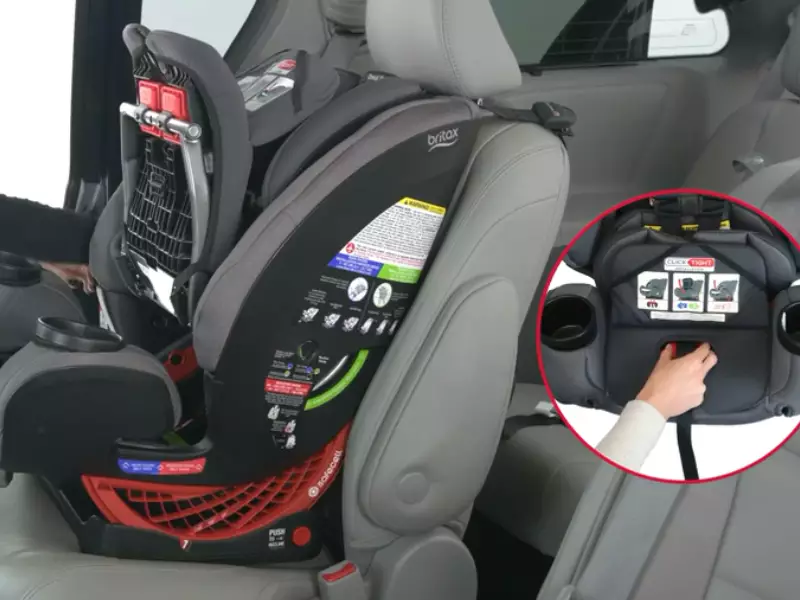
Installing The Britax Car Seat In Your Vehicle
Once you have chosen the perfect Britax car seat for your little one, it’s time to install it in your vehicle. Proper installation is crucial for ensuring your child’s safety during every car ride. The Britax car seat offers two installation options: using the LATCH system or the vehicle’s seat belt. In this guide, we will walk you through both options, providing step-by-step instructions for each. Follow the instructions below to install your Britax car seat correctly and securely.
Understanding the installation options available for Britax car seats
Before we dive into the step-by-step instructions, it’s essential to understand the two installation options available for Britax car seats. These options are:
- LATCH system
- Using the vehicle’s seat belt
The LATCH system, which stands for Lower Anchors and Tethers for Children, is a standardized system that allows you to secure the car seat directly to the vehicle’s anchors without using the seat belt. On the other hand, if your vehicle doesn’t have a LATCH system or if you prefer to use the seat belt for installation, you can do so by following the guidelines provided by Britax.
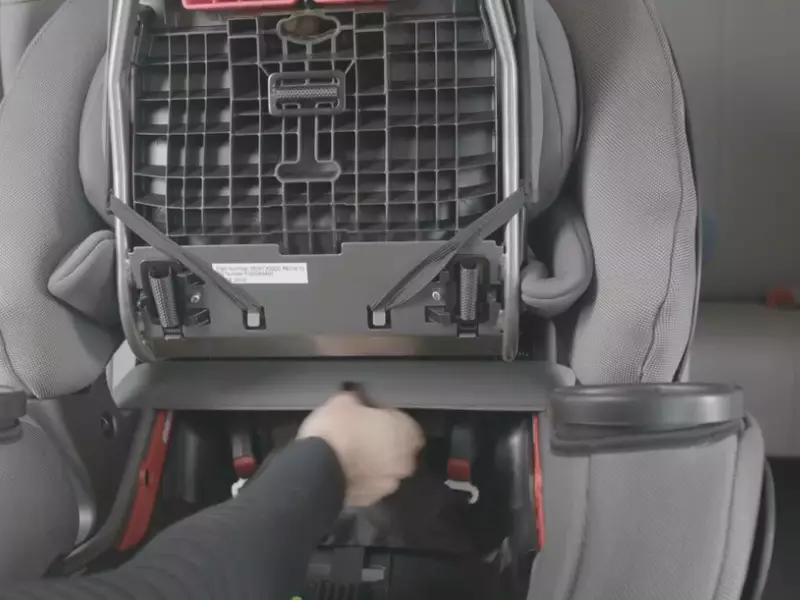
Step-by-step instructions for installing the car seat using the LATCH system
If you choose to install your Britax car seat using the LATCH system, follow these simple steps:
- Locate the lower anchors in your vehicle. These are usually located in the crease of your vehicle’s seat, where the seat back and seat bottom meet.
- Position the car seat facing the rear of the vehicle. Place it in the desired seating position.
- Attach the lower connectors on the car seat to the vehicle’s lower anchors. Push down firmly to ensure a secure connection.
- Make sure the car seat is properly leveled. Adjust the recline angle according to the guidelines provided by Britax.
- Attach the tether strap to the designated tether anchor in your vehicle. The tether anchor is typically located on the back of the vehicle’s seat or the rear shelf.
- Tighten the tether strap to eliminate any slack. Refer to the car seat’s manual for specific instructions on how to tighten the tether strap correctly.
- Double-check the installation by giving the car seat a firm tug. It should not move more than an inch in any direction.
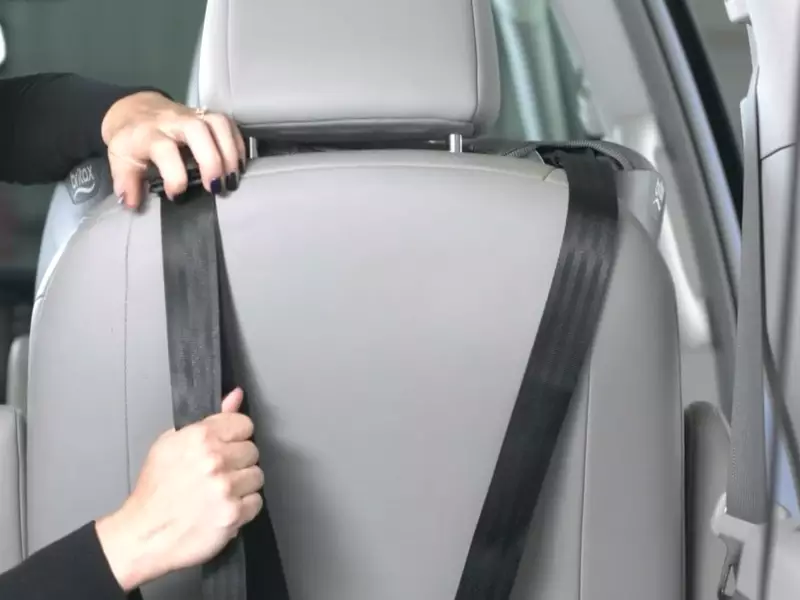
Step-by-step instructions for installing the car seat using the vehicle’s seat belt
If you choose to install your Britax car seat using the vehicle’s seat belt, follow these step-by-step instructions:
- Position the car seat facing the rear of the vehicle. Place it in the desired seating position.
- Thread the vehicle’s seat belt through the designated belt path on the car seat. Make sure the seat belt is not twisted and is properly secured.
- Buckle the seat belt and pull it tight to remove any slack.
- Lock the seat belt according to your vehicle’s instructions. This may involve using a locking clip or the seat belt’s locking mechanism.
- Make sure the car seat is properly leveled. Adjust the recline angle according to the guidelines provided by Britax.
- Attach the tether strap to the designated tether anchor in your vehicle. The tether anchor is typically located on the back of the vehicle’s seat or the rear shelf.
- Tighten the tether strap to eliminate any slack. Refer to the car seat’s manual for specific instructions on how to tighten the tether strap correctly.
- Double-check the installation by giving the car seat a firm tug. It should not move more than an inch in any direction.
With these step-by-step instructions, installing your Britax car seat will be a breeze. Remember to always consult the car seat’s manual and your vehicle’s instructions for specific guidelines related to your model. By installing your Britax car seat correctly, you can provide your child with a safe and secure ride every time.
Securing Your Child In The Car Seat
Once you have successfully installed your Britax car seat, the next crucial step is securing your child in the car seat. Properly securing your child ensures their safety and comfort during car rides. In this section, we will guide you through adjusting the harness height and tightness, positioning the chest clip correctly, and properly restraining your child in the car seat.
Adjusting the harness height and tightness for optimal safety and comfort
Before securing your child in the car seat, it is important to ensure that the harness is adjusted to the correct height and tightness. This will provide optimal safety and comfort for your little one. Here’s how you can do it:
- Begin by checking the height of your child by measuring from their shoulders to the top of their head. Refer to the car seat manual to determine the appropriate height range for the harness.
- Loosen the harness straps by pressing the harness release button.
- Adjust the height of the harness by rethreading the straps through the appropriate slots on the car seat. Make sure the straps are at or just above your child’s shoulders.
- Tighten the harness by pulling the straps until they are snug against your child’s body. Ensure that you can only fit one finger between the strap and your child’s collarbone.
- Check the harness by performing the “pinch test.” Try to pinch the harness webbing at your child’s shoulder. If you cannot pinch any excess webbing, the harness is properly tightened.
Positioning the chest clip correctly
The chest clip plays a vital role in keeping your child secure in the car seat. Here are the steps to position the chest clip correctly:
- Ensure that the chest clip is positioned at armpit level, resting on the child’s chest.
- Fasten the harness and make sure both shoulder straps are inserted through the slots in the chest clip.
- Check that the chest clip is not too high or too low; it should be level with your child’s armpits.
- Verify that the chest clip is fastened securely, ensuring that it is aligned with the child’s chest and not on their abdomen.
Properly restraining your child in the car seat
Properly restraining your child in the car seat is crucial for their safety. Follow these steps to ensure your child is securely restrained:
- Place your child in the car seat and position their bottom all the way back in the seat, ensuring their back is against the seatback.
- Insert the harness straps into the appropriate slots on the car seat, making sure they are not twisted.
- Buckle the harness and ensure it is securely fastened.
- Check that the harness is snug against your child’s body, with no slack or twisted straps.
- Perform the “pinch test” by trying to pinch the webbing at your child’s shoulder. If the webbing cannot be pinched, the harness is properly tightened.
By following these guidelines, you will be able to secure your child properly in the Britax car seat, ensuring their safety and comfort during every journey. Remember to always refer to the car seat manual for specific instructions and guidelines.
Ensuring A Safe Ride
Regularly checking the installation and condition of the Britax car seat
To ensure a safe ride for your child, it is essential to regularly check the installation and condition of the Britax car seat. This can help prevent any potential risks or accidents. Here are some key points to keep in mind:
1. Verify the proper installation:
- Make sure the car seat is securely attached to the vehicle’s seat.
- Check that the seatbelt or LATCH system is tightly fastened, and there is no excess slack.
- Ensure the car seat does not wobble or move excessively when gently tugged.
2. Inspect the condition of the car seat:
- Regularly examine the harness straps for any signs of wear or fraying. Replace them if needed.
- Check for any cracks, dents, or damage to the car seat’s structure. If you notice any, it’s time for a new one.
- Inspect the buckles and their functionality to ensure they securely fasten and release.
Remember, a well-installed and properly maintained Britax car seat can greatly reduce the risk of injury in case of a car accident or sudden stop.
Understanding the guidelines for rear-facing and forward-facing installations
When installing a Britax car seat, it’s crucial to pay attention to the guidelines for rear-facing and forward-facing installations. Here’s what you need to know:
1. Rear-facing installation:
- Follow the weight and height limits specified by the car seat’s manufacturer for rear-facing installations.
- Ensure the car seat is reclined at the proper angle, as per the manufacturer’s instructions. This helps protect your child’s head and neck.
- Position the car seat in the backseat, away from any active airbags.
2. Forward-facing installation:
- Switch to the forward-facing position only when your child meets the weight and height requirements set by the manufacturer.
- Use the tether strap provided with the car seat to secure it to the vehicle. This adds an extra layer of stability and safety.
- Again, position the car seat in the backseat, away from active airbags.
Following these guidelines will ensure your child is in the appropriate position as per their age and weight, minimizing the risk of injury in case of a car accident.
Tips for safe driving and minimizing potential hazards
Ensuring a safe ride involves not only proper installation of the Britax car seat but also safe driving practices. Here are some helpful tips to keep in mind:
1. Avoid distractions:
- Always focus on the road and avoid any distractions, such as phone usage or reaching for items while driving.
- Keep your child engaged with age-appropriate activities or toys to avoid any unnecessary fussing or distractions.
2. Maintain a safe speed:
- Adhere to the speed limits and adjust your driving speed according to the road conditions.
- Avoid sudden acceleration, braking, or sharp turns that may jolt the car and potentially harm your child.
3. Stay alert for potential hazards:
- Keep an eye out for any pedestrians, cyclists, or vehicles around you.
- Practice defensive driving techniques by anticipating the actions of other drivers and maintaining a safe distance from them.
- Be extra cautious in adverse weather conditions, such as rain or snow.
By implementing these tips, you can create a safe and secure environment for your child during car rides. Regularly check and maintain the Britax car seat, follow the installation guidelines, and drive responsibly to ensure a smooth and secure journey for you and your little one.
Frequently Asked Questions On How To Install A Britax Car Seat
How Do You Install A Britax Child Seat?
To install a Britax child seat, follow these steps:
1. Start by identifying the correct seat for your child’s weight and age.
2. Install the seat using either the vehicle’s seat belt or the LATCH system.
3. Make sure the seat is securely fastened and doesn’t move more than an inch in any direction.
4. Adjust the harness straps to fit your child snugly.
5. Finally, double-check everything to ensure a safe and secure installation.
How Do You Install A Britax Boulevard Rear-Facing Car Seat?
To install a Britax Boulevard rear-facing car seat, follow these steps:
1. Position the car seat in the back seat facing the rear.
2. Secure the seat using LATCH connectors or the vehicle’s seat belt.
3. Adjust the recline angle to ensure it’s level.
4. Attach the tether strap to the designated anchor point in your vehicle.
5. Verify the seat is properly installed by checking for secure fit and limited movement.
How Do You Fit A Britax Car Seat With A Seatbelt?
To fit a Britax car seat with a seatbelt, follow these steps:
1. Position the car seat in the desired location.
2. Thread the seatbelt through the appropriate slots in the car seat.
3. Ensure the seatbelt is securely fastened and not twisted.
4. Tighten the seatbelt to eliminate any slack.
5. Check for a snug fit by trying to wiggle the car seat.
How Do You Install A Britax Car Seat Without A Base?
To install a Britax car seat without a base, secure it using the car’s seat belt. First, thread the seat belt through the rear-facing belt path. Then, buckle the seat belt and tighten it. Verify that the car seat is stable by giving it a firm tug.
Finally, check the seat’s angle and adjust if necessary.
Conclusion
Installing a Britax car seat is a crucial task that ensures the safety of your child while traveling. By following the step-by-step instructions provided in this blog post, you can quickly and easily install your Britax car seat without any hassle.
Remember to always prioritize your child’s safety and double-check the installation to ensure a secure fit. Enjoy peace of mind knowing your little one is protected on every car journey.