To install a 7-way trailer plug, first, locate the wiring harness near the vehicle’s rear bumper. Then, connect the corresponding wires of the plug to the matching wires of the harness, ensuring a secure connection.
If you own a trailer and want to connect it to your vehicle, installing a 7-way trailer plug is essential. This type of plug allows for the transmission of power and signals between the towing vehicle and the trailer, enabling functions like brake lights, turn signals, and electric brakes.
By following a few simple steps, you can easily install a 7-way trailer plug and ensure a safe and efficient towing experience. We will guide you through the installation process, enabling you to connect your trailer to your vehicle hassle-free. So, let’s get started and make sure you have all the necessary tools and materials before beginning the installation process.
What Is A 7 Way Trailer Plug?
A 7 Way Trailer Plug, also known as a 7 pin trailer connector or a 7 blade trailer connector, is a standard electrical connection point for towing trailers. It is commonly used in North America and is designed to transmit power and signals from the tow vehicle to the trailer.
Purpose and functionality of a 7 Way Trailer Plug
The main purpose of a 7 Way Trailer Plug is to establish a secure connection between the trailer and the tow vehicle, allowing for the transfer of electrical power, brake control signals, and other necessary functions. By providing a standardized connection point, it simplifies trailer wiring and ensures compatibility between different trailers and vehicles.
Here are some key functionalities of a 7 Way Trailer Plug:
- Power supply: One of the most critical functions of a 7 Way Trailer Plug is to deliver power from the tow vehicle’s electrical system to the trailer. This is essential for powering the trailer’s lights, brakes, and other electrical components.
- Brake control: A 7 Way Trailer Plug allows the tow vehicle to send brake control signals to the trailer, enabling synchronized braking. This is crucial for maintaining safety and control while towing.
- Turn signals and brake lights: The plug facilitates the transmission of turn signal and brake light signals from the tow vehicle to the trailer, ensuring that the trailer’s lights are synchronized with the vehicle’s actions.
- Tail lights and running lights: The plug enables the trailer’s tail lights and running lights to function, providing visibility for other drivers on the road.
- Backup lights: Some 7 Way Trailer Plugs include a dedicated pin for backup lights, allowing the trailer to illuminate when the tow vehicle is in reverse.
With its multiple pins and standardized wiring configuration, a 7 Way Trailer Plug serves as an efficient and reliable solution for powering and controlling various electrical components on trailers. Whether you are towing a camper, a boat trailer, or any other type of trailer, having a properly installed 7 Way Trailer Plug is essential for ensuring functionality and safety.
Preparing For The Installation
Before you start installing a 7 way trailer plug, it’s essential to prepare yourself and gather the necessary tools and materials. Understanding the electrical system of your trailer and vehicle is crucial for a successful installation. Additionally, ensuring safety precautions will guarantee a smooth and secure process. Let’s dive into each step and learn how to prepare for the installation:
Gathering the necessary tools and materials
In order to properly install a 7 way trailer plug, you will need a few tools and materials. Make sure you have the following items handy:
| Tools | Materials |
|---|---|
|
|
Understanding the electrical system of your trailer and vehicle
Each trailer and vehicle may have a different electrical system, so it’s crucial to understand how they work together. Take some time to familiarize yourself with both the trailer and vehicle wiring diagrams. This will help you identify the correct wires and ensure a proper connection.
When looking at the trailer wiring diagram, you may notice different color codes for various functions such as brake lights, turn signals, and running lights. Make sure to identify these colors and match them with the corresponding wires on your trailer plug.
Similarly, check your vehicle’s wiring diagram to locate the appropriate wires for connecting the plug. This will vary depending on your vehicle’s make and model, so it’s essential to refer to the manual or consult an expert if needed.
Ensuring safety precautions
Safety should always be a top priority when working with electrical systems. Before starting the installation process, it’s important to keep the following safety precautions in mind:
- Disconnect the trailer from the vehicle and turn off the vehicle’s engine.
- Wear safety glasses and gloves to protect yourself from any potential hazards.
- Double-check that the power source is off before making any electrical connections.
- Avoid using damaged wires or connectors and replace them if necessary.
- Properly secure all connections with zip ties or electrical tape to prevent them from coming loose while on the road.
- Test the trailer lights and signals once the installation is complete to ensure everything is working correctly.
By adhering to these safety measures, you can ensure a safe and successful installation process.
Now that you are prepared with the necessary tools, understanding of the electrical system, and safety precautions, you are ready to move on to the next step: Wiring the 7 way trailer plug. Stay tuned for our upcoming blog posts, where we will guide you through each step of the installation process.
Mounting The Plug
Once you have successfully wired your 7-way trailer plug, the next step is to mount it securely onto your trailer. Proper mounting is essential to ensure a reliable connection between your trailer and towing vehicle. In this section, we will walk you through the process of locating the appropriate mounting location and securing the plug to the trailer.
Locating the appropriate mounting location
The first step in mounting your 7-way trailer plug is to find the right spot on your trailer where it will be easily accessible but also well-protected. Here are a few factors to consider when deciding on the mounting location:
- Accessibility: Choose a spot that is easily reachable, allowing you to plug and unplug the trailer without any hassle.
- Protection: Ensure that the location provides adequate protection from weather elements, such as rain, snow, and road debris.
- Visibility: Opt for a position that allows the plug to be clearly visible, making it easy for you and other drivers to see during towing.
Once you have identified the ideal spot, mark the mounting location on the trailer with a pencil or tape.
Securing the plug to the trailer
Now that you have determined the mounting location, it’s time to securely attach the 7-way plug to your trailer. Follow these steps:
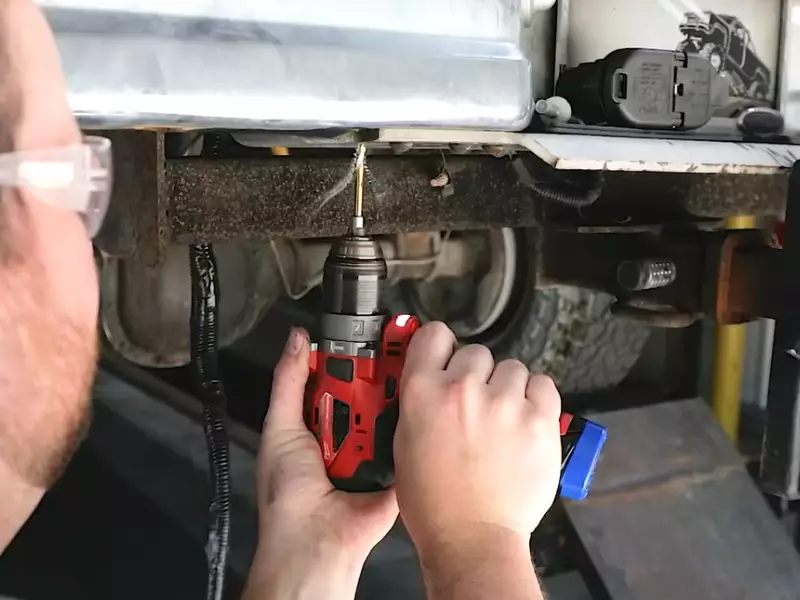
- Gather the necessary tools: Before you begin, make sure you have a screwdriver, drill, screws, and appropriate mounting brackets.
- Position the plug: Place the plug onto the marked location, ensuring that it aligns with the mounting holes on the trailer.
- Attach the brackets: Secure the plug to the trailer by using the mounting brackets. Use your drill and screws to firmly fasten the brackets onto the trailer frame.
- Test the stability: Give the plug a gentle tug to ensure it is securely mounted. If it feels loose, tighten the screws further until it is firmly in place.
Once you have completed these steps, you have successfully mounted your 7-way trailer plug. Take a moment to inspect the connection and ensure that everything is tight and secure. Now, you are ready to connect your trailer to your towing vehicle and hit the road with confidence!
Wiring The Plug
When it comes to installing a 7-way trailer plug, wiring is an essential step. Properly wiring the plug ensures that all the necessary connections are made for the trailer lights, brakes, and other electrical components to function properly. In this section, we will cover the process of identifying the wires on both the trailer and the vehicle, connecting the matching wires on the plug, and properly insulating the connections.
Identifying the wires on both the trailer and the vehicle
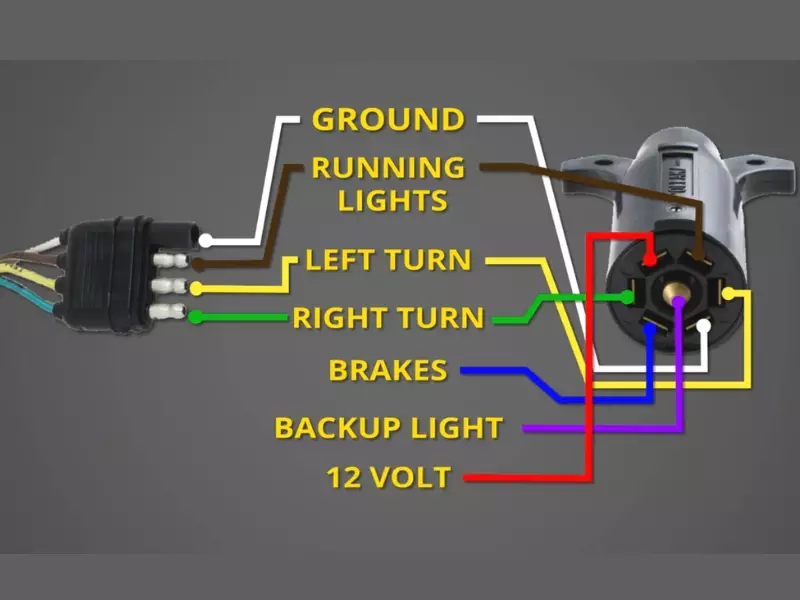
Before you start connecting the wires, it’s important to identify and understand the purpose of each wire. Both the trailer and the vehicle will have different wire colors, so it’s essential to match them correctly for a proper connection.
Here is a table that outlines the standard wire colors for a 7-way trailer plug:
| Wire Color | Function |
|---|---|
| White | Ground |
| Black | 12V Power |
| Blue | Electric Brakes |
| Green | Tail Lights |
| Red | Left Turn/Brake Lights |
| Brown | Right Turn/Brake Lights |
| Yellow | Auxiliary |
Similarly, your vehicle may have a different set of wire colors. It is advisable to refer to your vehicle’s manual or consult a professional to determine the correct wiring color codes.
Connecting the matching wires on the plug
Once you have identified the wires on both the trailer and the vehicle, the next step is to connect the matching wires. This can be done by stripping a small portion of the wire insulation to expose the bare wire. Then, twist the exposed wires together firmly, ensuring a secure connection.
Here’s a list of the wire connections on the 7-way trailer plug:
- Connect the white wire (ground) to the white wire on both the trailer and the vehicle.
- Connect the black wire (12V power) to the black wire on both the trailer and the vehicle.
- Connect the blue wire (electric brakes) to the blue wire on both the trailer and the vehicle.
- Connect the green wire (tail lights) to the green wire on both the trailer and the vehicle.
- Connect the red wire (left turn/brake lights) to the red wire on both the trailer and the vehicle.
- Connect the brown wire (right turn/brake lights) to the brown wire on both the trailer and the vehicle.
- Connect the yellow wire (auxiliary) to the yellow wire on both the trailer and the vehicle.
Properly insulating the connections
After making the wire connections, it’s crucial to insulate each connection properly to protect them from moisture and prevent any electrical issues. You can use electrical tape or heat shrink tubing to securely cover each connection, ensuring there are no exposed wires.
Once you have completed the wiring and insulation process, it’s a good idea to test the trailer’s electrical components to ensure everything is functioning correctly. This can be done by connecting the trailer to the vehicle and checking if the lights, brakes, and other electrical functions are working as intended.
By following these steps for wiring the 7-way trailer plug, you can ensure a secure and reliable connection between your trailer and vehicle. Proper wiring not only ensures your trailer’s electrical components work correctly but also helps improve safety on the road.
Testing The Connection
Once you have successfully installed the 7-way trailer plug into your vehicle, the next step is to test the connection to ensure proper functionality. Testing the connection is crucial as it helps you identify any potential issues and ensures a safe towing experience. In this section, we will discuss how to test the connection using a multimeter and troubleshoot common issues that may arise.
Using a Multimeter to Check for Proper Connectivity
A multimeter is a versatile tool that can be used to test electrical connections and measure voltage, current, and resistance. It is an essential tool for testing the connectivity of the 7-way trailer plug. Follow the steps below to use a multimeter to check for proper connectivity:
- Set the multimeter to the continuity testing mode. This mode beeps when there is an uninterrupted flow of current, indicating a good connection.
- Disconnect the trailer from your vehicle.
- Insert the multimeter probes into the appropriate terminals of the 7-way trailer plug. Consult the wiring diagram or the manufacturer’s instructions to identify the correct terminals for connectivity testing.
- Touch one multimeter probe to the vehicle’s ground wire terminal and the other probe to the corresponding terminal of the 7-way trailer plug.
- If the multimeter beeps, it indicates there is a good connection between the vehicle and the trailer plug. If there is no beep, it means there is a break in the connection that needs to be addressed.
- Repeat the process for each terminal of the 7-way trailer plug and ensure that all connections are functioning properly.

Troubleshooting Common Issues
Despite the careful installation process, you may encounter certain issues when testing the connection of your 7-way trailer plug. Troubleshooting these issues is essential to ensure a reliable and safe towing experience. Here are some common issues you may face and the steps to address them:
| Issue | Solution |
|---|---|
| No power at the trailer plug |
|
| Inconsistent or flickering lights on the trailer |
|
| Poor signal or weak brakes |
|
By following the steps outlined above and troubleshooting common issues, you can ensure that the connection of your 7-way trailer plug is functioning correctly. Remember to test the connection periodically to identify any potential issues beforehand and enjoy a smooth and safe towing experience.
Additional Tips And Considerations
When it comes to installing a 7 Way Trailer Plug, there are a few additional tips and considerations that can help ensure a successful installation and proper function of the plug. These tips include choosing the right plug for your needs, regular maintenance and inspection, and adhering to local regulations and requirements.
Choosing the right 7 Way Trailer Plug for your needs
When selecting a 7 Way Trailer Plug for your trailer, it is crucial to consider your specific needs and the capabilities of your towing vehicle. There are a variety of plugs available on the market, each with different features and capabilities.
For instance, if your trailer requires additional power for features such as electric brakes or reverse lights, you will need to choose a plug that includes the necessary connectors for these functions. On the other hand, if your trailer does not have these features, a basic 7 Way Trailer Plug without these connectors may be sufficient.
Additionally, consider the construction of the plug itself. Opt for a high-quality plug that is durable and weather-resistant, as it will be exposed to the elements during towing. Look for features such as corrosion-resistant materials and a secure connection to minimize the risk of malfunction.
Regular maintenance and inspection of the plug
Once you have installed the 7 Way Trailer Plug, it is important to perform regular maintenance and inspections to ensure its proper function. Over time, the plug may become dirty or corroded, impacting its performance.
To maintain the plug, clean it periodically using a contact cleaner or electrical cleaner. This will help remove any dirt, grime, or corrosion that may have accumulated. Additionally, inspect the plug for any signs of damage, such as loose connections or worn-out wires. Address any issues immediately to prevent further damage or malfunction.
| Inspection Checklist |
|---|
| Check for loose or damaged wires |
| Ensure all connections are secure and tight |
| Inspect for signs of corrosion |
| Test each function of the plug for proper operation |
Adhering to local regulations and requirements
When installing a 7 Way Trailer Plug, it is essential to adhere to local regulations and requirements. These regulations may vary from one jurisdiction to another, so it is important to research and understand the specific requirements in your area.
For example, certain regions may require trailers to have specific lighting or signaling features, such as amber side markers or auxiliary lights. By adhering to these regulations, you can ensure your trailer is street legal and reduce the risk of any legal issues or penalties.
Additionally, familiarize yourself with any safety standards or guidelines set forth by organizations such as the Department of Transportation (DOT) to ensure your trailer is safe and compliant.
In conclusion, choosing the right 7 Way Trailer Plug, performing regular maintenance and inspections, and adhering to local regulations are all important factors to consider when installing a 7 Way Trailer Plug. By following these additional tips and considerations, you can ensure a secure and reliable connection between your towing vehicle and trailer, enhancing both safety and functionality during your travels.
Frequently Asked Questions On How To Install A 7 Way Trailer Plug
How Is A 7-Way Trailer Plug Wired?
A 7-way trailer plug is wired using a specific color code. Each wire has a different function: brown for the tail lights, green for right turn/brake lights, yellow for left turn/brake lights, white for ground, blue for electric brakes, black for battery charge, and red for reverse lights.
How Does A 7-Way Trailer Plug Work?
A 7-way trailer plug allows for the connection of electrical components on a trailer to the towing vehicle. It has seven pins that correspond to different functions like brake lights, turn signals, and power supply. When plugged in, it enables communication between the trailer and the towing vehicle, ensuring proper operation of lights and other electrical features.
Does A 7 Pin Trailer Plug Into A 12 Pin Socket?
Yes, a 7 pin trailer plug can be inserted into a 12 pin socket. Both types of connectors are commonly used and can be compatible with each other. This allows for flexibility when connecting trailers to vehicles with different socket configurations.
How Do You Wire A 4 Wire Trailer To A 7 Wire Plug?
To wire a 4 wire trailer to a 7 wire plug, you’ll need an adapter. Connect the four wires from the trailer (ground, left turn/brake, right turn/brake, and taillights) to the corresponding wires on the adapter. Then plug the adapter into the 7 wire plug on your vehicle.
Conclusion
Installing a 7-way trailer plug is an essential task for any trailer owner. By following the step-by-step guide provided in this blog post, you can ensure a smooth and efficient installation process. Remember to gather the necessary tools and materials, carefully connect the wires, and test the plug for functionality.
With proper installation, you can enjoy a reliable and hassle-free towing experience. Happy trailering!