To install a 4-point harness, first, ensure that the harness is properly positioned and secure it to the mounting points in the vehicle. Then, connect the lap belt and shoulder straps, making sure they are properly tightened and adjusted for a comfortable fit.
A 4-point harness is a crucial safety feature for racing or high-performance vehicles. It provides additional security and protection for the driver or passenger during aggressive driving or collisions. Installing a 4-point harness is relatively straightforward but requires precision and attention to detail.
We will guide you through the process of installing a 4-point harness, ensuring that you can enjoy a safer and more secure driving experience. So, let’s dive in and learn how to properly install a 4-point harness in your vehicle.
Why You Need A 4 Point Harness For Your Vehicle
Installing a 4 point harness in your vehicle is not only a wise investment in your safety but also a crucial step in complying with safety regulations. Whether you are an off-road enthusiast seeking extra protection during rough rides or a driver who wants to ensure the safety of their passengers, a 4 point harness is an essential addition to your vehicle. In this blog post, we will discuss two key reasons why you need a 4 point harness – protecting yourself and your passengers and complying with safety regulations.
Protecting Yourself and Your Passengers
When it comes to vehicle safety, your well-being and the safety of your passengers should always be the top priority. A 4 point harness offers superior protection compared to a traditional seatbelt, especially during high-speed or off-road driving. Here’s how a 4 point harness safeguards you:
- Securing Your Body: A 4 point harness features two shoulder straps and two lap belts that are securely anchored to the vehicle. This configuration keeps your body firmly in place, minimizing the risk of being thrown around in the event of a sudden stop or impact.
- Reducing Whiplash: The shoulder straps of a 4 point harness are designed to distribute the force of impact across a larger area of your upper body. This reduces the risk of whiplash injuries and provides added protection for your neck and head.
- Enhancing Comfort: In addition to improved safety, a 4 point harness offers enhanced comfort during long drives or bumpy rides. The evenly distributed pressure from the shoulder and lap belts helps to reduce fatigue and strain, allowing you to focus more on the road ahead.
Complying with Safety Regulations
In most jurisdictions, safety regulations mandate the use of specific safety equipment while operating a vehicle, especially during off-road activities. Installing a 4 point harness ensures that you are in compliance with these regulations. Aside from the legal requirements, here are a few reasons why complying with safety regulations is essential:
- Minimizing Legal Liability: By adhering to safety regulations, you protect yourself from potential legal liabilities in case of an accident or injury. It demonstrates that you have taken necessary precautions to ensure the safety of yourself and your passengers.
- Promoting a Safety Culture: When you prioritize safety by installing a 4 point harness, you set an example for others and contribute to a safety-conscious culture. Encouraging others to follow safety regulations can help prevent accidents and save lives.
- Ensuring Insurance Coverage: In the unfortunate event of an accident, insurance coverage may depend on whether you were in compliance with safety regulations. By installing a 4 point harness, you ensure that you meet any safety requirements imposed by your insurance provider, avoiding potential coverage issues.
In conclusion, installing a 4 point harness is crucial for both your personal safety and complying with safety regulations. It provides superior protection, reduces the risk of injuries, enhances comfort, and demonstrates your commitment to promoting a safety-conscious culture. Don’t compromise on safety – make sure to equip your vehicle with a 4 point harness for added peace of mind.
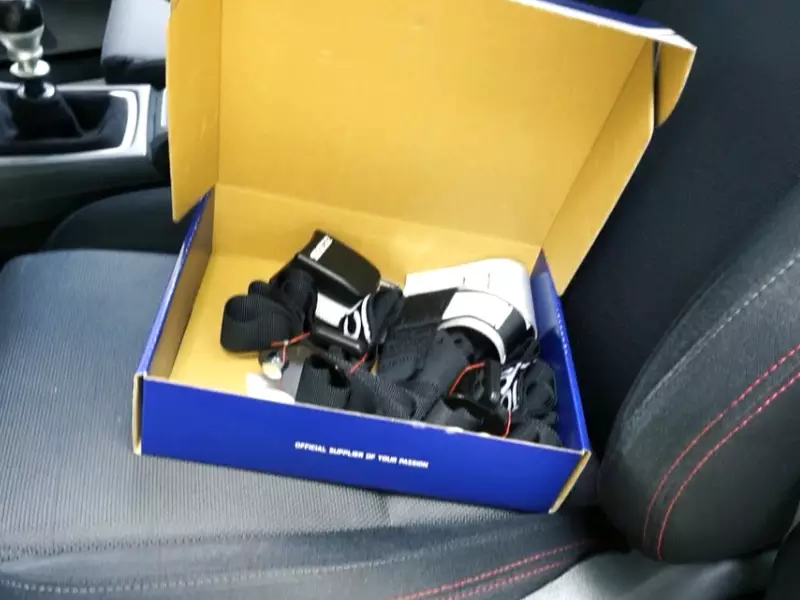
Gathering The Necessary Tools And Equipment
Before installing a 4 point harness in your vehicle, it’s essential to gather all the necessary tools and equipment. Ensuring that you have the right harness and components is crucial to a successful installation. Additionally, having the proper tools on hand will make the process much easier and efficient. In this section, we’ll guide you through the steps of gathering everything you need.
Ensuring You Have the Right Harness and Components
The first step in gathering the necessary tools and equipment is to ensure that you have the right harness and components for your specific vehicle. A 4 point harness typically consists of shoulder straps, lap belts, and a buckle system. However, it’s important to double-check the manufacturer’s instructions or consult with an expert to confirm the exact requirements for your vehicle.
Tools and Equipment Needed for Installation
Once you have confirmed the type of harness you need, it’s time to gather the tools and equipment necessary for the installation. Here is a comprehensive list of what you will need:
| Tools | Equipment |
|---|---|
|
|
Having these tools and equipment readily available will save you time and frustration during the installation process. It’s a good idea to gather everything in one place before you begin, ensuring that you won’t have to search for a missing tool halfway through the process.
Now that you have gathered all the necessary tools and equipment, you’re ready to move on to the next step of the installation process: preparing your vehicle for the installation of the 4 point harness. Stay tuned for the next section of our guide, where we’ll walk you through the steps of preparing your vehicle.
Preparing The Vehicle
Removing the Existing Seatbelts
Before you can install a 4 point harness in your vehicle, it is important to remove the existing seatbelts. This step ensures a clean and safe installation of the new harness. Follow these steps to successfully remove the seatbelts:
- Start by locating the bolts that secure the seatbelt. These bolts are usually located at the bottom and top of the seatbelt assembly.
- Use a wrench or socket set to loosen and remove these bolts. Be cautious as they may be tightly secured.
- Once the bolts are removed, carefully slide the seatbelt assembly out of its mounting bracket.
- Store the removed seatbelts in a safe place, as you may need them in the future.
Cleaning and Inspecting the Mounting Points
After removing the seatbelts, it is essential to thoroughly clean and inspect the mounting points. This step ensures proper installation and adds to the overall safety of the harness. Follow these steps to prepare the mounting points:
- Using a mild detergent and water, clean the mounting points to remove any dirt, debris, or rust.
- Inspect the mounting points for any signs of damage or wear. Look for cracks, dents, or any other factors that could compromise the integrity of the mounting points.
- If any damage is detected, it is recommended to consult a professional or replace the mounting points before proceeding with the installation.
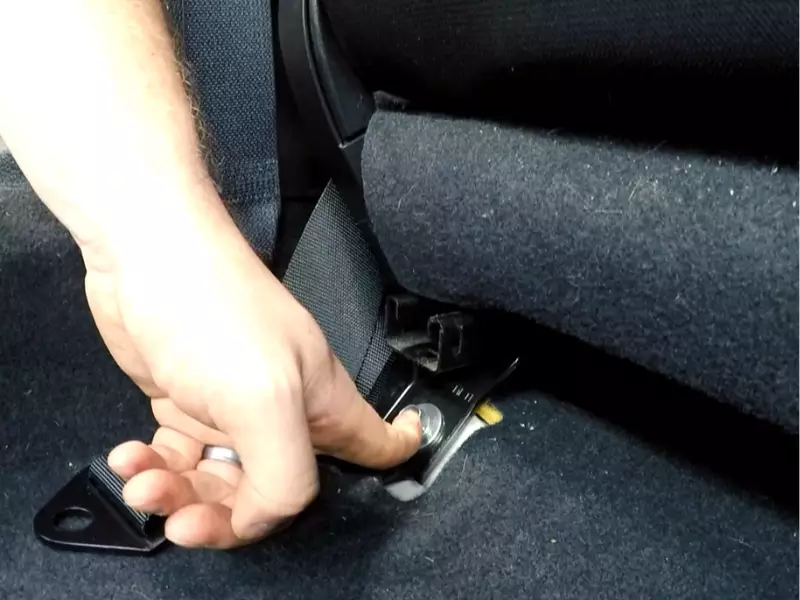
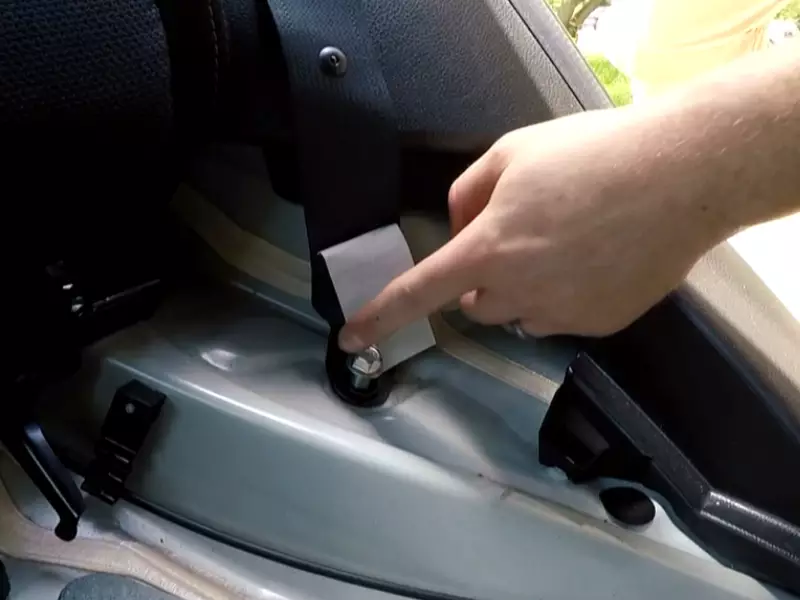
Attaching The Harness Mounting Brackets
Attaching the harness mounting brackets is a crucial step in installing a 4-point harness. These brackets play a pivotal role in ensuring the harness is securely fastened and provides optimal protection. In this section, we will guide you through the process of determining the correct position for mounting the brackets, as well as aligning and securing them effectively.
Determining the Correct Position for Mounting
Determining the correct position for mounting the harness brackets is vital for both safety and comfort. You want to ensure that the harness straps are positioned correctly over your shoulders and hips, allowing for maximum support and restraint in case of an impact. To determine the ideal position:
- Start by sitting in the driver’s seat and fastening the seatbelt securely.
- Adjust the seat to a comfortable position that allows you to reach the pedals and the steering wheel without straining.
- Visualize the path that the harness straps should follow, ensuring they will be properly aligned with your body.
- Consider any vehicle constraints or obstacles that may affect the optimal placement of the brackets.
- Once you have identified the ideal position, mark the spots where the brackets will be attached using a marker or tape.
Aligning and Securing the Brackets
Now that you have determined the correct position for mounting the brackets, it’s time to align and secure them properly. Follow these steps to ensure a secure installation:
- Using the marked spots as a guide, align the brackets with the corresponding points on your vehicle’s interior.
- Check that the brackets are level and parallel to each other, ensuring they are aligned symmetrically.
- Securely fasten the brackets using the appropriate screws or bolts, ensuring they are tightened to the manufacturer’s specifications.
- Double-check the tightness of the brackets to ensure there is no movement or play once installed.
It is essential to emphasize that proper alignment and secure attachment of the harness mounting brackets are of utmost importance. Any negligence in this step can compromise the effectiveness of the harness and put your safety at risk. Take the time to align and secure the brackets accurately, following the manufacturer’s instructions closely.
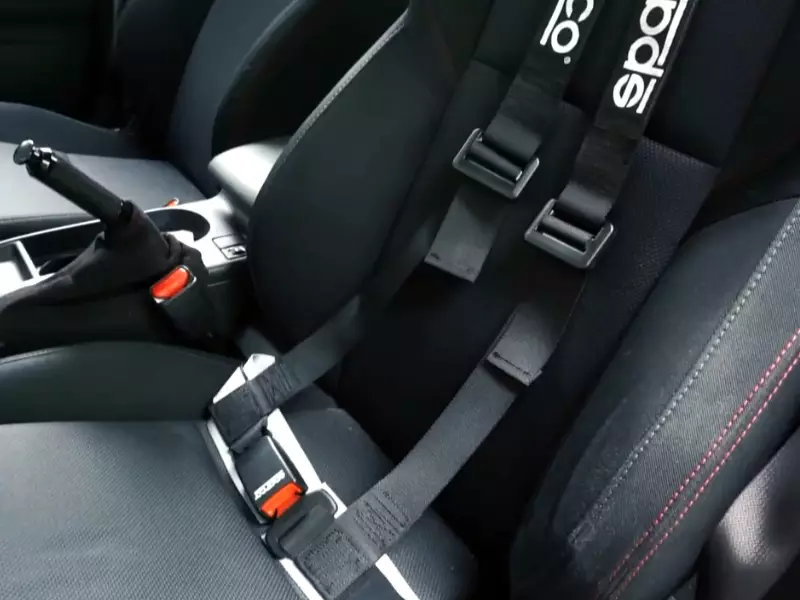
Installing The Shoulder Straps
Installing the shoulder straps is a crucial step when it comes to fitting a 4 point harness properly. It ensures that the harness provides optimal safety and restraint to the driver or passenger. In this section, we will guide you through the process of positioning and adjusting the shoulder straps, as well as securing them to the mounting points.
Positioning and Adjusting the Shoulder Straps
Proper positioning and adjusting of the shoulder straps is essential for comfort and safety. Follow these steps to ensure that you achieve the correct fit:
- Start by attaching the shoulder straps to the mounting points on the roll cage or seat using the provided hardware. Make sure the straps are securely fastened.
- Position the shoulder straps over your shoulders, ensuring they are not twisted or tangled.
- Adjust the length of the shoulder straps to achieve a snug fit. You want the straps to be tight enough to hold you in place during sudden movements but not so tight that they restrict your movement or cause discomfort.
- Once you have adjusted the length, secure the straps in place by tightening the adjustment buckles. Double-check that the straps are still properly positioned and not twisted.
Securing the Straps to the Mounting Points
After ensuring proper positioning and adjusting, it’s time to secure the straps to the mounting points. Here’s how to do it:
- Inspect the mounting points and make sure they are in good condition and securely attached to the roll cage or seat.
- Attach the shoulder straps to the mounting points using the appropriate hardware provided with your harness. Refer to the manufacturer’s instructions for the specific installation process.
- Tighten the mounting hardware to ensure a secure connection. Always follow the recommended torque specifications provided by the harness manufacturer.
- Give each strap a gentle tug to verify that it is securely fastened and won’t come loose during use. This step is crucial for your safety, so take the extra time to ensure everything is in place.
By following these steps, you will be able to properly install the shoulder straps of your 4 point harness. Remember, correct positioning, adjusting, and securing of the straps are vital for your safety and protection on the road or track.
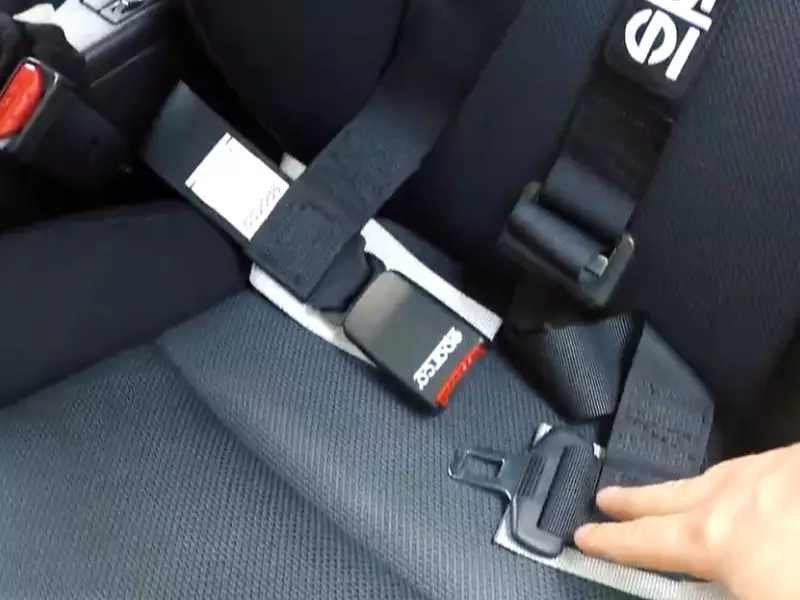
Installing The Lap Belt
Routing and Adjusting the Lap Belt
Proper routing and adjustment of the lap belt is crucial for ensuring the safety and comfort of the driver or passenger. Here, we will guide you through the steps to correctly route and adjust the lap belt of a 4 point harness.
- Start by positioning the lap belt on the lower portion of the hips, right above the thigh area. This will help distribute the force of impact across the stronger pelvic region, reducing the risk of injury.
- Next, make sure the lap belt is not twisted or tangled. Twisting can compromise the effectiveness of the belt, so take a moment to visually inspect it and untangle any knots.
- Adjust the length of the lap belt to achieve a snug fit. A properly adjusted lap belt should be tight enough to prevent excessive movement but not so tight that it restricts breathing or causes discomfort.
Remember, a well-fitted lap belt is essential for optimal safety. Take the time to adjust and check the positioning before moving on to the next step.
Attaching and Locking the Lap Belt
Once you have correctly routed and adjusted the lap belt, it’s time to attach and lock it in place. Follow these steps to ensure a secure connection:
- Locate the buckle on the lap belt. This is the mechanism that will hold the belt securely in place.
- Insert the metal tongue into the buckle until you hear a distinct click. This indicates that the buckle is securely engaged.
- Give the lap belt a gentle tug to confirm that it is locked in position. It should not come loose or slide out of the buckle easily.
It’s important to note that the lap belt should be the primary restraint for the lower body. Make sure it is properly secured before proceeding with the installation of the shoulder straps.
By following these steps to route, adjust, attach, and lock the lap belt of your 4 point harness, you can ensure a safe and comfortable ride. Remember to double-check the fit and tightness of the belt before hitting the road.
Completing The Installation
Now that you have successfully installed the 4 Point Harness in your vehicle, it is important to complete the installation process by ensuring its security and functionality. This final step will give you peace of mind and ensure maximum safety during your off-road adventures or high-performance driving. In this section, we will guide you through double-checking the installation for security and testing the functionality of the 4 Point Harness.
Double-Checking the Installation for Security
Before hitting the road, it is crucial to double-check the installation of your 4 Point Harness to ensure its security. This will help prevent any potential accidents or injuries caused by a loose or improperly secured harness. Follow these steps:
- Inspect the mounting points: Inspect the mounting points where the harness is secured to the vehicle. Ensure that the bolts, nuts, or brackets are tightened properly. Refer to the manufacturer’s instructions to determine the correct torque specifications.
- Check the harness straps: Carefully examine each strap of the 4 Point Harness to verify that they are securely fastened to the mounting points and properly adjusted for a snug fit. Make sure there are no twists or knots in the straps.
- Confirm the buckle: Check the functionality of the buckle by engaging and disengaging it to ensure a secure locking mechanism. Ensure that the buckle is free of any debris or obstructions that could interfere with its proper operation.
- Inspect the harness webbing: Inspect the webbing of the harness for signs of wear, fraying, or damage. Replace the harness if there are any visible defects that could compromise its safety.
Testing the Functionality of the 4 Point Harness
Once you have completed the double-checking process, it is time to test the functionality of your 4 Point Harness. Performing this test will give you confidence in the harness’s ability to protect you during high-speed maneuvers or rough off-road conditions. Follow these steps:
- Securing the harness: Wear the 4 Point Harness and make sure all the straps are properly secured and adjusted for a snug fit. Pay close attention to the shoulder straps, lap belts, and sub belts.
- Tightening the straps: While seated in the vehicle, tighten all the straps of the harness to remove any slack or looseness. This will eliminate the risk of the harness shifting or failing during sudden movements.
- Performing a tug test: Once the harness is securely fastened, perform a gentle tug on each strap to ensure that they hold firm and do not come loose. This test will validate the integrity of the harness’s connection points and adjustments.
- Comfort and range of motion: Move around in the vehicle to check for comfort and proper range of motion. Ensure that the harness does not restrict your movement or cause discomfort during driving.
By completing these steps, you can be confident in the security and functionality of your newly installed 4 Point Harness. Remember to regularly inspect, maintain, and replace the harness as needed to ensure optimum safety during every adventure.
Tips And Precautions For Installing A 4 Point Harness
Proper installation of a 4 point harness is crucial to ensure your safety while driving. These tips and precautions will guide you through the process, helping you avoid common mistakes and potential hazards. Remember to always follow the manufacturer’s guidelines and seek professional assistance if needed.
Following Manufacturer Guidelines
To install a 4 point harness correctly, it is important to carefully read and follow the guidelines provided by the manufacturer. Each harness may have specific instructions and requirements that need to be adhered to. By following these instructions, you can ensure that your harness is installed correctly, maximizing its effectiveness in protecting you during sudden stops or collisions.
Some important steps to keep in mind while following the manufacturer’s guidelines include:
- Inspect the harness for any signs of wear or damage before installation.
- Identify the proper anchor points in your vehicle for securing the harness.
- Adjust the straps to the appropriate lengths according to the manufacturer’s recommendations.
- Double-check that all connections and fasteners are secure before using the harness.
Following these guidelines will not only ensure your safety but also prevent any potential warranty issues with the harness.
Seeking Professional Assistance if Needed
While installing a 4 point harness may seem straightforward, it is always recommended to seek professional assistance if you are unsure or lack experience in the installation process. Seeking the help of a trained professional can provide you with peace of mind knowing that your harness has been installed correctly and will function properly when needed.
Professional assistance may be particularly necessary if:
- Your vehicle has unique modifications or requirements that may affect the installation process.
- You have limited knowledge or experience with automotive harness installation.
- You want to ensure maximum safety and reliability in your harness installation.
By involving a professional, you can minimize the risk of installation errors and ensure that the harness is properly integrated into your vehicle’s safety system.
Frequently Asked Questions For How To Install A 4 Point Harness
Are 4 Point Harnesses Road Legal?
Yes, 4 point harnesses are road legal. They provide better safety and support during high-speed driving. However, it’s important to ensure that they comply with local regulations and are properly installed to ensure maximum effectiveness.
Are 4 Point Harnesses Safe On The Street?
Yes, 4 point harnesses are safe for street use. They provide better support and protection during sudden stops or collisions. Make sure to install them correctly and follow all safety guidelines to ensure maximum effectiveness.
What Is The Benefit Of A 4 Point Harness?
A 4-point harness provides increased safety and security by distributing the force of impact across four points of the body. It helps prevent injuries during sudden stops or accidents.
What Is The Angle For Mounting A Harness?
When installing a harness, the angle is important for proper fit and safety. It should be mounted at a downward angle of 30-45 degrees. This helps distribute weight evenly and reduces strain on the shoulders.
Conclusion
Installing a 4 point harness is a crucial step towards enhancing safety and control in your vehicle. By following the step-by-step instructions provided in this blog post, you can easily install a 4 point harness and enjoy a secure driving experience.
Remember to prioritize safety and always double-check the installation process. Your vehicle and your passengers will thank you for it. Stay safe on the road!